airflow
Orchestrating Spark Jobs with Airflow
Introduction
This guide demonstrates how to orchestrate Apache Spark jobs using a self-managed Apache Airflow deployment on EKS. You will use the Airflow instance you deployed in the previous step to run a sample PySpark application.
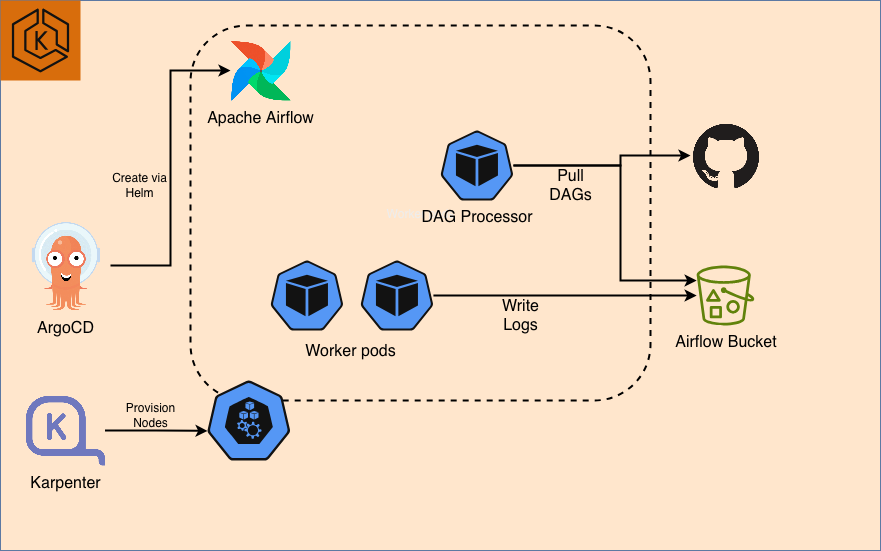
Architecture
Prerequisites
- Deploy Airflow on EKS infrastructure: Infrastructure Setup
Login to Airflow Web UI
kubectl port-forward svc/airflow-api-server 8080:8080 -n airflow
Log in with:
- username:
admin - password:
admin
Execute Sample Airflow Job
To ensure the Airflow installation is working correctly, you can trigger the included example DAG.
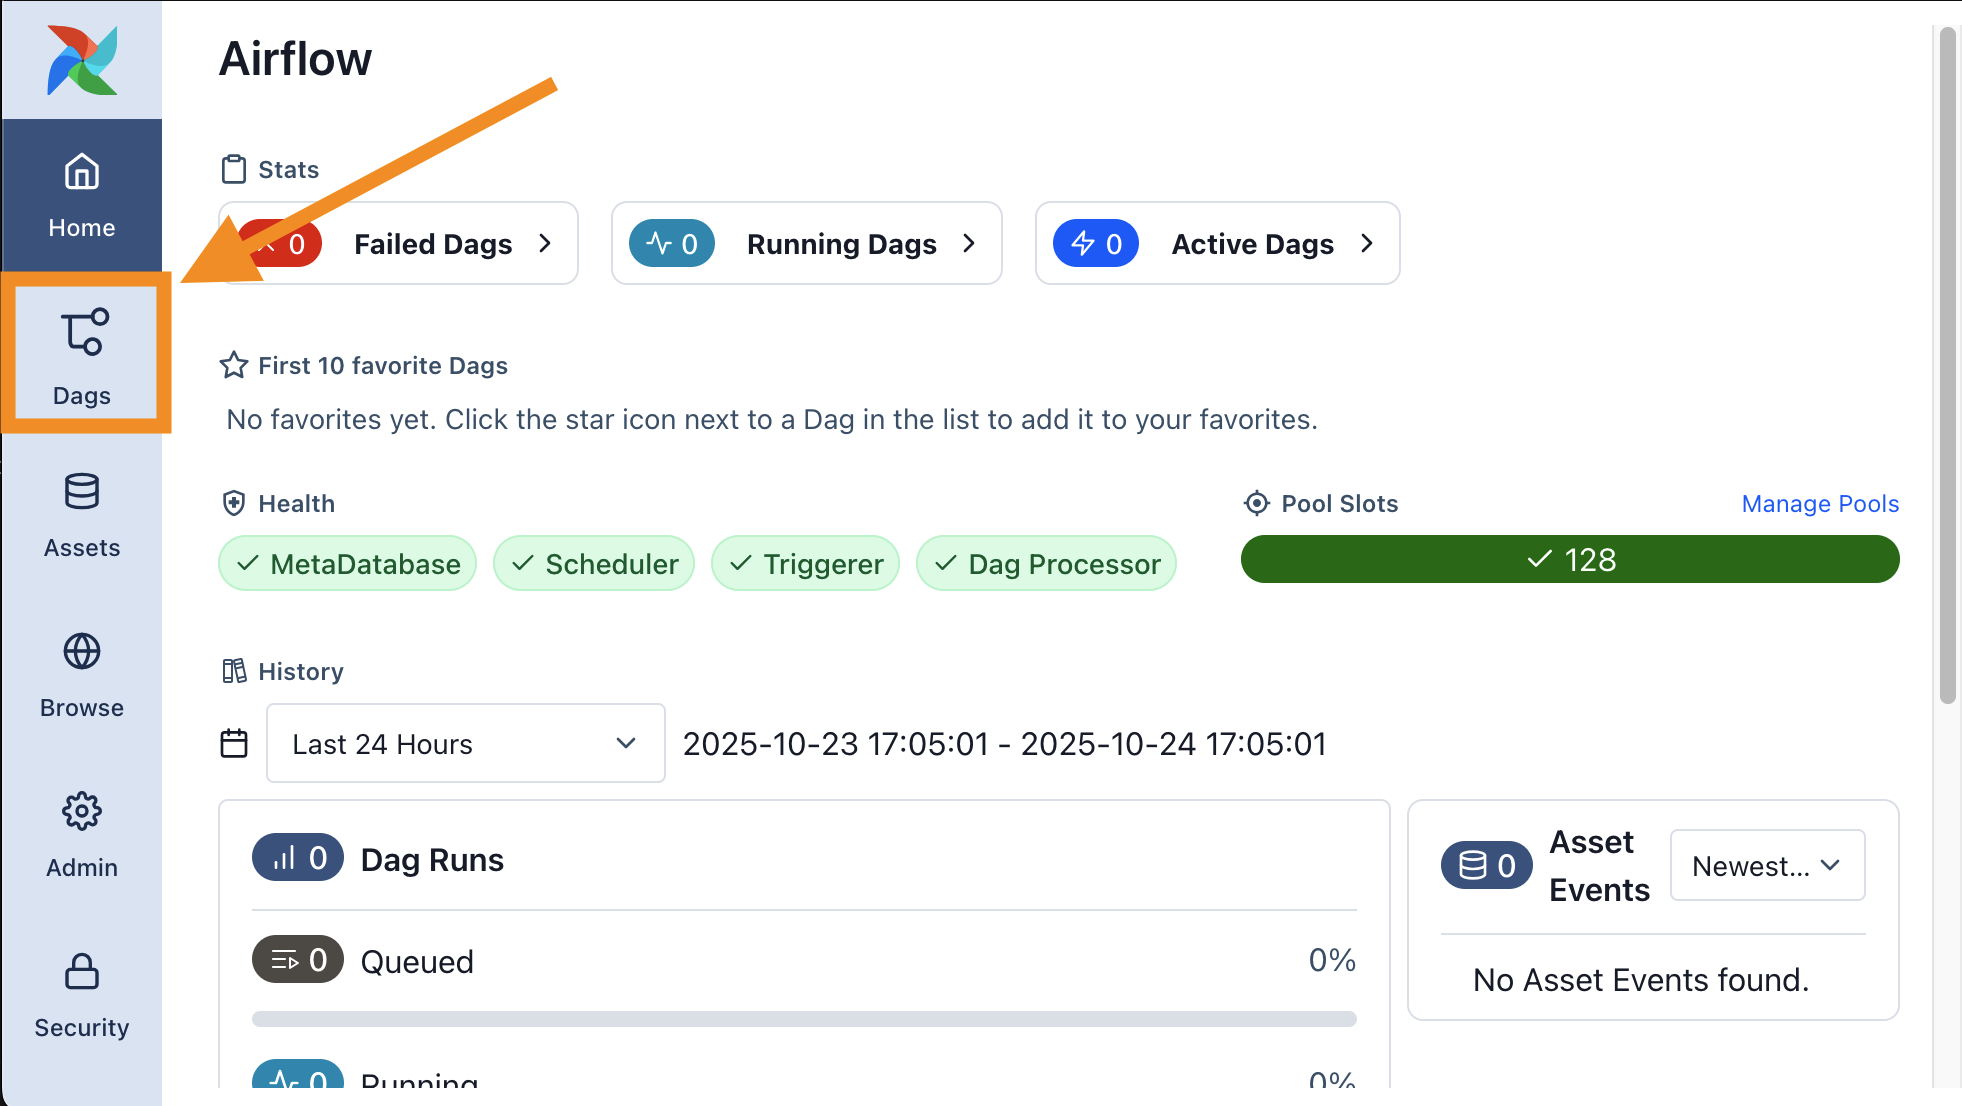
- Navigate to the Dags page from the main menu. You will see a list of DAGs pre-loaded via the DAG Bundles feature.
- Find the
simple_example_dagand click the Trigger button (▶) to start a new DAG run. - Click on the new DAG run from the list to view its progress.
- You can view the DAG's source code by clicking on the Code tab. This example is a simple DAG that runs both Bash commands and Python code.
- After a minute, the DAG run should be marked as Success.
- To inspect the logs for a specific task, navigate to the Task Instances tab and click on any Task ID.
In this stack, logs are stored in S3 using the remote logging feature. You can also write logs to other services such as Aamzon Cloudwatch.
How DAGs are Loaded via Bundles
This stack uses the DAG Bundles feature, introduced in Airflow 3.0.0, to load the example DAGs. This method allows for dynamic loading of DAGs from external sources.
Loading from a Public Git Repository
- The example DAGs are fetched from the public
data-on-eksGitHub repository. - Airflow is configured to clone this repository without authentication.
- For private repositories: You can connect to a private Git repository by configuring a Git Connection in the Airflow Admin UI and providing the necessary credentials (e.g., a personal access token).
A Note on S3 DAG Bundles
- While Airflow also supports fetching DAG bundles from Amazon S3, this functionality has a known issue in Airflow version 3.1.0 and is expected to be fixed in a future release.
- This stack already includes the necessary IAM roles and Kubernetes configurations (ServiceAccount, RBAC, and Pod Identity) for the DAG Processor to access S3, so it will be ready to use once the feature is patched in Airflow.
Running Spark Applications on EKS with Karpenter
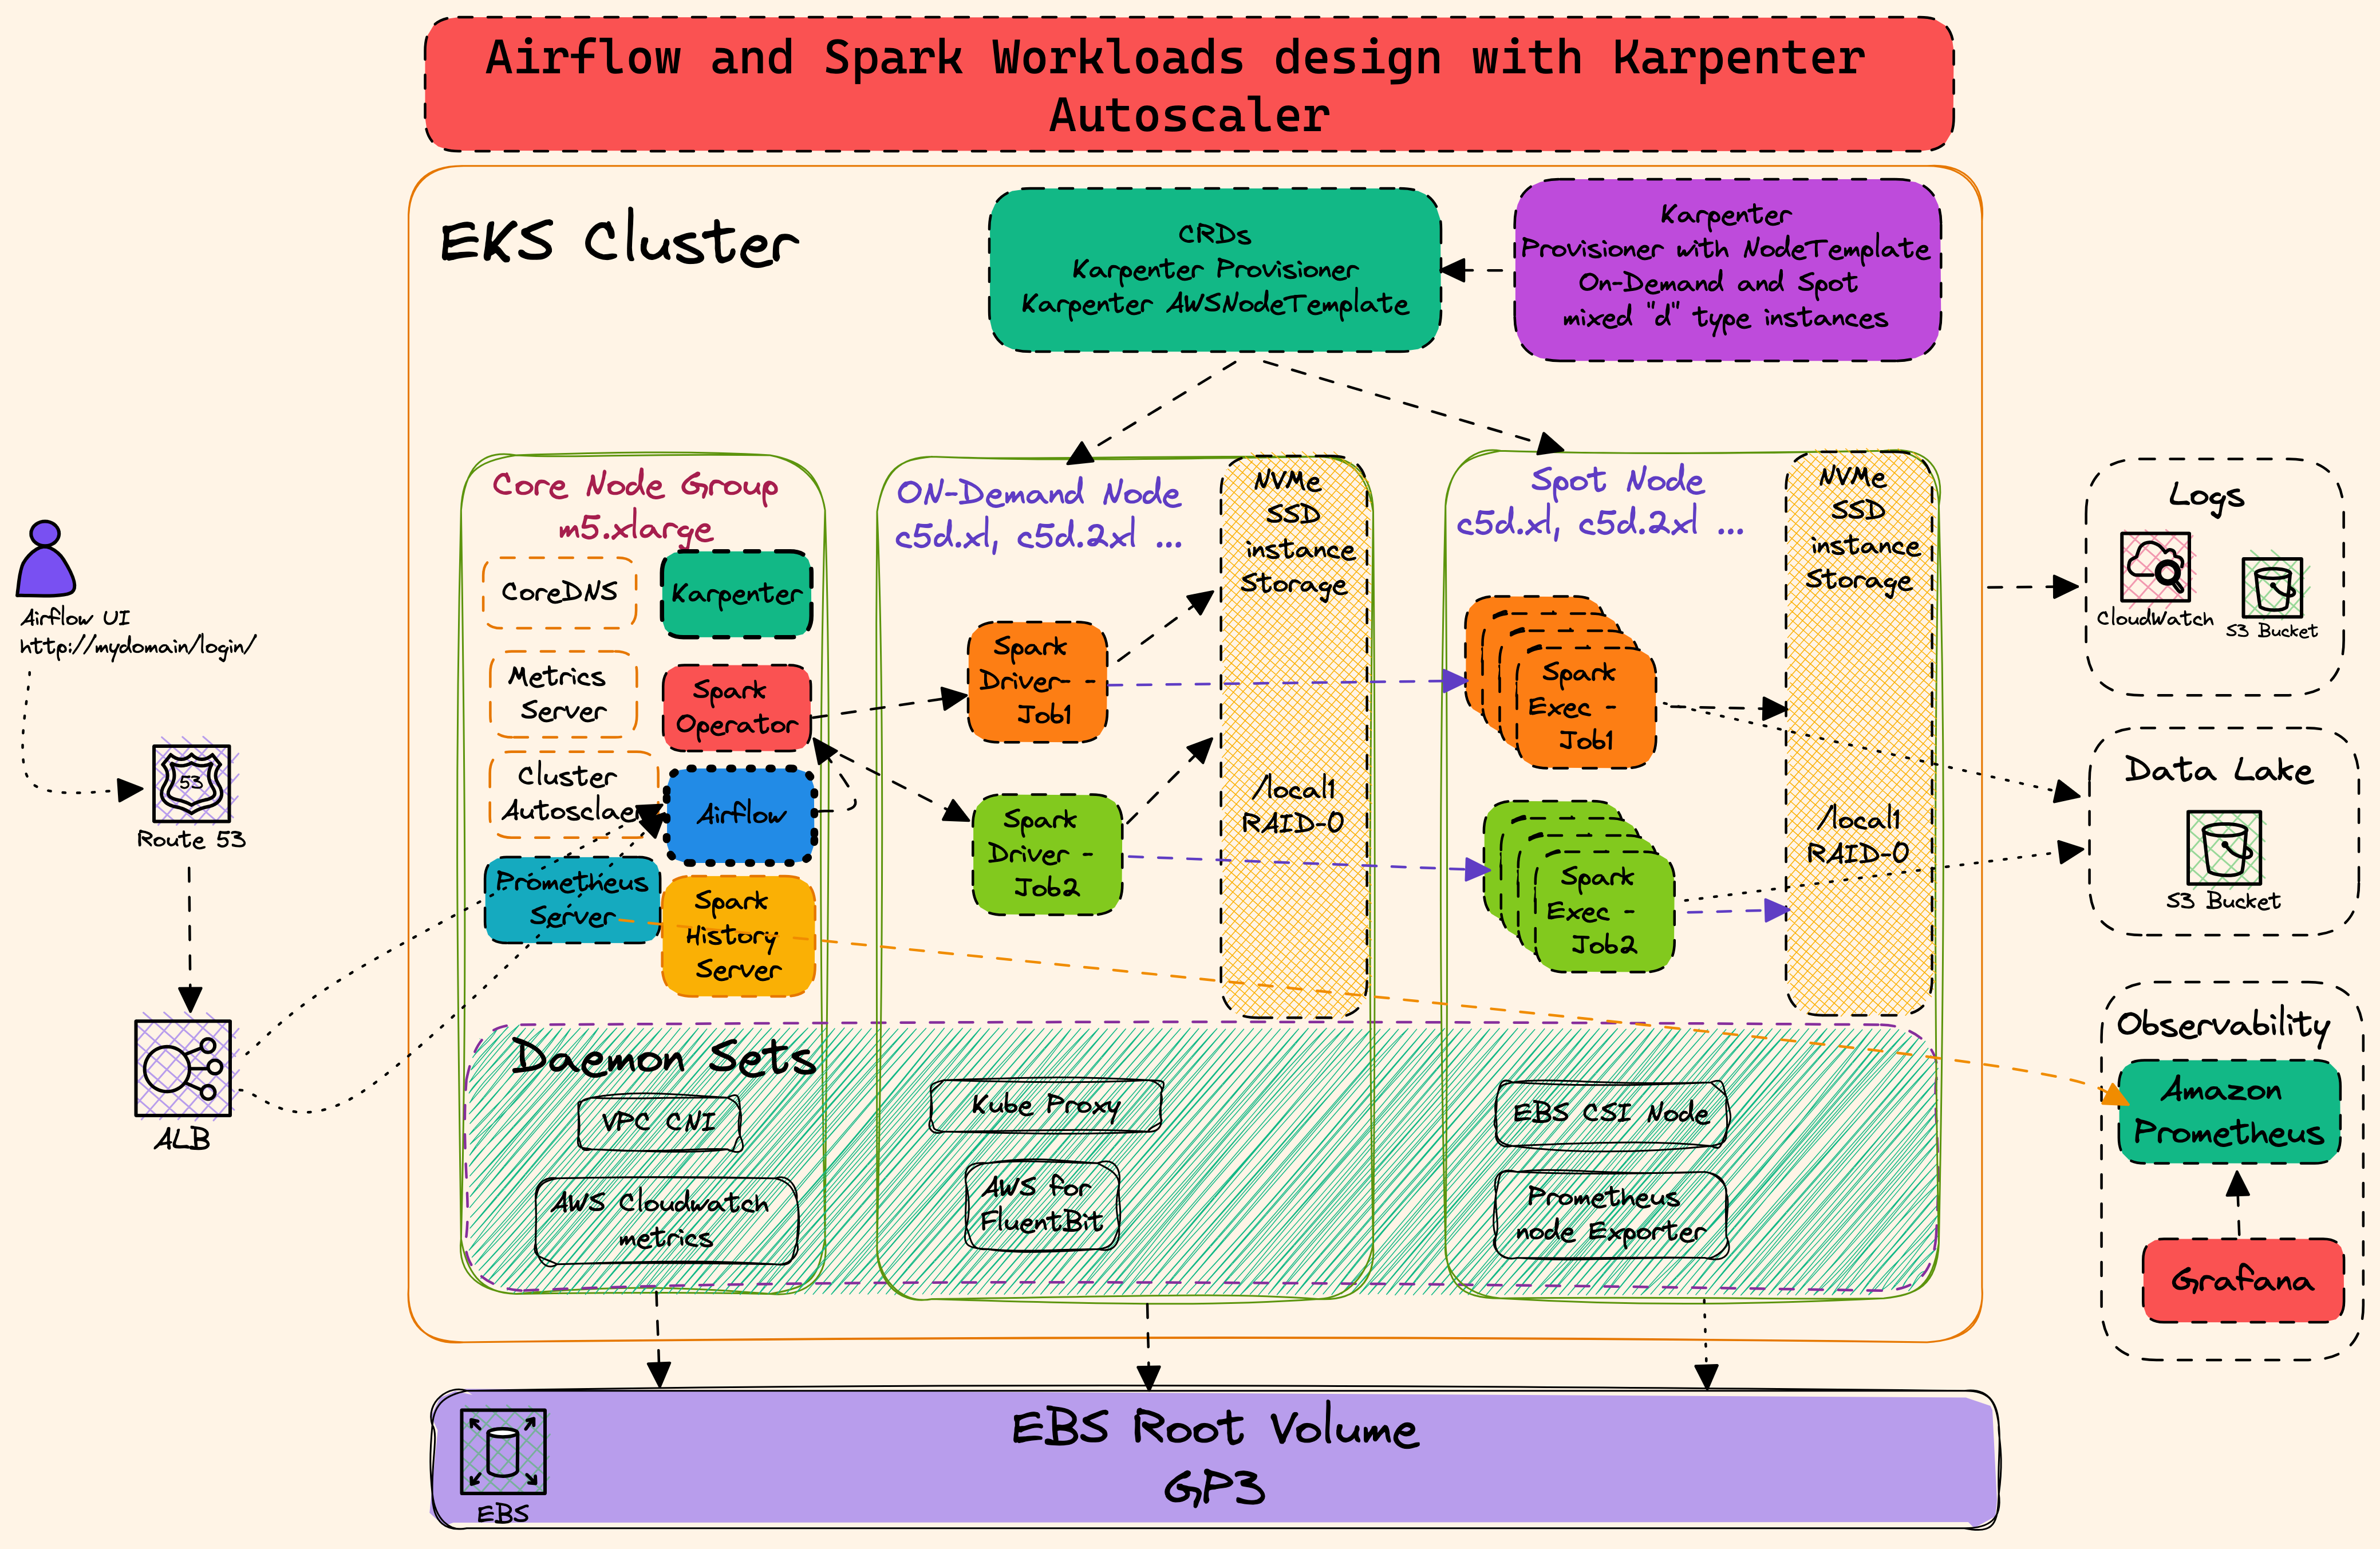
This Airflow stack is configured to run Spark jobs on EKS in a highly efficient manner by using Karpenter as the cluster autoscaler. This approach provides several advantages over using traditional EKS Managed Node Groups and the Cluster Autoscaler.
Key Karpenter Features for Spark Workloads:
- Efficient Scaling: Karpenter launches and terminates nodes directly in response to workload demand, leading to faster and more efficient scaling than the standard Cluster Autoscaler.
- Scale to Zero: Nodes are only provisioned when needed and are removed when idle, significantly reducing costs by eliminating resource waste.
- Flexible Node Provisioning: Karpenter can provision a diverse mix of instance types (including Spot and On-Demand) based on the specific requirements of your Spark jobs (e.g., compute-optimized, memory-optimized). This is managed through flexible
NodePools. - Targeted Scheduling: You can use node selectors and tolerations in your Spark application manifests to ensure driver and executor pods are placed on the most appropriate and cost-effective instance types.
In this tutorial, you will run a Spark job that leverages a Karpenter NodePool configured for memory-optimized instances.
To ensure Spark pods are scheduled correctly, you must add specific nodeSelector fields to your Spark application manifest. This allows you to control which nodes the driver and executor pods land on. For example, you can ensure drivers run on reliable On-Demand instances while executors use cost-effective Spot instances.
Example nodeSelector:
The following snippet shows how to target a specific NodePool and capacity type. This would be placed within your Spark application's pod configuration.
    # Example nodeSelector to target a specific Karpenter NodePool
    nodeSelector:
      NodeGroupType: "SparkComputeOptimized"
      karpenter.sh/capacity-type: "on-demand"
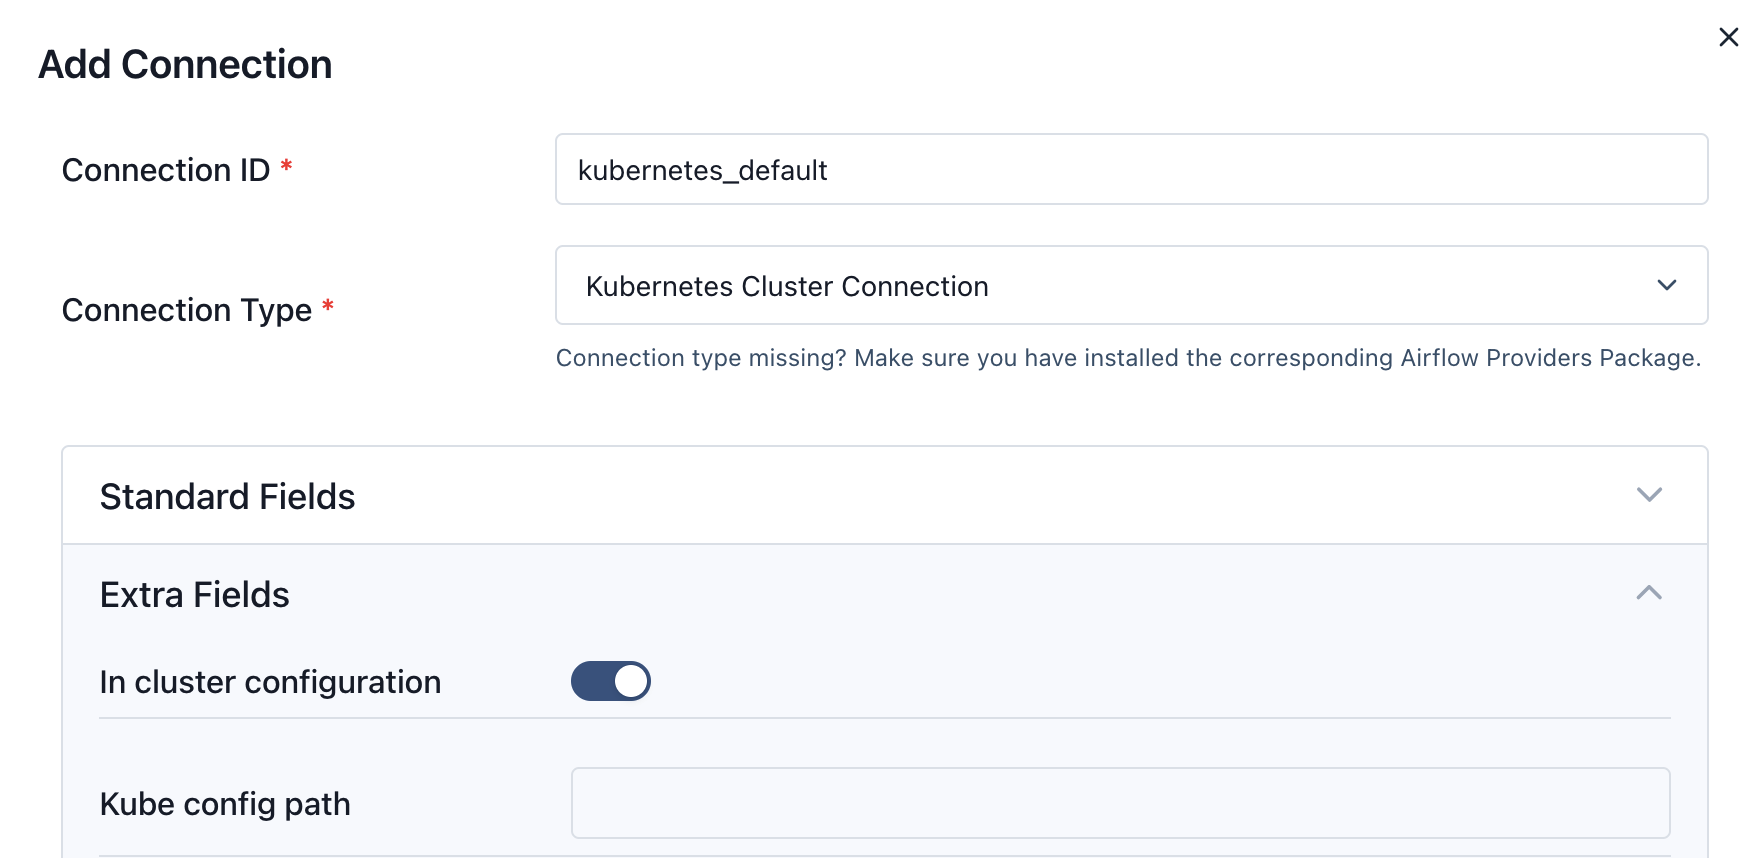
Create Kubernetes Default Connection from Airflow Web UI
This step is critical for writing the Airflow to connect to EKS cluster.
- Login to Airflow WebUI with
adminand password asadminusing ALB URL - Select
Admindropdown and Click onConnections - Click on "+" button to add a new record
- Enter Connection Id as
kubernetes_default, Connection Type asKubernetes Cluster Connectionand tick the checkbox In cluster configuration - Click on Save button
Execute the Spark Example DAG
Now you are ready to trigger the main example DAG that runs a PySpark application.
- In the Airflow UI, navigate back to the Dags page.
- Find the
pyspark-piDAG and click the Trigger button (▶) to start a run. - Click on the new run to monitor its progress.
Understanding the DAG Tasks
This DAG consists of two main tasks:
run_spark_pi: This task uses theSparkKubernetesOperator. It creates an Airflow worker pod, which in turn tells the Spark Operator to create aSparkApplication. The Spark Operator then launches the Spark driver and executor pods in thespark-team-anamespace to run the PySpark job.monitor_spark_pi: This task uses theSparkKubernetesSensor, which monitors theSparkApplicationand waits for it to complete.
After a few minutes, both tasks should show a Success status in the Airflow UI.
Verify the Spark Application
You can also verify that the Spark application was created and ran successfully directly from your command line.
kubectl get sparkapplications -n spark-team-a
You should see an application named spark-pi-* with a status of RUNNING.
Expected Output:
NAME       STATUS      ATTEMPTS   START TIME           FINISH TIME          AGE
spark-pi   RUNNING   1          2025-10-26T15:30:00Z   2025-10-26T15:32:00Z   2m
Once verified, you can inspect the logs for any task in the Airflow UI, which are stored remotely in S3.
Clean up
See the clean up steps in Airflow on EKS infrastructure: Infrastructure Setup
To avoid unwanted charges to your AWS account, delete all the AWS resources created during this deployment by following the clean up steps.