Launch your first job
Submit your job
Things to know before you start
- Jobs start on average 5 minutes after submission (this value may differ depending on the number and type of compute resource you need to be provisioned). You can reduce this cold-start by pre-configuring your AMI
- Nodes are ephemeral and tie to a given job id. If needed, you can launch 'AlwaysOn' instances that will be running 24/7.
- If your simulation requires a lot of disk I/O, it's recommended to use high performance SSD-NVMe disks (using /scratch location) and not default $HOME path
- Use the web-based simulator to generate your qsub/script command.
Web Based Job Submission
In addition of regular qsub, SOCA supports web based job submission as well as via HTTP REST API
To get started, create a simple text file and name it "job_submit.que". See below for a simple template (you will be required to edit whatever is between **)
#!/bin/bash
## BEGIN PBS SETTINGS: Note PBS lines MUST start with #
#PBS -N **your_job_name**
#PBS -V -j oe -o **your_job_name**.qlog
#PBS -P **your_project**
#PBS -q **your_queue**
#PBS -l nodes=**number_of_nodes_for_this_job**
## END PBS SETTINGS
## BEGIN ACTUAL CODE
** your code goes here **
## END ACTUAL CODE
Run your job
Run qsub job_submit.que to submit your job to the queue.
user@host:~$ qsub job_submit.que
3323.ip-10-10-10-28
If your qsub command succeed, you will receive an id for your job (3323 in this example). To get more information about this job, run qstat -f 3323 (or qstat -f 3323 -x is the job is already terminated).
Your job will start as soon as resources are available (usually within 5 minutes after job submission)
Delete a job from the queue
Run qdel <job_id> to remove a job from the queue. If the job was running, associated capacity will be terminated within 4 minutes.
Custom AWS scheduler resources (optional)
Here is a list of scheduler resources specially designed for workloads running on AWS. The line starting with -l (lowercase L) is meant to define scheduler resources which will be used by this job. Syntax is as follow:
- In a script:
#PBS -l parameter_name=parameter_value,parameter_name_2=parameter_value_2 - Using qsub:
qsub -l parameter_name=parameter_value -l parameter_name_2=parameter_value_2 myscript.sh
Specify an EC2 Instance Type (optional)
Scale-Out Computing on AWS supports all type of EC2 instance. If you don't specify it, job will use a default type which may not be optimal (eg: simulation is memory intensive but default EC2 is compute optimized) If you are not familiar with EC2 instances, take some time to review https://aws.amazon.com/ec2/instance-types/
If you want to force utilization of a specific instance type (and not use the default one), simply change the line and modify instance_type value
#PBS -l [existing_parameters...],instance_type=**instance_type_value**
Specify a license restriction (optional)
License Mapping
Please refer to /apps/soca/$SOCA_CONFIGURATION/cluster_manager/settings/licenses_mapping.yml for a list of licenses you can restrict. Contact your Administrator if your license is not available yet.
If your job needs to check-out a specific license to run, you want to make sure enough licenses are available before provisioning capacity for the job. To do so, you can add a new resource which will be your license name and the number of license you need.
Example: Your job will only start if we have at least 2 Synopsys VCSRuntime_Net licenses available.
#PBS -l [existing_parameters...],synopsys_lic_vcsruntimenet=2
Manage your application logs
PBS will automatically generate a .qlog file once the job is complete as shown below.
#PBS -V -j oe -o **your_job_name**.qlog
If you need more verbose log, we recommend you using STDERR/STDOUT redirection on your code
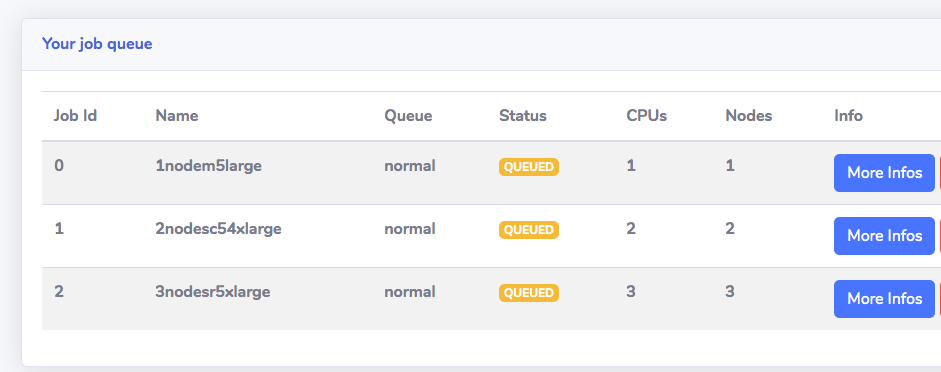
My job is queued. What next? (AWS orchestration)
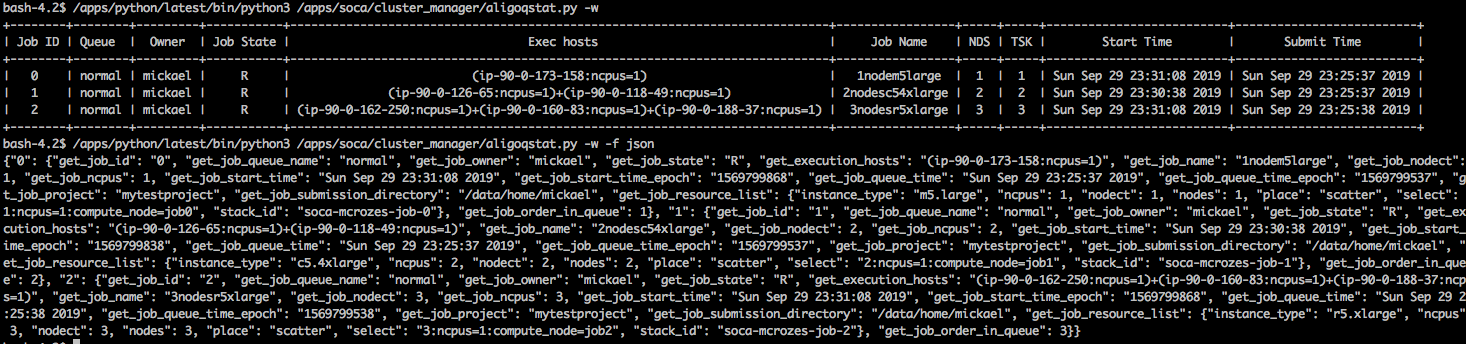
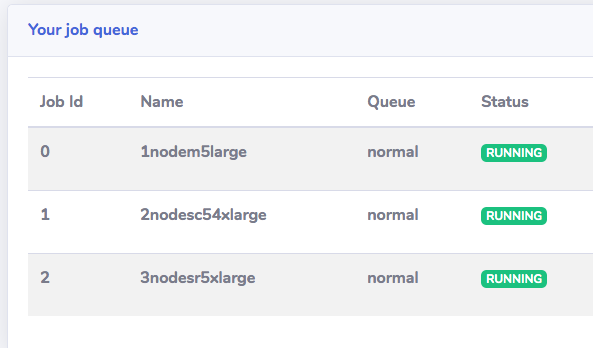
First, let's make sure your jobs have been sent to the queue. You can run default qstat or use aligoqstat which is a custom wrapper developed for Scale-Out Computing on AWS.
Web Based
CLI

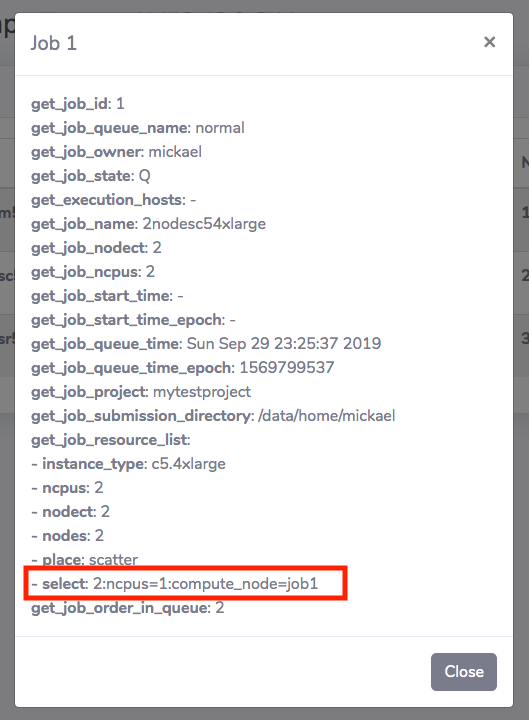
As soon as jobs are sent to the queue, our in-house dispatcher script which will decide if the job can start based on hardware availabilities, priorities or license requirements.
Run qstat -f **job_id** | grep Resource.
Web Based
CLI
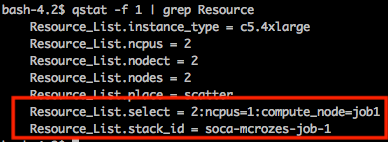
If you see stack_id or compute_node resource (under select), that means all requirements are met and capacity is being provisioned (aka: CloudFormation stack is created and capacity is being provisioned).
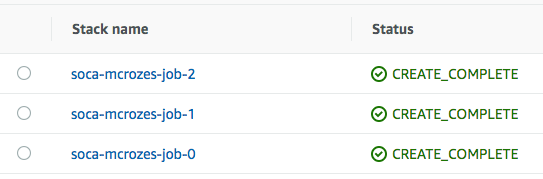
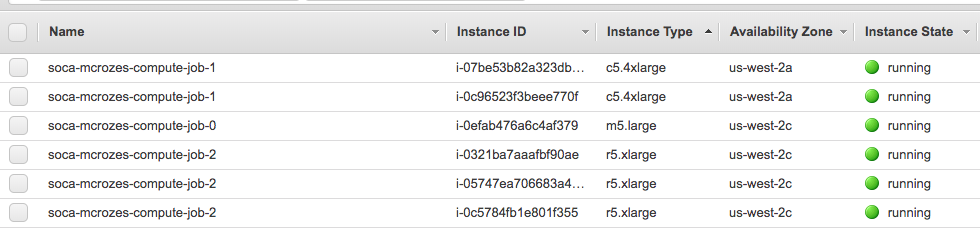
Look at your EC2 console. This is what you will see (syntax is **cluster_id**-compute-node-**job_id**):
Instances are being provisioned successfully, now let's make sure they are correctly being added to the scheduler by running pbsnodes -a
Note: PBS is updated as soon as the host are being added to EC2. You will need to wait a couple of minutes before the state change from "down" to "free" as Scale-Out Computing on AWS has to configure each node (install libraries, scheduler ...)
user@host:~$ pbsnodes -a
#Host Ready
ip-90-0-118-49
     Mom = ip-90-0-118-49.us-west-2.compute.internal
     ntype = PBS
     state = free
     pcpus = 16
     jobs = 1.ip-90-0-24-214/0
     resources_available.arch = linux
     resources_available.availability_zone = us-west-2a
     resources_available.compute_node = job1
     resources_available.host = ip-90-0-118-49
     resources_available.instance_type = c5.4xlarge
     resources_available.mem = 31890060kb
     resources_available.ncpus = 16
     resources_available.subnet_id = subnet-055c0dcdd6ddbb020
     resources_available.vnode = ip-90-0-118-49
     resources_assigned.accelerator_memory = 0kb
     resources_assigned.hbmem = 0kb
     resources_assigned.mem = 0kb
     resources_assigned.naccelerators = 0
     resources_assigned.ncpus = 1
     resources_assigned.vmem = 0kb
     queue = normal
     resv_enable = True
     sharing = default_shared
     last_state_change_time = Sun Sep 29 23:30:05 2019

# Host not ready yet
ip-90-0-188-37
     Mom = ip-90-0-188-37.us-west-2.compute.internal
     ntype = PBS
     state = state-unknown,down
     resources_available.availability_zone = us-west-2c
     resources_available.compute_node = job2
     resources_available.host = ip-90-0-188-37
     resources_available.instance_type = r5.xlarge
     resources_available.subnet_id = subnet-0d046c8668ccfdcb0
     resources_available.vnode = ip-90-0-188-37
     resources_assigned.accelerator_memory = 0kb
     resources_assigned.hbmem = 0kb
     resources_assigned.mem = 0kb
     resources_assigned.naccelerators = 0
     resources_assigned.ncpus = 0
     resources_assigned.vmem = 0kb
     queue = normal
     comment = node down: communication closed
     resv_enable = True
     sharing = default_shared
     last_state_change_time = Sun Sep 29 23:28:05 2019`
Simply wait a couple of minutes. Your jobs will start as soon as the PBS nodes are configured.
The web ui will also reflect this change.
How to submit and run multiple jobs on the same EC2 instance
SOCA 2.7.0 includes a new queue named job-shared which allows multiple jobs to run on the same EC2 instance. To allow multiple jobs to run on the same instance, the jobs need to have the same values for the following four parameters:
- instance_ami
- instance_type
- ht_support
- spot_price
If the jobs have the same values, then the jobs can run on the same EC2 instance. If some of the jobs have different values for any of these parameters, then one or more instances will be provisioned for these jobs.
EC2 instance capacity for job-shared queue is dynamically provisioned and de-provisioned automatically similar to the normal queue. The provisioning is based on the total number of vCPUs (when ht_support=true) or the total number of cores (when ht_support=false) for all queued jobs. Instances are deprovisioned after all jobs running on the instance complate and the instance(s) become idle for terminate_when_idle minutes. terminate_when_idle is defined in /apps/soca/$SOCA_CONFIGURATION/cluster_manager/queue_mapping.yml for the job-shared queue.
See Examples job submissions for job-shared queue
Examples
Job Submission Simulator
Use the web-based simulator to generate your qsub/script command.
How to set a parameter
- In a script: #PBS -l parameter_name=parameter_value,parameter_name_2=parameter_value_2
- Using qsub: qsub -l parameter_name=parameter_value -l parameter_name_2=parameter_value_2 myscript.sh
Refer to this page to get a list of all supported parameters For the rest of the examples below, I will run a simple script named "script.sh" with the following content:
#!/bin/bash
# Will output the hostname of the host where the script is executed
# If using MPI (more than 1 node), you will get the hostname of all the hosts allocated for your job
echo `hostname`
Run a simple script on 1 node using default settings on 'normal' queue
#!/bin/bash
#PBS -N my_job_name
#PBS -V -j oe -o my_job_name.qlog
#PBS -P project_a
#PBS -q normal
#PBS -l nodes=1
## END PBS SETTINGS
cd $HOME
./script.sh >> my_output.log 2>&1
Run a simple script on 1 node using default settings on 'normal' queue
#!/bin/bash
#PBS -N my_job_name
#PBS -V -j oe -o my_job_name.qlog
#PBS -P project_a
#PBS -q normal
#PBS -l nodes=1
## END PBS SETTINGS
cd $HOME
./script.sh >> my_output.log 2>&1
Run a simple MPI script on 3 nodes using custom EC2 instance type
This job will use a 3 c5.18xlarge instances
#!/bin/bash
#PBS -N my_job_name
#PBS -V -j oe -o my_job_name.qlog
#PBS -P project_a
#PBS -q normal
#PBS -l nodes=3,instance_type=c5.18xlarge
## END PBS SETTINGS
cd $PBS_O_WORKDIR
cat $PBS_NODEFILE | sort | uniq > mpi_nodes
export LD_LIBRARY_PATH=$LD_LIBRARY_PATH:/apps/soca/$SOCA_CONFIGURATION/openmpi/4.1.1/lib/
export PATH=$PATH:/apps/soca/$SOCA_CONFIGURATION/openmpi/4.1.1/bin/
# c5.18xlarge is 36 cores so -np is 36 * 3 hosts
/apps/soca/$SOCA_CONFIGURATION/openmpi/4.1.1/bin/mpirun --hostfile mpi_nodes -np 108 script.sh > my_output.log
Run a simple script on 3 nodes using custom License Restriction
This job will only start if we have at least 4 Comsol Acoustic licenses available
#!/bin/bash
#PBS -N my_job_name
#PBS -V -j oe -o my_job_name.qlog
#PBS -P project_a
#PBS -q normal
#PBS -l nodes=3,instance_type=c5.18xlarge,comsol_lic_acoustic=4
## END PBS SETTINGS
cd $PBS_O_WORKDIR
cat $PBS_NODEFILE | sort | uniq > mpi_nodes
export LD_LIBRARY_PATH=$LD_LIBRARY_PATH:/apps/openmpi/4.0.1/lib/
export PATH=$PATH:/apps/openmpi/4.0.1/bin/
# c5.18xlarge is 36 cores so -np is 36 * 3 hosts
/apps/openmpi/4.0.1/bin/mpirun --hostfile mpi_nodes -np 108 script.sh > my_output.log
Run a simple script on 5 nodes using custom AMI
This job will use a user-specified AMI ID
#!/bin/bash
#PBS -N my_job_name
#PBS -V -j oe -o my_job_name.qlog
#PBS -P project_a
#PBS -q normal
#PBS -l nodes=5,instance_type=c5.18xlarge,instance_ami=ami-123abcde
## END PBS SETTINGS
cd $PBS_O_WORKDIR
cat $PBS_NODEFILE | sort | uniq > mpi_nodes
export LD_LIBRARY_PATH=$LD_LIBRARY_PATH:/apps/openmpi/4.0.1/lib/
export PATH=$PATH:/apps/openmpi/4.0.1/bin/
# c5.18xlarge is 36 cores so -np is 36 * 5 hosts
/apps/openmpi/4.0.1/bin/mpirun --hostfile mpi_nodes -np 180 script.sh > my_output.log
Run a simple script on 5 nodes using custom AMI using a different OS
This job will use a user-specified AMI ID which use a operating system different than the scheduler
#!/bin/bash
#PBS -N my_job_name
#PBS -V -j oe -o my_job_name.qlog
#PBS -P project_a
#PBS -q normal
#PBS -l nodes=5,instance_type=c5.18xlarge,instance_ami=ami-123abcde,base_os=centos7
## END PBS SETTINGS
cd $PBS_O_WORKDIR
cat $PBS_NODEFILE | sort | uniq > mpi_nodes
export LD_LIBRARY_PATH=$LD_LIBRARY_PATH:/apps/openmpi/4.0.1/lib/
export PATH=$PATH:/apps/openmpi/4.0.1/bin/
# c5.18xlarge is 36 cores so -np is 36 * 5 hosts
/apps/openmpi/4.0.1/bin/mpirun --hostfile mpi_nodes -np 180 script.sh > my_output.log
Run a simple script on 5 m5.24xlarge SPOT instances as long as instance price is lower than $2.5 per hour
This job will use SPOT instances. Instances will be automatically terminated if BID price is higher than $2.5 / per hour per instance
#!/bin/bash
#PBS -N my_job_name
#PBS -V -j oe -o my_job_name.qlog
#PBS -P project_a
#PBS -q normal
#PBS -l nodes=5,instance_type=m5.24xlarge,spot_price=2.5
## END PBS SETTINGS
cd $PBS_O_WORKDIR
cat $PBS_NODEFILE | sort | uniq > mpi_nodes
export LD_LIBRARY_PATH=$LD_LIBRARY_PATH:/apps/openmpi/4.0.1/lib/
export PATH=$PATH:/apps/openmpi/4.0.1/bin/
# m5.24xlarge is 48 cores so -np is 48 * 5 hosts
/apps/openmpi/4.0.1/bin/mpirun --hostfile mpi_nodes -np 240 script.sh > my_output.log
Run a simple script on 5 m5.24xlarge SPOT instances as long as instance price is lower than OD price
#!/bin/bash
#PBS -N my_job_name
#PBS -V -j oe -o my_job_name.qlog
#PBS -P project_a
#PBS -q normal
#PBS -l nodes=5,instance_type=m5.24xlarge,spot_price=auto
## END PBS SETTINGS
cd $PBS_O_WORKDIR
cat $PBS_NODEFILE | sort | uniq > mpi_nodes
export LD_LIBRARY_PATH=$LD_LIBRARY_PATH:/apps/openmpi/4.0.1/lib/
export PATH=$PATH:/apps/openmpi/4.0.1/bin/
# m5.24xlarge is 48 cores so -np is 48 * 5 hosts
/apps/openmpi/4.0.1/bin/mpirun --hostfile mpi_nodes -np 240 script.sh > my_output.log
Submit a job with EFA
Make sure to use an instance type supported by EFA https://docs.aws.amazon.com/AWSEC2/latest/UserGuide/efa.html#efa-instance-types
#!/bin/bash
#PBS -N my_job_name
#PBS -V -j oe -o my_job_name.qlog
#PBS -P project_a
#PBS -q normal
#PBS -l nodes=5,instance_type=c5n.18xlarge,efa_support=true
## END PBS SETTINGS
cd $PBS_O_WORKDIR
cat $PBS_NODEFILE | sort | uniq > mpi_nodes
export LD_LIBRARY_PATH=$LD_LIBRARY_PATH:/apps/openmpi/4.0.1/lib/
export PATH=$PATH:/apps/openmpi/4.0.1/bin/
# c5n.18xlarge is 36 cores so -np is 36 * 5
/apps/openmpi/4.0.1/bin/mpirun --hostfile mpi_nodes -np 180 script.sh > my_output.log
Use 50 c5.xlarge for your job and fallback to m5.xlarge and r5.xlarge if capacity is not available
AWS honors the instance order, so it will try to provision 50 c5.large first and fallback to m5.xlarge/r5.xlarge if needed (in case your account has instance limitation or AWS can't allocate more than X instance type on a given AZ/region). Ultimately, you may end up with the following configuration (but not limited to):
- 50 c5.xlarge
- 30 c5.xlarge, 20 m5.xlarge
- 20 c5.xlarge, 20 m5.xlarge, 10 r5.xlarge
- Or any other combination. The only certain know is that you will get 50 instances
#!/bin/bash
#PBS -N my_job_name
#PBS -V -j oe -o my_job_name.qlog
#PBS -P project_a
#PBS -q normal
#PBS -l nodes=50,instance_type=c5.xlarge+m5.xlarge+r5.xlarge
## END PBS SETTINGS
cd $PBS_O_WORKDIR
cat $PBS_NODEFILE | sort | uniq > mpi_nodes
export LD_LIBRARY_PATH=$LD_LIBRARY_PATH:/apps/openmpi/4.0.1/lib/
export PATH=$PATH:/apps/openmpi/4.0.1/bin/
# c5n.18xlarge is 36 cores so -np is 36 * 5
/apps/openmpi/4.0.1/bin/mpirun --hostfile mpi_nodes -np 180 script.sh > my_output.log
Use multiple SPOT instance type
#!/bin/bash
#PBS -N my_job_name
#PBS -V -j oe -o my_job_name.qlog
#PBS -P project_a
#PBS -q normal
#PBS -l nodes=5,instance_type=c5.xlarge+m5.xlarge+r5.xlarge, spot_price=auto
## END PBS SETTINGS
cd $PBS_O_WORKDIR
cat $PBS_NODEFILE | sort | uniq > mpi_nodes
export LD_LIBRARY_PATH=$LD_LIBRARY_PATH:/apps/openmpi/4.0.1/lib/
export PATH=$PATH:/apps/openmpi/4.0.1/bin/
# c5n.18xlarge is 36 cores so -np is 36 * 5
/apps/openmpi/4.0.1/bin/mpirun --hostfile mpi_nodes -np 180 script.sh > my_output.log
Provision 50 instances (10 On-Demand and 40 SPOT)
#!/bin/bash
#PBS -N my_job_name
#PBS -V -j oe -o my_job_name.qlog
#PBS -P project_a
#PBS -q normal
#PBS -l nodes=50,instance_type=c5.large,spot_allocation_count=40
## END PBS SETTINGS
cd $PBS_O_WORKDIR
cat $PBS_NODEFILE | sort | uniq > mpi_nodes
export LD_LIBRARY_PATH=$LD_LIBRARY_PATH:/apps/openmpi/4.0.1/lib/
export PATH=$PATH:/apps/openmpi/4.0.1/bin/
# c5n.18xlarge is 36 cores so -np is 36 * 5
/apps/openmpi/4.0.1/bin/mpirun --hostfile mpi_nodes -np 180 script.sh > my_output.log
Multi-lines parameters
Custom AMI running on a different distribution than the scheduler, with EFA enable, without placement group and within a specific subnet_id
#!/bin/bash
#PBS -N my_job_name
#PBS -V -j oe -o my_job_name.qlog
#PBS -P project_a
#PBS -q normal
## Resources can be specified on multiple lines
#PBS -l nodes=5,instance_type=c5n.18xlarge,efa_support=yes
#PBS -l placement_group=false,base_os=rhel7,ami_id=ami-12345,subnet_id=sub-abcde
## END PBS SETTINGS
cd $PBS_O_WORKDIR
cat $PBS_NODEFILE | sort | uniq > mpi_nodes
export LD_LIBRARY_PATH=$LD_LIBRARY_PATH:/apps/openmpi/4.0.1/lib/
export PATH=$PATH:/apps/openmpi/4.0.1/bin/
# c5n.18xlarge is 36 cores so -np is 36 * 5
/apps/openmpi/4.0.1/bin/mpirun --hostfile mpi_nodes -np 180 script.sh > my_output.log
Examples for job-shared queue
Run a simple script on 96 vCPUs using on-demand c5.4xlarge instances on 'job-shared' queue
#!/bin/bash
for i in {1..96}; do
    qsub -q job-shared -l instance_type=c5.4xlarge -l ht_support=true -- /path/to/script.sh
done
Since we specified instance_type=c5.4xlarge and ht_support=true, the number of instances required would be calculated as 96 vCPUs (total number of queued jobs is 96 and each job requires 1 vCPU) divided by 16 vCPUs provided by each c5.4xlarge instance. So, these queued jobs would lead to provisioning of 6 on-demand c5.4xlarge instances
Run a simple script on 96 cores using on-demand c5.4xlarge instances on 'job-shared' queue
#!/bin/bash
for i in {1..96}; do
    qsub -q job-shared -l instance_type=c5.4xlarge -l ht_support=false -- /path/to/script.sh
done
Since we specified instance_type=c5.4xlarge and ht_support=false, the number of instances required would be calculated as 96 cores (total number of queued jobs is 96 and each job requires 1 core) divided by 8 cores provided by each c5.4xlarge instance. So, these queued jobs would lead to provisioning of 12 on-demand c5.4xlarge instances
Run a simple script on 96 vCPUs using Spot Fleet with c5.4xlarge or c5.9xlarge on 'job-shared' queue
#!/bin/bash
for i in {1..96}; do
    qsub -q job-shared -l instance_type=c5.4xlarge+c5.9xlarge -l ht_support=true -l spot_price=auto -- /path/to/script.sh
done
Since we specified instance_type=c5.4xlarge+c5.9xlarge, and spot_price=auto, this will create a spot fleet request with two instance types c5.4xlarge and c5.9xlarge and the total required capacity would be 96. Weighted Capacity for each instance type would be automatically calculated for c5.4xlarge and c5.9xlarge based on the value of ht_support. In this case the weighted capacity for c5.4xlarge would be 16 and the weighted capacity for c5.9xlarge would be 36. The Spot fleet would then create a corresponding number of instances depending on instance availability.
Run a script that requires 4 cores 24 times using Spot Fleet with c5.4xlarge or c5.9xlarge on 'job-shared' queue
#!/bin/bash
for i in {1..24}; do
    qsub -q job-shared -l instance_type=c5.4xlarge+c5.9xlarge -l ht_support=false -l select=1:ncpus=4 -l spot_price=auto -- /path/to/four_core_script.sh
done
Since we specified instance_type=c5.4xlarge+c5.9xlarge, and spot_price=auto, this will create a spot fleet request with two instance types c5.4xlarge and c5.9xlarge and the total required capacity would be 96 (24 jobs each requires 4 cores as ht_support is false). Weighted Capacity for each instance type would be automatically calculated for c5.4xlarge and c5.9xlarge based on the value of ht_support. In this case the weighted capacity for c5.4xlarge would be 8 and the weighted capacity for c5.9xlarge would be 18. The Spot fleet would then create a corresponding number of instances depending on instance availability.