NVIDIA NIM Operator on Amazon EKS
What is NVIDIA NIM?
NVIDIA NIM (NVIDIA Inference Microservices) is a set of containerized microservices that make it easier to deploy and host large language models (LLMs) and other AI models in your own environment. NIM provides standard APIs (similar to OpenAI or other AI services) for developers to build applications like chatbots and AI assistants, while leveraging NVIDIA’s GPU acceleration for high-performance inference. In essence, NIM abstracts away the complexities of model runtime and optimization, offering a fast path to inference with optimized backends (e.g., TensorRT-LLM, FasterTransformer, etc.) under the hood.
NVIDIA NIM Operator for Kubernetes
The NVIDIA NIM Operator is a Kubernetes operator that automates the deployment, scaling, and management of NVIDIA NIM microservices on a Kubernetes cluster.

Instead of manually pulling containers, provisioning GPU nodes, or writing YAML for every model, the NIM Operator introduces three primary Custom Resource Definitions (CRDs):
These CRDs allow you to declaratively define model deployments using native Kubernetes syntax.
The Operator handles:
- Pulling the model image from NVIDIA GPU Cloud (NGC)
- Caching model weights and optimized runtime profiles
- Launching model-serving pods with GPU allocation
- Exposing inference endpoints via Kubernetes Services
- Integrating with autoscaling (e.g., HPA + Karpenter)
- Chaining multiple models together into inference pipelines using NIMPipeline
NIMCache – Model Caching for Faster Load Times
A NIMCache (nimcaches.apps.nvidia.com) is a custom resource that pre-downloads and stores a model’s weights, tokenizer, and runtime-optimized engine files (such as TensorRT-LLM profiles) into a shared persistent volume.
This ensures:
- Faster cold start times: no repeated downloads from NGC
- Storage reuse across nodes and replicas
- Centralized, shared model store (typically on EFS or FSx for Lustre in EKS)
Model profiles are optimized for specific GPUs (e.g., A10G, L4) and precisions (e.g., FP16). When NIMCache is created, the Operator discovers available model profiles and selects the best one for your cluster.
📌 Tip: Using
NIMCacheis highly recommended for production, especially when running multiple replicas or restarting models frequently.
NIMService – Deploying and Managing the Model Server
A NIMService (nimservices.apps.nvidia.com) represents a running instance of a NIM model server on your cluster. It specifies the container image, GPU resources, number of replicas, and optionally the name of a NIMCache.
Key benefits:
- Declarative model deployment using Kubernetes YAML
- Automatic node scheduling for GPU nodes
- Shared cache support using
NIMCache - Autoscaling via HPA or external triggers
- ClusterIP or Ingress support to expose APIs
For example, deploying the Meta Llama 3.1 8B Instruct model involves creating:
- A
NIMCacheto store the model (optional but recommended) - A
NIMServicepointing to the cached model and allocating GPUs
If NIMCache is not used, the model will be downloaded each time a pod starts, which may increase startup latency.
NIMPipeline
NIMPipeline is another CRD that can group multiple NIMService resources into an ordered inference pipeline. This is useful for multi-model workflows like:
- Retrieval-Augmented Generation (RAG)
- Embeddings + LLM chaining
- Preprocessing + classification pipelines
In this tutorial, we focus on a single model deployment using
NIMCacheandNIMService.
Overview of this deployment pattern on Amazon EKS
This deployment blueprint demonstrates how to run the Meta Llama 3.1 8B Instruct model on Amazon EKS using the NVIDIA NIM Operator with multi-GPU support and optimized model caching for fast startup times.

The model is served using:
- G5 instances (g5.12xlarge): These instances come with 4 NVIDIA A10G GPUs
- Tensor Parallelism (TP): Set to
2, meaning the model will run in parallel across 2 GPUs - Persistent Shared Cache: Backed by Amazon EFS to speed up model startup by reusing previously generated engine files
By combining these components, the model is deployed as a scalable Kubernetes workload that supports:
- Efficient GPU scheduling with Karpenter
- Fast model load using the
NIMCache - Scalable serving endpoint via
NIMService
📌 Note: You can modify the
tensorParallelismsetting or select a different instance type (e.g., G6 with L4 GPUs) based on your performance and cost requirements.
Note: Before implementing NVIDIA NIM, please be aware it is part of NVIDIA AI Enterprise, which may introduce potential cost and licensing for production use.
For evaluation, NVIDIA also offers a free evaluation license to try NVIDIA AI Enterprise for 90 days, and you can register it with your corporate email.
Deploying the Solution
In this tutorial, the entire AWS infrastructure is provisioned using Terraform, including:
- Amazon VPC with public and private subnets
- Amazon EKS cluster
- GPU nodepools using Karpenter
- Addons such as:
- NVIDIA device plugin
- EFS CSI driver
- NVIDIA NIM Operator
As a demonstration, the Meta Llama-3.1 8B Instruct model will be deployed using a NIMService, optionally backed by a NIMCache for improved cold start performance.
Prerequisites
Before getting started with NVIDIA NIM, ensure you have the following:
Click to expand the NVIDIA NIM account setup details
NVIDIA AI Enterprise Account
- Register for an NVIDIA AI Enterprise account. If you don't have one, you can sign up for a trial account using this link.
NGC API Key
-
Log in to your NVIDIA AI Enterprise account
-
Navigate to the NGC (NVIDIA GPU Cloud) portal
-
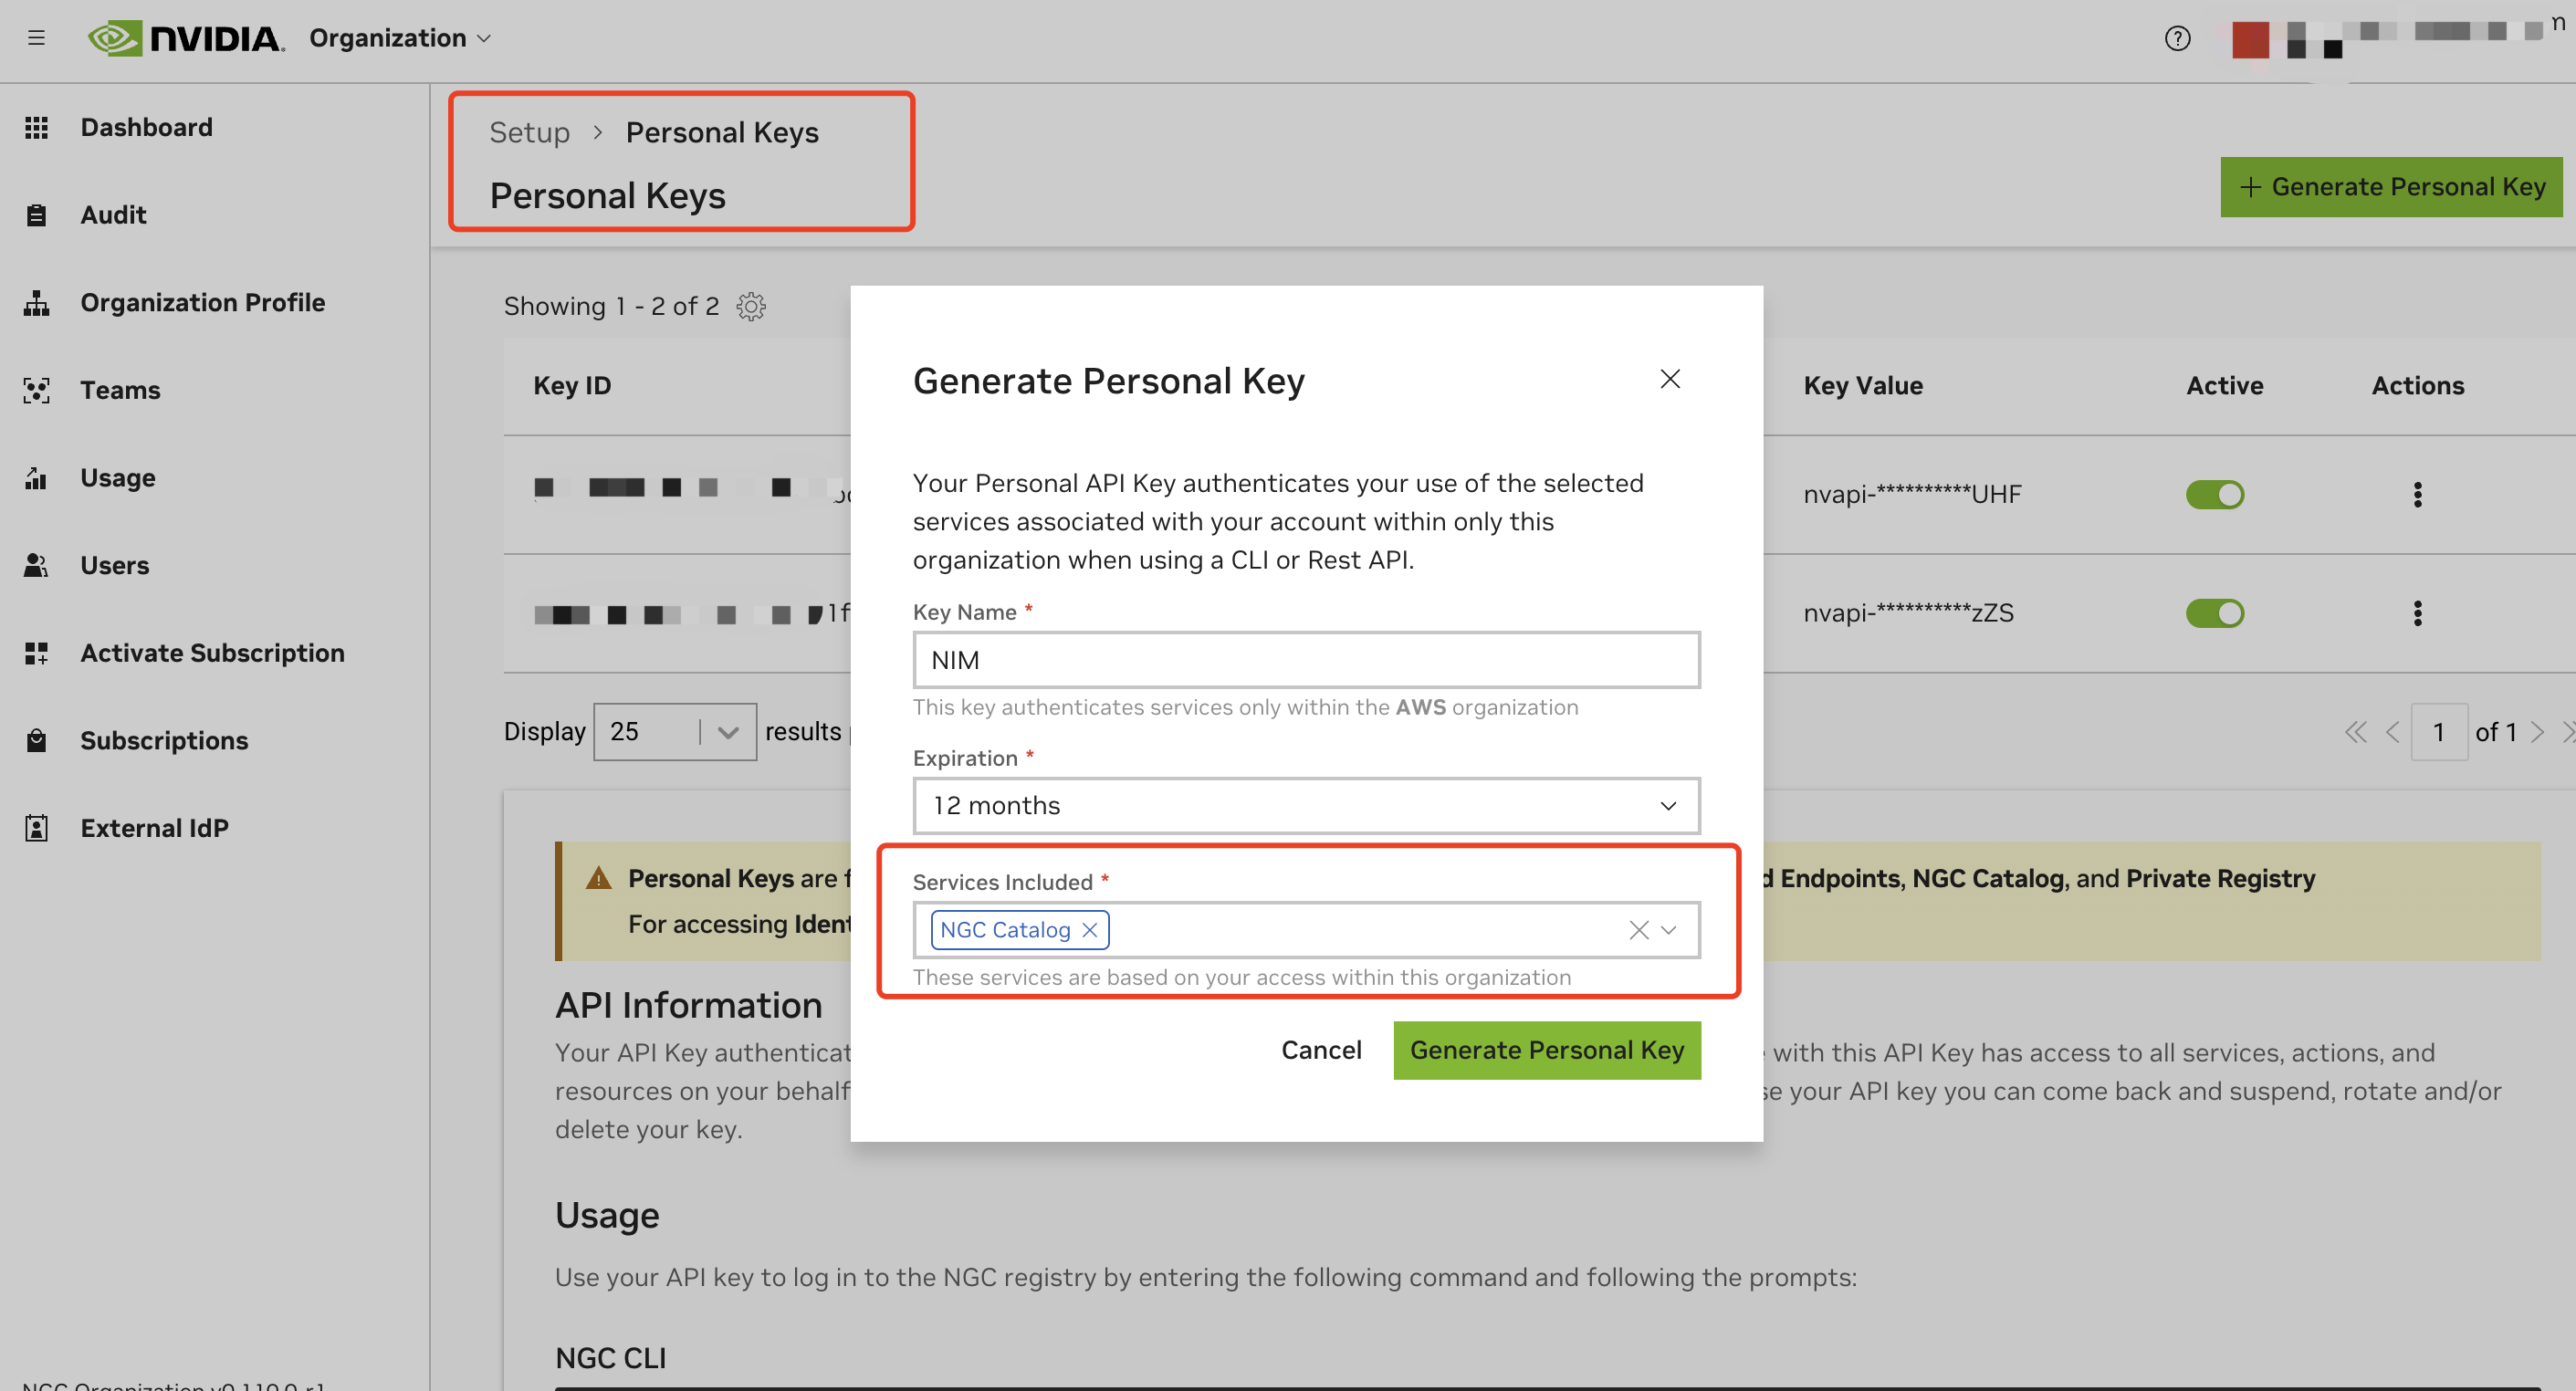
Generate a personal API key:
- Go to your account settings or navigate directly to: https://org.ngc.nvidia.com/setup/personal-keys
- Click on "Generate Personal Key"
- Ensure that at least "NGC Catalog" is selected from the "Services Included" dropdown
- Copy and securely store your API key, the key should have a prefix with
nvapi-
Validate NGC API Key and Test Image Pull
To ensure your API key is valid and working correctly:
- Set up your NGC API key as an environment variable:
export NGC_API_KEY=<your_api_key_here>
- Authenticate Docker with the NVIDIA Container Registry:
echo "$NGC_API_KEY" | docker login nvcr.io --username '$oauthtoken' --password-stdin
- Test pulling an image from NGC:
docker pull nvcr.io/nim/meta/llama3-8b-instruct:latest
You do not have to wait for it to complete, just to make sure the API key is valid to pull the image.
The following are required to run this tutorial
Deploy
Clone the ai-on-eks repository that contains the Terraform code for this deployment pattern:
git clone https://github.com/awslabs/ai-on-eks.git
Navigate to the NVIDIA NIM deployment directory and run the install script to deploy the infrastructure:
cd ai-on-eks/infra/nvidia-nim
./install.sh
This deployment will take approximately ~20 minute to complete.
Once the installation finishes, you may find the configure_kubectl command from the output. Run the following to configure EKS cluster access
# Creates k8s config file to authenticate with EKS
aws eks --region us-west-2 update-kubeconfig --name nvidia-nim-eks
Verify the deployments - Click to expand the deployment details
$ kubectl get all -n nim-operator
kubectl get all -n nim-operator
NAME                                                 READY   STATUS    RESTARTS   AGE
pod/nim-operator-k8s-nim-operator-6fdffdf97f-56fxc   1/1     Running   0          26h

NAME                                       TYPE        CLUSTER-IP     EXTERNAL-IP   PORT(S)    AGE
service/k8s-nim-operator-metrics-service   ClusterIP   172.20.148.6   <none>        8080/TCP   26h

NAME                                            READY   UP-TO-DATE   AVAILABLE   AGE
deployment.apps/nim-operator-k8s-nim-operator   1/1     1            1           26h

NAME                                                       DESIRED   CURRENT   READY   AGE
replicaset.apps/nim-operator-k8s-nim-operator-6fdffdf97f   1         1         1       26h
$ kubectl get crds | grep nim
nimcaches.apps.nvidia.com                    2025-03-27T17:39:00Z
nimpipelines.apps.nvidia.com                 2025-03-27T17:39:00Z
nimservices.apps.nvidia.com                  2025-03-27T17:39:01Z
$ kubectl get crds | grep nemo
nemocustomizers.apps.nvidia.com              2025-03-27T17:38:59Z
nemodatastores.apps.nvidia.com               2025-03-27T17:38:59Z
nemoentitystores.apps.nvidia.com             2025-03-27T17:38:59Z
nemoevaluators.apps.nvidia.com               2025-03-27T17:39:00Z
nemoguardrails.apps.nvidia.com               2025-03-27T17:39:00Z
To list Karpenter autoscaling Nodepools
$ kubectl get nodepools
NAME                NODECLASS           NODES   READY   AGE
g5-gpu-karpenter    g5-gpu-karpenter    1       True    47h
g6-gpu-karpenter    g6-gpu-karpenter    0       True    7h56m
inferentia-inf2     inferentia-inf2     0       False   47h
trainium-trn1       trainium-trn1       0       False   47h
x86-cpu-karpenter   x86-cpu-karpenter   0       True    47h
Deploy llama-3.1-8b-instruct with NIM Operator
Step 1: Create Secrets for Authentication
To access the NVIDIA container registry and model artifacts, you'll need to provide your NGC API key. This script creates two Kubernetes secrets: ngc-secret for Docker image pulls and ngc-api-secret for model authorization.
cd blueprints/inference/gpu/nvidia-nim-operator-llama3-8b

NGC_API_KEY="your-real-ngc-key" ./deploy-nim-auth.sh
Step 2: Cache the Model to EFS using NIMCache CRD
The NIMCache custom resource will pull the model and cache optimized engine profiles to EFS. This dramatically reduces startup time when launching the model later via NIMService.
cd blueprints/inference/gpu/nvidia-nim-operator-llama3-8b

kubectl apply -f nim-cache-llama3-8b-instruct.yaml
Check status:
kubectl get nimcaches.apps.nvidia.com -n nim-service
Expected output:
NAME                      STATUS   PVC                           AGE
meta-llama3-8b-instruct   Ready    meta-llama3-8b-instruct-pvc   21h
Display cached model profiles:
kubectl get nimcaches.apps.nvidia.com -n nim-service \
  meta-llama3-8b-instruct -o=jsonpath="{.status.profiles}" | jq .
Sample output:
[
  {
    "config": {
      "feat_lora": "false",
      "gpu": "A10G",
      "llm_engine": "tensorrt_llm",
      "precision": "fp16",
      "profile": "throughput",
      "tp": "2"
    }
  }
]
Step 3: Deploy the Model using NIMService CRD
Now launch the model service using the cached engine profiles.
cd blueprints/inference/gpu/nvidia-nim-operator-llama3-8b

kubectl apply -f nim-service-llama3-8b-instruct.yaml
Check the deployed resources:
kubectl get all -n nim-service
Exepcted Output:
NAME                                           READY   STATUS    RESTARTS   AGE
pod/meta-llama3-8b-instruct-6cdf47d6f6-hlbnf   1/1     Running   0          6h35m

NAME                              TYPE        CLUSTER-IP    EXTERNAL-IP   PORT(S)    AGE
service/meta-llama3-8b-instruct   ClusterIP   172.20.85.8   <none>        8000/TCP   6h35m

NAME                                      READY   UP-TO-DATE   AVAILABLE   AGE
deployment.apps/meta-llama3-8b-instruct   1/1     1            1           6h35m

NAME                                                 DESIRED   CURRENT   READY   AGE
replicaset.apps/meta-llama3-8b-instruct-6cdf47d6f6   1         1         1       6h35m
🚀 Model Startup Timeline
The following sample is captured from the pod/meta-llama3-8b-instruct-6cdf47d6f6-hlbnf log
| Step | Timestamp | Description |
|---|---|---|
| Start | ~20:00:50 | Pod starts, NIM container logs begin |
| Profile Match | 20:00:50.100 | Detects and selects cached profile (tp=2) |
| Workspace Ready | 20:00:50.132 | Model workspace initialized via EFS in 0.126s |
| TensorRT Init | 20:00:51.168 | TensorRT-LLM engine begins setup |
| Engine Ready | 20:01:06 | Engine loaded and profiles activated (~16.6 GiB across 2 GPUs) |
| API Server Ready | 20:02:11.036 | FastAPI + Uvicorn starts |
| Health Check OK | 20:02:18.781 | /v1/health/ready endpoint returns 200 OK |
⚡ Startup time (cold boot to ready): ~81 seconds thanks to cached engine on EFS.
Test the Model with a Prompt
Step 1: Port Forward the Model Service
Expose the model locally using port forwarding:
kubectl port-forward -n nim-service service/meta-llama3-8b-instruct 8001:8000
Step 2: Send a Sample Prompt Using curl
Run the following command to test the model with a chat prompt:
curl -X POST \
  http://localhost:8001/v1/chat/completions \
  -H 'Accept: application/json' \
  -H 'Content-Type: application/json' \
  -d '{
    "model": "meta/llama-3.1-8b-instruct",
    "messages": [
      {
        "role": "user",
        "content": "What should I do for a 4 day vacation at Cape Hatteras National Seashore?"
      }
    ],
    "top_p": 1,
    "n": 1,
    "max_tokens": 1024,
    "stream": false,
    "frequency_penalty": 0.0,
    "stop": ["STOP"]
  }'
Sample Response (Shortened):
{"id":"chat-061a9dba9179437fa24cab7f7c767f19","object":"chat.completion","created":1743215809,"model":"meta/llama-3.1-8b-instruct","choices":[{"index":0,"message":{"role":"assistant","content":"Cape Hatteras National Seashore is a beautiful coastal destination with a rich history, pristine beaches,
...
exploration of the area's natural beauty and history. Feel free to modify it to suit your interests and preferences. Safe travels!"},"logprobs":null,"finish_reason":"stop","stop_reason":null}],"usage":{"prompt_tokens":30,"total_tokens":773,"completion_tokens":743},"prompt_logprobs":null}%
🧠 The model is now running with Tensor Parallelism = 2 across two A10G GPUs, each utilizing approximately 21.4 GiB of memory. Thanks to NIMCache backed by EFS, the model loaded quickly and is ready for low-latency inference.
Open WebUI Deployment
Open WebUI is compatible only with models that work with the OpenAI API server and Ollama.
1. Deploy the WebUI
Deploy the Open WebUI by running the following command:
kubectl apply -f ai-on-eks/blueprints/inference/gpu/nvidia-nim-operator-llama3-8b/openai-webui-deployment.yaml
2. Port Forward to Access WebUI
Use kubectl port-forward to access the WebUI locally:
kubectl port-forward svc/open-webui 8081:80 -n openai-webui
3. Access the WebUI
Open your browser and go to http://localhost:8081
4. Sign Up
Sign up using your name, email, and a dummy password.
5. Start a New Chat
Click on New Chat and select the model from the dropdown menu, as shown in the screenshot below:

6. Enter Test Prompt
Enter your prompt, and you will see the streaming results, as shown below:

Performance Testing with NVIDIA GenAI-Perf Tool
GenAI-Perf is a command line tool for measuring the throughput and latency of generative AI models as served through an inference server.
GenAI-Perf can be used as standard tool to benchmark with other models deployed with inference server. But this tool requires a GPU. To make it easier, we provide you a pre-configured manifest genaiperf-deploy.yaml to run the tool.
cd ai-on-eks/blueprints/inference/gpu/nvidia-nim-operator-llama3-8b
kubectl apply -f genaiperf-deploy.yaml
Once the pod is ready with running status 1/1, can execute into the pod.
export POD_NAME=$(kubectl get po -l app=genai-perf -ojsonpath='{.items[0].metadata.name}')
kubectl exec -it $POD_NAME -- bash
Run the testing to the deployed NIM Llama3 model
genai-perf profile -m meta/llama-3.1-8b-instruct \
  --url meta-llama3-8b-instruct.nim-service:8000 \
  --service-kind openai \
  --endpoint-type chat \
  --num-prompts 100 \
  --synthetic-input-tokens-mean 200 \
  --synthetic-input-tokens-stddev 0 \
  --output-tokens-mean 100 \
  --output-tokens-stddev 0 \
  --concurrency 20 \
  --streaming \
  --tokenizer hf-internal-testing/llama-tokenizer
You should see similar output like the following
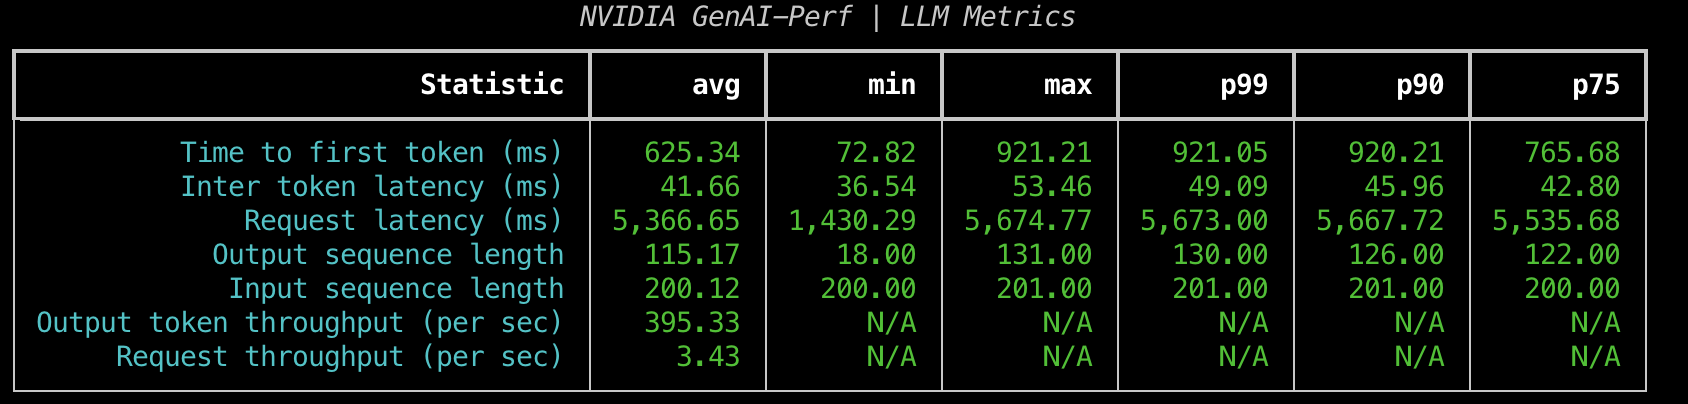
You should be able to see the metrics that genai-perf collects, including Request latency, Out token throughput, Request throughput.
To understand the command line options, please refer to this documentation.
Grafana Dashboard
NVIDIA provided a Grafana dashboard to better visualize NIM status. In the Grafana dashboard, it contains several important metrics:
- Time to First Token (TTFT): The latency between the initial inference request to the model and the return of the first token.
- Inter-Token Latency (ITL): The latency between each token after the first.
- Total Throughput: The total number of tokens generated per second by the NIM.
You can find more metrics description from this document.

You can monitor metrics such as Time-to-First-Token, Inter-Token-Latency, KV Cache Utilization metrics.

To view the Grafana dashboard to monitor these metrics, follow the steps below:
Click to expand details
1. Retrieve the Grafana password.
The password is saved in the AWS Secret Manager. Below Terraform command will show you the secret name.
terraform output grafana_secret_name
Then use the output secret name to run below command,
aws secretsmanager get-secret-value --secret-id <grafana_secret_name_output> --region $AWS_REGION --query "SecretString" --output text
2. Expose the Grafana Service
Use port-forward to expose the Grafana service.
kubectl port-forward svc/kube-prometheus-stack-grafana 3000:80 -n monitoring
3. Login to Grafana:
- Open your web browser and navigate to http://localhost:3000.
- Login with the username
adminand the password retrieved from AWS Secrets Manager.
4. Open the NIM Monitoring Dashboard:
- Once logged in, click "Dashboards" on the left sidebar and search "nim"
- You can find the Dashboard
NVIDIA NIM Monitoringfrom the list - Click and entering to the dashboard.
You should now see the metrics displayed on the Grafana dashboard, allowing you to monitor the performance your NVIDIA NIM service deployment.
As of writing this guide, NVIDIA also provides an example Grafana dashboard. You can check it from here.
Conclusion
This blueprint showcases how to deploy and scale large language models like Meta’s Llama 3.1 8B Instruct efficiently on Amazon EKS using the NVIDIA NIM Operator.
By combining OpenAI-compatible APIs with GPU-accelerated inference, declarative Kubernetes CRDs (NIMCache, NIMService), and fast model startup via EFS-based caching, you get a streamlined, production-grade model deployment experience.
Key Benefits:
- Faster cold starts through shared, persistent model cache
- Declarative and repeatable deployments with CRDs
- Dynamic GPU autoscaling powered by Karpenter
- One-click infrastructure provisioning using Terraform
In just ~20 minutes, you can go from zero to a scalable LLM service on Kubernetes — ready to serve real-world prompts with low latency and high efficiency.
Cleanup
To tear down the deployed model and associated infrastructure:
Step 1: Delete Model Resources
Delete the deployed NIMService and NIMCache objects from your cluster:
cd blueprints/inference/gpu/nvidia-nim-operator-llama3-8b

kubectl delete -f nim-service-llama3-8b-instruct.yaml
kubectl delete -f nim-cache-llama3-8b-instruct.yaml
Verify deletion:
kubectl get nimservices.apps.nvidia.com -n nim-service
kubectl get nimcaches.apps.nvidia.com -n nim-service
Step 2: Destroy AWS Infrastructure
Navigate back to the root Terraform module and run the cleanup script. This will destroy all AWS resources created for this blueprint, including the VPC, EKS cluster, EFS, and node groups:
cd ai-on-eks/infra/nvidia-nim
./cleanup.sh