2. Training KPI Prediction on the WindsorML Dataset
This section guides you through the steps to train a KPI prediction model on the WindsorML Dataset. If you haven’t already accessed the WindsorML dataset, follow these instructions.
The KPI Prediction pipeline consists of the following main steps:
Create the manifest linking geometries with KPIs
Preprocess the geometries and KPI values for training and testing
Train the KPI prediction model
Test the trained model on a test dataset
Before we begin, navigate to the tutorials/kpi/windsor folder, which contains the necessary scripts and configuration files for this tutorial:
tutorials/kpi/windsor/
├── download-dataset
├── logging.yaml
├── prediction.yaml
├── readme.txt
├── run-clean
├── run-create-manifest-prediction
├── run-create-manifest-training
├── run-prediction
├── run-training-pipeline
└── training.yaml
download-dataset: Script to help download the dataset from S3logging.yaml: Configuration file for logging settings.prediction.yaml: Configuration file for prediction on new geometries.training.yaml: Configuration file for the training and testing pipeline.run-create-manifest-prediction: Script to create the new geometry prediction data manifest.run-create-manifest-training: Script to create the training and testing data manifest.run-training: Script to run the entire training and testing pipeline.run-prediction: Script to run the prediction step on new geometries.readme.txt: Additional instructions and information about the tutorial.
The process involves creating the data manifest, understanding the configuration file, running the training and testing pipeline, and reviewing the results.
Let’s go through each step in detail.
2.1. Creating the Manifest
A manifest describes the paths to a dataset and is used to share data between tasks. The manifest format is JSON Lines where each line corresponds to one simulation run.
Note
Ensure the dataset is on a filesystem: use the ./download-dataset command or follow these instructions.
The run-create-manifest-training script generates the required manifest for the WindsorML dataset. To create the manifest, run the script pointing to your dataset location:
./run-create-manifest-training /path/to/windsor/dataset
This will generate a manifest:
training.manifest: Lists of geometries and KPIs used for training, validation, and testing
You can customize the manifests by editing run-create-manifest-training script. By default, all runs in WindsorML Dataset are included and all four KPI variables (Cd, Cl, Cs, CMy) from the run force_mom_*.csv files:
#!/bin/bash

# ...

# The simulation variables to train on
kpi_variables="cd cs cl cmy"

# Get a list of run folders for training
train_run_folders=($(ls -d "$dataset_prefix/run_"*))

 # Uncomment to get a list of just the first 20 runs (if you want to reduce the datset size for testing)
 #train_run_folders=($(ls -d "$dataset_prefix/run_"* | tail -20))

 # Create train.manifest including the kpi data
 mlsimkit-manifest create -m "training.manifest" -f "name=geometry_files,file_glob=*.stl" -d "name=kpi,file_regex=force_mom_\d+\.csv,columns=$kpi_variables" "${train_run_folders[@]}"
A manifest is a JSON Lines (.manifest) file that lists the paths to the geometry files and their associated KPIs. Each line in the manifest represents a single data file entry, containing the following keys:
"geometry_files": A list of relative or absolute paths to the geometry files (e.g.,.stl)"kpi": A list of KPI values associated with the geometries (optional for prediction/inference manifests)
Here’s an example manifest entry:
{
  "geometry_files": ["file:///data/windsor/dataset/run_90/windsor_90.stl"],
  "kpi": [0.31813241431261746, -0.14399077989789946, -0.2532649116225549, -0.05901077208996248]
}
This entry lists the path to a single geometry file (windsor_90.stl) and the associated KPI values.
Note
By default, training is configured to reproduce accurate results on the full dataset and will take over an hour to complete training. Instead, if you want to first verify end-to-end on the WindsorML dataset, edit training.yaml and reduce the number of epochs to e.g, 10. Then reduce the dataset size by editing run-create-manifest-training to include fewer runs and recreate the training manifest.
2.2. Understanding the Configuration File
The KPI training and testing pipeline is configured using training.yaml.
This file controls the training and testing pipeline, including data preprocessing, training the KPI model, and testing. Some key settings include:
output-dir: Directory for storing training artifacts (e.g., models, plots, metrics)kpi.manifest_uri: Path to the data manifestkpi.preprocess: Hyperparameters related to data preprocessing (including the percentage of data used for testing)kpi.train: Hyperparameters related to KPI model training (including the percentage of data used for validation)kpi.predict: Hyperparameters related to KPI model inference
To get an introduction to the available configuration options, use the mlsimkit-learn kpi --help command and the --help option for each sub-command. This will provide an overview of the options and their purposes, which can be helpful when configuring the training and testing pipelines.
2.3. Running the Pipeline
With the manifest created and the configuration file in place, you can run the KPI model training pipeline using the provided script:
Run the training and testing pipeline:
./run-training-pipeline
The script executes the necessary commands using the training.yaml configuration file.
You can also run individual commands manually if needed:
mlsimkit-learn --config training.yaml kpi <command>
For example, you may want to skip the preprocessing step when you are training with new parameters, as you can reuse the preprocessed data files.
Note
Preprocessing runs on multiple CPUs by default. You may need a higher limit for the number of open file descriptors, depending on
the number of CPUs on your system. For the Windsor dataset, run e.g, ulimit -n 8192 if you have permissions. If not, edit
the training script to use fewer processes e.g: kpi preprocess --num-processes 1. Please refer to the
troubleshooting guide for details.
Note
On older MacOS hardware, you may see the error Cannot convert a MPS Tensor to float64 dtype. If so, force CPU by specifying device: cpu for train commands in the configuration file.
In general, please see the Troubleshooting guide for possible errors if commands do not work.
2.4. Training with Multiple GPUs
MLSimKit integrates training with Hugging Face Accelerate to enable and launch multi-GPU training. This can significantly speed up the training process when multiple GPUs are available.
To enable multi-GPU training, you can use the --multi-gpu flag when running the training script:
./run-training-pipeline --multi-gpu
Note
The availability of multi-GPU training depends on your hardware setup and the number of GPUs available on your machine or cluster. If multiple GPUs are not available, the training pipeline will continue to run on a single GPU or CPU.
The script calls mlsimkit-accelerate which is our thin wrapper around accelerate launch that runs multiple training processess. By default, accelerate launch will automatically set a configuration for various platforms. Refer to the accelerate launch tutorial for a quick overview. For the complete list of configuration options, see accelerate launch --help.
You may pass additional arguments to Accelerate using --launch-args:
mlsimkit-accelerate --config <config.yaml> kpi train \
 --launch-args <additional accelerate launch args>
For example, the following limits to 2 GPUs:
mlsimkit-accelerate --config <config.yaml> kpi train \
 --launch-args --num_processes 2
We recommend using mlsimkit-accelerate for simplicity but you may invoke accelerate launch directly like this:
accelerate launch --no-python \
    mlsimkit-learn --accelerate-mode kpi train
Warning
Use accelerate launch for training commands only. Non-training commands do not support multiple GPU processors.
Always specify --accelerate-mode with accelerate launch to hide duplicate logs and avoid logging race conditions on start.
Do not use --accelerate-mode outside accelerate launch.
2.5. Reviewing Results
2.5.1. During Training
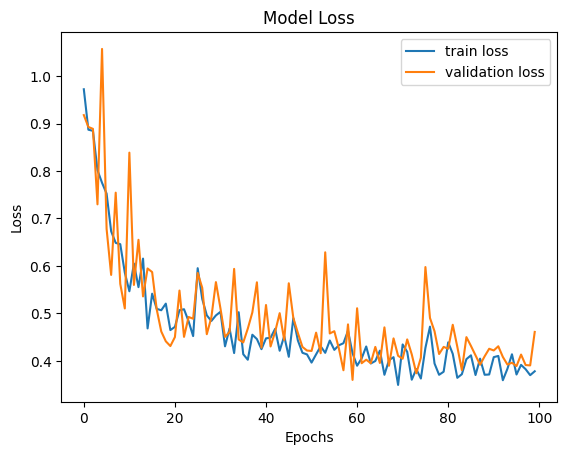
The training pipeline generates two plots to help you monitor the KPI model training. They can be found in the outputs/training/training_output/ directory.
model_loss.png: The plot that shows the training and validation losses of every epoch.model_loss_log.png: The plot that shows the training and validation losses at the log scale of every epoch.
Here is an example of a loss plot:

You can also find quantitative metrics summarizing the KPI model performance on the training and validation data in the outputs/training/training_output/best_model_predictions/dataset_prediction_error_metrics.csv file.
2.5.2. During Testing
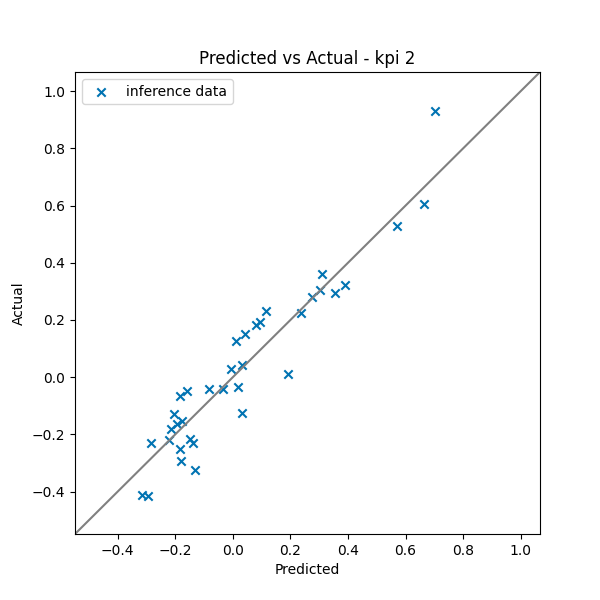
The testing step generates KPI values predicted by the trained model. The testing output is located in the outputs/training/predictions/ directory. Given the ground truth KPI data for the prediction geometries is available, there should be the following output files:
prediction_results.csv: Predicted and actual KPIs for each geometry in the test data setpredicted_vs_actual_*.png: The plot comparing predictions with ground truthdataset_prediction_error_metrics.csv: Metrics that quantify the differences between predictions and ground truth
Here is an example prediction output plot that shows how closely the predictions match the ground truth:

Note
If you want to start tuning training parameters while keeping the same dataset, you can skip the preprocessing step. To do this, either edit run-training-pipeline script and remove preprocess from the command or, alternatively, call mlsimkit-learn --config training.yaml kpi ... subcommands directly.
2.6. Next Steps
Proceed to Using KPI Prediction on New Geometries tutorial to learn how to run KPI prediction on new geometries without ground truth simulation data.
See the KPI user guide for detailed information on more configuration options and how they impact model training and performance.