Load Balancer
This tutorial shows how to expose Kubeflow over a load balancer on AWS.
Before you begin
Follow this guide only if you are not using Cognito as the authentication provider in your deployment. Cognito-integrated deployment is configured with the AWS Load Balancer controller by default to create an ingress-managed Application Load Balancer and exposes Kubeflow via a hosted domain.
Note: For Terraform deployment users, some steps that should be skipped will have a note indicating such below.
Background
Kubeflow does not offer a generic solution for connecting to Kubeflow over a Load Balancer because this process is highly dependent on your environment and cloud provider. On AWS, we use the AWS Load Balancer (ALB) controller, which satisfies the Kubernetes Ingress resource to create an Application Load Balancer (ALB). When you create a Kubernetes Ingress, an ALB is provisioned that load balances application traffic.
In order to connect to Kubeflow using a Load Balancer, we need to setup HTTPS. Many of the Kubeflow web apps (e.g. Tensorboard Web App, Jupyter Web App, Katib UI) use Secure Cookies, so accessing Kubeflow with HTTP over a non-localhost domain does not work.
To secure the traffic and use HTTPS, we must associate a Secure Sockets Layer/Transport Layer Security (SSL/TLS) certificate with the Load Balancer. AWS Certificate Manager is a service that lets you easily provision, manage, and deploy public and private SSL/TLS certificates for use with AWS services and your internal connected resources. To create a certificate for use with the Load Balancer, you must specify a domain name (i.e. certificates cannot be created for ALB DNS). You can register your domain using any domain service provider such as Route53, or GoDaddy.
Prerequisites
This guide assumes that you have:
- A Kubeflow deployment on EKS with Dex as your authentication provider (Dex is the default authentication provider in the Vanilla deployment of Kubeflow on AWS).
- Installed the tools mentioned in the general prerequisites guide on the client machine.
- Verified that you are connected to the right cluster, that the cluster has compute, and that the AWS region is set to the region of your cluster.
- Verify that your cluster name and region are exported:
echo $CLUSTER_REGION echo $CLUSTER_NAME - Display the current cluster that kubeconfig points to:
kubectl config current-context
aws eks describe-cluster --name $CLUSTER_NAME --region $CLUSTER_REGION
- Verify that your cluster name and region are exported:
- Verify that the current directory is the root of the repository by running the
pwdcommand. The output should be<path/to/kubeflow-manifests>.
Create Load Balancer
Setup for Manifest deployments
If you prefer to create a load balancer using automated scripts, you only need to follow the steps in the automated script section. You can read the following sections in this guide to understand what happens when you run the automated script or to walk through all of the steps manually.
Setup for Terraform deployments
Follow the manual steps below.
Create domain and certificates
You need a registered domain and TLS certificate to use HTTPS with Load Balancer. Since your top level domain (e.g. example.com) can be registered at any service provider, for uniformity and taking advantage of the integration provided between Route53, ACM, and Application Load Balancer, you will create a separate sudomain (e.g. platform.example.com) to host Kubeflow and a corresponding hosted zone in Route53 to route traffic for this subdomain. To get TLS support, you will need certificates for both the root domain (*.example.com) and subdomain (*.platform.example.com) in the region where your platform will run (your EKS cluster region).
Create a subdomain
- Register a domain in any domain provider like Route 53 or GoDaddy. For this guide, we assume that this domain is
example.com. It is handy to have a domain managed by Route53 to deal with all the DNS records that you will have to add (wildcard for ALB DNS, validation for the certificate manager, etc). - Go to Route53 and create a subdomain to host Kubeflow:
-
Create a hosted zone for the desired subdomain (e.g.
platform.example.com). -
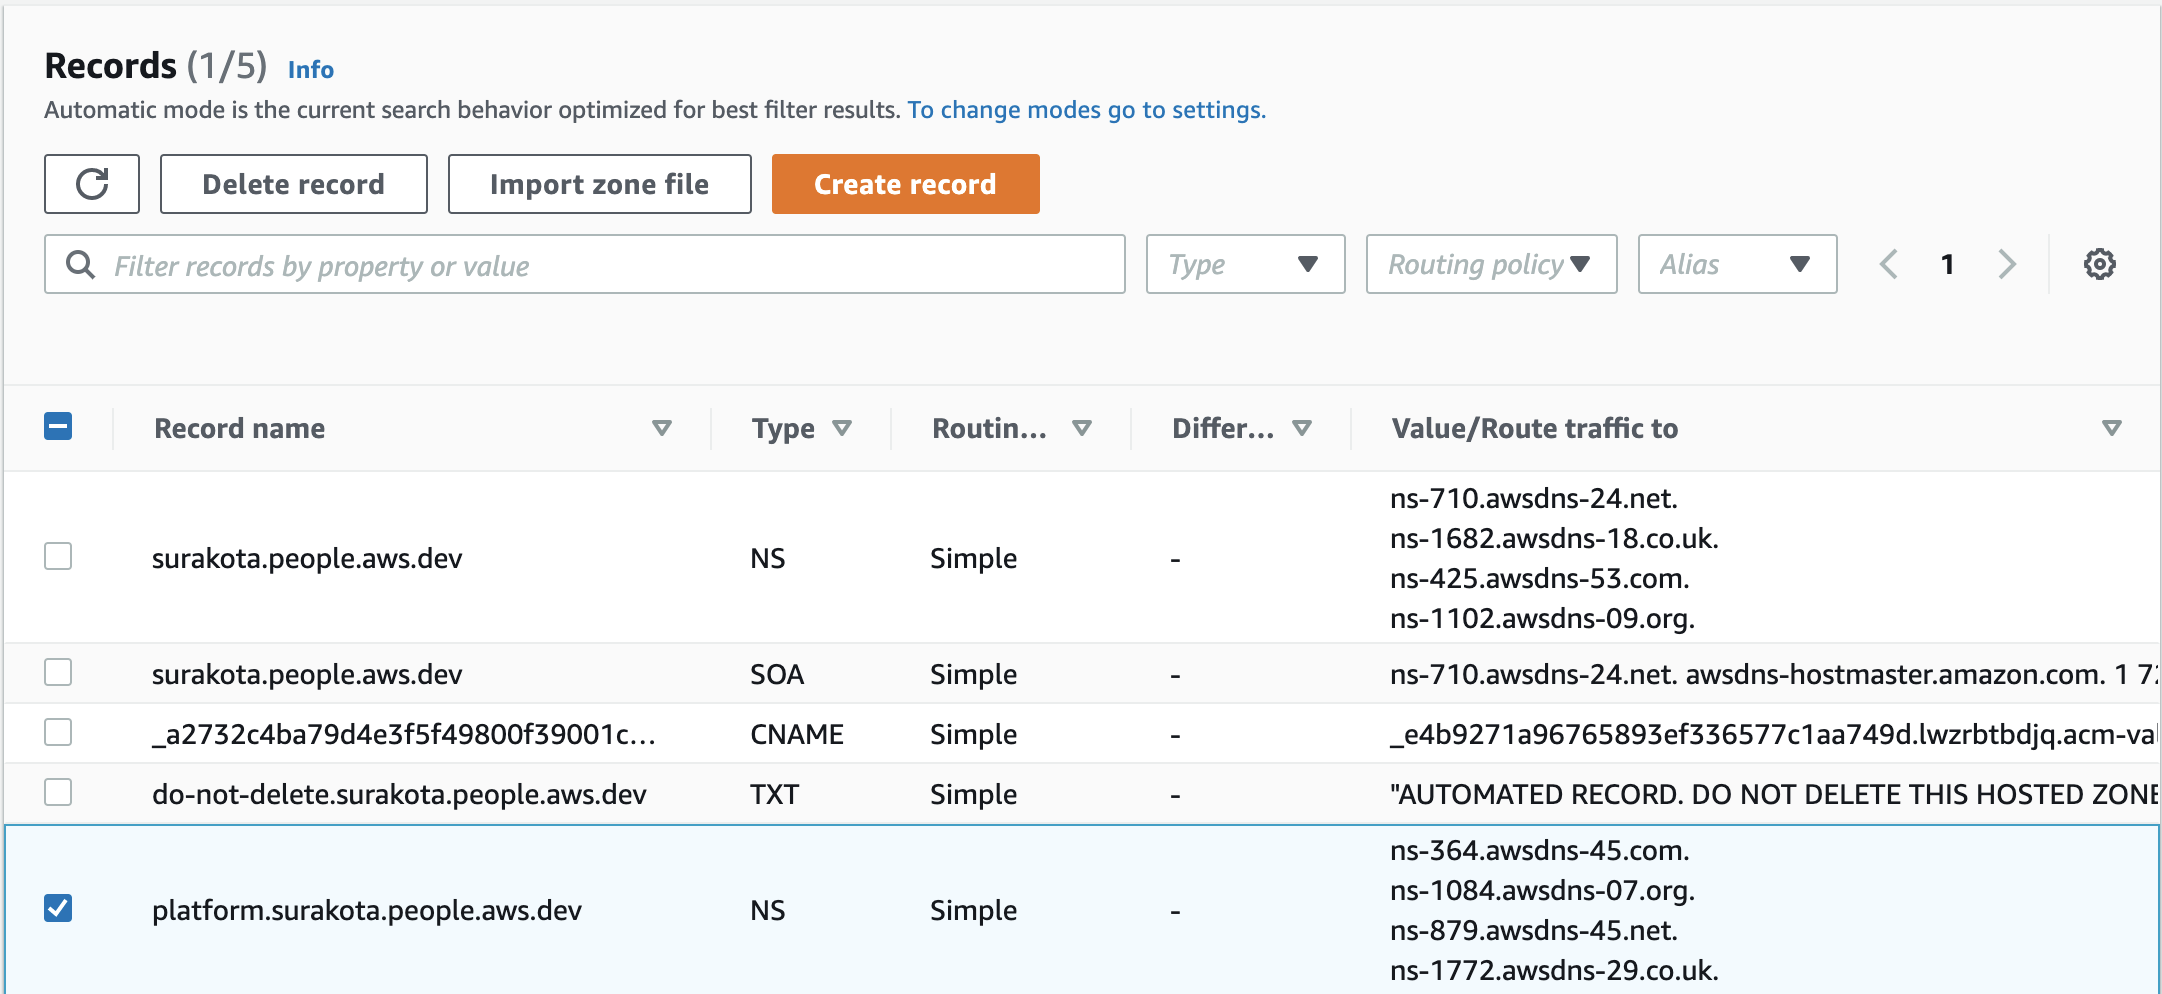
Copy the value of the NS type record from the subdomain hosted zone (
platform.example.com)
-
Create an
NStype record in the rootexample.comhosted zone for the subdomainplatform.example.com.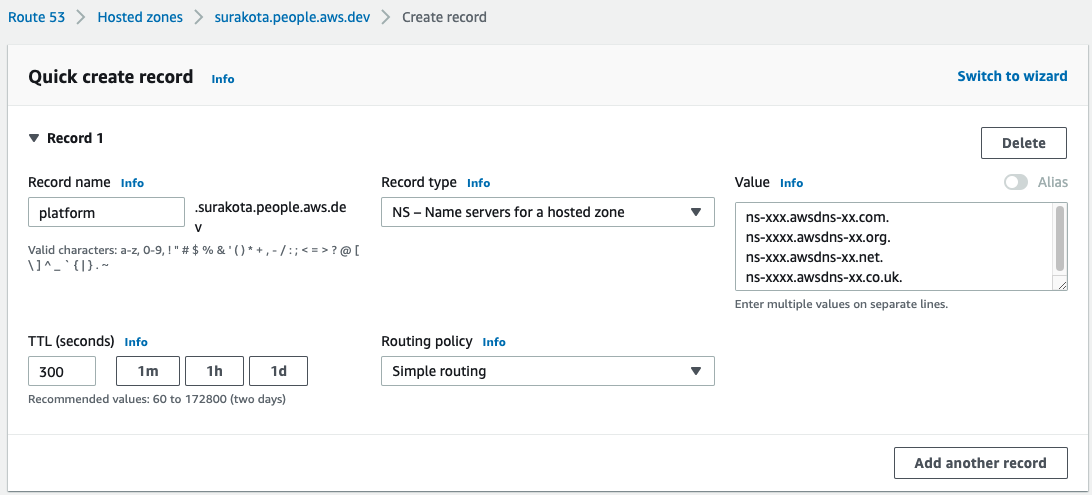
Verify the creation of your NS record in the Route53 console.
-
From this point on, you create and update the DNS records only in the subdomain. All of the images of the hosted zone in the following steps of this guide are for the subdomain.
Create certificates for domain
To create the certificates for the domains in the region where your platform will run (i.e. EKS cluster region), follow the steps in the Request a public certificate using the console guide.
Note: The certificates are valid only after successful validation of domain ownership.
The following image is a screenshot showing that a certificate has been issued.
Note: Status turns to
Issuedafter a few minutes of validation.

If you choose DNS validation for the validation of the certificates, you will be asked to create a CNAME type record in the hosted zone. The following image is a screenshot of the CNAME record of the certificate in the platform.example.com hosted zone for DNS validation:

- Create a certificate for
*.example.comin the region where your platform will run. - Create a certificate for
*.platform.example.comin the region where your platform will run.
Configure Ingress
- Export the ARN of the certificate created for
*.platform.example.com:export certArn=<> - Configure the parameters for ingress with the certificate ARN of the subdomain.
printf 'certArn='$certArn'' > awsconfigs/common/istio-ingress/overlays/https/params.env
Configure Load Balancer Controller
Important: Skip this step if you are using a Terraform deployment since the AWS Load Balancer Controller is installed by default unless you set
enable_aws_load_balancer_controller = false.
Set up resources required for the Load Balancer controller:
-
Make sure that all the subnets (public and private) corresponding to the EKS cluster are tagged according to the Prerequisites section in the Application load balancing on Amazon EKS guide. Ignore the requirement to have an existing ALB provisioned on the cluster. We will deploy Load Balancer controller version 1.1.5 later on.
- Check if the following tags exist on the subnets:
kubernetes.io/cluster/cluster-name(replacecluster-namewith your cluster name e.g.kubernetes.io/cluster/my-k8s-cluster). Add this tag in both private and public subnets. If you created the cluster usingeksctl, you might be missing only this tag. Use the following command to tag all subnets by substituting the value ofTAG_VALUEvariable(ownedorshared). Usesharedas the tag value if you have more than one cluster using the subnets:export TAG_VALUE=<> export CLUSTER_SUBNET_IDS=$(aws ec2 describe-subnets --region $CLUSTER_REGION --filters Name=tag:alpha.eksctl.io/cluster-name,Values=$CLUSTER_NAME --output json | jq -r '.Subnets[].SubnetId') for i in "${CLUSTER_SUBNET_IDS[@]}" do aws ec2 create-tags --resources ${i} --tags Key=kubernetes.io/cluster/${CLUSTER_NAME},Value=${TAG_VALUE} donekubernetes.io/role/internal-elb. Add this tag only to private subnets.kubernetes.io/role/elb. Add this tag only to public subnets.
- Check if the following tags exist on the subnets:
-
The Load balancer controller uses IAM roles for service accounts(IRSA) to access AWS services. An OIDC provider must exist for your cluster to use IRSA. Create an OIDC provider and associate it with your EKS cluster by running the following command if your cluster doesn’t already have one:
eksctl utils associate-iam-oidc-provider --cluster ${CLUSTER_NAME} --region ${CLUSTER_REGION} --approve -
Create an IAM role with the necessary permissions for the Load Balancer controller to use via a service account to access AWS services.
export LBC_POLICY_NAME=alb_ingress_controller_${CLUSTER_REGION}_${CLUSTER_NAME} export LBC_POLICY_ARN=$(aws iam create-policy --policy-name $LBC_POLICY_NAME --policy-document file://awsconfigs/infra_configs/iam_alb_ingress_policy.json --output text --query 'Policy.Arn') eksctl create iamserviceaccount --name aws-load-balancer-controller --namespace kube-system --cluster ${CLUSTER_NAME} --region ${CLUSTER_REGION} --attach-policy-arn ${LBC_POLICY_ARN} --override-existing-serviceaccounts --approve -
Configure the parameters for load balancer controller with the cluster name.
printf 'clusterName='$CLUSTER_NAME'' > awsconfigs/common/aws-alb-ingress-controller/base/params.env
Install Load Balancer Controller
Important: Skip this step if you are using a Terraform deployment since the AWS Load Balancer Controller is installed by default unless you set
enable_aws_load_balancer_controller = false.
Run the following command to build and install the Load Balancer controller kustomize file.
kustomize build awsconfigs/common/aws-alb-ingress-controller/base | kubectl apply -f -
kubectl wait --for condition=established crd/ingressclassparams.elbv2.k8s.aws
kustomize build awsconfigs/common/aws-alb-ingress-controller/base | kubectl apply -f -
Create Ingress
Create an ingress that will use the certifcate you specified in certArn.
kustomize build awsconfigs/common/istio-ingress/overlays/https | kubectl apply -f -
Update the domain with ALB address
- Check if ALB is provisioned. This may take a few minutes.
Ifkubectl get ingress -n istio-system istio-ingress NAME CLASS HOSTS ADDRESS PORTS AGE istio-ingress <none> * k8s-istiosys-istioing-xxxxxx-110050202.us-west-2.elb.amazonaws.com 80 15dADDRESSis empty after a few minutes, check the logs of the controller by following the troubleshooting steps in ALB fails to provision. - When ALB is ready, copy the DNS name of that load balancer and create a CNAME entry to it in Route53 under the subdomain (
platform.example.com) for*.platform.example.com. Please note that it might make up to five to ten minutes for DNS changes to propagate and for your URL to work.
Note: Check if the DNS entry propogated with the Google Admin Toolbox.
- The central dashboard should now be available at
https://kubeflow.platform.example.com. Open a browser and navigate to this URL.
Automated script
Important: Terraform deployment users should not follow these Automated setup instructions and should follow the Manual setup instructions.
- Install dependencies for the script
cd tests/e2e pip install -r requirements.txt - Substitute values in
tests/e2e/utils/load_balancer/config.yaml.- Register root domain in
route53.rootDomain.name. For this example, assume that this domain isexample.com.- If your domain is managed in Route53, enter the Hosted zone ID found under Hosted zone details in
route53.rootDomain.hostedZoneId. Skip this step if your domain is managed by other domain provider.
- If your domain is managed in Route53, enter the Hosted zone ID found under Hosted zone details in
- Name of the sudomain that you want to use to host Kubeflow (e.g.
platform.example.com) inroute53.subDomain.name. - Cluster name and region where Kubeflow is deployed in
cluster.nameandcluster.region(e.g.us-west-2), respectively. - Load balancer scheme (e.g.
internet-facingorinternal). Default is set tointernet-facing. Useinternalas the load balancer scheme if you want the load balancer to be accessible only within your VPC. See Load balancer scheme in the AWS documentation for more details. - The Config file will look something like:
cluster:
    name: kube-eks-cluster
    region: us-west-2
kubeflow:
    alb:
        scheme: internet-facing
route53:
    rootDomain:
        hostedZoneId: XXXX
        name: example.com
    subDomain:
        name: platform.example.com
- Register root domain in
- Run the script to create the resources.
PYTHONPATH=.. python utils/load_balancer/setup_load_balancer.py - The script will update the Config file with the resource names, IDs, and ARNs that it created. Refer to the following example for more information:
kubeflow: alb: dns: xxxxxx-istiosystem-istio-2af2-1100502020.us-west-2.elb.amazonaws.com scheme: internet-facing serviceAccount: name: alb-ingress-controller namespace: kubeflow policyArn: arn:aws:iam::123456789012:policy/alb_ingress_controller_kube-eks-clusterxxx cluster: name: kube-eks-cluster region: us-west-2 route53: rootDomain: certARN: arn:aws:acm:us-west-2:123456789012:certificate/9d8c4bbc-3b02-4a48-8c7d-d91441c6e5af hostedZoneId: XXXXX name: example.com subDomain: certARN: arn:aws:acm:us-west-2:123456789012:certificate/d1d7b641c238-4bc7-f525-b7bf-373cc726 hostedZoneId: XXXXX name: platform.example.com - The central dashboard should now be available at
https://kubeflow.platform.example.com. Open a browser and navigate to this URL.
Note: It might a few minutes for DNS changes to propagate and for your URL to work. Check if the DNS entry propogated with the Google Admin Toolbox
Clean up
Important: Terraform deployment users should not follow these clean up steps and should manually delete resources created while following the Manual setup instructions.
To delete the resources created in this guide, run the following commands from the root of your repository:
Note: Make sure that you have the configuration file created by the script in
tests/e2e/utils/load_balancer/config.yaml. If you did not use the script, plug in the name, ARN, or ID of the resources that you created in the configuration file by referring to the sample in Step 4 of the previous section.
cd tests/e2e
PYTHONPATH=.. python utils/load_balancer/lb_resources_cleanup.py
cd -