

AI Dungeon Game
Module 1: Monorepo setup
We are going to start by creating a new monorepo. From within your desired directory, run the following command:
npx create-nx-workspace@~20.6.3 dungeon-adventure --pm=pnpm --preset=ts --ci=skip --formatter=prettiernpx create-nx-workspace@~20.6.3 dungeon-adventure --pm=yarn --preset=ts --ci=skip --formatter=prettiernpx create-nx-workspace@~20.6.3 dungeon-adventure --pm=npm --preset=ts --ci=skip --formatter=prettiernpx create-nx-workspace@~20.6.3 dungeon-adventure --pm=bun --preset=ts --ci=skip --formatter=prettierThis will set up a NX monorepo within the dungeon-adventure directory which you can then open in vscode. It should look like the following:
Directory.nx/
- …
Directory.vscode/
- …
Directorynode_modules/
- …
Directorypackages/ this is where your sub-projects will reside
- …
- .gitignore
- .npmrc
- .prettierignore
- .prettierrc
- nx.json configures the Nx CLI and monorepo defaults
- package.json all node dependencies are defined here
- pnpm-lock.yaml or bun.lock, yarn.lock, package-lock.json depending on package manager
- pnpm-workspace.yaml if using pnpm
- README.md
- tsconfig.base.json all node based sub-projects extend this
- tsconfig.json
In order to start adding components from the @aws/nx-plugin into the monorepo, we need to install it as a dev dependency by running the following command from the root of the dungeon-adventure monorepo:
pnpm add -Dw @aws/nx-pluginyarn add -D @aws/nx-pluginnpm install --legacy-peer-deps -D @aws/nx-pluginbun install -D @aws/nx-pluginNow we are ready to start creating our different sub-projects using the @aws/nx-plugin.
Game API
First let’s create our Game API. To do this, let’s create a tRPC API called GameApi by following the below steps:
- Install the Nx Console VSCode Plugin if you haven't already
- Open the Nx Console in VSCode
- Click
Generate (UI)in the "Common Nx Commands" section - Search for
@aws/nx-plugin - ts#trpc-api - Fill in the required parameters
- apiName: GameApi
- Click
Generate
pnpm nx g @aws/nx-plugin:ts#trpc-api --apiName=GameApi --no-interactiveyarn nx g @aws/nx-plugin:ts#trpc-api --apiName=GameApi --no-interactivenpx nx g @aws/nx-plugin:ts#trpc-api --apiName=GameApi --no-interactivebunx nx g @aws/nx-plugin:ts#trpc-api --apiName=GameApi --no-interactiveYou can also perform a dry-run to see what files would be changed
pnpm nx g @aws/nx-plugin:ts#trpc-api --apiName=GameApi --no-interactive --dry-runyarn nx g @aws/nx-plugin:ts#trpc-api --apiName=GameApi --no-interactive --dry-runnpx nx g @aws/nx-plugin:ts#trpc-api --apiName=GameApi --no-interactive --dry-runbunx nx g @aws/nx-plugin:ts#trpc-api --apiName=GameApi --no-interactive --dry-runYou should see some new files have appeared in your file tree.
ts#trpc-api updated files
Below is a list of all files which have been generated by the ts#trpc-api generator. We are going to examine some of the key files highlighted in the file tree:
Directorypackages/
Directorycommon/
Directoryconstructs/
Directorysrc/
Directoryapp/ app specific cdk constructs
Directoryhttp-apis/
- game-api.ts cdk construct to create your tRPC API
- index.ts
- …
- index.ts
Directorycore/ generic cdk constructs
- http-api.ts base cdk construct for a Http based API
- index.ts
- runtime-config.ts
- index.ts
- project.json
- …
Directorytypes/ shared types
Directorysrc/
- index.ts
- runtime-config.ts interface definition used by both CDK and website
- project.json
- …
Directorygame-api/
Directorybackend/ tRPC implementation code
Directorysrc/
Directoryclient/ vanilla client typically used for ts machine to machine calls
- index.ts
- sigv4.ts
Directorymiddleware/ powertools instrumentation
- error.ts
- index.ts
- logger.ts
- metrics.ts
- tracer.ts
Directoryprocedures/ specific implementations for your API procedures/routes
- echo.ts
- index.ts
- init.ts sets up context and middleware
- local-server.ts used when running the tRPC server locally
- router.ts entrypoint for your lambda handler which defines all procedures
- project.json
- …
Directoryschema/
Directorysrc/
Directoryprocedures/
- echo.ts
- index.ts
- project.json
- …
- eslint.config.mjs
- vitest.workspace.ts
Taking a look at a few of the key files:
import {  awsLambdaRequestHandler,  CreateAWSLambdaContextOptions,} from '@trpc/server/adapters/aws-lambda';import { echo } from './procedures/echo.js';import { t } from './init.js';import { APIGatewayProxyEventV2WithIAMAuthorizer } from 'aws-lambda';
export const router = t.router;
export const appRouter = router({  echo,});
export const handler = awsLambdaRequestHandler({  router: appRouter,  createContext: (    ctx: CreateAWSLambdaContextOptions<APIGatewayProxyEventV2WithIAMAuthorizer>,  ) => ctx,});
export type AppRouter = typeof appRouter;The router defines the entrypoint for your tRPC API and is the place where you will declare all of your API methods. As you can see above, we have a method called echo with it’s implementation living in the ./procedures/echo.ts file.
import { publicProcedure } from '../init.js';import {  EchoInputSchema,  EchoOutputSchema,} from ':dungeon-adventure/game-api-schema';
export const echo = publicProcedure .input(EchoInputSchema) .output(EchoOutputSchema) .query((opts) => ({ result: opts.input.message }));This file is the implementation of the echo method and as you can see is strongly typed by declaring its input and output data structures. It is importing these definitions from the :dungeon-adventure/game-api-schema project which is an alias for the schema project.
import { z } from 'zod';
export const EchoInputSchema = z.object({  message: z.string(),});
export type IEchoInput = z.TypeOf<typeof EchoInputSchema>;
export const EchoOutputSchema = z.object({  result: z.string(),});
export type IEchoOutput = z.TypeOf<typeof EchoOutputSchema>;All tRPC schema definitions are defined using Zod and are exported as typescript types via the z.TypeOf syntax.
import { Construct } from 'constructs';import * as url from 'url';import { HttpApi } from '../../core/http-api.js';import { HttpIamAuthorizer } from 'aws-cdk-lib/aws-apigatewayv2-authorizers';import { Runtime } from 'aws-cdk-lib/aws-lambda';
export class GameApi extends HttpApi { constructor(scope: Construct, id: string) { super(scope, id, { defaultAuthorizer: new HttpIamAuthorizer(), apiName: 'GameApi', runtime: Runtime.NODEJS_LATEST, handler: 'index.handler', handlerFilePath: url.fileURLToPath( new URL( '../../../../../../dist/packages/game-api/backend/bundle', import.meta.url, ), ), }); }}This is the CDK construct that defines our GameApi. As you can see, it has already configured the handler file path to the generated bundle for our tRPC backend implementation. This means that at cdk synth time, bundling does not occur (opposed to using NodeJsFunction) as we have already bundled it as part of the backend project’s build target.
Story API
Now let’s create our Story API. To do this, let’s create a Fast API called StoryApi by following the below steps:
- Install the Nx Console VSCode Plugin if you haven't already
- Open the Nx Console in VSCode
- Click
Generate (UI)in the "Common Nx Commands" section - Search for
@aws/nx-plugin - py#fast-api - Fill in the required parameters
- name: StoryApi
- Click
Generate
pnpm nx g @aws/nx-plugin:py#fast-api --name=StoryApi --no-interactiveyarn nx g @aws/nx-plugin:py#fast-api --name=StoryApi --no-interactivenpx nx g @aws/nx-plugin:py#fast-api --name=StoryApi --no-interactivebunx nx g @aws/nx-plugin:py#fast-api --name=StoryApi --no-interactiveYou can also perform a dry-run to see what files would be changed
pnpm nx g @aws/nx-plugin:py#fast-api --name=StoryApi --no-interactive --dry-runyarn nx g @aws/nx-plugin:py#fast-api --name=StoryApi --no-interactive --dry-runnpx nx g @aws/nx-plugin:py#fast-api --name=StoryApi --no-interactive --dry-runbunx nx g @aws/nx-plugin:py#fast-api --name=StoryApi --no-interactive --dry-runYou should see some new files have appeared in your file tree.
py#fast-api updated files
Below is a list of all files which have been generated by the py#fast-api generator. We are going to examine some of the key files highlighted in the file tree:
Directory.venv/ single virtual env for monorepo
- …
Directorypackages/
Directorycommon/
Directoryconstructs/
Directorysrc/
Directoryapp/ app specific cdk constructs
Directoryhttp-apis/
- story-api.ts cdk construct to create your Fast API
- index.ts updated to export the new story-api
- project.json updated to add a build dep on story_api
Directorytypes/ shared types
Directorysrc/
- runtime-config.ts updated to add the StoryApi
Directorystory_api/
Directorystory_api/ python module
- init.py sets up powertools, FastAPI and middleware
- main.py entrypoint for the lambda containing all routes
Directorytests/
- …
- .python-version
- project.json
- pyproject.toml
- project.json
- .python-version pinned uv python version
- pyproject.toml
- uv.lock
import { Construct } from 'constructs';import * as url from 'url';import { HttpApi } from '../../core/http-api.js';import { HttpIamAuthorizer } from 'aws-cdk-lib/aws-apigatewayv2-authorizers';import { Runtime } from 'aws-cdk-lib/aws-lambda';
export class StoryApi extends HttpApi { constructor(scope: Construct, id: string) { super(scope, id, { defaultAuthorizer: new HttpIamAuthorizer(), apiName: 'StoryApi', runtime: Runtime.PYTHON_3_12, handler: 'story_api.main.handler', handlerFilePath: url.fileURLToPath( new URL( '../../../../../../dist/packages/story_api/bundle', import.meta.url, ), ), }); }}This is the CDK construct that defines our StoryApi. As you can see, it has already configured the handler file path to the generated bundle for our Fast API backend implementation. This means that at cdk synth time, bundling does not occur (opposed to PythonFunction) as we have already bundled it as part of the backend project’s build target.
export type ApiUrl = string;// eslint-disable-next-line @typescript-eslint/no-empty-object-type, @typescript-eslint/no-empty-interfaceexport interface IRuntimeConfig { httpApis: { GameApi: ApiUrl; StoryApi: ApiUrl; };}Here is an example of the generator performing an AST transform which preserves all existing code and performs an update. Here you can see the StoryApi was added to the IRuntimeConfig definition which means when this is eventually consumed by our frontend, it will enforce type safety!
from .init import app, lambda_handler, tracer
handler = lambda_handler
@app.get("/")@tracer.capture_methoddef read_root(): return {"Hello": "World"}This is where all your API method will be defined. As you can see here, we have a read_root method mapped to the GET / route. You can use Pydantic to declare your method inputs and outputs to ensure type safety.
Game UI: Website
Now let’s create the UI which will enable you to interact with the game. To do this, let’s create a website called GameUI by following the below steps:
- Install the Nx Console VSCode Plugin if you haven't already
- Open the Nx Console in VSCode
- Click
Generate (UI)in the "Common Nx Commands" section - Search for
@aws/nx-plugin - ts#cloudscape-website - Fill in the required parameters
- name: GameUI
- Click
Generate
pnpm nx g @aws/nx-plugin:ts#cloudscape-website --name=GameUI --no-interactiveyarn nx g @aws/nx-plugin:ts#cloudscape-website --name=GameUI --no-interactivenpx nx g @aws/nx-plugin:ts#cloudscape-website --name=GameUI --no-interactivebunx nx g @aws/nx-plugin:ts#cloudscape-website --name=GameUI --no-interactiveYou can also perform a dry-run to see what files would be changed
pnpm nx g @aws/nx-plugin:ts#cloudscape-website --name=GameUI --no-interactive --dry-runyarn nx g @aws/nx-plugin:ts#cloudscape-website --name=GameUI --no-interactive --dry-runnpx nx g @aws/nx-plugin:ts#cloudscape-website --name=GameUI --no-interactive --dry-runbunx nx g @aws/nx-plugin:ts#cloudscape-website --name=GameUI --no-interactive --dry-runYou should see some new files have appeared in your file tree.
ts#cloudscape-website updated files
Below is a list of all files which have been generated by the ts#cloudscape-website generator. We are going to examine some of the key files highlighted in the file tree:
Directorypackages/
Directorycommon/
Directoryconstructs/
Directorysrc/
Directoryapp/ app specific cdk constructs
Directorystatic-websites/
- game-ui.ts cdk construct to create your Game UI
Directorycore/
- static-website.ts generic static website construct
Directorygame-ui/
Directorypublic/
- …
Directorysrc/
Directorycomponents/
DirectoryAppLayout/
- index.ts overall page layout: header, footer, sidebar, etc
- navitems.ts sidebar nav items
Directoryhooks/
- useAppLayout.tsx allows you to dynamically set things like notifications, page style, etc
Directoryroutes/ @tanstack/react-router file based routes
- index.tsx root ’/’ page redirects to ‘/welcome’
- __root.tsx all pages use this component as a base
Directorywelcome/
- index.tsx
- config.ts
- main.tsx React entrypoint
- routeTree.gen.ts this is automatically updated by @tanstack/react-router
- styles.css
- index.html
- project.json
- vite.config.ts
- …
import * as url from 'url';import { Construct } from 'constructs';import { StaticWebsite } from '../../core/index.js';
export class GameUI extends StaticWebsite { constructor(scope: Construct, id: string) { super(scope, id, { websiteFilePath: url.fileURLToPath( new URL( '../../../../../../dist/packages/game-ui/bundle', import.meta.url, ), ), }); }}This is the CDK construct that defines our GameUI. As you can see, it has already configured the file path to the generated bundle for our Vite based UI. This means that at build time, bundling occurs within the game-ui project’s build target and it’s output is used here.
import React from 'react';import { createRoot } from 'react-dom/client';import { I18nProvider } from '@cloudscape-design/components/i18n';import messages from '@cloudscape-design/components/i18n/messages/all.en';import { RouterProvider, createRouter } from '@tanstack/react-router';import { routeTree } from './routeTree.gen';
import '@cloudscape-design/global-styles/index.css';
const router = createRouter({ routeTree });
// Register the router instance for type safetydeclare module '@tanstack/react-router' {  interface Register {    router: typeof router;  }}
const root = document.getElementById('root');root && createRoot(root).render( <React.StrictMode> <I18nProvider locale="en" messages={[messages]}> <RouterProvider router={router} /> </I18nProvider> </React.StrictMode>, );This is the entrypoint where React is mounted. As shown, it initially just configures a @tanstack/react-router in a file-based-routing configuration. This means, as long as your development server is running - you can simply create files within the routes folder and @tanstack/react-router will create the boilerplate file setup for you along with updating the routeTree.gen.ts file. This file maintains all routes in a type-safe manner, which means when you use <Link>- the to option will only show valid routes. For more information, refer to the @tanstack/react-router docs.
import {  ContentLayout,  Header,  SpaceBetween,  Container,} from '@cloudscape-design/components';import { createFileRoute } from '@tanstack/react-router';
export const Route = createFileRoute('/welcome/')({  component: RouteComponent,});
function RouteComponent() { return ( <ContentLayout header={<Header>Welcome</Header>}> <SpaceBetween size="l"> <Container>Welcome to your new Cloudscape website!</Container> </SpaceBetween> </ContentLayout> );}A component which will be rendered when navigating to the /welcome route. @tanstack/react-router will manage the Route for you whenever you create/move this file (as long as the dev server is running). This will be shown in a later section of this tutorial.
Game UI: Auth
Now let’s configure our Game UI to require authenticated access via Amazon Cognito by following the below steps:
- Install the Nx Console VSCode Plugin if you haven't already
- Open the Nx Console in VSCode
- Click
Generate (UI)in the "Common Nx Commands" section - Search for
@aws/nx-plugin - ts#cloudscape-website#auth - Fill in the required parameters
- cognitoDomain: game-ui
- project: @dungeon-adventure/game-ui
- allowSignup: true
- Click
Generate
pnpm nx g @aws/nx-plugin:ts#cloudscape-website#auth --cognitoDomain=game-ui --project=@dungeon-adventure/game-ui --allowSignup=true --no-interactiveyarn nx g @aws/nx-plugin:ts#cloudscape-website#auth --cognitoDomain=game-ui --project=@dungeon-adventure/game-ui --allowSignup=true --no-interactivenpx nx g @aws/nx-plugin:ts#cloudscape-website#auth --cognitoDomain=game-ui --project=@dungeon-adventure/game-ui --allowSignup=true --no-interactivebunx nx g @aws/nx-plugin:ts#cloudscape-website#auth --cognitoDomain=game-ui --project=@dungeon-adventure/game-ui --allowSignup=true --no-interactiveYou can also perform a dry-run to see what files would be changed
pnpm nx g @aws/nx-plugin:ts#cloudscape-website#auth --cognitoDomain=game-ui --project=@dungeon-adventure/game-ui --allowSignup=true --no-interactive --dry-runyarn nx g @aws/nx-plugin:ts#cloudscape-website#auth --cognitoDomain=game-ui --project=@dungeon-adventure/game-ui --allowSignup=true --no-interactive --dry-runnpx nx g @aws/nx-plugin:ts#cloudscape-website#auth --cognitoDomain=game-ui --project=@dungeon-adventure/game-ui --allowSignup=true --no-interactive --dry-runbunx nx g @aws/nx-plugin:ts#cloudscape-website#auth --cognitoDomain=game-ui --project=@dungeon-adventure/game-ui --allowSignup=true --no-interactive --dry-runYou should see some new files have appeared/changed in your file tree.
ts#cloudscape-website#auth updated files
Below is a list of all files which have been generated/updated by the ts#cloudscape-website#auth generator. We are going to examine some of the key files highlighted in the file tree:
Directorypackages/
Directorycommon/
Directoryconstructs/
Directorysrc/
Directorycore/
- user-identity.ts cdk construct for creating user/identity pools
Directorytypes/
Directorysrc/
- runtime-config.ts updated to add the cognitoProps
Directorygame-ui/
Directorysrc/
Directorycomponents/
DirectoryAppLayout/
- index.tsx adds the logged in user/logout to the header
DirectoryCognitoAuth/
- index.ts manages logging into Cognito
DirectoryRuntimeConfig/
- index.tsx fetches the
runtime-config.jsonand provides it to children via context
- index.tsx fetches the
Directoryhooks/
- useRuntimeConfig.tsx
- main.tsx Updated to add Cognito
import CognitoAuth from './components/CognitoAuth';import RuntimeConfigProvider from './components/RuntimeConfig';import React from 'react';import { createRoot } from 'react-dom/client';import { I18nProvider } from '@cloudscape-design/components/i18n';import messages from '@cloudscape-design/components/i18n/messages/all.en';import { RouterProvider, createRouter } from '@tanstack/react-router';import { routeTree } from './routeTree.gen';import '@cloudscape-design/global-styles/index.css';const router = createRouter({ routeTree });// Register the router instance for type safetydeclare module '@tanstack/react-router' { interface Register { router: typeof router; }}const root = document.getElementById('root');root && createRoot(root).render( <React.StrictMode> <I18nProvider locale="en" messages={[messages]}> <RuntimeConfigProvider> <CognitoAuth> <RouterProvider router={router} /> </CognitoAuth> </RuntimeConfigProvider> </I18nProvider> </React.StrictMode>, );The RuntimeConfigProvider and CognitoAuth components have been added to the main.tsx file via an AST transform. This allows the CognitoAuth component to authenticate with Amazon Cognito by fetching the runtime-config.json which contains the required cognito connection configuration in order to make the backend calls to the correct destination.
Game UI: Connect to Story API
Now let’s configure our Game UI to connect to our previously created Story API:
- Install the Nx Console VSCode Plugin if you haven't already
- Open the Nx Console in VSCode
- Click
Generate (UI)in the "Common Nx Commands" section - Search for
@aws/nx-plugin - api-connection - Fill in the required parameters
- sourceProject: @dungeon-adventure/game-ui
- targetProject: dungeon_adventure.story_api
- Click
Generate
pnpm nx g @aws/nx-plugin:api-connection --sourceProject=@dungeon-adventure/game-ui --targetProject=dungeon_adventure.story_api --no-interactiveyarn nx g @aws/nx-plugin:api-connection --sourceProject=@dungeon-adventure/game-ui --targetProject=dungeon_adventure.story_api --no-interactivenpx nx g @aws/nx-plugin:api-connection --sourceProject=@dungeon-adventure/game-ui --targetProject=dungeon_adventure.story_api --no-interactivebunx nx g @aws/nx-plugin:api-connection --sourceProject=@dungeon-adventure/game-ui --targetProject=dungeon_adventure.story_api --no-interactiveYou can also perform a dry-run to see what files would be changed
pnpm nx g @aws/nx-plugin:api-connection --sourceProject=@dungeon-adventure/game-ui --targetProject=dungeon_adventure.story_api --no-interactive --dry-runyarn nx g @aws/nx-plugin:api-connection --sourceProject=@dungeon-adventure/game-ui --targetProject=dungeon_adventure.story_api --no-interactive --dry-runnpx nx g @aws/nx-plugin:api-connection --sourceProject=@dungeon-adventure/game-ui --targetProject=dungeon_adventure.story_api --no-interactive --dry-runbunx nx g @aws/nx-plugin:api-connection --sourceProject=@dungeon-adventure/game-ui --targetProject=dungeon_adventure.story_api --no-interactive --dry-runYou should see some new files have appeared/changed in your file tree.
UI -> FastAPI api-connection updated files
Below is a list of all files which have been generated/updated by the api-connection generator. We are going to examine some of the key files highlighted in the file tree:
Directorypackages/
Directorygame-ui/
Directorysrc/
Directoryhooks/
- useSigV4.tsx used by StoryApi to sign requests
- useStoryApiClient.tsx hook to construct a StoryApi client
- useStoryApi.tsx hook for interacting with the StoryApi using TanStack Query
Directorycomponents/
- QueryClientProvider.tsx TanStack Query client provider
- StoryApiProvider.tsx Provider for the StoryApi TanStack Query hook
- main.tsx Instrument the QueryClientProvider and StoryApiProvider
- .gitignore ignore generated client files
- project.json updated to add targets for generating openapi hooks
- …
Directorystory_api/
Directoryscripts/
- generate_open_api.py
- project.json updated to emit an openapi.json file
import { StoryApi } from '../generated/story-api/client.gen';import { useSigV4 } from './useSigV4';import { useRuntimeConfig } from './useRuntimeConfig';import { useMemo } from 'react';
export const useStoryApi = (): StoryApi => { const runtimeConfig = useRuntimeConfig(); const apiUrl = runtimeConfig.httpApis.StoryApi; const sigv4Client = useSigV4(); return useMemo( () => new StoryApi({ url: apiUrl, fetch: sigv4Client, }), [apiUrl, sigv4Client], );};This hook can be used to make authenticated API requests to the StoryApi. As you can see in the implementation, it uses the StoryApi which is generated at build time and as such you will see an error in your IDE until we build our code. For more details on how the client is generated or how to consume the API, refer to the React to FastAPI guide.
import { createContext, FC, PropsWithChildren, useMemo } from 'react';import { useStoryApiClient } from '../hooks/useStoryApiClient';import { StoryApiOptionsProxy } from '../generated/story-api/options-proxy.gen';
export const StoryApiContext = createContext<StoryApiOptionsProxy | undefined>(  undefined,);
export const StoryApiProvider: FC<PropsWithChildren> = ({ children }) => {  const client = useStoryApiClient();  const optionsProxy = useMemo(    () => new StoryApiOptionsProxy({ client }),    [client],  );
  return (    <StoryApiContext.Provider value={optionsProxy}>      {children}    </StoryApiContext.Provider>  );};
export default StoryApiProvider;The above provider component uses the useStoryApiClient hook, and instantiates the StoryApiOptionsProxy, which is used to build options for TanStack Query hooks. You can use the corresponding hook useStoryApi to access this options proxy, which provides a way to interact with your FastAPI in a consistent manner to your tRPC API.
Since useStoryApiClient provides us with an async iterator for our streaming API, we will just use the vanilla client directly in this tutorial.
Game UI: Connect to Game API
Now let’s configure our Game UI to connect to our previously created Game API:
- Install the Nx Console VSCode Plugin if you haven't already
- Open the Nx Console in VSCode
- Click
Generate (UI)in the "Common Nx Commands" section - Search for
@aws/nx-plugin - api-connection - Fill in the required parameters
- sourceProject: @dungeon-adventure/game-ui
- targetProject: @dungeon-adventure/game-api-backend
- Click
Generate
pnpm nx g @aws/nx-plugin:api-connection --sourceProject=@dungeon-adventure/game-ui --targetProject=@dungeon-adventure/game-api-backend --no-interactiveyarn nx g @aws/nx-plugin:api-connection --sourceProject=@dungeon-adventure/game-ui --targetProject=@dungeon-adventure/game-api-backend --no-interactivenpx nx g @aws/nx-plugin:api-connection --sourceProject=@dungeon-adventure/game-ui --targetProject=@dungeon-adventure/game-api-backend --no-interactivebunx nx g @aws/nx-plugin:api-connection --sourceProject=@dungeon-adventure/game-ui --targetProject=@dungeon-adventure/game-api-backend --no-interactiveYou can also perform a dry-run to see what files would be changed
pnpm nx g @aws/nx-plugin:api-connection --sourceProject=@dungeon-adventure/game-ui --targetProject=@dungeon-adventure/game-api-backend --no-interactive --dry-runyarn nx g @aws/nx-plugin:api-connection --sourceProject=@dungeon-adventure/game-ui --targetProject=@dungeon-adventure/game-api-backend --no-interactive --dry-runnpx nx g @aws/nx-plugin:api-connection --sourceProject=@dungeon-adventure/game-ui --targetProject=@dungeon-adventure/game-api-backend --no-interactive --dry-runbunx nx g @aws/nx-plugin:api-connection --sourceProject=@dungeon-adventure/game-ui --targetProject=@dungeon-adventure/game-api-backend --no-interactive --dry-runYou should see some new files have appeared/changed in your file tree.
UI -> tRPC api-connection updated files
Below is a list of all files which have been generated/updated by the api-connection generator. We are going to examine some of the key files highlighted in the file tree:
Directorypackages/
Directorygame-ui/
Directorysrc/
Directorycomponents/
DirectoryTrpcClients/
- index.tsx
- TrpcApis.tsx all configured tRPC APIs
- TrpcClientProviders.tsx creates a client provider per tRPC API
- TrpcProvider.tsx
Directoryhooks/
- useGameApi.tsx hooks to call the GameApi
- main.tsx injects the trpc client providers
- package.json
import { TrpcApis } from '../components/TrpcClients';
export const useGameApi = () => TrpcApis.GameApi.useTRPC();This hook uses tRPC’s latest React Query integration allowing user’s to interact with @tanstack/react-query directly without any additional layers of abstraction. For examples on how to call tRPC APIs, refer to the using the tRPC hook guide.
import TrpcClientProviders from './components/TrpcClients';import QueryClientProvider from './components/QueryClientProvider';import CognitoAuth from './components/CognitoAuth';import RuntimeConfigProvider from './components/RuntimeConfig';import React from 'react';import { createRoot } from 'react-dom/client';import { I18nProvider } from '@cloudscape-design/components/i18n';import messages from '@cloudscape-design/components/i18n/messages/all.en';import { RouterProvider, createRouter } from '@tanstack/react-router';import { routeTree } from './routeTree.gen';import '@cloudscape-design/global-styles/index.css';const router = createRouter({ routeTree });// Register the router instance for type safetydeclare module '@tanstack/react-router' { interface Register { router: typeof router; }}const root = document.getElementById('root');root && createRoot(root).render( <React.StrictMode> <I18nProvider locale="en" messages={[messages]}> <RuntimeConfigProvider> <CognitoAuth> <QueryClientProvider> <TrpcClientProviders> <RouterProvider router={router} /> </TrpcClientProviders> </QueryClientProvider> </CognitoAuth> </RuntimeConfigProvider> </I18nProvider> </React.StrictMode>, );The main.tsx file has been updated via an AST transform to inject the tRPC providers.
Game UI: Infrastructure
Now the final sub-project we need to create is for the CDK infrastructure. To create this, follow the below steps:
- Install the Nx Console VSCode Plugin if you haven't already
- Open the Nx Console in VSCode
- Click
Generate (UI)in the "Common Nx Commands" section - Search for
@aws/nx-plugin - ts#infra - Fill in the required parameters
- name: infra
- Click
Generate
pnpm nx g @aws/nx-plugin:ts#infra --name=infra --no-interactiveyarn nx g @aws/nx-plugin:ts#infra --name=infra --no-interactivenpx nx g @aws/nx-plugin:ts#infra --name=infra --no-interactivebunx nx g @aws/nx-plugin:ts#infra --name=infra --no-interactiveYou can also perform a dry-run to see what files would be changed
pnpm nx g @aws/nx-plugin:ts#infra --name=infra --no-interactive --dry-runyarn nx g @aws/nx-plugin:ts#infra --name=infra --no-interactive --dry-runnpx nx g @aws/nx-plugin:ts#infra --name=infra --no-interactive --dry-runbunx nx g @aws/nx-plugin:ts#infra --name=infra --no-interactive --dry-runYou should see some new files have appeared/changed in your file tree.
ts#infra updated files
Below is a list of all files which have been generated/updated by the ts#infra generator. We are going to examine some of the key files highlighted in the file tree:
Directorypackages/
Directorycommon/
Directoryconstructs/
Directorysrc/
Directorycore/
Directorycfn-guard-rules/
- *.guard
- cfn-guard.ts
- index.ts
Directoryinfra
Directorysrc/
Directorystacks/
- application-stack.ts cdk resources defined here
- index.ts
- main.ts entrypoint which defines all stacks
- cdk.json
- project.json
- …
- package.json
- tsconfig.json add references
- tsconfig.base.json add alias
import { ApplicationStack } from './stacks/application-stack.js';import {  App,  CfnGuardValidator,  RuleSet,} from ':dungeon-adventure/common-constructs';
const app = new App({  policyValidationBeta1: [new CfnGuardValidator(RuleSet.AWS_PROTOTYPING)],});
// Use this to deploy your own sandbox environment (assumes your CLI credentials)new ApplicationStack(app, 'dungeon-adventure-infra-sandbox', {  env: {    account: process.env.CDK_DEFAULT_ACCOUNT,    region: process.env.CDK_DEFAULT_REGION,  },  crossRegionReferences: true,});
app.synth();This is the entrypoint for your CDK application.
It is configured to use cfn-guard to run infrastructure validation based on the configured ruleset. This is instrumented post synthesis.
import * as cdk from 'aws-cdk-lib';import { Construct } from 'constructs';
export class ApplicationStack extends cdk.Stack {  constructor(scope: Construct, id: string, props?: cdk.StackProps) {    super(scope, id, props);
// The code that defines your stack goes here }}This is where we will instantiate our CDK constructs to build our dungeon adventure game.
Update our infrastructure
Let’s make an update to our packages/infra/src/stacks/application-stack.ts to instantiate some of our already generated constructs:
import {  GameApi,  GameUI,  StoryApi,  UserIdentity,} from ':dungeon-adventure/common-constructs';import * as cdk from 'aws-cdk-lib';import { Construct } from 'constructs';
export class ApplicationStack extends cdk.Stack {  constructor(scope: Construct, id: string, props?: cdk.StackProps) {    super(scope, id, props);
    // The code that defines your stack goes here    const userIdentity = new UserIdentity(this, 'UserIdentity');
    const gameApi = new GameApi(this, 'GameApi');    const storyApi = new StoryApi(this, 'StoryApi');
    // grant our authenticated role access to invoke our APIs    [storyApi, gameApi].forEach((api) =>      api.grantInvokeAccess(userIdentity.identityPool.authenticatedRole),    );
    // Ensure this is instantiated last so our runtime-config.json can be automatically configured    new GameUI(this, 'GameUI');  }}
Building our code
Nx commands
Single vs Multiple targets
The run-many command will run a target on multiple listed subprojects (--all will target them all). It will ensure dependencies are executed in the correct order.
You can also trigger a build (or any other task) for a single project target by running the target on the project directly. For example, if we want to build the @dungeon-adventure/infra project, you can run the following command:
pnpm nx run @dungeon-adventure/infra:buildyarn nx run @dungeon-adventure/infra:buildnpx nx run @dungeon-adventure/infra:buildbunx nx run @dungeon-adventure/infra:buildVisualizing your dependencies
You can also visualize your dependencies via:
pnpm nx graphyarn nx graphnpx nx graphbunx nx graph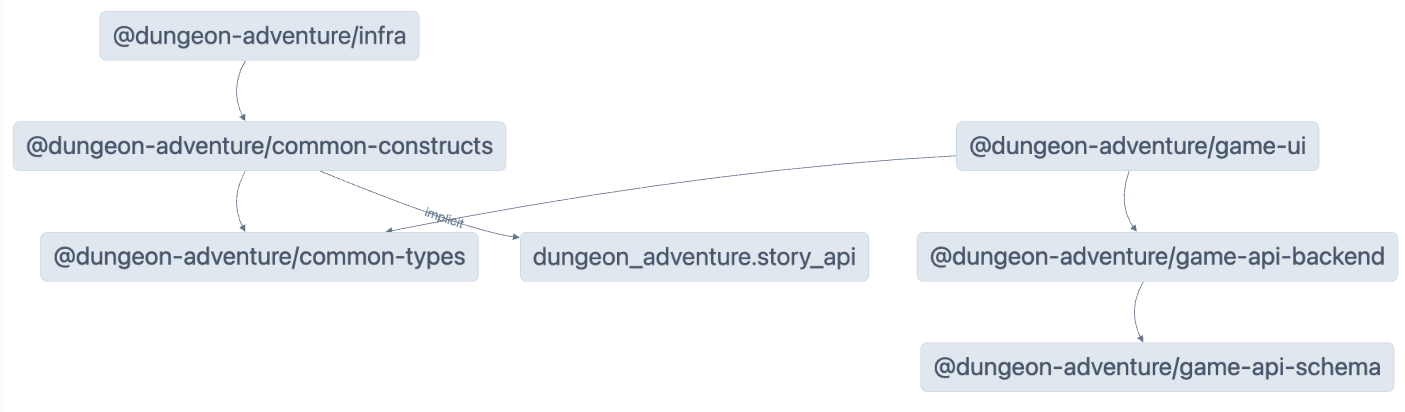
Caching
Nx relies on caching so that you can re-use artifacts from previous builds in order to speed up development. There is some configuration required to get this to work correctly and there may be cases where you want to perform a build without using the cache. To do that, simply append the --skip-nx-cache argument to your command. For example:
pnpm nx run @dungeon-adventure/infra:build --skip-nx-cacheyarn nx run @dungeon-adventure/infra:build --skip-nx-cachenpx nx run @dungeon-adventure/infra:build --skip-nx-cachebunx nx run @dungeon-adventure/infra:build --skip-nx-cacheIf for whatever reason you ever wanted to clear your cache (stored in the .nx folder), you can run the following command:
pnpm nx resetyarn nx resetnpx nx resetbunx nx resetpnpm nx run-many --target build --allyarn nx run-many --target build --allnpx nx run-many --target build --allbunx nx run-many --target build --allYou should be prompted with the following:
 NX   The workspace is out of sync
[@nx/js:typescript-sync]: Some TypeScript configuration files are missing project references to the projects they depend on or contain outdated project references.
This will result in an error in CI.
? Would you like to sync the identified changes to get your workspace up to date? …Yes, sync the changes and run the tasksNo, run the tasks without syncing the changes
This message indicates that NX has detected some files which can be updated automatically for you. In this case, it is referring to the tsconfig.json files which do not have Typescript references set up on references projects. Select the Yes, sync the changes and run the tasks option to proceed. You should notice all of you IDE related import errors get automatically resolved as the sync generator will add the missing typescript references automatically!
All built artifacts are now available within the dist/ folder located at the root of the monorepo. This is a standard practice when using projects generated by the @aws/nx-plugin as it does not pollute your file-tree with generated files. In the event you want to clean yor files, you can simply delete the dist/ folder without having to worry about generated files being littered throughout the file tree.
Congratulations! You’ve created all of the required sub-projects needed to start implementing the core of our Dunegeon Adventure game. 🎉🎉🎉