

AI Dungeon Game
Module 2: Game API implementation
We are going to start by implementing our Game API. To do this, we need to create 4 API’s in total:
createGame- this will create a new game instance.queryGames- this will return a paginated list of previously saved games.saveAction- this will save an action for a given game.queryActions- this will return a paginated list of all actions related to a game.
API Schema
To define our API inputs and outputs, let’s create our schema using Zod within the packages/game-api/schema/src project as follows:
import { z } from 'zod';
export const ActionSchema = z.object({  playerName: z.string(),  timestamp: z.string().datetime(),  role: z.enum(['assistant', 'user']),  content: z.string(),});
export type IAction = z.TypeOf<typeof ActionSchema>;
import { z } from 'zod';
export const QueryInputSchema = z.object({ cursor: z.string().optional(), limit: z.number().optional().default(100),});
export const createPaginatedQueryOutput = <ItemType extends z.ZodTypeAny>( itemSchema: ItemType,) => { return z.object({ items: z.array(itemSchema), cursor: z.string().nullable(), });};
export type IQueryInput = z.TypeOf<typeof QueryInputSchema>;import { z } from 'zod';
export const GameSchema = z.object({ playerName: z.string(), genre: z.enum(['zombie', 'superhero', 'medieval']), lastUpdated: z.string().datetime(),});
export type IGame = z.TypeOf<typeof GameSchema>;export * from './procedures/echo.js';export * from './types/action.js';export * from './types/common.js';export * from './types/game.js';You can also delete the ./procedures/echo.ts file given we will not be using it in this project.
Entity modelling
The ER diagram for our application is as follows:
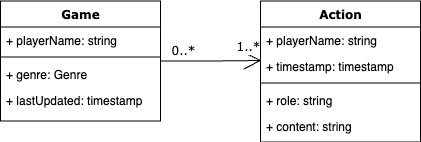
We are going to implement our Database in DynamoDB and will be using the ElectroDB DynamoDB client library to simplify things. To get started we need to first install electrodb by running the following command:
pnpm add -w electrodb @aws-sdk/client-dynamodbyarn add electrodb @aws-sdk/client-dynamodbnpm install --legacy-peer-deps electrodb @aws-sdk/client-dynamodbbun install electrodb @aws-sdk/client-dynamodbNow let’s create the following files within our packages/game-api/backend/src/entities folder to define our ElectroDB entities as per the above ER Diagram:
import { Entity } from 'electrodb';import { DynamoDBClient } from '@aws-sdk/client-dynamodb';
export const createActionEntity = (client?: DynamoDBClient) =>  new Entity(    {      model: {        entity: 'Action',        version: '1',        service: 'game',      },      attributes: {        playerName: { type: 'string', required: true, readOnly: true },        timestamp: {          type: 'string',          required: true,          readOnly: true,          set: () => new Date().toISOString(),          default: () => new Date().toISOString(),        },        role: { type: 'string', required: true, readOnly: true },        content: { type: 'string', required: true, readOnly: true },      },      indexes: {        primary: {          pk: { field: 'pk', composite: ['playerName'] },          sk: { field: 'sk', composite: ['timestamp'] },        },      },    },    { client, table: process.env.TABLE_NAME },  );
import { Entity } from 'electrodb';import { DynamoDBClient } from '@aws-sdk/client-dynamodb';
export const createGameEntity = (client?: DynamoDBClient) => new Entity( { model: { entity: 'Game', version: '1', service: 'game', }, attributes: { playerName: { type: 'string', required: true, readOnly: true }, genre: { type: 'string', required: true, readOnly: true }, lastUpdated: { type: 'string', required: true, default: () => new Date().toISOString(), }, }, indexes: { primary: { pk: { field: 'pk', composite: ['playerName'] }, sk: { field: 'sk', composite: [], }, }, }, }, { client, table: process.env.TABLE_NAME }, );ElectroDB is very powerful and allows us to not only define our types, but can also provide defaults for certain values like the timestamps above. In addition, ElectroDB follows single-table design which is the best practice when using DynamoDB.
Adding the dynamoDB client to our tRPC context
Given we need access to the DynamoDB client in each of our procedures, we want to be able to create a single instance of the client which we can pass through via context. To do this, make the following changes within packages/game-api/backend/src:
import { DynamoDBClient } from '@aws-sdk/client-dynamodb';import { initTRPC } from '@trpc/server';
export interface IDynamoDBContext {  dynamoDb?: DynamoDBClient;}
export const createDynamoDBPlugin = () => {  const t = initTRPC.context<IDynamoDBContext>().create();  return t.procedure.use(async (opts) => {    const dynamoDb = new DynamoDBClient();
    const response = await opts.next({      ctx: {        ...opts.ctx,        dynamoDb,      },    });
    return response;  });};
This is a plugin that we instrument to create the DynamoDBClient and inject it into the context.
import { CreateAWSLambdaContextOptions } from '@trpc/server/adapters/aws-lambda';import type { APIGatewayProxyEventV2WithIAMAuthorizer } from 'aws-lambda';import { ILoggerContext } from './logger.js';import { IMetricsContext } from './metrics.js';import { ITracerContext } from './tracer.js';import { IDynamoDBContext } from './dynamodb.js';
export * from './dynamodb.js';export * from './logger.js';export * from './metrics.js';export * from './tracer.js';export * from './error.js';
export type IMiddlewareContext =  CreateAWSLambdaContextOptions<APIGatewayProxyEventV2WithIAMAuthorizer> &    IDynamoDBContext &    ILoggerContext &    IMetricsContext &    ITracerContext;
Augment our IMiddlewareContext to add the IDynamoDBContext.
import { initTRPC } from '@trpc/server';import {  createDynamoDBPlugin,  createErrorPlugin,  createLoggerPlugin,  createMetricsPlugin,  createTracerPlugin,  IMiddlewareContext,} from './middleware/index.js';
process.env.POWERTOOLS_SERVICE_NAME = 'GameApi';process.env.POWERTOOLS_METRICS_NAMESPACE = 'GameApi';
export type Context = IMiddlewareContext;
export const t = initTRPC.context<Context>().create();
export const publicProcedure = t.procedure  .unstable_concat(createDynamoDBPlugin())  .unstable_concat(createLoggerPlugin())  .unstable_concat(createTracerPlugin())  .unstable_concat(createMetricsPlugin())  .unstable_concat(createErrorPlugin());
The DynamoDB plugin is instrumented.
Defining our procedures
Now it’s time to implement the API methods. To do this, make the following changes within packages/game-api/backend/src/procedures:
import { createActionEntity } from '../entities/action.js';import {  ActionSchema,  IAction,  QueryInputSchema,  createPaginatedQueryOutput,} from ':dungeon-adventure/game-api-schema';import { publicProcedure } from '../init.js';import { z } from 'zod';
export const queryActions = publicProcedure  .input(QueryInputSchema.extend({ playerName: z.string() }))  .output(createPaginatedQueryOutput(ActionSchema))  .query(async ({ input, ctx }) => {    const actionEntity = createActionEntity(ctx.dynamoDb);    const result = await actionEntity.query      .primary({ playerName: input.playerName })      .go({ cursor: input.cursor, count: input.limit });
    return {      items: result.data as IAction[],      cursor: result.cursor,    };  });
import { createGameEntity } from '../entities/game.js';import { GameSchema, IGame, QueryInputSchema, createPaginatedQueryOutput,} from ':dungeon-adventure/game-api-schema';import { publicProcedure } from '../init.js';
export const queryGames = publicProcedure .input(QueryInputSchema) .output(createPaginatedQueryOutput(GameSchema)) .query(async ({ input, ctx }) => { const gameEntity = createGameEntity(ctx.dynamoDb); const result = await gameEntity.scan.go({ cursor: input.cursor, count: input.limit, });
return { items: result.data as IGame[], cursor: result.cursor, }; });import { ActionSchema, IAction } from ':dungeon-adventure/game-api-schema';import { publicProcedure } from '../init.js';import { createActionEntity } from '../entities/action.js';import { createGameEntity } from '../entities/game.js';
export const saveAction = publicProcedure .input(ActionSchema.omit({ timestamp: true })) .output(ActionSchema) .mutation(async ({ input, ctx }) => { const actionEntity = createActionEntity(ctx.dynamoDb); const gameEntity = createGameEntity(ctx.dynamoDb);
const action = await actionEntity.put(input).go(); await gameEntity .update({ playerName: input.playerName }) .set({ lastUpdated: action.data.timestamp }) .go(); return action.data as IAction; });import { createGameEntity } from '../entities/game.js';import { GameSchema, IGame } from ':dungeon-adventure/game-api-schema';import { publicProcedure } from '../init.js';
export const saveGame = publicProcedure .input(GameSchema.omit({ lastUpdated: true })) .output(GameSchema) .mutation(async ({ input, ctx }) => { const gameEntity = createGameEntity(ctx.dynamoDb);
const result = await gameEntity.put(input).go(); return result.data as IGame; });You can also delete the echo.ts file (from packages/game-api/backend/src/procedures) given we will not be using it in this project.
Router setup
Now that we have defined our procedures, let’s wire them into our API. To do this, update the following file as follows:
import {  awsLambdaRequestHandler,  CreateAWSLambdaContextOptions,} from '@trpc/server/adapters/aws-lambda';import { echo } from './procedures/echo.js';import { t } from './init.js';import { APIGatewayProxyEventV2WithIAMAuthorizer } from 'aws-lambda';import { queryActions } from './procedures/query-actions.js';import { saveAction } from './procedures/save-action.js';import { queryGames } from './procedures/query-games.js';import { saveGame } from './procedures/save-game.js';
export const router = t.router;
export const appRouter = router({  echo,  actions: router({    query: queryActions,    save: saveAction,  }),  games: router({    query: queryGames,    save: saveGame,  }),});
export const handler = awsLambdaRequestHandler({  router: appRouter,  createContext: (    ctx: CreateAWSLambdaContextOptions<APIGatewayProxyEventV2WithIAMAuthorizer>,  ) => ctx,});
export type AppRouter = typeof appRouter;
Infrastructure
The final step is to update our infrastructure to create the DynamoDB table and grant permissions to perform operations from the Game API. To do so, update the packages/infra/src as follows:
import { CfnOutput } from 'aws-cdk-lib';import {  AttributeType,  BillingMode,  ProjectionType,  Table,  TableProps,} from 'aws-cdk-lib/aws-dynamodb';import { Construct } from 'constructs';
export type ElectrodbDynamoTableProps = Omit<  TableProps,  'partitionKey' | 'sortKey' | 'billingMode'>;
export class ElectrodbDynamoTable extends Table {  constructor(scope: Construct, id: string, props?: ElectrodbDynamoTableProps) {    super(scope, id, {      partitionKey: {        name: 'pk',        type: AttributeType.STRING,      },      sortKey: {        name: 'sk',        type: AttributeType.STRING,      },      billingMode: BillingMode.PAY_PER_REQUEST,      ...props,    });
    this.addGlobalSecondaryIndex({      indexName: 'gsi1pk-gsi1sk-index',      partitionKey: {        name: 'gsi1pk',        type: AttributeType.STRING,      },      sortKey: {        name: 'gsi1sk',        type: AttributeType.STRING,      },      projectionType: ProjectionType.ALL,    });
new CfnOutput(this, 'TableName', { value: this.tableName }); }}import { GameApi, GameUI, StoryApi, UserIdentity,} from ':dungeon-adventure/common-constructs';import * as cdk from 'aws-cdk-lib';import { Construct } from 'constructs';import { ElectrodbDynamoTable } from '../constructs/electrodb-table.js';
export class ApplicationStack extends cdk.Stack { constructor(scope: Construct, id: string, props?: cdk.StackProps) { super(scope, id, props);
// The code that defines your stack goes here const userIdentity = new UserIdentity(this, 'UserIdentity');
const electroDbTable = new ElectrodbDynamoTable(this, 'ElectroDbTable');
const gameApi = new GameApi(this, 'GameApi'); const storyApi = new StoryApi(this, 'StoryApi');
gameApi.routerFunction.addEnvironment( 'TABLE_NAME', electroDbTable.tableName, ); // grant the gameAPI rw access to DynamoDB electroDbTable.grantReadWriteData(gameApi.routerFunction);
// grant our authenticated role access to invoke our APIs [storyApi, gameApi].forEach((api) => api.grantInvokeAccess(userIdentity.identityPool.authenticatedRole), );
// Ensure this is instantiated last so our runtime-config.json can be automatically configured new GameUI(this, 'GameUI'); }}Deployment and testing
First, lets build the codebase:
pnpm nx run-many --target build --allyarn nx run-many --target build --allnpx nx run-many --target build --allbunx nx run-many --target build --allYour application can now be deployed by running the following command:
pnpm nx run @dungeon-adventure/infra:deploy dungeon-adventure-infra-sandboxyarn nx run @dungeon-adventure/infra:deploy dungeon-adventure-infra-sandboxnpx nx run @dungeon-adventure/infra:deploy dungeon-adventure-infra-sandboxbunx nx run @dungeon-adventure/infra:deploy dungeon-adventure-infra-sandboxYour first deployment will take around 8 minutes to complete. Subsequent deployments will take around 2 minutes.
Deployment command
You can also deploy all stacks contained in the CDK application by running:
pnpm nx run @dungeon-adventure/infra:deploy --allyarn nx run @dungeon-adventure/infra:deploy --allnpx nx run @dungeon-adventure/infra:deploy --allbunx nx run @dungeon-adventure/infra:deploy --allThis is not recommended given that you may choose to seperate out your deployment stages as seperate stacks i.e. infra-prod. In this case the --all flag will attempt to deploy all stacks which can result in unwanted deployments!
Once the deployment completes, you should see some outputs similar to the following (some values have been redacted):
dungeon-adventure-infra-sandboxdungeon-adventure-infra-sandbox: deploying... [2/2]
 ✅  dungeon-adventure-infra-sandbox
✨  Deployment time: 354s
Outputs:dungeon-adventure-infra-sandbox.ElectroDbTableTableNameXXX = dungeon-adventure-infra-sandbox-ElectroDbTableXXX-YYYdungeon-adventure-infra-sandbox.GameApiGameApiUrlXXX = https://xxx.region.amazonaws.com/dungeon-adventure-infra-sandbox.GameUIDistributionDomainNameXXX = xxx.cloudfront.netdungeon-adventure-infra-sandbox.StoryApiStoryApiUrlXXX = https://xxx.execute-api.region.amazonaws.com/dungeon-adventure-infra-sandbox.UserIdentityUserIdentityIdentityPoolIdXXX = region:xxxdungeon-adventure-infra-sandbox.UserIdentityUserIdentityUserPoolIdXXX = region_xxx
We can test our API by either:
- Starting a local instance of the tRPC backend and invoke the API’s using
curl. - Calling the deployed API using sigv4 enabled curl
Sigv4 enabled curl
You can either add the following script to your
.bashrcfile (andsourceit) or simply paste the following into the same terminal you wish to run the command in.~/.bashrc acurl () {REGION=$1SERVICE=$2shift; shift;curl --aws-sigv4 "aws:amz:$REGION:$SERVICE" --user "$(aws configure get aws_access_key_id):$(aws configure get aws_secret_access_key)" -H "X-Amz-Security-Token: $(aws configure get aws_session_token)" "$@"}Then to make a sigv4 authenticated curl request, you can simply invoke
acurllike the following examples:API Gateway
Terminal window acurl ap-southeast-2 execute-api -X GET https://xxxStreaming Lambda function url
Terminal window acurl ap-southeast-2 lambda -N -X POST https://xxx
Start your local game-api server by running the following command:
TABLE_NAME=dungeon-adventure-infra-sandbox-ElectroDbTableXXX-YYY pnpm nx run @dungeon-adventure/game-api-backend:serveTABLE_NAME=dungeon-adventure-infra-sandbox-ElectroDbTableXXX-YYY yarn nx run @dungeon-adventure/game-api-backend:serveTABLE_NAME=dungeon-adventure-infra-sandbox-ElectroDbTableXXX-YYY npx nx run @dungeon-adventure/game-api-backend:serveTABLE_NAME=dungeon-adventure-infra-sandbox-ElectroDbTableXXX-YYY bunx nx run @dungeon-adventure/game-api-backend:serveOnce your server is up and running, you can call it by running the following command:
curl -X GET http://localhost:2022/games.query\?input="\\{\\}"acurl ap-southeast-2 execute-api -X GET \ https://xxx.execute-api.region.amazonaws.com/games.query\?input\="\{\}"If the command executes successfully, you should see a response as follows:
{"result":{"data":{"items":[],"cursor":null}}}Congratulations. You have built and deployed your first API using tRPC! 🎉🎉🎉