

Configurare un monorepo
Task 1: Creare un monorepo
Sezione intitolata “Task 1: Creare un monorepo”Per creare un nuovo monorepo, esegui il seguente comando dalla directory desiderata:
pnpm create @aws/nx-workspace dungeon-adventure --iac=cdkyarn create @aws/nx-workspace dungeon-adventure --iac=cdknpm create @aws/nx-workspace -- dungeon-adventure --iac=cdkbun create @aws/nx-workspace dungeon-adventure --iac=cdkQuesto configurerà un monorepo NX all’interno della directory dungeon-adventure. Quando apri la directory in VSCode, vedrai questa struttura di file:
Directory.nx/
- …
Directory.vscode/
- …
Directorynode_modules/
- …
Directorypackages/ qui risiederanno i tuoi sotto-progetti
- …
- .gitignore
- biome.json configura Biome per il linting e la formattazione
- nx.json configura la CLI NX e le impostazioni predefinite del monorepo
- package.json tutte le dipendenze Node sono definite qui
- pnpm-lock.yaml o bun.lock, yarn.lock, package-lock.json in base al package manager
- pnpm-workspace.yaml se si utilizza pnpm
- README.md
- tsconfig.base.json esteso da tutti i sotto-progetti basati su Node
- tsconfig.json
- aws-nx-plugin.config.mts configurazione per il Plugin Nx per AWS
Ora possiamo iniziare a creare i diversi sotto-progetti utilizzando @aws/nx-plugin.
Task 2: Creare una Game API
Sezione intitolata “Task 2: Creare una Game API”Per prima cosa, creiamo la nostra Game API. Per farlo, creiamo un’API tRPC chiamata GameApi seguendo questi passaggi:
- Installa il Nx Console VSCode Plugin se non l'hai già fatto
- Apri la console Nx in VSCode
- Clicca su
Generate (UI)nella sezione "Common Nx Commands" - Cerca
@aws/nx-plugin - ts#api - Compila i parametri richiesti
- name: GameApi
- framework: trpc
- Clicca su
Generate
pnpm nx g @aws/nx-plugin:ts#api --name=GameApi --framework=trpc --no-interactiveyarn nx g @aws/nx-plugin:ts#api --name=GameApi --framework=trpc --no-interactivenpx nx g @aws/nx-plugin:ts#api --name=GameApi --framework=trpc --no-interactivebunx nx g @aws/nx-plugin:ts#api --name=GameApi --framework=trpc --no-interactivePuoi anche eseguire una prova per vedere quali file verrebbero modificati
pnpm nx g @aws/nx-plugin:ts#api --name=GameApi --framework=trpc --no-interactive --dry-runyarn nx g @aws/nx-plugin:ts#api --name=GameApi --framework=trpc --no-interactive --dry-runnpx nx g @aws/nx-plugin:ts#api --name=GameApi --framework=trpc --no-interactive --dry-runbunx nx g @aws/nx-plugin:ts#api --name=GameApi --framework=trpc --no-interactive --dry-runVedrai alcuni nuovi file apparire nella struttura delle cartelle.
File aggiornati da ts#api
Di seguito l’elenco dei file generati dal generatore ts#api. Esamineremo alcuni file chiave evidenziati nella struttura:
Directorypackages/
Directorycommon/
Directoryconstructs/
Directorysrc/
Directoryapp/ CDK constructs specifici per l’applicazione
Directoryapis/
- game-api.ts CDK construct per creare l’API tRPC
- index.ts
- …
- index.ts
Directorycore/ CDK constructs generici
Directoryapi/
- rest-api.ts CDK construct base per API Gateway Rest API
- trpc-utils.ts utility per CDK constructs di API tRPC
- utils.ts utility per i constructs API
- index.ts
- runtime-config.ts
- index.ts
- project.json
- …
Directorygame-api/ API tRPC
Directorysrc/
Directoryclient/ client vanilla tipicamente usato per chiamate machine-to-machine in TS
- index.ts
Directorymiddleware/ strumentazione Powertools
- error.ts
- index.ts
- logger.ts
- metrics.ts
- tracer.ts
Directoryschema/ definizioni di input e output per l’API
- index.ts
- echo.ts schema di input e output di esempio
- z-async-iterable.ts schema Zod wrapper per output subscription tRPC
Directoryprocedures/ implementazioni specifiche delle procedure/route dell’API
- echo.ts implementazione procedura di esempio
- index.ts
- init.ts configura contesto e middleware
- handler.ts entrypoint del Lambda handler (usa response streaming per REST APIs)
- local-server.ts usato per eseguire il server tRPC localmente
- router.ts definisce il router tRPC e tutte le procedure
- project.json
- …
- vitest.workspace.ts
Esaminiamo questi file chiave:
import { echo } from './procedures/echo.js';import { t } from './init.js';
export const router = t.router;
export const appRouter = router({  echo,});
export type AppRouter = typeof appRouter;Il router definisce il router tRPC per l’API ed è dove dichiarerai tutti i metodi dell’API. Come visibile sopra, abbiamo un metodo chiamato echo con l’implementazione nel file ./procedures/echo.ts. L’entrypoint del Lambda handler si trova in handler.ts, che è configurato automaticamente dal generatore.
import { publicProcedure } from '../init.js';import {  EchoInputSchema,  EchoOutputSchema,} from '../schema/echo.js';
export const echo = publicProcedure .input(EchoInputSchema) .output(EchoOutputSchema) .query((opts) => ({ result: opts.input.message }));Questo file implementa il metodo echo ed è fortemente tipizzato dichiarando le strutture dati di input e output.
import { z } from 'zod';
export const EchoInputSchema = z.object({  message: z.string().max(1024),});
export type IEchoInput = z.TypeOf<typeof EchoInputSchema>;
export const EchoOutputSchema = z.object({  message: z.string().max(1024),});
export type IEchoOutput = z.TypeOf<typeof EchoOutputSchema>;Tutte le definizioni degli schema tRPC sono create con Zod ed esportate come tipi TypeScript tramite la sintassi z.TypeOf.
import { Construct } from 'constructs';import * as url from 'url';import { Distribution } from 'aws-cdk-lib/aws-cloudfront';import {  Code,  Runtime,  Function,  FunctionProps,  Tracing,} from 'aws-cdk-lib/aws-lambda';import {  AuthorizationType,  LambdaIntegration,  ResponseTransferMode,} from 'aws-cdk-lib/aws-apigateway';import { Aspects, Duration } from 'aws-cdk-lib';import {  PolicyDocument,  PolicyStatement,  Effect,  AnyPrincipal,  IGrantable,  Grant,} from 'aws-cdk-lib/aws-iam';import {  IntegrationBuilder,  RestApiIntegration,} from '../../core/api/utils.js';import { AddCorsPreflightAspect, RestApi } from '../../core/api/rest-api.js';import { Procedures, routerToOperations } from '../../core/api/trpc-utils.js';import { AppRouter, appRouter } from ':dungeon-adventure/game-api';
// Tipo union per tutti i nomi delle operazioni APItype Operations = Procedures<AppRouter>;
/** * Proprietà per creare un construct GameApi * * @template TIntegrations - Mappa dei nomi delle operazioni alle loro integrazioni */export interface GameApiProps<  TIntegrations extends Record<Operations, RestApiIntegration>,> {  /**   * Mappa dei nomi delle operazioni alle integrazioni API Gateway   */  integrations: TIntegrations;}
/** * CDK construct che crea e configura un'API REST API Gateway AWS * specifica per GameApi. * @template TIntegrations - Mappa dei nomi delle operazioni alle loro integrazioni */export class GameApi<  TIntegrations extends Record<Operations, RestApiIntegration>,> extends RestApi<Operations, TIntegrations> {  private allowedOrigins: readonly string[] = ['*'];
  /**   * Crea integrazioni predefinite per tutte le operazioni, implementando ciascuna operazione   * come singola funzione lambda.   *   * @param scope - Scope del construct CDK   * @returns IntegrationBuilder con integrazioni lambda predefinite   */  public static defaultIntegrations = (scope: Construct) => {    return IntegrationBuilder.rest({      operations: routerToOperations(appRouter),      defaultIntegrationOptions: <FunctionProps>{        runtime: Runtime.NODEJS_LATEST,        handler: 'index.handler',        code: Code.fromAsset(          url.fileURLToPath(            new URL(              '../../../../../../dist/packages/game-api/bundle',              import.meta.url,            ),          ),        ),        timeout: Duration.seconds(30),        tracing: Tracing.ACTIVE,      },      buildDefaultIntegration: (op, props: FunctionProps) => {        const handler = new Function(scope, `GameApi${op}Handler`, props);        return {          handler,          integration: new LambdaIntegration(handler, {            responseTransferMode: ResponseTransferMode.STREAM,          }),        };      },    });  };
  constructor(    scope: Construct,    id: string,    props: GameApiProps<TIntegrations>,  ) {    super(scope, id, {      apiName: 'GameApi',      defaultMethodOptions: {        authorizationType: AuthorizationType.IAM,      },      deployOptions: {        tracingEnabled: true,      },      policy: new PolicyDocument({        statements: [          // Apriamo OPTIONS per permettere ai browser richieste preflight non autenticate          new PolicyStatement({            effect: Effect.ALLOW,            principals: [new AnyPrincipal()],            actions: ['execute-api:Invoke'],            resources: ['execute-api:/*/OPTIONS/*'],          }),        ],      }),      operations: routerToOperations(appRouter),      ...props,    });    Aspects.of(this).add(new AddCorsPreflightAspect(() => this.allowedOrigins));  }
  /**   * Limita CORS alle origini fornite   *   * Configura i domini della distribuzione CloudFront o le stringhe di origine   * come uniche origini CORS permesse nelle risposte preflight di API Gateway e nelle   * integrazioni AWS Lambda.   *   * @param origins - Le stringhe di origine, distribuzioni CloudFront, o oggetti contenenti una distribuzione CloudFront da cui concedere CORS   */  public restrictCorsTo(    ...origins: (string | Distribution | { cloudFrontDistribution: Distribution })[]  ) {    const allowedOrigins = origins.map((origin) =>      typeof origin === 'string'        ? origin        : 'cloudFrontDistribution' in origin          ? `https://${origin.cloudFrontDistribution.distributionDomainName}`          : `https://${origin.distributionDomainName}`,    );
    this.allowedOrigins = allowedOrigins;
    // Imposta la variabile d'ambiente ALLOWED_ORIGINS per tutte le integrazioni Lambda    Object.values(this.integrations).forEach((integration) => {      if ('handler' in integration && integration.handler instanceof Function) {        integration.handler.addEnvironment(          'ALLOWED_ORIGINS',          allowedOrigins.join(','),        );      }    });  }
  /**   * Concede permessi IAM per invocare qualsiasi metodo su questa API.   *   * @param grantee - Il principal IAM a cui concedere i permessi   */  public grantInvokeAccess(grantee: IGrantable) {    // Qui concediamo al grantee il permesso di chiamare l'API.    // È possibile definire qui accessi granulari machine-to-machine usando principal specifici (es. ruoli o    // utenti) e risorse (es. quali percorsi API possono essere invocati da quale principal) se necessario.    this.api.addToResourcePolicy(      new PolicyStatement({        effect: Effect.ALLOW,        principals: [grantee.grantPrincipal],        actions: ['execute-api:Invoke'],        resources: ['execute-api:/*'],      }),    );
Grant.addToPrincipal({ grantee, actions: ['execute-api:Invoke'], resourceArns: [this.api.arnForExecuteApi('*', '/*', '*')], }); }}Questo è il CDK construct che definisce la nostra GameApi. Fornisce un metodo defaultIntegrations che crea automaticamente una funzione Lambda per ogni procedura nell’API tRPC, puntando all’implementazione bundled. Ciò significa che al momento di cdk synth non avviene il bundling (a differenza di NodeJsFunction) poiché è già stato eseguito come parte del target di build del progetto backend.
Task 3: Creare gli Story agents
Sezione intitolata “Task 3: Creare gli Story agents”Ora creiamo i nostri Story Agents.
Story agent: Progetto Python
Sezione intitolata “Story agent: Progetto Python”Per creare un progetto Python:
- Installa il Nx Console VSCode Plugin se non l'hai già fatto
- Apri la console Nx in VSCode
- Clicca su
Generate (UI)nella sezione "Common Nx Commands" - Cerca
@aws/nx-plugin - py#project - Compila i parametri richiesti
- name: story
- Clicca su
Generate
pnpm nx g @aws/nx-plugin:py#project --name=story --no-interactiveyarn nx g @aws/nx-plugin:py#project --name=story --no-interactivenpx nx g @aws/nx-plugin:py#project --name=story --no-interactivebunx nx g @aws/nx-plugin:py#project --name=story --no-interactivePuoi anche eseguire una prova per vedere quali file verrebbero modificati
pnpm nx g @aws/nx-plugin:py#project --name=story --no-interactive --dry-runyarn nx g @aws/nx-plugin:py#project --name=story --no-interactive --dry-runnpx nx g @aws/nx-plugin:py#project --name=story --no-interactive --dry-runbunx nx g @aws/nx-plugin:py#project --name=story --no-interactive --dry-runVedrai alcuni nuovi file apparire nella struttura delle cartelle.
File aggiornati da py#project
Il generatore py#project genera questi file:
Directory.venv/ virtual env condiviso per il monorepo
- …
Directorypackages/
Directorystory/
Directorydungeon_adventure_story/ modulo Python
- …
Directorytests/
- …
- .python-version
- pyproject.toml
- project.json
- .python-version versione Python bloccata per UV
- pyproject.toml
- uv.lock
Questo ha configurato un progetto Python e un UV Workspace con ambiente virtuale condiviso.
Story agent
Sezione intitolata “Story agent”Per aggiungere un agente Strands al progetto con il generatore py#agent:
- Installa il Nx Console VSCode Plugin se non l'hai già fatto
- Apri la console Nx in VSCode
- Clicca su
Generate (UI)nella sezione "Common Nx Commands" - Cerca
@aws/nx-plugin - py#agent - Compila i parametri richiesti
- project: story
- auth: cognito
- protocol: ag-ui
- Clicca su
Generate
pnpm nx g @aws/nx-plugin:py#agent --project=story --auth=cognito --protocol=ag-ui --no-interactiveyarn nx g @aws/nx-plugin:py#agent --project=story --auth=cognito --protocol=ag-ui --no-interactivenpx nx g @aws/nx-plugin:py#agent --project=story --auth=cognito --protocol=ag-ui --no-interactivebunx nx g @aws/nx-plugin:py#agent --project=story --auth=cognito --protocol=ag-ui --no-interactivePuoi anche eseguire una prova per vedere quali file verrebbero modificati
pnpm nx g @aws/nx-plugin:py#agent --project=story --auth=cognito --protocol=ag-ui --no-interactive --dry-runyarn nx g @aws/nx-plugin:py#agent --project=story --auth=cognito --protocol=ag-ui --no-interactive --dry-runnpx nx g @aws/nx-plugin:py#agent --project=story --auth=cognito --protocol=ag-ui --no-interactive --dry-runbunx nx g @aws/nx-plugin:py#agent --project=story --auth=cognito --protocol=ag-ui --no-interactive --dry-runVedrai alcuni nuovi file apparire nella struttura delle cartelle.
File aggiornati da py#agent
Il generatore py#agent genera questi file:
Directorypackages/
Directorystory/
Directorydungeon_adventure_story/ modulo Python
Directoryagent/
- init.py configura l’app FastAPI e il middleware
- main.py entrypoint per l’agente in Bedrock AgentCore Runtime
- agent.py definisce un agente e strumenti di esempio
- Dockerfile definisce l’immagine Docker per il deployment in AgentCore Runtime
Directorycommon/constructs/
Directorysrc
Directoryapp/agents/story-agent/
- story-agent.ts construct per deployare lo Story agent in AgentCore Runtime
Esaminiamo alcuni file in dettaglio:
from contextlib import contextmanager
from strands import Agent, toolfrom strands_tools import current_time

@tooldef subtract(a: int, b: int) -> int:    return a - b

@contextmanagerdef get_agent(): yield Agent( name="StoryAgent", description="StoryAgent Agent", system_prompt="""You are a mathematical wizard.Use your tools for mathematical tasks.Refer to tools as your 'spellbook'.""", tools=[subtract, current_time], )Questo crea un agente Strands di esempio e definisce uno strumento di sottrazione.
import loggingimport uuid
from ag_ui_strands import StrandsAgent, create_strands_appfrom dungeon_adventure_agent_connection import session_id_contextfrom fastapi import Requestfrom starlette.middleware.base import BaseHTTPMiddleware
from .agent import get_agent
logging.basicConfig(level=logging.INFO)
SESSION_ID_HEADER = "x-amzn-bedrock-agentcore-runtime-session-id"
# Create AG-UI agent wrapper_agent_ctx = get_agent()_agent = _agent_ctx.__enter__()
agui_agent = StrandsAgent(    agent=_agent,    name="StoryAgent",    description="An Agent exposed via the AG-UI protocol.",)

class _SessionIdMiddleware(BaseHTTPMiddleware):    """Bind the session ID for this request so downstream MCP / A2A clients forward it on outbound calls."""
    async def dispatch(self, request: Request, call_next):        session_id = request.headers.get(SESSION_ID_HEADER) or str(uuid.uuid4())        with session_id_context(session_id):            return await call_next(request)

# Create FastAPI app with AG-UI endpoint and health checkapp = create_strands_app(agui_agent, path="/invocations")app.add_middleware(_SessionIdMiddleware)Questo è l’entrypoint dell’agente. Poiché abbiamo selezionato --protocol=AG-UI, il generatore avvolge il nostro Agent Strands con StrandsAgent da ag_ui_strands e lo monta su un’app FastAPI che parla il protocollo AG-UI — questo è ciò con cui CopilotKit comunicherà dal sito web React. Il _SessionIdMiddleware collega l’ID di sessione del runtime AgentCore in entrata a un ContextVar in modo che qualsiasi client MCP/A2A downstream che colleghiamo successivamente (ad es. il server MCP Inventory nel Modulo 2) lo inoltri automaticamente nelle sue chiamate in uscita. Nel Modulo 3 aggiungeremo anche un session_manager_provider in modo che ogni thread id ottenga il proprio S3SessionManager e la cronologia delle conversazioni persista tra i turni.
import { Lazy, Names } from 'aws-cdk-lib';import { Platform } from 'aws-cdk-lib/aws-ecr-assets';import { Construct } from 'constructs';import { execSync } from 'child_process';import * as path from 'path';import * as url from 'url';import {  AgentRuntimeArtifact,  ProtocolType,  Runtime,  RuntimeProps,} from 'aws-cdk-lib/aws-bedrockagentcore';import { IGrantable, IPrincipal } from 'aws-cdk-lib/aws-iam';
export type StoryAgentProps = Omit<  RuntimeProps,  'runtimeName' | 'protocolConfiguration' | 'agentRuntimeArtifact'>;
export class StoryAgent extends Construct implements IGrantable {  public readonly dockerImage: AgentRuntimeArtifact;  public readonly agentCoreRuntime: Runtime;
  constructor(scope: Construct, id: string, props?: StoryAgentProps) {    super(scope, id);
    this.dockerImage = AgentRuntimeArtifact.fromAsset(      path.dirname(url.fileURLToPath(new URL(import.meta.url))),      {        platform: Platform.LINUX_ARM64,        extraHash: execSync(          `docker inspect dungeon-adventure-story-agent:latest --format '{{.Id}}'`,          { encoding: 'utf-8' },        ).trim(),      },    );
    this.agentCoreRuntime = new Runtime(this, 'StoryAgent', {      runtimeName: Lazy.string({        produce: () =>          Names.uniqueResourceName(this.agentCoreRuntime, { maxLength: 40 }),      }),      protocolConfiguration: ProtocolType.HTTP,      agentRuntimeArtifact: this.dockerImage,      ...props,    });  }
public get grantPrincipal(): IPrincipal { return this.agentCoreRuntime.grantPrincipal; }}Questo configura un AgentRuntimeArtifact CDK che carica l’immagine Docker dell’agente su ECR e la ospita usando AgentCore Runtime.
Potresti notare un Dockerfile aggiuntivo che referenzia l’immagine Docker dal progetto story, permettendo di collocare Dockerfile e codice sorgente insieme.
Task 4: Configurare gli strumenti di inventario
Sezione intitolata “Task 4: Configurare gli strumenti di inventario”Inventory: Progetto TypeScript
Sezione intitolata “Inventory: Progetto TypeScript”Creiamo un server MCP che fornirà strumenti allo Story Agent per gestire l’inventario del giocatore.
Iniziamo creando un progetto TypeScript:
- Installa il Nx Console VSCode Plugin se non l'hai già fatto
- Apri la console Nx in VSCode
- Clicca su
Generate (UI)nella sezione "Common Nx Commands" - Cerca
@aws/nx-plugin - ts#project - Compila i parametri richiesti
- name: inventory
- Clicca su
Generate
pnpm nx g @aws/nx-plugin:ts#project --name=inventory --no-interactiveyarn nx g @aws/nx-plugin:ts#project --name=inventory --no-interactivenpx nx g @aws/nx-plugin:ts#project --name=inventory --no-interactivebunx nx g @aws/nx-plugin:ts#project --name=inventory --no-interactivePuoi anche eseguire una prova per vedere quali file verrebbero modificati
pnpm nx g @aws/nx-plugin:ts#project --name=inventory --no-interactive --dry-runyarn nx g @aws/nx-plugin:ts#project --name=inventory --no-interactive --dry-runnpx nx g @aws/nx-plugin:ts#project --name=inventory --no-interactive --dry-runbunx nx g @aws/nx-plugin:ts#project --name=inventory --no-interactive --dry-runQuesto creerà un progetto TypeScript vuoto.
File aggiornati da ts#project
Il generatore ts#project genera questi file.
Directorypackages/
Directoryinventory/
Directorysrc/
- index.ts entry point con funzione di esempio
- project.json configurazione del progetto
- vitest.config.mts configurazione test
- tsconfig.json configurazione TypeScript base
- tsconfig.lib.json configurazione per compilazione e bundling
- tsconfig.spec.json configurazione per i test
- tsconfig.base.json aggiornato con alias per riferire questo progetto
Inventory: Server MCP
Sezione intitolata “Inventory: Server MCP”Aggiungiamo un server MCP al progetto TypeScript:
- Installa il Nx Console VSCode Plugin se non l'hai già fatto
- Apri la console Nx in VSCode
- Clicca su
Generate (UI)nella sezione "Common Nx Commands" - Cerca
@aws/nx-plugin - ts#mcp-server - Compila i parametri richiesti
- project: inventory
- Clicca su
Generate
pnpm nx g @aws/nx-plugin:ts#mcp-server --project=inventory --no-interactiveyarn nx g @aws/nx-plugin:ts#mcp-server --project=inventory --no-interactivenpx nx g @aws/nx-plugin:ts#mcp-server --project=inventory --no-interactivebunx nx g @aws/nx-plugin:ts#mcp-server --project=inventory --no-interactivePuoi anche eseguire una prova per vedere quali file verrebbero modificati
pnpm nx g @aws/nx-plugin:ts#mcp-server --project=inventory --no-interactive --dry-runyarn nx g @aws/nx-plugin:ts#mcp-server --project=inventory --no-interactive --dry-runnpx nx g @aws/nx-plugin:ts#mcp-server --project=inventory --no-interactive --dry-runbunx nx g @aws/nx-plugin:ts#mcp-server --project=inventory --no-interactive --dry-runQuesto aggiungerà un server MCP.
File aggiornati da ts#mcp-server
Il generatore ts#mcp-server genera questi file.
Directorypackages/
Directoryinventory/
Directorysrc/mcp-server/
- index.ts barrel export
- server.ts crea il server MCP
Directorytools/
- divide.ts strumento di esempio
Directoryresources/
- sample-guidance.ts risorsa di esempio
- stdio.ts entry point per MCP con trasporto STDIO
- http.ts entry point per MCP con trasporto HTTP streamable
- Dockerfile builda l’immagine per AgentCore Runtime
- rolldown.config.ts configurazione per il bundling del server MCP per il deployment in AgentCore
Directorycommon/constructs/
Directorysrc
Directoryapp/mcp-servers/inventory-mcp-server/
- inventory-mcp-server.ts construct per deployare il server MCP inventory in AgentCore Runtime
Task 5: Creare il database del gioco
Sezione intitolata “Task 5: Creare il database del gioco”Lo stato del gioco — partite salvate e inventario di ogni giocatore — risiede in Amazon DynamoDB. Crea un progetto DynamoDB chiamato DungeonDb con il generatore ts#dynamodb:
- Installa il Nx Console VSCode Plugin se non l'hai già fatto
- Apri la console Nx in VSCode
- Clicca su
Generate (UI)nella sezione "Common Nx Commands" - Cerca
@aws/nx-plugin - ts#dynamodb - Compila i parametri richiesti
- name: DungeonDb
- Clicca su
Generate
pnpm nx g @aws/nx-plugin:ts#dynamodb --name=DungeonDb --no-interactiveyarn nx g @aws/nx-plugin:ts#dynamodb --name=DungeonDb --no-interactivenpx nx g @aws/nx-plugin:ts#dynamodb --name=DungeonDb --no-interactivebunx nx g @aws/nx-plugin:ts#dynamodb --name=DungeonDb --no-interactivePuoi anche eseguire una prova per vedere quali file verrebbero modificati
pnpm nx g @aws/nx-plugin:ts#dynamodb --name=DungeonDb --no-interactive --dry-runyarn nx g @aws/nx-plugin:ts#dynamodb --name=DungeonDb --no-interactive --dry-runnpx nx g @aws/nx-plugin:ts#dynamodb --name=DungeonDb --no-interactive --dry-runbunx nx g @aws/nx-plugin:ts#dynamodb --name=DungeonDb --no-interactive --dry-runVedrai alcuni nuovi file apparire nella struttura delle cartelle.
File aggiornati da ts#dynamodb
Il generatore ts#dynamodb genera questi file.
Directorypackages/
Directorydungeon-db/
- config.json configurazione DynamoDB inclusi porta, nome tabella, impostazioni container e Global Secondary Indexes
Directorysrc/
- index.ts entry point ed export
- client.ts singleton client DynamoDB e risoluzione nome tabella
Directoryentities/
- example.ts entità ElectroDB di esempio (la sostituiremo)
- index.ts export entità
- project.json aggiunge i target
devepull-image
Directorycommon/
Directoryscripts/
Directorysrc/
Directorydynamodb/
- create-local-table.ts crea la tabella in DynamoDB Local
- pull-image.ts scarica l’immagine DynamoDB Local
- start-container.ts avvia il container DynamoDB Local
Directoryconstructs/
Directorysrc/
Directoryapp/dynamodb/
- dungeon-db.ts construct per il provisioning della tabella
Directorycore/
- dynamodb.ts construct generico per tabelle DynamoDB
Il src/client.ts generato esporta getDynamoDBClient() e resolveTableName(). Quando LOCAL_DEV=true (impostato automaticamente dai target dev) questi si connettono a DynamoDB Local; altrimenti si connettono ad AWS e risolvono il nome della tabella deployata dalla Runtime Configuration. Modelleremo le nostre entità Game e Inventory in questo progetto nel Modulo 2.
Per maggiori dettagli, consulta la guida del generatore ts#dynamodb.
Task 6: Creare l’interfaccia utente (UI)
Sezione intitolata “Task 6: Creare l’interfaccia utente (UI)”In questo task, creeremo l’interfaccia utente che ti permetterà di interagire con il gioco.
Game UI: Sito Web
Sezione intitolata “Game UI: Sito Web”Per creare l’interfaccia utente, creiamo un sito web chiamato GameUI seguendo questi passaggi:
- Installa il Nx Console VSCode Plugin se non l'hai già fatto
- Apri la console Nx in VSCode
- Clicca su
Generate (UI)nella sezione "Common Nx Commands" - Cerca
@aws/nx-plugin - ts#website - Compila i parametri richiesti
- name: GameUI
- ux: shadcn
- Clicca su
Generate
pnpm nx g @aws/nx-plugin:ts#website --name=GameUI --ux=shadcn --no-interactiveyarn nx g @aws/nx-plugin:ts#website --name=GameUI --ux=shadcn --no-interactivenpx nx g @aws/nx-plugin:ts#website --name=GameUI --ux=shadcn --no-interactivebunx nx g @aws/nx-plugin:ts#website --name=GameUI --ux=shadcn --no-interactivePuoi anche eseguire una prova per vedere quali file verrebbero modificati
pnpm nx g @aws/nx-plugin:ts#website --name=GameUI --ux=shadcn --no-interactive --dry-runyarn nx g @aws/nx-plugin:ts#website --name=GameUI --ux=shadcn --no-interactive --dry-runnpx nx g @aws/nx-plugin:ts#website --name=GameUI --ux=shadcn --no-interactive --dry-runbunx nx g @aws/nx-plugin:ts#website --name=GameUI --ux=shadcn --no-interactive --dry-runVedrai alcuni nuovi file apparire nella struttura delle cartelle.
File aggiornati da ts#website
Il generatore ts#website genera questi file. Esaminiamo alcuni file chiave evidenziati nella struttura:
Directorypackages/
Directorycommon/
Directoryconstructs/
Directorysrc/
Directoryapp/ CDK constructs specifici per l’applicazione
Directorystatic-websites/
- game-ui.ts CDK construct per creare la Game UI
Directorycore/
- static-website.ts construct generico per siti statici
Directorygame-ui/
Directorypublic/
- …
Directorysrc/
Directorycomponents/
DirectoryAppLayout/
- index.tsx layout generale della pagina usando shadcn
SidebarProvider+ header
- index.tsx layout generale della pagina usando shadcn
- app-sidebar.tsx sidebar shadcn predefinita con voci di navigazione
- alert.tsx, spinner.tsx primitive di feedback avvolte in shadcn
Directoryroutes/ routing basato su file @tanstack/react-router
- index.tsx root ’/’ page
- __root.tsx componente base per tutte le pagine
- config.ts
- main.tsx entrypoint React
- routeTree.gen.ts generato automaticamente da @tanstack/react-router
- styles.css importa i globali shadcn condivisi (Tailwind v4)
- index.html
- project.json
- vite.config.mts
- …
Directorycommon/
Directoryshadcn/ libreria shadcn/ui condivisa (token del tema,
Button,Card,Input,Sidebar, …) importata da ogni sito web conuxProvider=Shadcn- src/components/ui/*
- src/styles/globals.css token di design Tailwind + shadcn
- …
import * as url from 'url';import { Construct } from 'constructs';import { StaticWebsite } from '../../core/index.js';
export class GameUI extends StaticWebsite { constructor(scope: Construct, id: string) { super(scope, id, { websiteName: 'GameUI', websiteFilePath: url.fileURLToPath( new URL( '../../../../../../dist/packages/game-ui/bundle', import.meta.url, ), ), }); }}Questo è il CDK construct che definisce la nostra GameUI. Ha già configurato il percorso del bundle generato per la nostra UI basata su Vite. Ciò significa che al momento della build, il bundling avviene all’interno del target di build del progetto game-ui e l’output viene utilizzato qui.
import React from 'react';import { createRoot } from 'react-dom/client';import { RouterProvider, createRouter } from '@tanstack/react-router';import { routeTree } from './routeTree.gen';import './styles.css';
export type RouterProviderContext = {};
const router = createRouter({ routeTree, context: {} });
declare module '@tanstack/react-router' {  interface Register {    router: typeof router;  }}
const App = () => <RouterProvider router={router} context={{}} />;
const root = document.getElementById('root');root && createRoot(root).render( <React.StrictMode> <App /> </React.StrictMode>, );Questo è l’entry point dove React viene montato. Lo stile proviene dai token Tailwind v4 importati tramite styles.css. @tanstack/react-router è configurato in modalità file-based routing: finché il server dev è in esecuzione, qualsiasi file creato sotto routes/ viene rilevato automaticamente e l’albero delle route viene rigenerato. I generatori successivi (auth, connection) patcheranno questo file con AST per avvolgere <App /> in provider aggiuntivi.
import { createFileRoute } from '@tanstack/react-router';
export const Route = createFileRoute('/')({  component: RouteComponent,});
function RouteComponent() { return ( <div className="text-center"> <header> <h1>Welcome</h1> <p>Welcome to your new React website!</p> </header> </div> );}Un componente verrà renderizzato quando si naviga verso la route /. @tanstack/react-router gestirà la Route per te ogni volta che crei/sposti questo file (finché il server dev è in esecuzione).
Game UI: Autenticazione
Sezione intitolata “Game UI: Autenticazione”Configuriamo la nostra Game UI per richiedere autenticazione tramite Amazon Cognito seguendo questi passaggi:
- Installa il Nx Console VSCode Plugin se non l'hai già fatto
- Apri la console Nx in VSCode
- Clicca su
Generate (UI)nella sezione "Common Nx Commands" - Cerca
@aws/nx-plugin - ts#website#auth - Compila i parametri richiesti
- cognitoDomain: game-ui
- project: @dungeon-adventure/game-ui
- allowSignup: true
- Clicca su
Generate
pnpm nx g @aws/nx-plugin:ts#website#auth --cognitoDomain=game-ui --project=@dungeon-adventure/game-ui --allowSignup=true --no-interactiveyarn nx g @aws/nx-plugin:ts#website#auth --cognitoDomain=game-ui --project=@dungeon-adventure/game-ui --allowSignup=true --no-interactivenpx nx g @aws/nx-plugin:ts#website#auth --cognitoDomain=game-ui --project=@dungeon-adventure/game-ui --allowSignup=true --no-interactivebunx nx g @aws/nx-plugin:ts#website#auth --cognitoDomain=game-ui --project=@dungeon-adventure/game-ui --allowSignup=true --no-interactivePuoi anche eseguire una prova per vedere quali file verrebbero modificati
pnpm nx g @aws/nx-plugin:ts#website#auth --cognitoDomain=game-ui --project=@dungeon-adventure/game-ui --allowSignup=true --no-interactive --dry-runyarn nx g @aws/nx-plugin:ts#website#auth --cognitoDomain=game-ui --project=@dungeon-adventure/game-ui --allowSignup=true --no-interactive --dry-runnpx nx g @aws/nx-plugin:ts#website#auth --cognitoDomain=game-ui --project=@dungeon-adventure/game-ui --allowSignup=true --no-interactive --dry-runbunx nx g @aws/nx-plugin:ts#website#auth --cognitoDomain=game-ui --project=@dungeon-adventure/game-ui --allowSignup=true --no-interactive --dry-runVedrai alcuni nuovi file apparire/cambiare nella struttura delle cartelle.
File aggiornati da ts#website#auth
Il generatore ts#website#auth aggiorna/genera questi file. Esaminiamo alcuni file chiave evidenziati nella struttura:
Directorypackages/
Directorycommon/
Directoryconstructs/
Directorysrc/
Directorycore/
- user-identity.ts CDK construct per pool utenti/identità
Directorygame-ui/
Directorysrc/
Directorycomponents/
DirectoryAppLayout/
- index.tsx aggiunge utente/logout nell’header
DirectoryCognitoAuth/
- index.tsx gestisce il login a Cognito
DirectoryRuntimeConfig/
- index.tsx recupera
runtime-config.jsone lo fornisce via context
- index.tsx recupera
Directoryhooks/
- useRuntimeConfig.tsx
- main.tsx Aggiornato con Cognito
import { useAuth } from 'react-oidc-context';import CognitoAuth from './components/CognitoAuth';import { useRuntimeConfig } from './hooks/useRuntimeConfig';import RuntimeConfigProvider from './components/RuntimeConfig';import React from 'react';import { createRoot } from 'react-dom/client';import { RouterProvider, createRouter } from '@tanstack/react-router';import { routeTree } from './routeTree.gen';import './styles.css';export type RouterProviderContext = {};export type RouterProviderContext = { runtimeConfig?: ReturnType<typeof useRuntimeConfig>; auth?: ReturnType<typeof useAuth>;};const router = createRouter({ routeTree, context: {} });const router = createRouter({ routeTree, context: { runtimeConfig: undefined, auth: undefined },});// Register the router instance for type safetydeclare module '@tanstack/react-router' { interface Register { router: typeof router; }}const App = () => <RouterProvider router={router} context={{}} />;const App = () => { const auth = useAuth(); const runtimeConfig = useRuntimeConfig(); return <RouterProvider router={router} context={{ runtimeConfig, auth }} />;};const root = document.getElementById('root');root && createRoot(root).render( <React.StrictMode> <RuntimeConfigProvider> <CognitoAuth> <App /> </CognitoAuth> </RuntimeConfigProvider> </React.StrictMode>, );I componenti RuntimeConfigProvider e CognitoAuth sono stati aggiunti al file main.tsx tramite una trasformazione AST. Questo permette al componente CognitoAuth di autenticarsi con Amazon Cognito recuperando il runtime-config.json che contiene la configurazione necessaria per effettuare le chiamate backend alla destinazione corretta.
Game UI: Connessione alla Game API
Sezione intitolata “Game UI: Connessione alla Game API”Configuriamo la nostra Game UI per connettersi alla Game API creata precedentemente.
- Installa il Nx Console VSCode Plugin se non l'hai già fatto
- Apri la console Nx in VSCode
- Clicca su
Generate (UI)nella sezione "Common Nx Commands" - Cerca
@aws/nx-plugin - connection - Compila i parametri richiesti
- sourceProject: @dungeon-adventure/game-ui
- targetProject: @dungeon-adventure/game-api
- Clicca su
Generate
pnpm nx g @aws/nx-plugin:connection --sourceProject=@dungeon-adventure/game-ui --targetProject=@dungeon-adventure/game-api --no-interactiveyarn nx g @aws/nx-plugin:connection --sourceProject=@dungeon-adventure/game-ui --targetProject=@dungeon-adventure/game-api --no-interactivenpx nx g @aws/nx-plugin:connection --sourceProject=@dungeon-adventure/game-ui --targetProject=@dungeon-adventure/game-api --no-interactivebunx nx g @aws/nx-plugin:connection --sourceProject=@dungeon-adventure/game-ui --targetProject=@dungeon-adventure/game-api --no-interactivePuoi anche eseguire una prova per vedere quali file verrebbero modificati
pnpm nx g @aws/nx-plugin:connection --sourceProject=@dungeon-adventure/game-ui --targetProject=@dungeon-adventure/game-api --no-interactive --dry-runyarn nx g @aws/nx-plugin:connection --sourceProject=@dungeon-adventure/game-ui --targetProject=@dungeon-adventure/game-api --no-interactive --dry-runnpx nx g @aws/nx-plugin:connection --sourceProject=@dungeon-adventure/game-ui --targetProject=@dungeon-adventure/game-api --no-interactive --dry-runbunx nx g @aws/nx-plugin:connection --sourceProject=@dungeon-adventure/game-ui --targetProject=@dungeon-adventure/game-api --no-interactive --dry-runVedrai alcuni nuovi file apparire/cambiare nella struttura delle cartelle.
File aggiornati da UI -> tRPC connection
Il generatore connection genera/aggiorna questi file. Esaminiamo alcuni file chiave evidenziati nella struttura:
Directorypackages/
Directorygame-ui/
Directorysrc/
Directorycomponents/
- GameApiClientProvider.tsx configura il client GameAPI
Directoryhooks/
- useGameApi.tsx hook per chiamare la GameApi
- main.tsx inietta i provider trpc client
- package.json
import { useContext } from 'react';import { GameApiTRPCContext } from '../components/GameApiClientProvider';
export const useGameApi = () => {  const container = useContext(GameApiTRPCContext);  if (!container) {    throw new Error('useGameApi must be used within GameApiClientProvider');  }  return container.optionsProxy;};
export const useGameApiClient = () => { const container = useContext(GameApiTRPCContext); if (!container) { throw new Error( 'useGameApiClient must be used within GameApiClientProvider', ); } return container.client;};Questo hook fornisce accesso al client tRPC per chiamare la GameApi. Per esempi su come chiamare le API tRPC, consulta la guida all’utilizzo dell’hook tRPC.
import GameApiClientProvider from './components/GameApiClientProvider';import QueryClientProvider from './components/QueryClientProvider';import { useAuth } from 'react-oidc-context';import CognitoAuth from './components/CognitoAuth';import { useRuntimeConfig } from './hooks/useRuntimeConfig';import RuntimeConfigProvider from './components/RuntimeConfig';import React from 'react';import { createRoot } from 'react-dom/client';import { RouterProvider, createRouter } from '@tanstack/react-router';import { routeTree } from './routeTree.gen';import './styles.css';...const root = document.getElementById('root');root && createRoot(root).render( <React.StrictMode> <RuntimeConfigProvider> <CognitoAuth> <QueryClientProvider> <GameApiClientProvider> <App /> </GameApiClientProvider> </QueryClientProvider> </CognitoAuth> </RuntimeConfigProvider> </React.StrictMode>, );Il file main.tsx è stato aggiornato tramite una trasformazione AST per iniettare i provider tRPC.
Story Agent: Connessione al server MCP Inventory
Sezione intitolata “Story Agent: Connessione al server MCP Inventory”Connettiamo il nostro Story Agent al server MCP Inventory in modo che l’agente possa scoprire e invocare gli strumenti del server MCP.
- Installa il Nx Console VSCode Plugin se non l'hai già fatto
- Apri la console Nx in VSCode
- Clicca su
Generate (UI)nella sezione "Common Nx Commands" - Cerca
@aws/nx-plugin - connection - Compila i parametri richiesti
- sourceProject: story
- targetProject: inventory
- Clicca su
Generate
pnpm nx g @aws/nx-plugin:connection --sourceProject=story --targetProject=inventory --no-interactiveyarn nx g @aws/nx-plugin:connection --sourceProject=story --targetProject=inventory --no-interactivenpx nx g @aws/nx-plugin:connection --sourceProject=story --targetProject=inventory --no-interactivebunx nx g @aws/nx-plugin:connection --sourceProject=story --targetProject=inventory --no-interactivePuoi anche eseguire una prova per vedere quali file verrebbero modificati
pnpm nx g @aws/nx-plugin:connection --sourceProject=story --targetProject=inventory --no-interactive --dry-runyarn nx g @aws/nx-plugin:connection --sourceProject=story --targetProject=inventory --no-interactive --dry-runnpx nx g @aws/nx-plugin:connection --sourceProject=story --targetProject=inventory --no-interactive --dry-runbunx nx g @aws/nx-plugin:connection --sourceProject=story --targetProject=inventory --no-interactive --dry-runFile aggiornati dalla connessione Story Agent -> Inventory MCP
Il generatore connection genera/aggiorna questi file:
Directorypackages/
Directorycommon/
Directoryagent_connection/
Directorydungeon_adventure_agent_connection/
Directorycore/
- agentcore_endpoints.py Risoluzione ARN/URL indipendente dal framework
- agentcore_mcp_transport.py Trasporto MCP indipendente dal framework
- agentcore_mcp_client_strands.py Client MCP Strands che avvolge il trasporto
Directoryauth/
httpx.Authindipendente dal framework per SigV4 / inoltro sessione- …
Directoryapp/
- inventory_mcp_server_client_strands.py Client Strands per connettersi al server MCP Inventory
- __init__.py Re-esporta i client per connessione
Directorystory/
Directorydungeon_adventure_story/agent/
- agent.py Modificato per importare e usare il client MCP
Il generatore:
- Crea un progetto Python condiviso
agent_connection(se non esiste già) con ilAgentCoreMCPClientStrandsprincipale - Genera una classe
InventoryMcpServerClientStrandsche gestisce la connessione al server MCP sia localmente (HTTP diretto) che quando deployato (tramite AgentCore con autenticazione IAM) - Trasforma
agent.pyper importare il client, creare un’istanza e collegare gli strumenti del server MCP all’agente - Aggiunge il progetto
agent_connectioncome dipendenza workspace del progetto story - Aggiorna il target
devper avviare automaticamente il server MCP quando si esegue localmente
Per maggiori dettagli, consulta la guida alla connessione Python Agent a MCP.
Game UI: Connessione allo Story Agent
Sezione intitolata “Game UI: Connessione allo Story Agent”Connettiamo la nostra Game UI allo Story Agent. Poiché l’agente parla AG-UI, il generatore connection collega CopilotKit: un componente chat con tema e un HttpAgent @ag-ui/client pronto per il rendering.
- Installa il Nx Console VSCode Plugin se non l'hai già fatto
- Apri la console Nx in VSCode
- Clicca su
Generate (UI)nella sezione "Common Nx Commands" - Cerca
@aws/nx-plugin - connection - Compila i parametri richiesti
- sourceProject: @dungeon-adventure/game-ui
- targetProject: story
- Clicca su
Generate
pnpm nx g @aws/nx-plugin:connection --sourceProject=@dungeon-adventure/game-ui --targetProject=story --no-interactiveyarn nx g @aws/nx-plugin:connection --sourceProject=@dungeon-adventure/game-ui --targetProject=story --no-interactivenpx nx g @aws/nx-plugin:connection --sourceProject=@dungeon-adventure/game-ui --targetProject=story --no-interactivebunx nx g @aws/nx-plugin:connection --sourceProject=@dungeon-adventure/game-ui --targetProject=story --no-interactivePuoi anche eseguire una prova per vedere quali file verrebbero modificati
pnpm nx g @aws/nx-plugin:connection --sourceProject=@dungeon-adventure/game-ui --targetProject=story --no-interactive --dry-runyarn nx g @aws/nx-plugin:connection --sourceProject=@dungeon-adventure/game-ui --targetProject=story --no-interactive --dry-runnpx nx g @aws/nx-plugin:connection --sourceProject=@dungeon-adventure/game-ui --targetProject=story --no-interactive --dry-runbunx nx g @aws/nx-plugin:connection --sourceProject=@dungeon-adventure/game-ui --targetProject=story --no-interactive --dry-runFile aggiornati dalla connessione UI -> Story Agent
Il generatore connection genera/aggiorna questi file:
Directorypackages/
Directorygame-ui/
Directorysrc/
Directorycomponents/
- AguiProvider.tsx
CopilotKitProvidercon ogni agente AG-UI connesso registrato Directorycopilot/
- index.tsx
CopilotChat/CopilotSidebar/CopilotPopupcon tema Shadcn - ShadcnAssistantMessage.tsx, ShadcnUserMessage.tsx, ShadcnChatInput.tsx, ShadcnCursor.tsx, copilot.css
- index.tsx
- AguiProvider.tsx
Directoryhooks/
- useAguiStoryAgent.tsx Costruisce un
HttpAgent, inietta il token bearer Cognito e riempiethreadIdall’id di sessione di 33 caratteri di AgentCore
- useAguiStoryAgent.tsx Costruisce un
- main.tsx Avvolge
<App />in<AguiProvider>
Il generatore:
- Rileva il
uxProviderdel sito web React (Shadcn qui) e fornisce componenti chat corrispondenti. - Registra ogni agente connesso su un singolo
CopilotKitProvider— rieseguire per un altro agente aggiunge semplicemente un altro hook. - Legge l’ARN del runtime dell’agente dalla Runtime Configuration, costruisce l’URL di invocazione AgentCore e allega il token bearer Cognito più l’header dell’id di sessione AgentCore.
Per maggiori dettagli, consulta la guida alla connessione React a AG-UI.
Connettere la Game API e il server MCP Inventory al database
Sezione intitolata “Connettere la Game API e il server MCP Inventory al database”Sia la Game API che il server MCP Inventory leggono e scrivono nella nostra tabella DynamoDB, quindi connettiamoli al progetto DungeonDb. Il generatore connection rileva che il target è un progetto ts#dynamodb e collega il target dev di ogni progetto sorgente per avviare automaticamente DynamoDB Local.
- Installa il Nx Console VSCode Plugin se non l'hai già fatto
- Apri la console Nx in VSCode
- Clicca su
Generate (UI)nella sezione "Common Nx Commands" - Cerca
@aws/nx-plugin - connection - Compila i parametri richiesti
- sourceProject: @dungeon-adventure/game-api
- targetProject: @dungeon-adventure/dungeon-db
- Clicca su
Generate
pnpm nx g @aws/nx-plugin:connection --sourceProject=@dungeon-adventure/game-api --targetProject=@dungeon-adventure/dungeon-db --no-interactiveyarn nx g @aws/nx-plugin:connection --sourceProject=@dungeon-adventure/game-api --targetProject=@dungeon-adventure/dungeon-db --no-interactivenpx nx g @aws/nx-plugin:connection --sourceProject=@dungeon-adventure/game-api --targetProject=@dungeon-adventure/dungeon-db --no-interactivebunx nx g @aws/nx-plugin:connection --sourceProject=@dungeon-adventure/game-api --targetProject=@dungeon-adventure/dungeon-db --no-interactivePuoi anche eseguire una prova per vedere quali file verrebbero modificati
pnpm nx g @aws/nx-plugin:connection --sourceProject=@dungeon-adventure/game-api --targetProject=@dungeon-adventure/dungeon-db --no-interactive --dry-runyarn nx g @aws/nx-plugin:connection --sourceProject=@dungeon-adventure/game-api --targetProject=@dungeon-adventure/dungeon-db --no-interactive --dry-runnpx nx g @aws/nx-plugin:connection --sourceProject=@dungeon-adventure/game-api --targetProject=@dungeon-adventure/dungeon-db --no-interactive --dry-runbunx nx g @aws/nx-plugin:connection --sourceProject=@dungeon-adventure/game-api --targetProject=@dungeon-adventure/dungeon-db --no-interactive --dry-run- Installa il Nx Console VSCode Plugin se non l'hai già fatto
- Apri la console Nx in VSCode
- Clicca su
Generate (UI)nella sezione "Common Nx Commands" - Cerca
@aws/nx-plugin - connection - Compila i parametri richiesti
- sourceProject: @dungeon-adventure/inventory
- targetProject: @dungeon-adventure/dungeon-db
- Clicca su
Generate
pnpm nx g @aws/nx-plugin:connection --sourceProject=@dungeon-adventure/inventory --targetProject=@dungeon-adventure/dungeon-db --no-interactiveyarn nx g @aws/nx-plugin:connection --sourceProject=@dungeon-adventure/inventory --targetProject=@dungeon-adventure/dungeon-db --no-interactivenpx nx g @aws/nx-plugin:connection --sourceProject=@dungeon-adventure/inventory --targetProject=@dungeon-adventure/dungeon-db --no-interactivebunx nx g @aws/nx-plugin:connection --sourceProject=@dungeon-adventure/inventory --targetProject=@dungeon-adventure/dungeon-db --no-interactivePuoi anche eseguire una prova per vedere quali file verrebbero modificati
pnpm nx g @aws/nx-plugin:connection --sourceProject=@dungeon-adventure/inventory --targetProject=@dungeon-adventure/dungeon-db --no-interactive --dry-runyarn nx g @aws/nx-plugin:connection --sourceProject=@dungeon-adventure/inventory --targetProject=@dungeon-adventure/dungeon-db --no-interactive --dry-runnpx nx g @aws/nx-plugin:connection --sourceProject=@dungeon-adventure/inventory --targetProject=@dungeon-adventure/dungeon-db --no-interactive --dry-runbunx nx g @aws/nx-plugin:connection --sourceProject=@dungeon-adventure/inventory --targetProject=@dungeon-adventure/dungeon-db --no-interactive --dry-runGame UI: Infrastruttura
Sezione intitolata “Game UI: Infrastruttura”Creiamo il progetto finale per l’infrastruttura CDK.
- Installa il Nx Console VSCode Plugin se non l'hai già fatto
- Apri la console Nx in VSCode
- Clicca su
Generate (UI)nella sezione "Common Nx Commands" - Cerca
@aws/nx-plugin - ts#infra - Compila i parametri richiesti
- name: infra
- Clicca su
Generate
pnpm nx g @aws/nx-plugin:ts#infra --name=infra --no-interactiveyarn nx g @aws/nx-plugin:ts#infra --name=infra --no-interactivenpx nx g @aws/nx-plugin:ts#infra --name=infra --no-interactivebunx nx g @aws/nx-plugin:ts#infra --name=infra --no-interactivePuoi anche eseguire una prova per vedere quali file verrebbero modificati
pnpm nx g @aws/nx-plugin:ts#infra --name=infra --no-interactive --dry-runyarn nx g @aws/nx-plugin:ts#infra --name=infra --no-interactive --dry-runnpx nx g @aws/nx-plugin:ts#infra --name=infra --no-interactive --dry-runbunx nx g @aws/nx-plugin:ts#infra --name=infra --no-interactive --dry-runVedrai alcuni nuovi file apparire/cambiare nella struttura delle cartelle.
File aggiornati da ts#infra
Il generatore ts#infra genera/aggiorna questi file. Esaminiamo alcuni file chiave evidenziati nella struttura:
Directorypackages/
Directorycommon/
Directoryconstructs/
Directorysrc/
Directorycore/
- checkov.ts
- index.ts
Directoryinfra
Directorysrc/
Directorystages/
- application-stage.ts stack CDK definiti qui
Directorystacks/
- application-stack.ts risorse CDK definite qui
- main.ts entrypoint che definisce tutti gli stage
- cdk.json
- checkov.yml
- project.json
- …
- package.json
- tsconfig.json aggiunti riferimenti
- tsconfig.base.json aggiunto alias
import { ApplicationStage } from './stages/application-stage.js';import { App } from ':dungeon-adventure/common-constructs';
const app = new App();
// Usa questo per deployare il tuo ambiente sandbox personale (assume le credenziali CLI)new ApplicationStage(app, 'dungeon-adventure-infra-sandbox', {  env: {    account: process.env.CDK_DEFAULT_ACCOUNT,    region: process.env.CDK_DEFAULT_REGION,  },});
app.synth();Questo è l’entry point per l’applicazione CDK.
import { Stack, StackProps } from 'aws-cdk-lib';import { Construct } from 'constructs';
export class ApplicationStack extends Stack {  constructor(scope: Construct, id: string, props?: StackProps) {    super(scope, id, props);
// Il codice che definisce lo stack va qui }}Istanzieremo i nostri CDK constructs per costruire il gioco dungeon adventure.
Task 7: Aggiornare l’infrastruttura
Sezione intitolata “Task 7: Aggiornare l’infrastruttura”Aggiorniamo packages/infra/src/stacks/application-stack.ts per istanziare alcuni dei nostri constructs generati:
import {  GameApi,  GameUI,  InventoryMcpServer,  StoryAgent,  UserIdentity,} from ':dungeon-adventure/common-constructs';import { Stack, StackProps, CfnOutput } from 'aws-cdk-lib';import { Construct } from 'constructs';export class ApplicationStack extends Stack {  constructor(scope: Construct, id: string, props?: StackProps) {    super(scope, id, props);
    const userIdentity = new UserIdentity(this, 'UserIdentity');
    const gameApi = new GameApi(this, 'GameApi', {      integrations: GameApi.defaultIntegrations(this).build(),    });
    const mcpServer = new InventoryMcpServer(this, 'InventoryMcpServer');
    // Use Cognito for user authentication with the agent    const storyAgent = new StoryAgent(this, 'StoryAgent', {      identity: userIdentity,    });
    new CfnOutput(this, 'StoryAgentArn', {      value: storyAgent.agentCoreRuntime.agentRuntimeArn,    });    new CfnOutput(this, 'InventoryMcpArn', {      value: mcpServer.agentCoreRuntime.agentRuntimeArn,    });
    // Grant the agent permissions to invoke our mcp server    mcpServer.grantInvokeAccess(storyAgent);
    // Grant the authenticated role access to invoke the api    gameApi.grantInvokeAccess(userIdentity.identityPool.authenticatedRole);
    new GameUI(this, 'GameUI');  }}
import { Stack, StackProps } from 'aws-cdk-lib';import { GameApi, GameUI, InventoryMcpServer, StoryAgent, UserIdentity,} from ':dungeon-adventure/common-constructs';import { Stack, StackProps, CfnOutput } from 'aws-cdk-lib';import { Construct } from 'constructs';
export class ApplicationStack extends Stack { constructor(scope: Construct, id: string, props?: StackProps) { super(scope, id, props);
// The code that defines your stack goes here const userIdentity = new UserIdentity(this, 'UserIdentity');
const gameApi = new GameApi(this, 'GameApi', { integrations: GameApi.defaultIntegrations(this).build(), });
const mcpServer = new InventoryMcpServer(this, 'InventoryMcpServer');
// Use Cognito for user authentication with the agent const storyAgent = new StoryAgent(this, 'StoryAgent', { identity: userIdentity, });
new CfnOutput(this, 'StoryAgentArn', { value: storyAgent.agentCoreRuntime.agentRuntimeArn, }); new CfnOutput(this, 'InventoryMcpArn', { value: mcpServer.agentCoreRuntime.agentRuntimeArn, });
// Grant the agent permissions to invoke our mcp server mcpServer.grantInvokeAccess(storyAgent);
// Grant the authenticated role access to invoke the api gameApi.grantInvokeAccess(userIdentity.identityPool.authenticatedRole);
new GameUI(this, 'GameUI'); }}Task 8: Compilare il codice
Sezione intitolata “Task 8: Compilare il codice”Comandi Nx
Target singoli vs multipli
Sezione intitolata “Target singoli vs multipli”Il comando run-many esegue un target su più sotto-progetti elencati (--all li seleziona tutti). Questo garantisce che le dipendenze vengano eseguite nell’ordine corretto.
Puoi anche attivare una build (o qualsiasi altro task) per un singolo target di progetto eseguendo il target direttamente sul progetto. Ad esempio, per compilare il progetto @dungeon-adventure/infra, esegui il seguente comando:
pnpm nx build infrayarn nx build infranpx nx build infrabunx nx build infraPuoi anche omettere lo scope e usare la sintassi abbreviata di Nx se preferisci:
pnpm nx build infrayarn nx build infranpx nx build infrabunx nx build infraVisualizzare le dipendenze
Sezione intitolata “Visualizzare le dipendenze”Per visualizzare le dipendenze, esegui:
pnpm nx graphyarn nx graphnpx nx graphbunx nx graph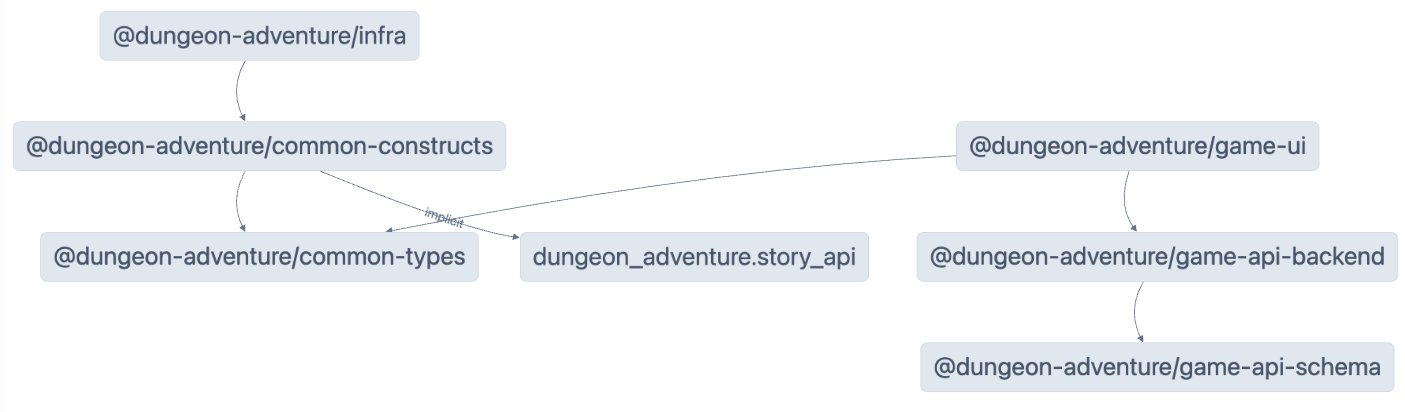
Caching
Sezione intitolata “Caching”Nx si basa sul caching per riutilizzare gli artefatti delle build precedenti e velocizzare lo sviluppo. È necessaria una certa configurazione per farlo funzionare correttamente e potrebbero esserci casi in cui vuoi eseguire una build senza usare la cache. Per farlo, aggiungi semplicemente l’argomento --skip-nx-cache al comando. Ad esempio:
pnpm nx build infra --skip-nx-cacheyarn nx build infra --skip-nx-cachenpx nx build infra --skip-nx-cachebunx nx build infra --skip-nx-cacheSe per qualsiasi motivo volessi pulire la cache (memorizzata nella cartella .nx), puoi eseguire il seguente comando:
pnpm nx resetyarn nx resetnpx nx resetbunx nx resetDalla riga di comando, esegui il seguente comando per correggere prima eventuali problemi di lint:
pnpm lintyarn lintnpm run lintbun lintQuindi, esegui il seguente comando per una build completa:
pnpm buildyarn buildnpm run buildbun buildVedrai il seguente prompt:
 NX   The workspace is out of sync
[@nx/js:typescript-sync]: Alcuni file di configurazione TypeScript mancano di riferimenti di progetto ai progetti da cui dipendono o contengono riferimenti di progetto obsoleti.
Questo causerà un errore in CI.
? Vuoi sincronizzare le modifiche identificate per aggiornare il workspace? …Sì, sincronizza le modifiche ed esegui i taskNo, esegui i task senza sincronizzare le modifiche
Questo messaggio indica che NX ha rilevato alcuni file che possono essere aggiornati automaticamente. In questo caso, si riferisce ai file tsconfig.json che non hanno riferimenti TypeScript configurati sui progetti referenziati.
Seleziona l’opzione Sì, sincronizza le modifiche ed esegui i task per procedere. Dovresti notare che tutti gli errori di import dell’IDE vengono risolti automaticamente poiché il generatore sync aggiungerà automaticamente i riferimenti TypeScript mancanti!
Tutti gli artefatti compilati sono ora disponibili nella cartella dist/ situata alla radice del monorepo. Questa è una pratica standard quando si utilizzano progetti generati da @aws/nx-plugin poiché non inquina la struttura dei file con file generati. Nel caso in cui tu voglia pulire i file, elimina la cartella dist/ senza preoccuparti degli artefatti di build sparsi nella struttura dei file.
Congratulazioni! Hai creato tutti i sotto-progetti necessari per iniziare a implementare il core del nostro gioco AI Dungeon Adventure. 🎉🎉🎉