

构建 UI
任务 1:在本地运行所有内容
Section titled “任务 1:在本地运行所有内容”启动完整的本地堆栈——game-ui 开发服务器以及本地 Game API 和本地 AG-UI Story Agent(后者会启动 Inventory MCP 服务器)——只需一个命令:
pnpm nx dev game-uiyarn nx dev game-uinpx nx dev game-uibunx nx dev game-uigame-ui 上的 dev 目标依赖于 game-api:dev 和 dungeon_adventure.story:agent-dev,因此 Nx 会并行启动每个项目的本地服务器。通过我们在模块 1 中设置的连接,它们会依次启动 Inventory MCP 服务器和 DynamoDB Local。确保您的容器引擎正在运行,然后在浏览器中打开 http://localhost:4200/ 上的开发服务器。
任务 2:CopilotKit 已连接的位置
Section titled “任务 2:CopilotKit 已连接的位置”当您在模块 1 中为 game-ui → story 运行 connection 生成器时,Shadcn 网站的 AG-UI 集成已为您生成。值得快速查看一下:
文件夹packages/game-ui/src/
文件夹components/
- AguiProvider.tsx 单个
CopilotKitProvider注册到每个 AG-UI 代理。 文件夹copilot/
- index.tsx 重新导出主题化的
CopilotChat/CopilotSidebar/CopilotPopup。 - ShadcnAssistantMessage.tsx, ShadcnUserMessage.tsx, ShadcnChatInput.tsx, ShadcnCursor.tsx, copilot.css
- index.tsx 重新导出主题化的
- story-agent-chat.tsx A
CopilotChatpre-bound to the Story Agent’sagentId.
- AguiProvider.tsx 单个
文件夹hooks/
- useAguiStoryAgent.tsx 实例化一个指向已部署 Story Agent 的
@ag-ui/clientHttpAgent,并将threadId填充到 AgentCore 的 33 字符最小会话 id。
- useAguiStoryAgent.tsx 实例化一个指向已部署 Story Agent 的
- main.tsx 将
<App />包装在<AguiProvider>中
我们需要做的就是将 <CopilotChat agentId="agent" threadId={...} /> 放入路由中。有关集成如何组合的更多详细信息,请参阅 React → AG-UI 连接指南。
任务 3:为地牢重新设计样式
Section titled “任务 3:为地牢重新设计样式”替换 packages/game-ui/src/styles.css——这是我们为样式更改的唯一文件。它导入共享的 Shadcn 全局样式,将调色板覆盖为火把照明的地牢主题,并使 CopilotKit 继承这些颜色:
@import '../../common/shadcn/src/styles/globals.css';@source './**/*.{ts,tsx}';
/* Dungeon theme — torch-lit parchment on stone. Applied to `:root` for the * page and to `[data-copilotkit][data-copilotkit]` for CopilotKit's chat * surface; CopilotKit ships a same-specificity `[data-copilotkit]` rule that * resets `--background` back to white, so we bump specificity with the * doubled selector. */:root,[data-copilotkit][data-copilotkit] {  --background: oklch(0.18 0.02 60);  --foreground: oklch(0.92 0.04 85);  --card: oklch(0.22 0.03 60);  --card-foreground: oklch(0.92 0.04 85);  --popover: oklch(0.2 0.02 60);  --popover-foreground: oklch(0.92 0.04 85);  --primary: oklch(0.75 0.15 75);  --primary-foreground: oklch(0.15 0.02 60);  --secondary: oklch(0.28 0.04 60);  --secondary-foreground: oklch(0.92 0.04 85);  --muted: oklch(0.25 0.02 60);  --muted-foreground: oklch(0.7 0.04 85);  --accent: oklch(0.4 0.12 30);  --accent-foreground: oklch(0.95 0.04 85);  --destructive: oklch(0.55 0.22 25);  --border: oklch(0.35 0.03 60);  --input: oklch(0.3 0.03 60);  --ring: oklch(0.75 0.15 75);  --sidebar: oklch(0.15 0.02 60);  --sidebar-foreground: oklch(0.88 0.04 85);  --sidebar-primary: oklch(0.75 0.15 75);  --sidebar-primary-foreground: oklch(0.15 0.02 60);  --sidebar-accent: oklch(0.28 0.04 60);  --sidebar-accent-foreground: oklch(0.92 0.04 85);  --sidebar-border: oklch(0.3 0.03 60);  --sidebar-ring: oklch(0.75 0.15 75);}
body {  font-family: 'Georgia', 'Cambria', serif;  background:    radial-gradient(circle at 20% 10%, oklch(0.25 0.05 70 / 0.4), transparent 40%),    radial-gradient(circle at 80% 90%, oklch(0.25 0.1 30 / 0.3), transparent 40%),    var(--background);}
h1, h2, h3 {  letter-spacing: 0.05em;}
任务 4:创建游戏路由
Section titled “任务 4:创建游戏路由”我们需要两个路由——一个用于选择英雄,一个用于游戏。两者都使用 shadcn 组件和 CopilotKit 聊天;没有手工制作的聊天 UI。
import { useInfiniteQuery, useMutation } from '@tanstack/react-query';import { createFileRoute, useNavigate } from '@tanstack/react-router';import { useEffect, useMemo, useRef, useState } from 'react';import { Button } from '@dungeon-adventure/common-shadcn/components/ui/button';import { Input } from '@dungeon-adventure/common-shadcn/components/ui/input';import {  Card,  CardContent,} from '@dungeon-adventure/common-shadcn/components/ui/card';import { Spinner } from '@dungeon-adventure/common-shadcn/components/ui/spinner';import { useGameApi } from '../hooks/useGameApi';import type { IGame } from '@dungeon-adventure/game-api';
const GENRES = ['medieval', 'zombie', 'superhero'] as const;
export const Route = createFileRoute('/')({ component: RouteComponent });
function RouteComponent() {  const [playerName, setPlayerName] = useState('');  const [pending, setPending] = useState<IGame['genre'] | null>(null);  const navigate = useNavigate();  const gameApi = useGameApi();  const saveGame = useMutation(gameApi.games.save.mutationOptions());  const games = useInfiniteQuery(    gameApi.games.query.infiniteQueryOptions(      { limit: 10 },      { getNextPageParam: ({ cursor }) => cursor ?? undefined },    ),  );  const savedGames = useMemo(    () => games.data?.pages.flatMap((p) => p.items) ?? [],    [games.data],  );
  // Auto-fetch subsequent pages when the sentinel at the bottom of the list  // scrolls into view — keeps the homepage a simple infinite scroll without  // a "Load more" button.  const sentinel = useRef<HTMLDivElement | null>(null);  useEffect(() => {    const el = sentinel.current;    if (!el || !games.hasNextPage) return;    const io = new IntersectionObserver(      (entries) => {        if (          entries.some((e) => e.isIntersecting) &&          !games.isFetchingNextPage        ) {          void games.fetchNextPage();        }      },      { rootMargin: '120px' },    );    io.observe(el);    return () => io.disconnect();  }, [games.hasNextPage, games.isFetchingNextPage, games.fetchNextPage]);
  const startGame = async (player: string, genre: IGame['genre']) => {    if (!player.trim()) return;    setPending(genre);    try {      if (!savedGames.find((g) => g.playerName === player)) {        await saveGame.mutateAsync({ playerName: player, genre });      }      await navigate({        to: '/game/$playerName',        params: { playerName: player },        search: { genre },      });    } finally {      setPending(null);    }  };
  const busy = pending !== null;  const firstLoad = games.isLoading;
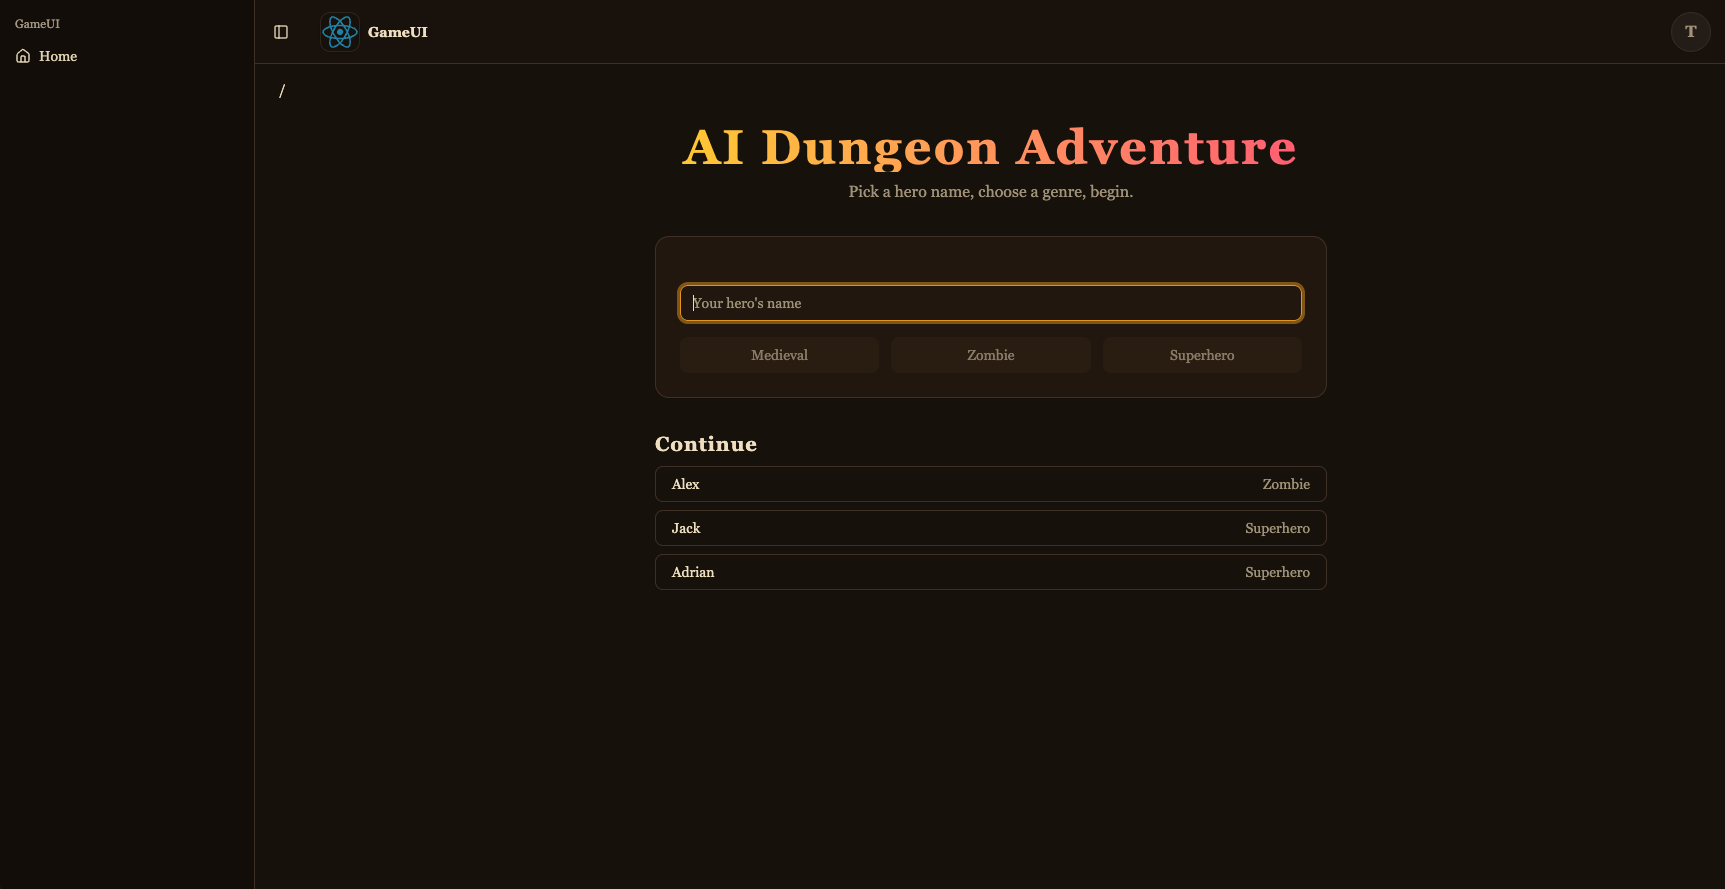
  return (    <div className="mx-auto flex w-full max-w-2xl flex-col gap-8">      <div className="text-center">        <h1 className="bg-gradient-to-r from-amber-300 to-rose-400 bg-clip-text text-5xl font-bold text-transparent">          AI Dungeon Adventure        </h1>        <p className="text-muted-foreground mt-2">          Pick a hero name, choose a genre, begin.        </p>      </div>
      <Card>        <CardContent className="flex flex-col gap-4 pt-6">          <Input            placeholder="Your hero's name"            value={playerName}            disabled={busy}            onChange={(e) => setPlayerName(e.target.value)}          />          <div className="grid grid-cols-3 gap-3">            {GENRES.map((genre) => (              <Button                key={genre}                variant="secondary"                disabled={!playerName.trim() || busy}                onClick={() => startGame(playerName, genre)}              >                {pending === genre && <Spinner />}                {genre[0].toUpperCase() + genre.slice(1)}              </Button>            ))}          </div>        </CardContent>      </Card>
      <div className="flex flex-col gap-2">        <h2 className="flex items-center gap-2 text-xl font-semibold">          Continue          {(firstLoad || games.isFetching) && <Spinner className="size-4" />}        </h2>        {!firstLoad && savedGames.length === 0 && (          <p className="text-muted-foreground text-sm">            No saved games yet — start a new adventure above.          </p>        )}        {savedGames.map((g) => (          <Button            key={g.playerName}            variant="outline"            className="justify-between"            disabled={busy}            onClick={() => startGame(g.playerName, g.genre)}          >            <span>{g.playerName}</span>            <span className="text-muted-foreground text-sm">              {g.genre[0].toUpperCase() + g.genre.slice(1)}            </span>          </Button>        ))}        <div ref={sentinel} aria-hidden className="h-1" />        {games.isFetchingNextPage && (          <div className="flex justify-center py-2">            <Spinner />          </div>        )}      </div>    </div>  );}
import { createFileRoute } from '@tanstack/react-router';import { useInfiniteQuery, useMutation } from '@tanstack/react-query';import { createFileRoute, useNavigate } from '@tanstack/react-router';import { useEffect, useMemo, useRef, useState } from 'react';import { Button } from '@dungeon-adventure/common-shadcn/components/ui/button';import { Input } from '@dungeon-adventure/common-shadcn/components/ui/input';import { Card, CardContent,} from '@dungeon-adventure/common-shadcn/components/ui/card';import { Spinner } from '@dungeon-adventure/common-shadcn/components/ui/spinner';import { useGameApi } from '../hooks/useGameApi';import type { IGame } from '@dungeon-adventure/game-api';
export const Route = createFileRoute('/')({ component: RouteComponent,});const GENRES = ['medieval', 'zombie', 'superhero'] as const;
export const Route = createFileRoute('/')({ component: RouteComponent });
function RouteComponent() { const [playerName, setPlayerName] = useState(''); const [pending, setPending] = useState<IGame['genre'] | null>(null); const navigate = useNavigate(); const gameApi = useGameApi(); const saveGame = useMutation(gameApi.games.save.mutationOptions()); const games = useInfiniteQuery( gameApi.games.query.infiniteQueryOptions( { limit: 10 }, { getNextPageParam: ({ cursor }) => cursor ?? undefined }, ), ); const savedGames = useMemo( () => games.data?.pages.flatMap((p) => p.items) ?? [], [games.data], );
// Auto-fetch subsequent pages when the sentinel at the bottom of the list // scrolls into view — keeps the homepage a simple infinite scroll without // a "Load more" button. const sentinel = useRef<HTMLDivElement | null>(null); useEffect(() => { const el = sentinel.current; if (!el || !games.hasNextPage) return; const io = new IntersectionObserver( (entries) => { if ( entries.some((e) => e.isIntersecting) && !games.isFetchingNextPage ) { void games.fetchNextPage(); } }, { rootMargin: '120px' }, ); io.observe(el); return () => io.disconnect(); }, [games.hasNextPage, games.isFetchingNextPage, games.fetchNextPage]);
const startGame = async (player: string, genre: IGame['genre']) => { if (!player.trim()) return; setPending(genre); try { if (!savedGames.find((g) => g.playerName === player)) { await saveGame.mutateAsync({ playerName: player, genre }); } await navigate({ to: '/game/$playerName', params: { playerName: player }, search: { genre }, }); } finally { setPending(null); } };
const busy = pending !== null; const firstLoad = games.isLoading;
return ( <div className="text-center"> <header> <h1>Welcome</h1> <p>Welcome to your new React website!</p> </header> <div className="mx-auto flex w-full max-w-2xl flex-col gap-8"> <div className="text-center"> <h1 className="bg-gradient-to-r from-amber-300 to-rose-400 bg-clip-text text-5xl font-bold text-transparent"> AI Dungeon Adventure </h1> <p className="text-muted-foreground mt-2"> Pick a hero name, choose a genre, begin. </p> </div>
<Card> <CardContent className="flex flex-col gap-4 pt-6"> <Input placeholder="Your hero's name" value={playerName} disabled={busy} onChange={(e) => setPlayerName(e.target.value)} /> <div className="grid grid-cols-3 gap-3"> {GENRES.map((genre) => ( <Button key={genre} variant="secondary" disabled={!playerName.trim() || busy} onClick={() => startGame(playerName, genre)} > {pending === genre && <Spinner />} {genre[0].toUpperCase() + genre.slice(1)} </Button> ))} </div> </CardContent> </Card>
<div className="flex flex-col gap-2"> <h2 className="flex items-center gap-2 text-xl font-semibold"> Continue {(firstLoad || games.isFetching) && <Spinner className="size-4" />} </h2> {!firstLoad && savedGames.length === 0 && ( <p className="text-muted-foreground text-sm"> No saved games yet — start a new adventure above. </p> )} {savedGames.map((g) => ( <Button key={g.playerName} variant="outline" className="justify-between" disabled={busy} onClick={() => startGame(g.playerName, g.genre)} > <span>{g.playerName}</span> <span className="text-muted-foreground text-sm"> {g.genre[0].toUpperCase() + g.genre.slice(1)} </span> </Button> ))} <div ref={sentinel} aria-hidden className="h-1" /> {games.isFetchingNextPage && ( <div className="flex justify-center py-2"> <Spinner /> </div> )} </div> </div> );}这是游戏选择器:新游戏表单(shadcn Input + Button + Card)加上由 useGameApi().games.query 与 useInfiniteQuery 提供的”继续”列表——底部哨兵 <div> 由 IntersectionObserver 监视,当滚动到视图中时自动调用 fetchNextPage(),标题旁边和列表下方的加载指示器显示加载状态。开始游戏会 saveGame (playerName, genre) 对(因此下次会显示)并导航到游戏路由。
import { UseAgentUpdate, useAgent } from '@copilotkit/react-core/v2';import { useQuery } from '@tanstack/react-query';import { createFileRoute } from '@tanstack/react-router';import { useEffect, useMemo, useRef } from 'react';import { CopilotChat } from '../../components/copilot';import { useGameApi } from '../../hooks/useGameApi';import type { IGame } from '@dungeon-adventure/game-api';
// AgentCore session ids must be at least 33 characters. The AG-UI hook pads// the threadId to this length before sending, so the thread id is stable for// a given (player, genre) pair — revisiting the URL continues the same story.const buildThreadId = (playerName: string, genre: string) =>  `${playerName}-${genre}`.padEnd(33, '0');
export const Route = createFileRoute('/game/$playerName')({  component: RouteComponent,  validateSearch: (search: Record<string, unknown>) => ({    genre: search.genre as IGame['genre'],  }),});
function RouteComponent() {  const { playerName } = Route.useParams();  const { genre } = Route.useSearch();  const threadId = useMemo(    () => buildThreadId(playerName, genre),    [playerName, genre],  );
  const gameApi = useGameApi();  const inventory = useQuery(    gameApi.inventory.query.queryOptions({ playerName, limit: 100 }),  );  // Conversation history persisted by the agent's ``S3SessionManager``. Each  // turn is stored as ``session_<threadId>/agents/agent_default/messages/…``.  //  // `staleTime: 0` + `refetchOnMount: 'always'` together force a fresh read  // on every visit — the cached snapshot from the *first* time we loaded  // this route (before the agent had written any turns back to S3) would  // otherwise look like an empty thread on revisit and trigger re-priming.  const pastActions = useQuery({    ...gameApi.actions.query.queryOptions({ sessionId: threadId }),    staleTime: 0,    refetchOnMount: 'always',  });
  const { agent } = useAgent({    agentId: 'agent',    updates: [UseAgentUpdate.OnMessagesChanged],  });
  // Hydrate the chat once the history query resolves. For a fresh thread  // (no stored messages) the agent's system prompt expects the player's  // name and genre in the first user message, so send that priming line.  //  // We wait for `isFetching` to go false (rather than just `isLoading`) so  // that revisits with a cached empty result from the first visit aren't  // mistaken for a fresh thread — the background refetch is what sees the  // turns the agent wrote since.  const primedRef = useRef(false);  useEffect(() => {    if (!agent || primedRef.current) return;    if (pastActions.isFetching || !pastActions.isSuccess) return;    primedRef.current = true;    const items = pastActions.data.items;    if (items.length > 0) {      agent.setMessages(        items.map((a) => ({          id: `m-${a.messageId}`,          role: a.role,          content: a.content,        })),      );      return;    }    agent.addMessage({      id: crypto.randomUUID(),      role: 'user',      content: `My name is ${playerName}. Start my ${genre} adventure.`,    });    void agent.runAgent();  }, [    agent,    pastActions.data,    pastActions.isFetching,    pastActions.isSuccess,    playerName,    genre,  ]);
  // The agent's ``add-to-inventory`` tool calls mutate DynamoDB directly, so  // the inventory query needs a nudge to refetch as turns complete. The  // ``useAgent({ updates: [OnMessagesChanged] })`` subscription re-renders  // this route on each message event — refetch whenever the message count  // changes, which covers both the initial populate and every subsequent  // turn.  const seenMessages = useRef(0);  useEffect(() => {    if (!agent) return;    if (agent.messages.length !== seenMessages.current) {      seenMessages.current = agent.messages.length;      void inventory.refetch();    }  });
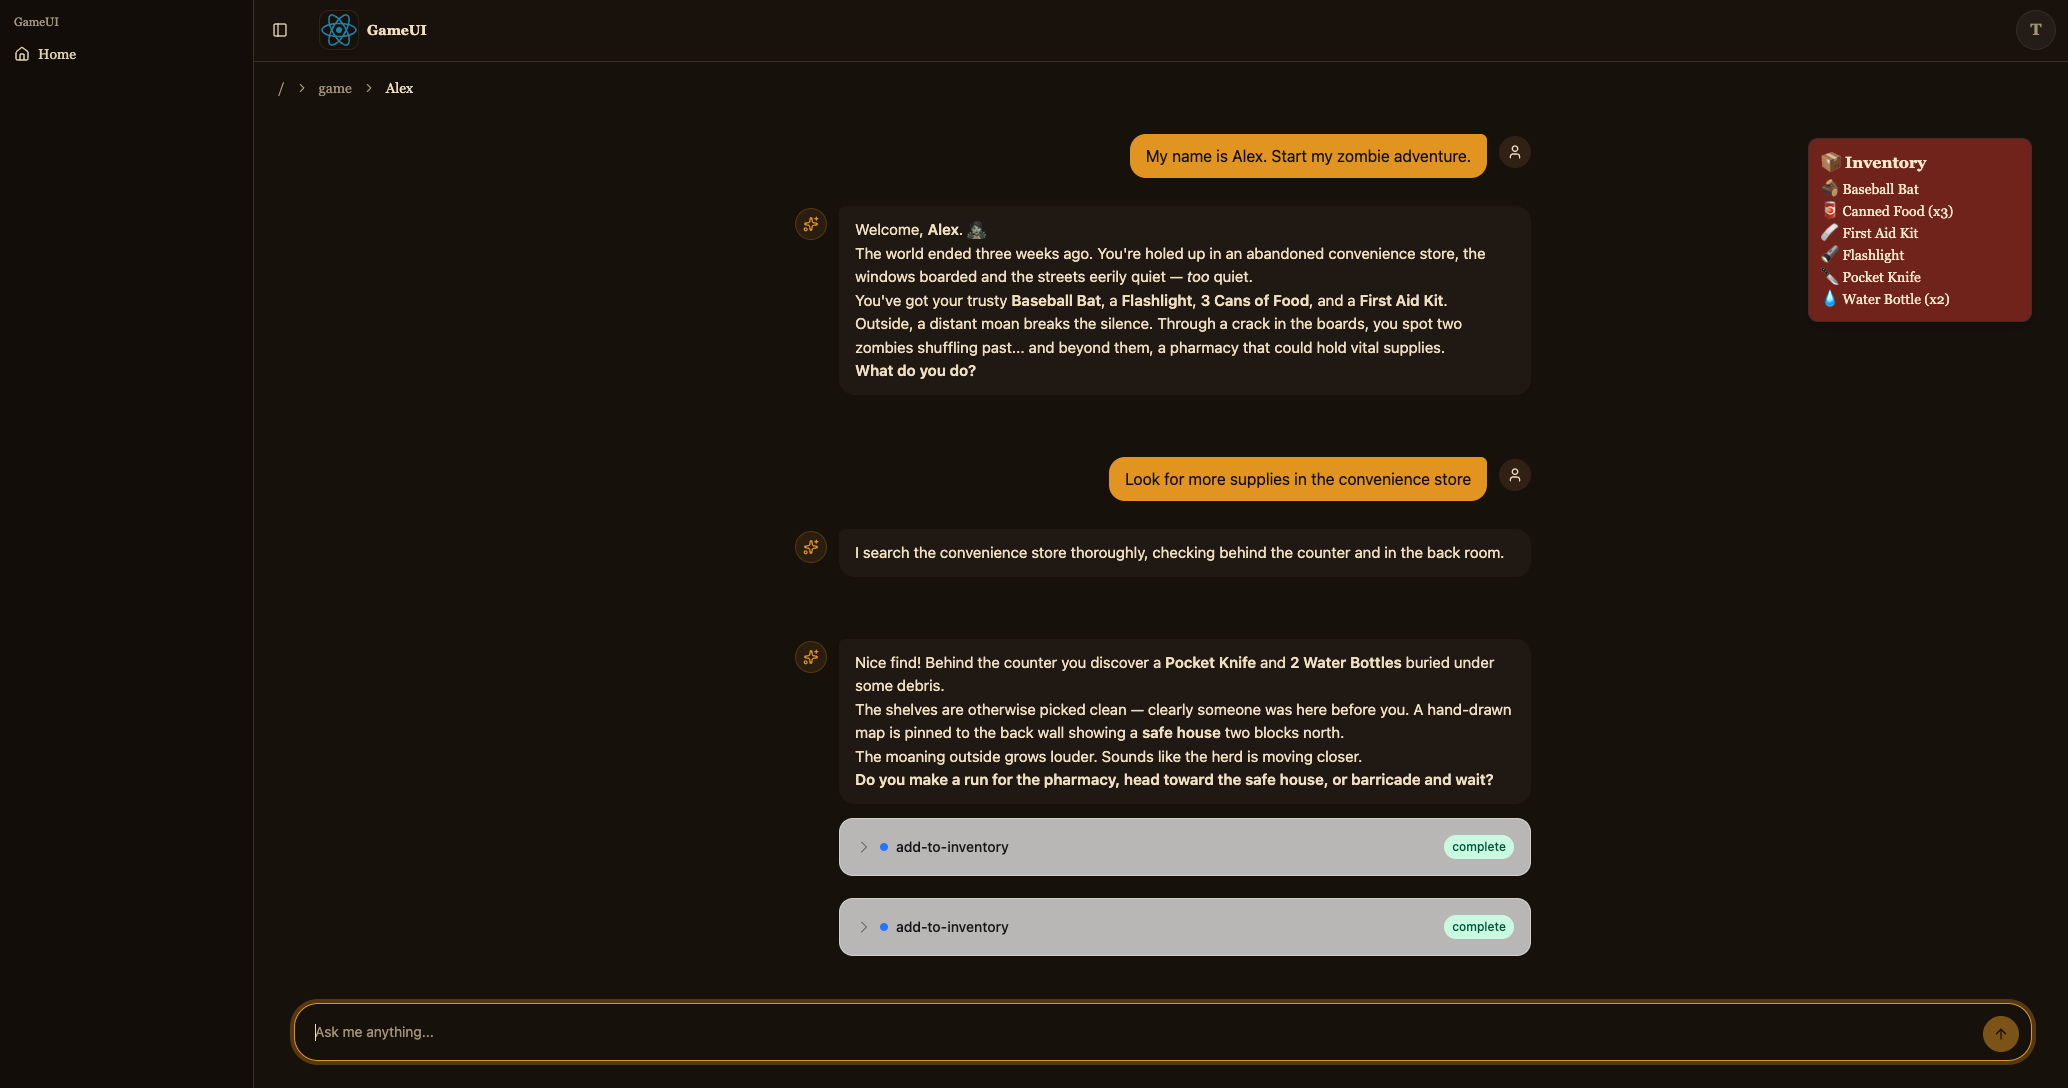
  return (    <div className="relative flex h-[calc(100vh-10rem)] min-h-0 flex-col">      {!!inventory.data?.items.length && (        <aside className="bg-accent text-accent-foreground pointer-events-none absolute right-4 top-4 z-10 w-56 rounded-lg border p-3 shadow-lg">          <div className="mb-1 font-semibold">📦 Inventory</div>          <ul className="flex flex-col gap-0.5 text-sm">            {inventory.data.items.map((item) => (              <li key={item.itemName}>                {item.emoji ?? '•'} {item.itemName}                {item.quantity > 1 ? ` (x${item.quantity})` : ''}              </li>            ))}          </ul>        </aside>      )}      <CopilotChat        agentId="agent"        threadId={threadId}        labels={{          chatInputPlaceholder: 'What do you do?',          welcomeMessageText: `${playerName}'s ${genre} adventure`,        }}      />    </div>  );}
这是游戏路由。它构建确定性的 threadId({player}-{genre} 填充到 33 个字符——AG-UI 钩子将其原样作为 AgentCore 会话 id 发送),渲染 <CopilotChat agentId="agent" threadId={threadId} />,并在顶部叠加来自 useGameApi().inventory.query 的库存。在挂载时,useGameApi().actions.query({ sessionId: threadId }) 读取代理存储在 S3 中的对话历史记录,如果有任何历史记录,则调用 agent.setMessages(...) 来重新激活聊天;否则它发送一条启动用户消息来启动故事。agent.messages 通过 useAgent({ updates: [OnMessagesChanged] }) 订阅,因此每个新回合也会重新获取库存查询(MCP 工具调用直接修改 DynamoDB)。
保存后,开发服务器现在应该允许您开始冒险并与 Story Agent 聊天。
任务 5:部署到 AWS
Section titled “任务 5:部署到 AWS”您的游戏已完成,并且您已在本地测试了每个部分。现在让我们将其部署到 AWS,以便您可以从任何地方玩它。
构建您的代码
Section titled “构建您的代码”pnpm buildyarn buildnpm run buildbun build部署您的应用程序
Section titled “部署您的应用程序”pnpm nx deploy-sandbox infrayarn nx deploy-sandbox infranpx nx deploy-sandbox infrabunx nx deploy-sandbox infradeploy-sandbox 目标部署在 packages/infra/src/main.ts 中定义的沙箱阶段。
deploy-sandbox 目标使用 CloudFormation 快速模式,该模式会在应用配置后立即完成每个资源操作,而不是等待完全稳定。您的第一次部署将需要大约 4 分钟才能完成,并且某些资源(例如 CloudFront 分配)可能会在之后短时间内继续在后台配置。后续部署会更快。
由于快速模式在资源完全稳定之前返回,deploy-sandbox 仅用于开发。对于 CI/CD 和生产部署,请使用 deploy-ci 目标,它始终等待完全稳定。
部署完成后,您将看到类似以下的输出:
dungeon-adventure-infra-sandbox-Applicationdungeon-adventure-infra-sandbox-Application: deploying... [2/2]
 ✅  dungeon-adventure-infra-sandbox-Application
✨  Deployment time: 220s
⚠️  Stack deployed using Express Mode. Resources still stabilizing: GameUICloudfrontDistribution, UserIdentityWebAcl, ...and more...
Outputs:dungeon-adventure-infra-sandbox-Application.GameApiEndpointXXX = https://xxx.execute-api.region.amazonaws.com/prod/dungeon-adventure-infra-sandbox-Application.GameUIDistributionDomainNameXXX = xxx.cloudfront.netdungeon-adventure-infra-sandbox-Application.InventoryMcpArn = arn:aws:bedrock-agentcore:region:xxxxxxx:runtime/dungeonadventureventoryMcpServerXXXX-YYYYdungeon-adventure-infra-sandbox-Application.RuntimeConfigApplicationId = xxxxdungeon-adventure-infra-sandbox-Application.StoryAgentArn = arn:aws:bedrock-agentcore:region:xxxxxxx:runtime/dungeonadventurecationStoryAgentXXXX-YYYYdungeon-adventure-infra-sandbox-Application.UserIdentityUserIdentityIdentityPoolIdXXX = region:xxxdungeon-adventure-infra-sandbox-Application.UserIdentityUserIdentityUserPoolClientIdXXX = xxxxxxxxxxdungeon-adventure-infra-sandbox-Application.UserIdentityUserIdentityUserPoolIdXXX = region_xxx
导航到您的 CloudFront URL(CDK 输出中的 GameUIDistributionDomainName),注册一个新账户,并玩完全在 AWS 上运行的游戏!
任务 6:混合本地和已部署的组件
Section titled “任务 6:混合本地和已部署的组件”您已经看到了两个极端:所有内容都在本地(dev)和所有内容都已部署。在日常开发中,混合两者通常很有用——例如,针对真实已部署的 API 和代理迭代网站代码,或者针对真实 DynamoDB 表在本地运行 API。
关键是 RUNTIME_CONFIG_APP_ID 环境变量。当项目在没有 LOCAL_DEV=true 的情况下运行时,运行时配置查找会使用此应用程序 id 从 AWS AppConfig 获取其配置——即 CDK 输出中的 RuntimeConfigApplicationId 值。
每个网站都有一个 load-runtime-config 目标,可将已部署的 runtime-config.json(Cognito 池、API 端点、代理 ARN)下载到本地开发服务器中。一些有用的组合:
-
本地网站 → 已部署的后端。 拉取一次已部署的配置,然后运行普通的
serve目标,以便 UI 与已部署的 API 和代理通信:Terminal window pnpm nx load-runtime-config game-uiTerminal window yarn nx load-runtime-config game-uiTerminal window npx nx load-runtime-config game-uiTerminal window bunx nx load-runtime-config game-uiTerminal window pnpm nx serve game-uiTerminal window yarn nx serve game-uiTerminal window npx nx serve game-uiTerminal window bunx nx serve game-ui -
本地 API → 真实 DynamoDB 表。 使用设置为已部署应用程序 id 的
RUNTIME_CONFIG_APP_ID运行普通的serve目标:Terminal window RUNTIME_CONFIG_APP_ID=<RuntimeConfigApplicationId from CDK outputs> pnpm nx serve game-apiTerminal window RUNTIME_CONFIG_APP_ID=<RuntimeConfigApplicationId from CDK outputs> yarn nx serve game-apiTerminal window RUNTIME_CONFIG_APP_ID=<RuntimeConfigApplicationId from CDK outputs> npx nx serve game-apiTerminal window RUNTIME_CONFIG_APP_ID=<RuntimeConfigApplicationId from CDK outputs> bunx nx serve game-api
这种灵活性使您可以准确测试您正在处理的部分,针对任何有意义的组件——本地或已部署。
恭喜。您已经构建、测试并部署了您的 Agentic Dungeon Adventure Game!🎉🎉🎉