We are actively enhancing this blueprint to incorporate improvements in observability and logging.
Deploying Stable Diffusion v2 with GPUs, Ray Serve and Gradio
This pattern demonstrates how to deploy the Stable Diffusion V2 model on Amazon EKS, using GPUs for accelerated image generation. Ray Serve provides efficient scaling across multiple GPU nodes, while Karpenter dynamically manages node provisioning.
Through this pattern, you will accomplish the following:
- Create an Amazon EKS cluster with a Karpenter managed GPU nodepool for dynamic scaling of Nodes.
- Install KubeRay Operator and other core EKS add-ons using the jark-stack Terraform blueprint.
- Deploy the Stable Diffusion model using RayServe for efficient scaling across your GPU resources
What is Stable Diffusion?
Stable Diffusion is a cutting-edge text-to-image model that generates stunning, detailed images from text descriptions. It's a powerful tool for artists, designers, and anyone who wants to unleash their imagination through image generation. This model stands out by offering a high degree of creative control and flexibility in the image generation process.
Deploying the Solution
Let's get Stable Diffusion v2-1 up and running on Amazon EKS! In this section, we'll cover:
- Prerequisites: Ensuring you have everything in place.
- Infrastructure Setup: Creating your EKS cluster and preparing it for deployment.
- Deploying the Ray Cluster: The core of your image generation pipeline, providing scalability and efficiency.
- Building the Gradio Web UI: A user-friendly interface for interacting with Stable Diffusion.
Prerequisites
👈Deploying the Ray Cluster with Stable Diffusion Model
Once the jark-stack cluster is deployed, you can proceed to use kubectl to deploy the ray-service-stablediffusion.yaml from /data-on-eks/gen-ai/inference/stable-diffusion-rayserve-gpu/ path.
In this step, we will deploy the Ray Serve cluster, which comprises one Head Pod on x86 CPU instances using Karpenter autoscaling, as well as Ray workers on g5.2xlarge instances, autoscaled by Karpenter.
Let's take a closer look at the key files used in this deployment and understand their functionalities before proceeding with the deployment:
-
ray_serve_sd.py: This script sets up a FastAPI application with two main components deployed using Ray Serve, which enables scalable model serving on GPU-equipped infrastructure:
- StableDiffusionV2 Deployment: This class initializes the Stable Diffusion V2 model using a scheduler and moves it to a GPU for processing. It includes functionality to generate images based on textual prompts, with the image size customizable via the input parameter.
- APIIngress: This FastAPI endpoint acts as an interface to the Stable Diffusion model. It exposes a GET method on the
/imaginepath that takes a text prompt and an optional image size. It generates an image using the Stable Diffusion model and returns it as a PNG file.
-
ray-service-stablediffusion.yaml: This RayServe deployment pattern sets up a scalable service for hosting the Stable Diffusion model on Amazon EKS with GPU support. It creates a dedicated namespace and configures a RayService with autoscaling capabilities to efficiently manage resource utilization based on incoming traffic. The deployment ensures that the model, served under the RayService umbrella, can automatically adjust between 1 and 4 replicas, depending on demand, with each replica requiring a GPU. This pattern makes use of custom container images designed to maximize performance and minimizes startup delays by ensuring that heavy dependencies are preloaded.
Deploy the Stable Diffusion V2 Model
Ensure the cluster is configured locally
aws eks --region us-west-2 update-kubeconfig --name jark-stack
Deploy RayServe Cluster
cd ./../gen-ai/inference/stable-diffusion-rayserve-gpu
kubectl apply -f ray-service-stablediffusion.yaml
Verify the deployment by running the following commands
The deployment process may take up to 10 to 12 minutes. The Head Pod is expected to be ready within 2 to 3 minutes, while the Ray Serve worker pod may take up to 10 minutes for image retrieval and Model deployment from Huggingface.
This deployment establishes a Ray head pod running on an x86 instance and a worker pod on a GPU G5 instance as shown below.
kubectl get pods -n stablediffusion

NAME                                                      READY   STATUS
rservice-raycluster-hb4l4-worker-gpu-worker-group-z8gdw   1/1     Running
stablediffusion-service-raycluster-hb4l4-head-4kfzz       2/2     Running
This deployment also sets up a stablediffusion service with multiple ports configured; port 8265 is designated for the Ray dashboard and port 8000 for the Stable Diffusion model endpoint.
kubectl get svc -n stablediffusion
NAME                                TYPE       CLUSTER-IP       EXTERNAL-IP   PORT(S)
stablediffusion-service             NodePort   172.20.223.142   <none>        8080:30213/TCP,6379:30386/TCP,8265:30857/TCP,10001:30666/TCP,8000:31194/TCP
stablediffusion-service-head-svc    NodePort   172.20.215.100   <none>        8265:30170/TCP,10001:31246/TCP,8000:30376/TCP,8080:32646/TCP,6379:31846/TCP
stablediffusion-service-serve-svc   NodePort   172.20.153.125   <none>        8000:31459/TCP
For the Ray dashboard, you can port-forward these ports individually to access the web UI locally using localhost.
kubectl port-forward svc/stablediffusion-service 8266:8265 -n stablediffusion
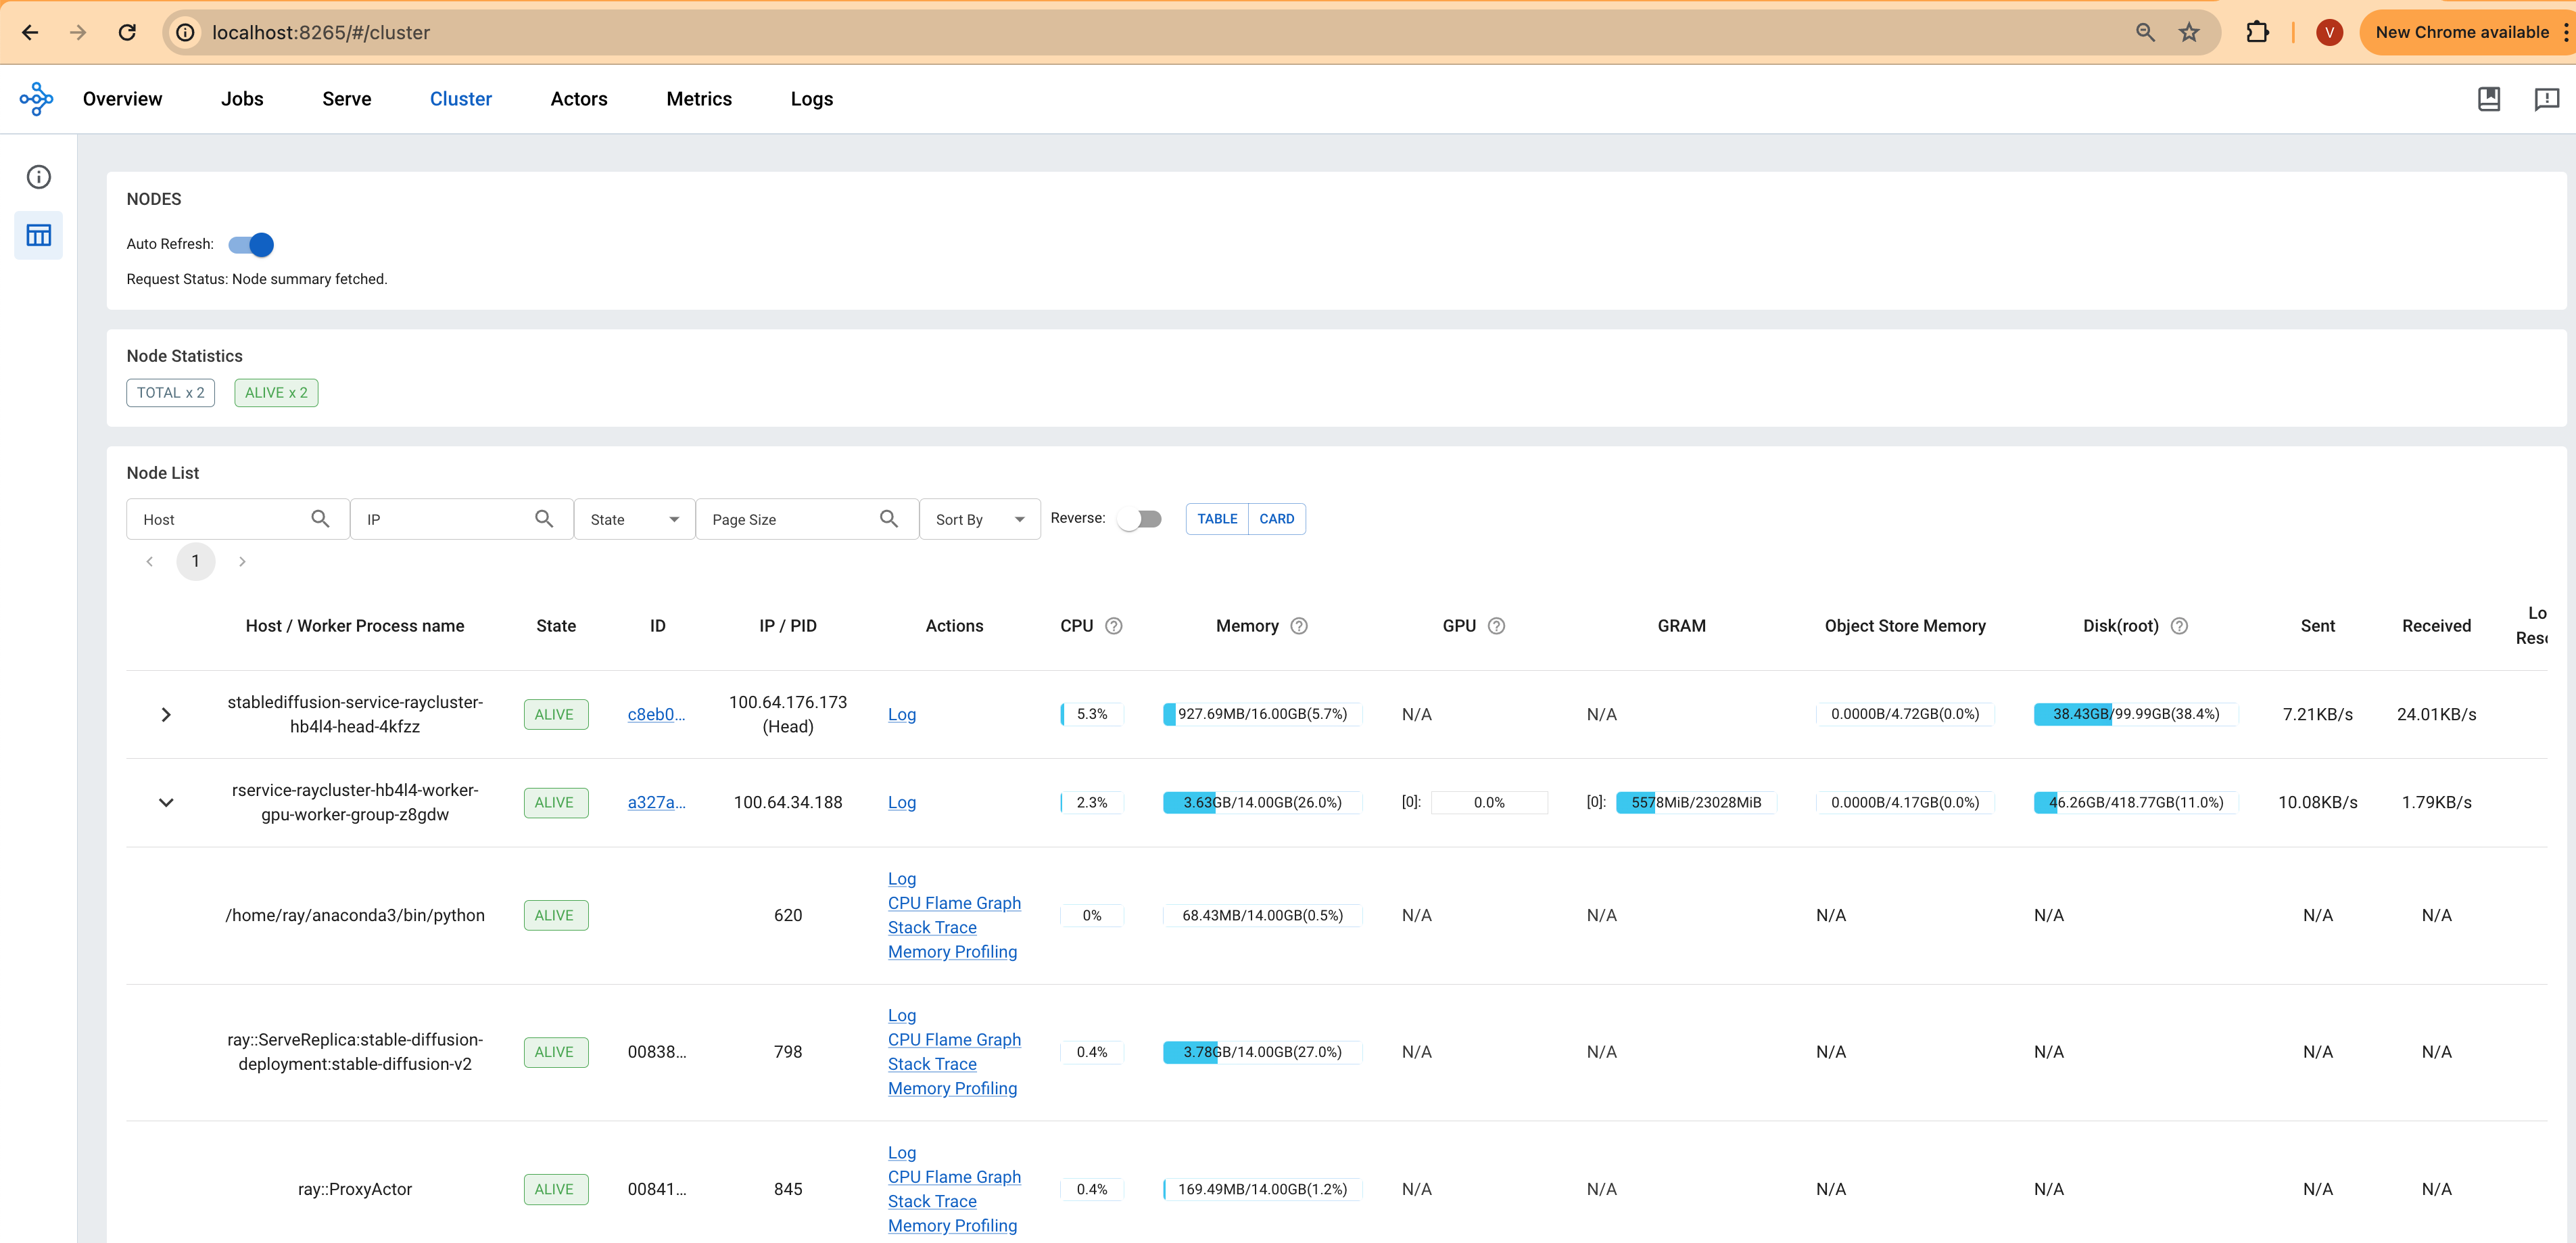
Access the web UI via http://localhost:8265 . This interface displays the deployment of jobs and actors within the Ray ecosystem.
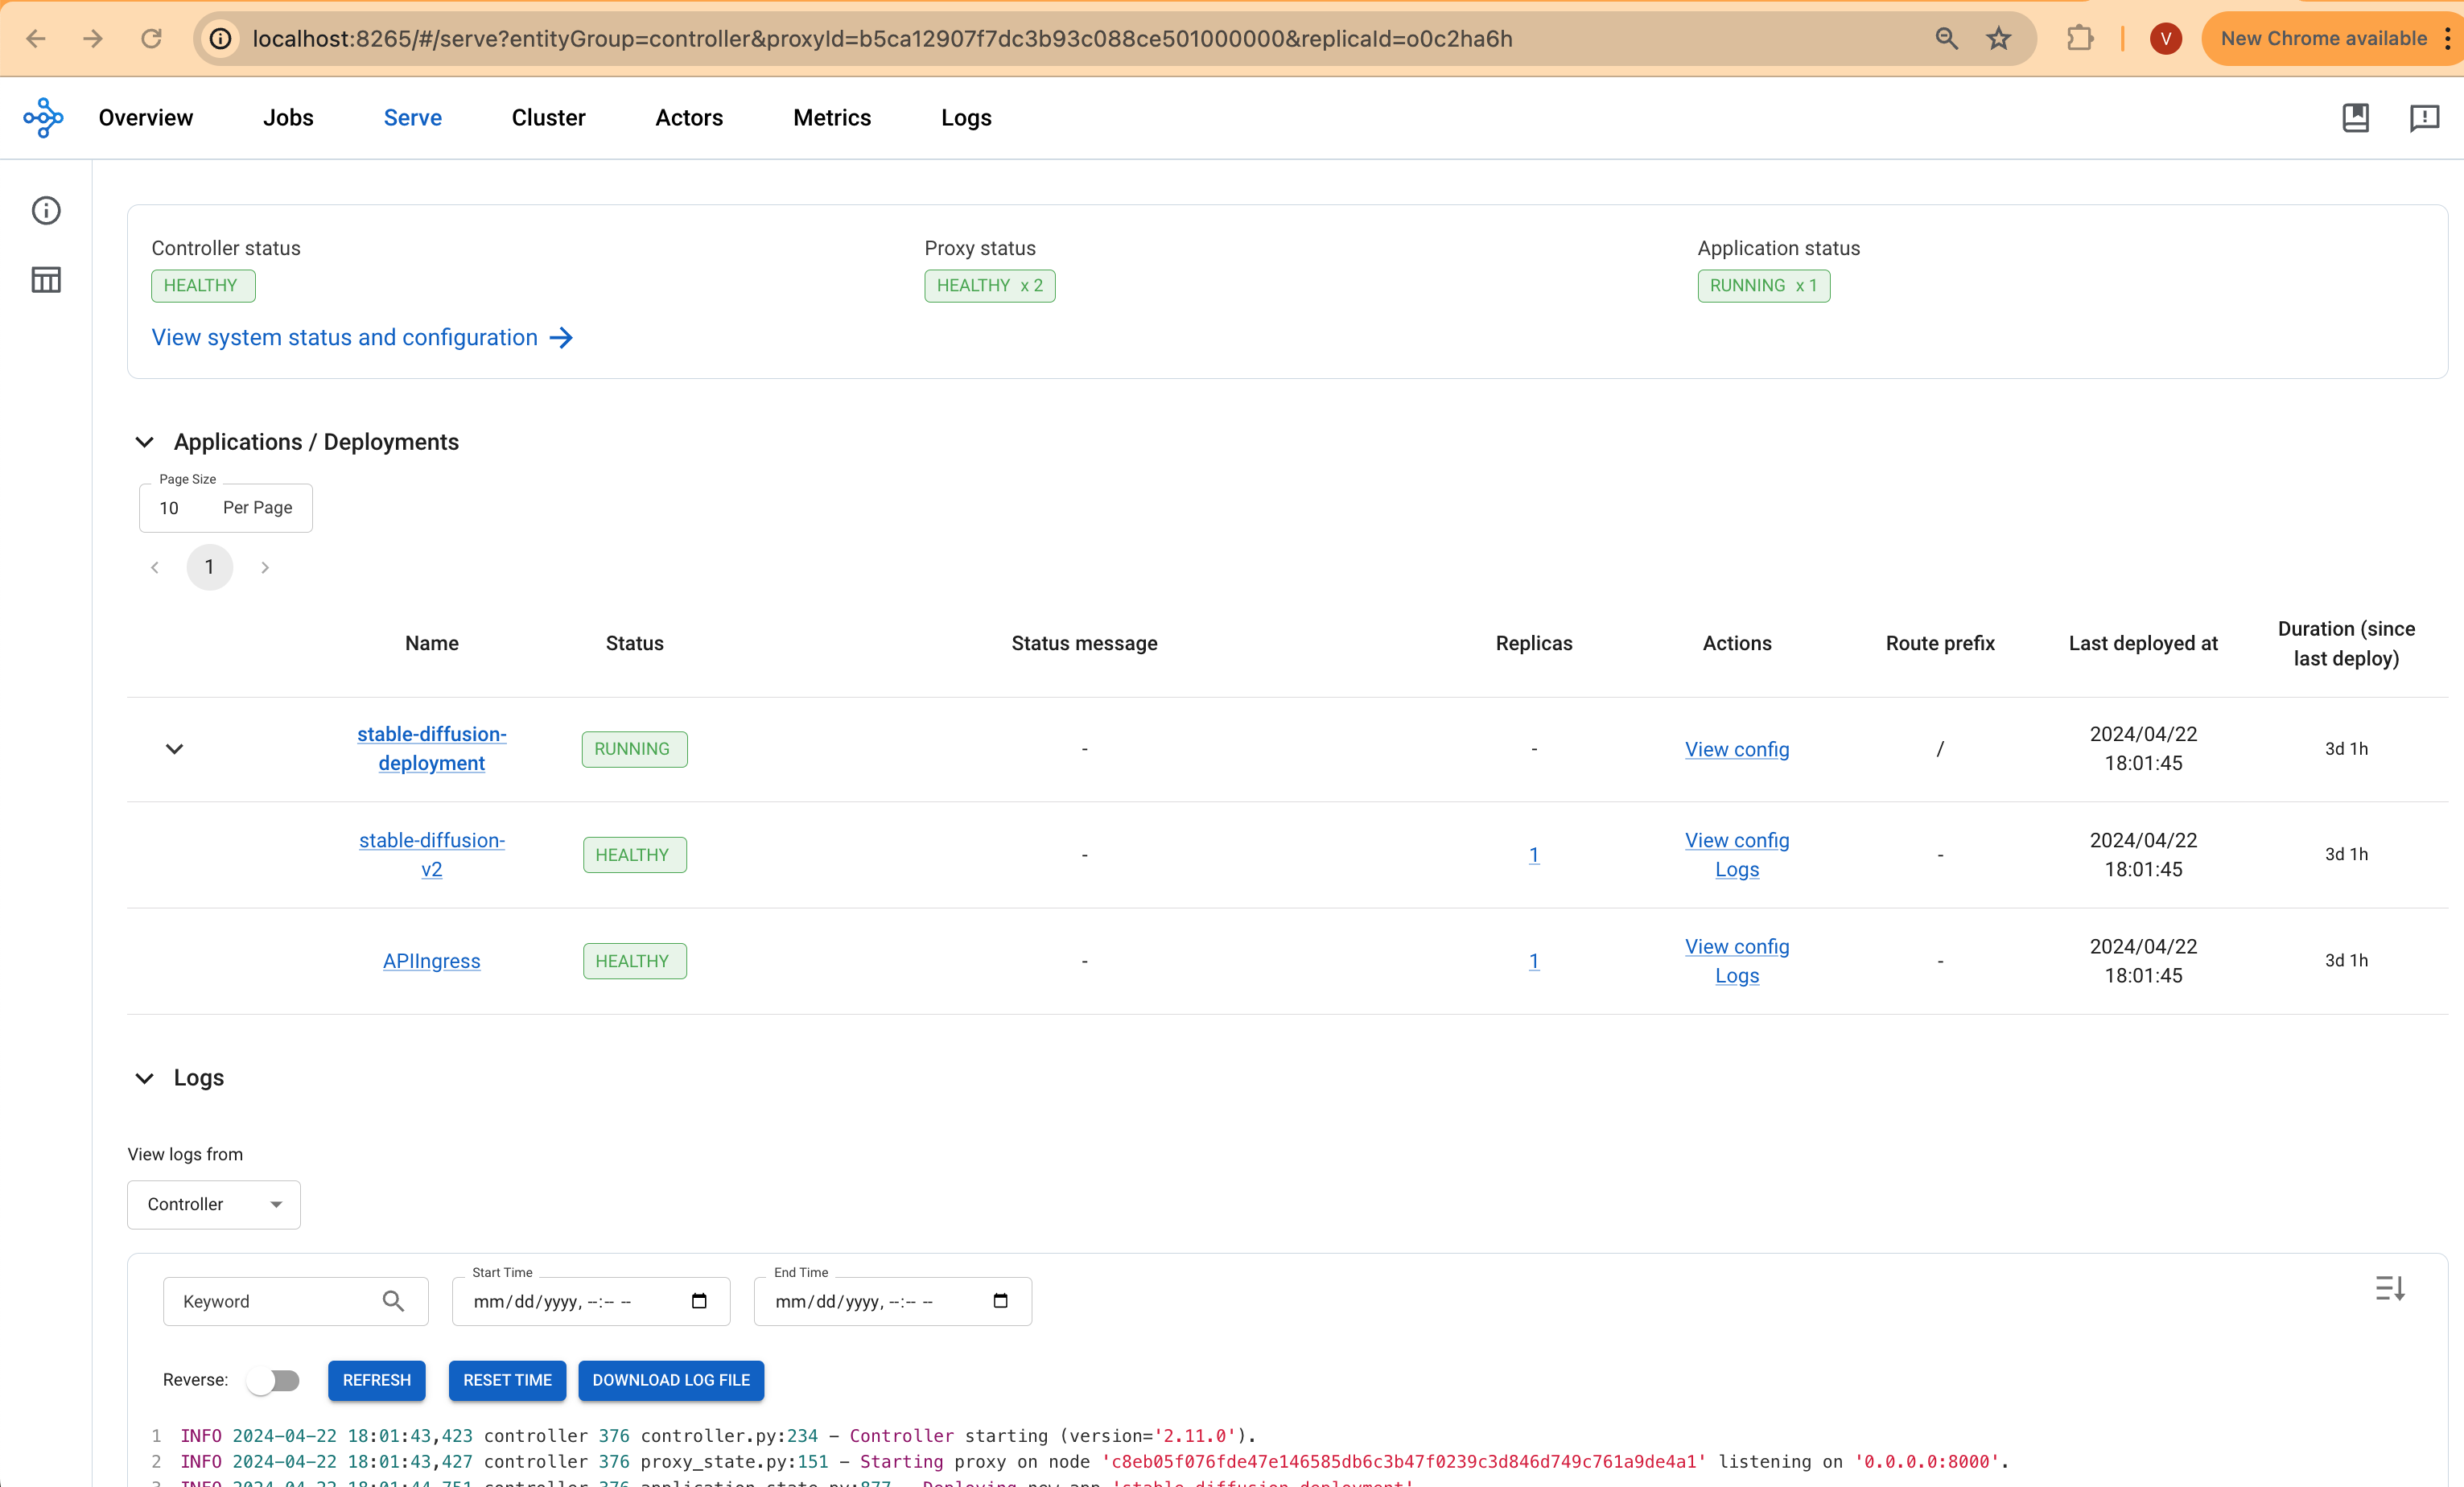
The screenshots provided will show the Serve deployment and the Ray Cluster deployment, offering a visual overview of the setup and operational status.
Deploying the Gradio WebUI App
Discover how to create a user-friendly chat interface using Gradio that integrates seamlessly with deployed models.
Let's move forward with setting up the Gradio app as a Docker container running on localhost. This setup will enable interaction with the Stable Diffusion XL model, which is deployed using RayServe.
Build the Gradio app docker container
First, lets build the docker container for the client app.
cd ../gradio-ui
docker build --platform=linux/amd64 \
    -t gradio-app:sd \
    --build-arg GRADIO_APP="gradio-app-stable-diffusion.py" \
    .
Deploy the Gradio container
Deploy the Gradio app as a container on localhost using docker:
docker run --rm -it -p 7860:7860 -p 8000:8000 gradio-app:sd
If you are not running Docker Desktop on your machine and using something like finch instead then you will need to additional flags for a custom host-to-IP mapping inside the container.
docker run --rm -it \
    --add-host ray-service:<workstation-ip> \
    -e "SERVICE_NAME=http://ray-service:8000" \
    -p 7860:7860 gradio-app:sd
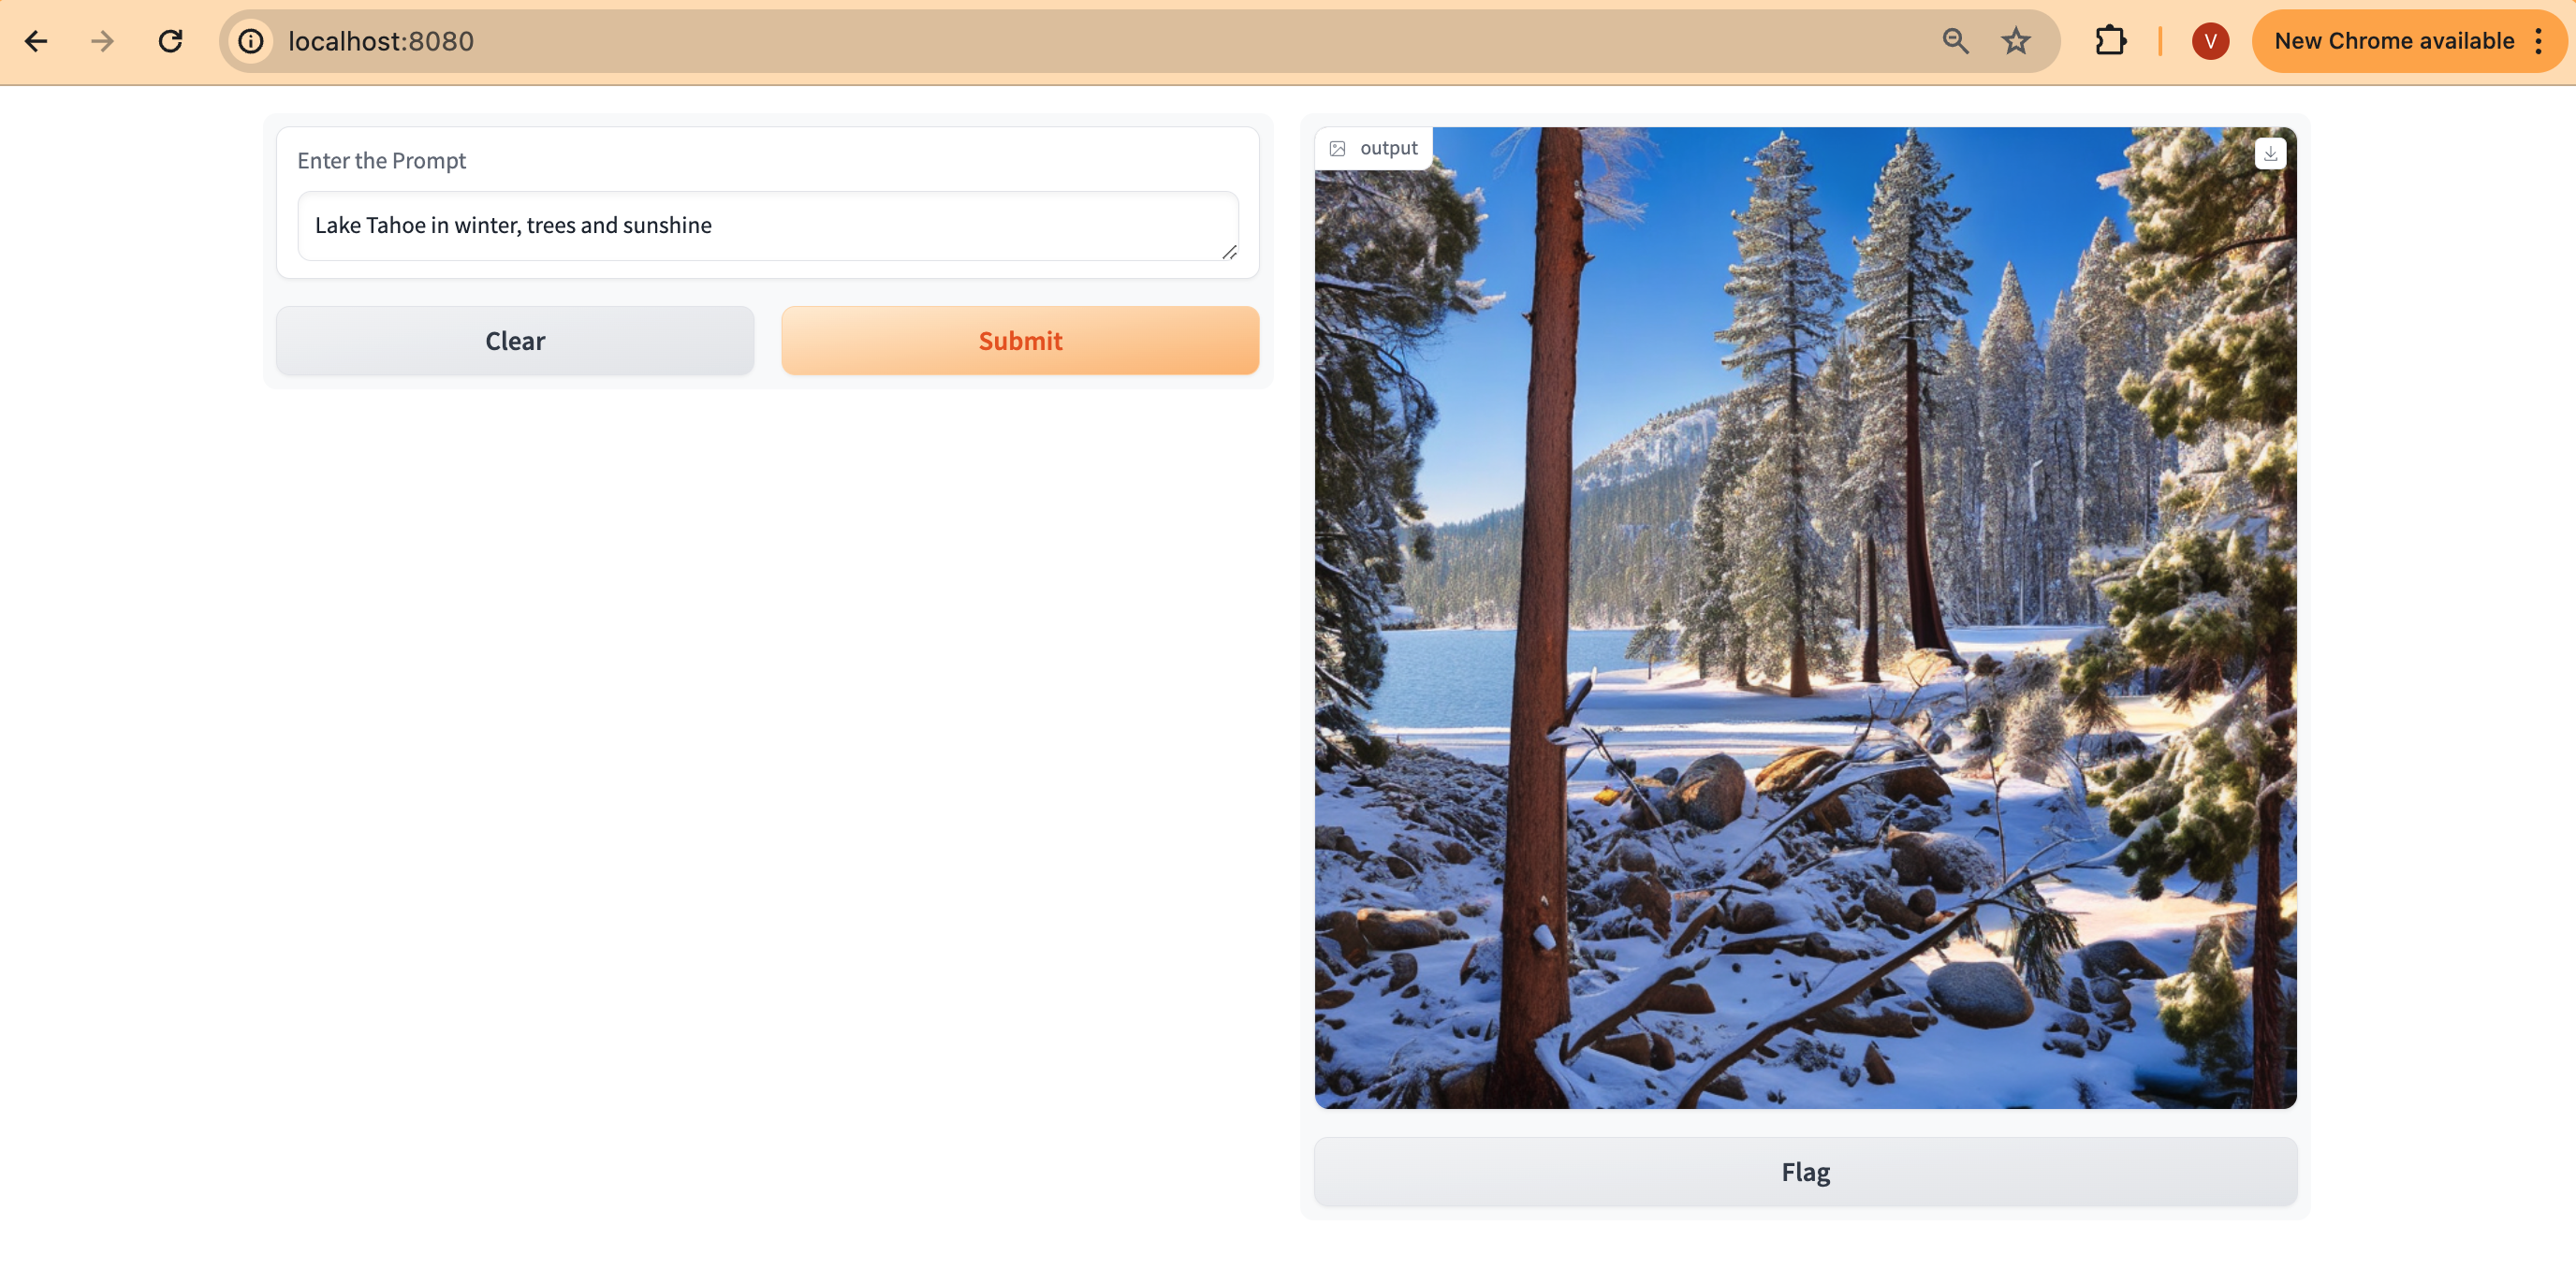
Invoke the WebUI
Open your web browser and access the Gradio WebUI by navigating to the following URL:
Running on local URL: http://localhost:7860
You should now be able to interact with the Gradio application from your local machine.
Ray Autoscaling��
The Ray Autoscaling configuration detailed in the ray-serve-stablediffusion.yaml file leverages the capabilities of Ray on Kubernetes to dynamically scale applications based on computational needs.
- Incoming Traffic: Incoming requests to your stable-diffusion deployment trigger Ray Serve to monitor the load on existing replicas.
- Metrics-Based Scaling: Ray Serve tracks the average number of ongoing requests per replica. This configuration has
target_num_ongoing_requests_per_replicaset to 1. If this metric exceeds the threshold, it signals the need for more replicas. - Replica Creation (Within Node): If a node has sufficient GPU capacity, Ray Serve will attempt to add a new replica within the existing node. Your deployment requests 1 GPU per replica (
ray_actor_options: num_gpus: 1). - Node Scaling (Karpenter): If a node cannot accommodate an additional replica (e.g., only one GPU per node), Ray will signal to Kubernetes that it needs more resources. Karpenter observes pending pod requests from Kubernetes and provisions a new g5 GPU node to fulfill the resource need.
- Replica Creation (Across Nodes): Once the new node is ready, Ray Serve schedules an additional replica on the newly provisioned node.
To simulate autoscaling:
- Generate Load: Create a script or use a load testing tool to send a burst of image generation requests to your stable diffusion service.
- Observe (Ray Dashboard): Access the Ray Dashboard (via port-forwarding or public NLB if configured) at http://your-cluster/dashboard. Observe how these metrics change: The number of replicas for your deployment. The number of nodes in your Ray cluster.
- Observe (Kubernetes): Use
kubectl get pods -n stablediffusionto see the creation of new pods. Usekubectl get nodesto observe new nodes provisioned by Karpenter.
Cleanup
Finally, we'll provide instructions for cleaning up and deprovisioning the resources when they are no longer needed.
Step1: Delete Gradio Container
Ctrl-c on the localhost terminal window where docker run is running to kill the container running the Gradio app. Optionally clean up the docker image
docker rmi gradio-app:sd
Step2: Delete Ray Cluster
cd ../stable-diffusion-rayserve-gpu
kubectl delete -f ray-service-stablediffusion.yaml
Step3: Cleanup the EKS Cluster
This script will cleanup the environment using -target option to ensure all the resources are deleted in correct order.
cd ../../../ai-ml/jark-stack/
./cleanup.sh