

Thiết lập monorepo
Nhiệm vụ 1: Tạo một monorepo
Phần tiêu đề “Nhiệm vụ 1: Tạo một monorepo”Để tạo một monorepo mới, từ thư mục mong muốn của bạn, chạy lệnh sau:
pnpm create @aws/nx-workspace dungeon-adventure --iac=cdkyarn create @aws/nx-workspace dungeon-adventure --iac=cdknpm create @aws/nx-workspace -- dungeon-adventure --iac=cdkbun create @aws/nx-workspace dungeon-adventure --iac=cdkĐiều này sẽ thiết lập một NX monorepo trong thư mục dungeon-adventure. Khi bạn mở thư mục trong VSCode, bạn sẽ thấy cấu trúc tệp này:
Thư mục.nx/
- …
Thư mục.vscode/
- …
Thư mụcnode_modules/
- …
Thư mụcpackages/ đây là nơi các dự án con của bạn sẽ nằm
- …
- .gitignore
- biome.json cấu hình Biome cho linting và formatting
- nx.json cấu hình Nx CLI và các giá trị mặc định của monorepo
- package.json tất cả các phụ thuộc node được định nghĩa ở đây
- pnpm-lock.yaml hoặc bun.lock, yarn.lock, package-lock.json tùy thuộc vào trình quản lý gói
- pnpm-workspace.yaml nếu sử dụng pnpm
- README.md
- tsconfig.base.json tất cả các dự án con dựa trên node đều mở rộng từ tệp này
- tsconfig.json
- aws-nx-plugin.config.mts cấu hình cho Nx Plugin cho AWS
Bây giờ chúng ta có thể bắt đầu tạo các dự án con khác nhau bằng cách sử dụng @aws/nx-plugin.
Nhiệm vụ 2: Tạo một Game API
Phần tiêu đề “Nhiệm vụ 2: Tạo một Game API”Đầu tiên, hãy tạo Game API của chúng ta. Để làm điều này, tạo một tRPC API có tên GameApi bằng các bước sau:
- Cài đặt Nx Console VSCode Plugin nếu bạn chưa cài đặt
- Mở Nx Console trong VSCode
- Nhấp
Generate (UI)trong phần "Common Nx Commands" - Tìm kiếm
@aws/nx-plugin - ts#api - Điền các tham số bắt buộc
- name: GameApi
- framework: trpc
- Nhấp
Generate
pnpm nx g @aws/nx-plugin:ts#api --name=GameApi --framework=trpc --no-interactiveyarn nx g @aws/nx-plugin:ts#api --name=GameApi --framework=trpc --no-interactivenpx nx g @aws/nx-plugin:ts#api --name=GameApi --framework=trpc --no-interactivebunx nx g @aws/nx-plugin:ts#api --name=GameApi --framework=trpc --no-interactiveBạn cũng có thể thực hiện chạy thử để xem những tệp nào sẽ bị thay đổi
pnpm nx g @aws/nx-plugin:ts#api --name=GameApi --framework=trpc --no-interactive --dry-runyarn nx g @aws/nx-plugin:ts#api --name=GameApi --framework=trpc --no-interactive --dry-runnpx nx g @aws/nx-plugin:ts#api --name=GameApi --framework=trpc --no-interactive --dry-runbunx nx g @aws/nx-plugin:ts#api --name=GameApi --framework=trpc --no-interactive --dry-runBạn sẽ thấy một số tệp mới xuất hiện trong cây tệp của mình.
Các tệp được cập nhật bởi ts#api
Dưới đây là danh sách tất cả các tệp đã được tạo bởi trình tạo ts#api. Chúng ta sẽ xem xét một số tệp chính được đánh dấu trong cây tệp:
Thư mụcpackages/
Thư mụccommon/
Thư mụcconstructs/
Thư mụcsrc/
Thư mụcapp/ các cdk construct cụ thể cho ứng dụng
Thư mụcapis/
- game-api.ts cdk construct để tạo tRPC API của bạn
- index.ts
- …
- index.ts
Thư mụccore/ các cdk construct chung
Thư mụcapi/
- rest-api.ts cdk construct cơ sở cho API Gateway Rest API
- trpc-utils.ts tiện ích cho các cdk construct của trpc API
- utils.ts tiện ích cho các API construct
- index.ts
- runtime-config.ts
- index.ts
- project.json
- …
Thư mụcgame-api/ tRPC API
Thư mụcsrc/
Thư mụcclient/ vanilla client thường được sử dụng cho các cuộc gọi máy móc với máy móc bằng ts
- index.ts
Thư mụcmiddleware/ công cụ đo lường powertools
- error.ts
- index.ts
- logger.ts
- metrics.ts
- tracer.ts
Thư mụcschema/ định nghĩa đầu vào và đầu ra cho API của bạn
- index.ts
- echo.ts schema đầu vào và đầu ra mẫu
- z-async-iterable.ts wrapper Zod schema cho tRPC subscription output
Thư mụcprocedures/ triển khai cụ thể cho các thủ tục/tuyến đường API của bạn
- echo.ts triển khai thủ tục mẫu
- index.ts
- init.ts thiết lập ngữ cảnh và middleware
- handler.ts điểm vào Lambda handler (sử dụng response streaming cho REST APIs)
- local-server.ts được sử dụng khi chạy máy chủ tRPC cục bộ
- router.ts định nghĩa tRPC router và tất cả các thủ tục
- project.json
- …
- vitest.workspace.ts
Hãy xem các tệp chính này:
import { echo } from './procedures/echo.js';import { t } from './init.js';
export const router = t.router;
export const appRouter = router({  echo,});
export type AppRouter = typeof appRouter;Router định nghĩa tRPC router cho API của bạn và là nơi bạn sẽ khai báo tất cả các phương thức API của mình. Như bạn có thể thấy ở trên, chúng ta có một phương thức gọi là echo với triển khai của nó trong tệp ./procedures/echo.ts. Điểm vào Lambda handler nằm trong handler.ts, được cấu hình tự động bởi trình tạo.
import { publicProcedure } from '../init.js';import {  EchoInputSchema,  EchoOutputSchema,} from '../schema/echo.js';
export const echo = publicProcedure .input(EchoInputSchema) .output(EchoOutputSchema) .query((opts) => ({ message: opts.input.message }));Tệp này là triển khai của phương thức echo và như bạn có thể thấy được định kiểu mạnh bằng cách khai báo các cấu trúc dữ liệu đầu vào và đầu ra của nó.
import { z } from 'zod';
export const EchoInputSchema = z.object({  message: z.string().max(1024),});
export type IEchoInput = z.TypeOf<typeof EchoInputSchema>;
export const EchoOutputSchema = z.object({  message: z.string().max(1024),});
export type IEchoOutput = z.TypeOf<typeof EchoOutputSchema>;Tất cả các định nghĩa schema tRPC được định nghĩa bằng Zod và được xuất dưới dạng các kiểu typescript thông qua cú pháp z.TypeOf.
import { Construct } from 'constructs';import * as url from 'url';import { Distribution } from 'aws-cdk-lib/aws-cloudfront';import {  Code,  Runtime,  Function,  FunctionProps,  Tracing,} from 'aws-cdk-lib/aws-lambda';import {  AuthorizationType,  LambdaIntegration,  ResponseTransferMode,} from 'aws-cdk-lib/aws-apigateway';import { Aspects, Duration } from 'aws-cdk-lib';import {  PolicyDocument,  PolicyStatement,  Effect,  AnyPrincipal,  IGrantable,  Grant,} from 'aws-cdk-lib/aws-iam';import {  IntegrationBuilder,  RestApiIntegration,} from '../../core/api/utils.js';import { AddCorsPreflightAspect, RestApi } from '../../core/api/rest-api.js';import { Procedures, routerToOperations } from '../../core/api/trpc-utils.js';import { AppRouter, appRouter } from ':dungeon-adventure/game-api';
// Kiểu union chuỗi cho tất cả tên hoạt động APItype Operations = Procedures<AppRouter>;
/** * Thuộc tính để tạo một construct GameApi * * @template TIntegrations - Ánh xạ tên hoạt động với các tích hợp của chúng */export interface GameApiProps<  TIntegrations extends Record<Operations, RestApiIntegration>,> {  /**   * Ánh xạ tên hoạt động với các tích hợp API Gateway của chúng   */  integrations: TIntegrations;}
/** * Một CDK construct tạo và cấu hình AWS API Gateway REST API * dành riêng cho GameApi. * @template TIntegrations - Ánh xạ tên hoạt động với các tích hợp của chúng */export class GameApi<  TIntegrations extends Record<Operations, RestApiIntegration>,> extends RestApi<Operations, TIntegrations> {  private allowedOrigins: readonly string[] = ['*'];
  /**   * Tạo các tích hợp mặc định cho tất cả các hoạt động, triển khai mỗi hoạt động như   * một hàm lambda riêng lẻ.   *   * @param scope - Phạm vi construct CDK   * @returns Một IntegrationBuilder với các tích hợp lambda mặc định   */  public static defaultIntegrations = (scope: Construct) => {    return IntegrationBuilder.rest({      operations: routerToOperations(appRouter),      defaultIntegrationOptions: <FunctionProps>{        runtime: Runtime.NODEJS_LATEST,        handler: 'index.handler',        code: Code.fromAsset(          url.fileURLToPath(            new URL(              '../../../../../../dist/packages/game-api/bundle',              import.meta.url,            ),          ),        ),        timeout: Duration.seconds(30),        tracing: Tracing.ACTIVE,      },      buildDefaultIntegration: (op, props: FunctionProps) => {        const handler = new Function(scope, `GameApi${op}Handler`, props);        return {          handler,          integration: new LambdaIntegration(handler, {            responseTransferMode: ResponseTransferMode.STREAM,          }),        };      },    });  };
  constructor(    scope: Construct,    id: string,    props: GameApiProps<TIntegrations>,  ) {    super(scope, id, {      apiName: 'GameApi',      defaultMethodOptions: {        authorizationType: AuthorizationType.IAM,      },      deployOptions: {        tracingEnabled: true,      },      policy: new PolicyDocument({        statements: [          // Mở OPTIONS để cho phép trình duyệt thực hiện các yêu cầu preflight không xác thực          new PolicyStatement({            effect: Effect.ALLOW,            principals: [new AnyPrincipal()],            actions: ['execute-api:Invoke'],            resources: ['execute-api:/*/OPTIONS/*'],          }),        ],      }),      operations: routerToOperations(appRouter),      ...props,    });    Aspects.of(this).add(new AddCorsPreflightAspect(() => this.allowedOrigins));  }
  /**   * Hạn chế CORS cho các origin được cung cấp   *   * Cấu hình các domain CloudFront distribution hoặc chuỗi origin   * là các CORS origin được phép duy nhất trong các phản hồi preflight của API Gateway và các   * tích hợp AWS Lambda.   *   * @param origins - Các chuỗi origin, CloudFront distribution, hoặc các đối tượng chứa CloudFront distribution để cấp CORS từ   */  public restrictCorsTo(    ...origins: (string | Distribution | { cloudFrontDistribution: Distribution })[]  ) {    const allowedOrigins = origins.map((origin) =>      typeof origin === 'string'        ? origin        : 'cloudFrontDistribution' in origin          ? `https://${origin.cloudFrontDistribution.distributionDomainName}`          : `https://${origin.distributionDomainName}`,    );
    this.allowedOrigins = allowedOrigins;
    // Đặt biến môi trường ALLOWED_ORIGINS cho tất cả các tích hợp Lambda    Object.values(this.integrations).forEach((integration) => {      if ('handler' in integration && integration.handler instanceof Function) {        integration.handler.addEnvironment(          'ALLOWED_ORIGINS',          allowedOrigins.join(','),        );      }    });  }
  /**   * Cấp quyền IAM để gọi bất kỳ phương thức nào trên API này.   *   * @param grantee - IAM principal để cấp quyền   */  public grantInvokeAccess(grantee: IGrantable) {    // Ở đây chúng ta cấp quyền cho grantee để gọi api.    // Truy cập chi tiết máy móc với máy móc có thể được định nghĩa ở đây bằng cách sử dụng các principal cụ thể hơn (ví dụ: vai trò hoặc    // người dùng) và tài nguyên (ví dụ: đường dẫn api nào có thể được gọi bởi principal nào) nếu cần.    this.api.addToResourcePolicy(      new PolicyStatement({        effect: Effect.ALLOW,        principals: [grantee.grantPrincipal],        actions: ['execute-api:Invoke'],        resources: ['execute-api:/*'],      }),    );
Grant.addToPrincipal({ grantee, actions: ['execute-api:Invoke'], resourceArns: [this.api.arnForExecuteApi('*', '/*', '*')], }); }}Đây là CDK construct định nghĩa GameApi của chúng ta. Nó cung cấp một phương thức defaultIntegrations tự động tạo một hàm Lambda cho mỗi thủ tục trong tRPC API của chúng ta, trỏ đến triển khai API đã được đóng gói. Điều này có nghĩa là tại thời điểm cdk synth, việc đóng gói không xảy ra (trái ngược với việc sử dụng NodeJsFunction) vì chúng ta đã đóng gói nó như một phần của mục tiêu build của dự án backend.
Nhiệm vụ 3: Tạo các agent Story
Phần tiêu đề “Nhiệm vụ 3: Tạo các agent Story”Bây giờ hãy tạo các Story Agent của chúng ta.
Story agent: Dự án Python
Phần tiêu đề “Story agent: Dự án Python”Để tạo một dự án Python:
- Cài đặt Nx Console VSCode Plugin nếu bạn chưa cài đặt
- Mở Nx Console trong VSCode
- Nhấp
Generate (UI)trong phần "Common Nx Commands" - Tìm kiếm
@aws/nx-plugin - py#project - Điền các tham số bắt buộc
- name: story
- Nhấp
Generate
pnpm nx g @aws/nx-plugin:py#project --name=story --no-interactiveyarn nx g @aws/nx-plugin:py#project --name=story --no-interactivenpx nx g @aws/nx-plugin:py#project --name=story --no-interactivebunx nx g @aws/nx-plugin:py#project --name=story --no-interactiveBạn cũng có thể thực hiện chạy thử để xem những tệp nào sẽ bị thay đổi
pnpm nx g @aws/nx-plugin:py#project --name=story --no-interactive --dry-runyarn nx g @aws/nx-plugin:py#project --name=story --no-interactive --dry-runnpx nx g @aws/nx-plugin:py#project --name=story --no-interactive --dry-runbunx nx g @aws/nx-plugin:py#project --name=story --no-interactive --dry-runBạn sẽ thấy một số tệp mới xuất hiện trong cây tệp của mình.
Các tệp được cập nhật bởi py#project
py#project tạo các tệp sau:
Thư mục.venv/ môi trường ảo duy nhất cho monorepo
- …
Thư mụcpackages/
Thư mụcstory/
Thư mụcdungeon_adventure_story/ module python
- …
Thư mụctests/
- …
- .python-version
- pyproject.toml
- project.json
- .python-version phiên bản python uv được cố định
- pyproject.toml
- uv.lock
Điều này đã cấu hình một dự án Python và UV Workspace với môi trường ảo được chia sẻ.
Story agent
Phần tiêu đề “Story agent”Để thêm một Strands agent vào dự án với trình tạo py#agent:
- Cài đặt Nx Console VSCode Plugin nếu bạn chưa cài đặt
- Mở Nx Console trong VSCode
- Nhấp
Generate (UI)trong phần "Common Nx Commands" - Tìm kiếm
@aws/nx-plugin - py#agent - Điền các tham số bắt buộc
- project: story
- auth: cognito
- protocol: ag-ui
- Nhấp
Generate
pnpm nx g @aws/nx-plugin:py#agent --project=story --auth=cognito --protocol=ag-ui --no-interactiveyarn nx g @aws/nx-plugin:py#agent --project=story --auth=cognito --protocol=ag-ui --no-interactivenpx nx g @aws/nx-plugin:py#agent --project=story --auth=cognito --protocol=ag-ui --no-interactivebunx nx g @aws/nx-plugin:py#agent --project=story --auth=cognito --protocol=ag-ui --no-interactiveBạn cũng có thể thực hiện chạy thử để xem những tệp nào sẽ bị thay đổi
pnpm nx g @aws/nx-plugin:py#agent --project=story --auth=cognito --protocol=ag-ui --no-interactive --dry-runyarn nx g @aws/nx-plugin:py#agent --project=story --auth=cognito --protocol=ag-ui --no-interactive --dry-runnpx nx g @aws/nx-plugin:py#agent --project=story --auth=cognito --protocol=ag-ui --no-interactive --dry-runbunx nx g @aws/nx-plugin:py#agent --project=story --auth=cognito --protocol=ag-ui --no-interactive --dry-runBạn sẽ thấy một số tệp mới xuất hiện trong cây tệp của mình.
Các tệp được cập nhật bởi py#agent
Trình tạo py#agent tạo các tệp sau:
Thư mụcpackages/
Thư mụcstory/
Thư mụcdungeon_adventure_story/ module python
Thư mụcagent/
- init.py thiết lập ứng dụng FastAPI và middleware
- main.py điểm vào cho agent của bạn trong Bedrock AgentCore Runtime
- agent.py định nghĩa một agent và công cụ ví dụ
- Dockerfile định nghĩa docker image để triển khai lên AgentCore Runtime
Thư mụccommon/constructs/
Thư mụcsrc
Thư mụcapp/agents/story-agent/
- story-agent.ts construct để triển khai Story agent của bạn lên AgentCore Runtime
Hãy xem xét một số tệp chi tiết:
from contextlib import contextmanager
from strands import Agent, toolfrom strands_tools import current_time

@tooldef subtract(a: int, b: int) -> int:    return a - b

@contextmanagerdef get_agent(): yield Agent( name="StoryAgent", description="StoryAgent Agent", system_prompt="""You are a mathematical wizard.Use your tools for mathematical tasks.Refer to tools as your 'spellbook'.""", tools=[subtract, current_time], )Điều này tạo một Strands agent ví dụ và định nghĩa một công cụ trừ.
import loggingimport uuid
from ag_ui_strands import StrandsAgent, create_strands_appfrom dungeon_adventure_agent_connection import session_id_contextfrom fastapi import Requestfrom starlette.middleware.base import BaseHTTPMiddleware
from .agent import get_agent
logging.basicConfig(level=logging.INFO)
SESSION_ID_HEADER = "x-amzn-bedrock-agentcore-runtime-session-id"
# Create AG-UI agent wrapper_agent_ctx = get_agent()_agent = _agent_ctx.__enter__()
agui_agent = StrandsAgent(    agent=_agent,    name="StoryAgent",    description="An Agent exposed via the AG-UI protocol.",)

class _SessionIdMiddleware(BaseHTTPMiddleware):    """Bind the session ID for this request so downstream MCP / A2A clients forward it on outbound calls."""
    async def dispatch(self, request: Request, call_next):        session_id = request.headers.get(SESSION_ID_HEADER) or str(uuid.uuid4())        with session_id_context(session_id):            return await call_next(request)

# Create FastAPI app with AG-UI endpoint and health checkapp = create_strands_app(agui_agent, path="/invocations")app.add_middleware(_SessionIdMiddleware)Đây là điểm vào cho agent. Vì chúng ta đã chọn --protocol=AG-UI, trình tạo bọc Strands Agent của chúng ta với StrandsAgent từ ag_ui_strands và gắn nó vào một ứng dụng FastAPI giao tiếp bằng giao thức AG-UI — đây là thứ mà CopilotKit sẽ giao tiếp từ website React. _SessionIdMiddleware liên kết session ID của AgentCore runtime đến vào một ContextVar để bất kỳ MCP/A2A client downstream nào mà chúng ta kết nối sau này (ví dụ: máy chủ MCP Inventory trong Module 2) tự động chuyển tiếp nó trên các cuộc gọi đi ra. Trong Module 3, chúng ta cũng sẽ thêm một session_manager_provider để mỗi thread id có S3SessionManager riêng và lịch sử hội thoại được duy trì qua các lượt.
import { Lazy, Names } from 'aws-cdk-lib';import { Platform } from 'aws-cdk-lib/aws-ecr-assets';import { Construct } from 'constructs';import { execSync } from 'child_process';import * as path from 'path';import * as url from 'url';import {  AgentRuntimeArtifact,  ProtocolType,  Runtime,  RuntimeProps,} from 'aws-cdk-lib/aws-bedrockagentcore';import { IGrantable, IPrincipal } from 'aws-cdk-lib/aws-iam';
export type StoryAgentProps = Omit<  RuntimeProps,  'runtimeName' | 'protocolConfiguration' | 'agentRuntimeArtifact'>;
export class StoryAgent extends Construct implements IGrantable {  public readonly dockerImage: AgentRuntimeArtifact;  public readonly agentCoreRuntime: Runtime;
  constructor(scope: Construct, id: string, props?: StoryAgentProps) {    super(scope, id);
    this.dockerImage = AgentRuntimeArtifact.fromAsset(      path.dirname(url.fileURLToPath(new URL(import.meta.url))),      {        platform: Platform.LINUX_ARM64,        extraHash: execSync(          `docker inspect dungeon-adventure-story-agent:latest --format '{{.Id}}'`,          { encoding: 'utf-8' },        ).trim(),      },    );
    this.agentCoreRuntime = new Runtime(this, 'StoryAgent', {      runtimeName: Lazy.string({        produce: () =>          Names.uniqueResourceName(this.agentCoreRuntime, { maxLength: 40 }),      }),      protocolConfiguration: ProtocolType.HTTP,      agentRuntimeArtifact: this.dockerImage,      ...props,    });  }
public get grantPrincipal(): IPrincipal { return this.agentCoreRuntime.grantPrincipal; }}Điều này cấu hình một CDK AgentRuntimeArtifact tải image Docker agent của bạn lên ECR và lưu trữ nó bằng AgentCore Runtime.
Bạn có thể nhận thấy một Dockerfile bổ sung, tham chiếu đến Docker image từ dự án story, cho phép chúng ta đặt cùng vị trí Dockerfile và mã nguồn agent.
Nhiệm vụ 4: Thiết lập công cụ inventory
Phần tiêu đề “Nhiệm vụ 4: Thiết lập công cụ inventory”Inventory: Dự án TypeScript
Phần tiêu đề “Inventory: Dự án TypeScript”Hãy tạo một máy chủ MCP để cung cấp công cụ cho Story Agent của chúng ta để quản lý kho đồ của người chơi.
Đầu tiên, chúng ta tạo một dự án TypeScript:
- Cài đặt Nx Console VSCode Plugin nếu bạn chưa cài đặt
- Mở Nx Console trong VSCode
- Nhấp
Generate (UI)trong phần "Common Nx Commands" - Tìm kiếm
@aws/nx-plugin - ts#project - Điền các tham số bắt buộc
- name: inventory
- Nhấp
Generate
pnpm nx g @aws/nx-plugin:ts#project --name=inventory --no-interactiveyarn nx g @aws/nx-plugin:ts#project --name=inventory --no-interactivenpx nx g @aws/nx-plugin:ts#project --name=inventory --no-interactivebunx nx g @aws/nx-plugin:ts#project --name=inventory --no-interactiveBạn cũng có thể thực hiện chạy thử để xem những tệp nào sẽ bị thay đổi
pnpm nx g @aws/nx-plugin:ts#project --name=inventory --no-interactive --dry-runyarn nx g @aws/nx-plugin:ts#project --name=inventory --no-interactive --dry-runnpx nx g @aws/nx-plugin:ts#project --name=inventory --no-interactive --dry-runbunx nx g @aws/nx-plugin:ts#project --name=inventory --no-interactive --dry-runĐiều này sẽ tạo một dự án TypeScript trống.
Các tệp được cập nhật bởi ts#project
Trình tạo ts#project tạo các tệp này.
Thư mụcpackages/
Thư mụcinventory/
Thư mụcsrc/
- index.ts điểm vào với hàm ví dụ
- project.json cấu hình dự án
- vitest.config.mts cấu hình test
- tsconfig.json cấu hình typescript cơ sở cho dự án
- tsconfig.lib.json cấu hình typescript cho dự án được nhắm mục tiêu để biên dịch và đóng gói
- tsconfig.spec.json cấu hình typescript cho các bài test
- tsconfig.base.json được cập nhật để cấu hình một bí danh cho các dự án khác tham chiếu đến dự án này
Inventory: Máy chủ MCP
Phần tiêu đề “Inventory: Máy chủ MCP”Tiếp theo, chúng ta sẽ thêm một máy chủ MCP vào dự án TypeScript của mình:
- Cài đặt Nx Console VSCode Plugin nếu bạn chưa cài đặt
- Mở Nx Console trong VSCode
- Nhấp
Generate (UI)trong phần "Common Nx Commands" - Tìm kiếm
@aws/nx-plugin - ts#mcp-server - Điền các tham số bắt buộc
- project: inventory
- Nhấp
Generate
pnpm nx g @aws/nx-plugin:ts#mcp-server --project=inventory --no-interactiveyarn nx g @aws/nx-plugin:ts#mcp-server --project=inventory --no-interactivenpx nx g @aws/nx-plugin:ts#mcp-server --project=inventory --no-interactivebunx nx g @aws/nx-plugin:ts#mcp-server --project=inventory --no-interactiveBạn cũng có thể thực hiện chạy thử để xem những tệp nào sẽ bị thay đổi
pnpm nx g @aws/nx-plugin:ts#mcp-server --project=inventory --no-interactive --dry-runyarn nx g @aws/nx-plugin:ts#mcp-server --project=inventory --no-interactive --dry-runnpx nx g @aws/nx-plugin:ts#mcp-server --project=inventory --no-interactive --dry-runbunx nx g @aws/nx-plugin:ts#mcp-server --project=inventory --no-interactive --dry-runĐiều này sẽ thêm một máy chủ MCP.
Các tệp được cập nhật bởi ts#mcp-server
Trình tạo ts#mcp-server tạo các tệp này.
Thư mụcpackages/
Thư mụcinventory/
Thư mụcsrc/mcp-server/
- index.ts barrel export
- server.ts tạo máy chủ MCP
Thư mụctools/
- divide.ts công cụ ví dụ
Thư mụcresources/
- sample-guidance.ts tài nguyên ví dụ
- stdio.ts điểm vào cho MCP với STDIO transport
- http.ts điểm vào cho MCP với Streamable HTTP transport
- Dockerfile xây dựng image cho AgentCore Runtime
- rolldown.config.ts cấu hình để đóng gói máy chủ MCP để triển khai lên AgentCore
Thư mụccommon/constructs/
Thư mụcsrc
Thư mụcapp/mcp-servers/inventory-mcp-server/
- inventory-mcp-server.ts construct để triển khai máy chủ MCP inventory của bạn lên AgentCore Runtime
Nhiệm vụ 5: Tạo cơ sở dữ liệu trò chơi
Phần tiêu đề “Nhiệm vụ 5: Tạo cơ sở dữ liệu trò chơi”Trạng thái trò chơi của chúng ta — các trò chơi đã lưu và kho đồ của mỗi người chơi — được lưu trữ trong Amazon DynamoDB. Tạo một dự án DynamoDB có tên DungeonDb với trình tạo ts#dynamodb:
- Cài đặt Nx Console VSCode Plugin nếu bạn chưa cài đặt
- Mở Nx Console trong VSCode
- Nhấp
Generate (UI)trong phần "Common Nx Commands" - Tìm kiếm
@aws/nx-plugin - ts#dynamodb - Điền các tham số bắt buộc
- name: DungeonDb
- Nhấp
Generate
pnpm nx g @aws/nx-plugin:ts#dynamodb --name=DungeonDb --no-interactiveyarn nx g @aws/nx-plugin:ts#dynamodb --name=DungeonDb --no-interactivenpx nx g @aws/nx-plugin:ts#dynamodb --name=DungeonDb --no-interactivebunx nx g @aws/nx-plugin:ts#dynamodb --name=DungeonDb --no-interactiveBạn cũng có thể thực hiện chạy thử để xem những tệp nào sẽ bị thay đổi
pnpm nx g @aws/nx-plugin:ts#dynamodb --name=DungeonDb --no-interactive --dry-runyarn nx g @aws/nx-plugin:ts#dynamodb --name=DungeonDb --no-interactive --dry-runnpx nx g @aws/nx-plugin:ts#dynamodb --name=DungeonDb --no-interactive --dry-runbunx nx g @aws/nx-plugin:ts#dynamodb --name=DungeonDb --no-interactive --dry-runBạn sẽ thấy một số tệp mới xuất hiện trong cây tệp của mình.
Các tệp được cập nhật bởi ts#dynamodb
Trình tạo ts#dynamodb tạo các tệp này.
Thư mụcpackages/
Thư mụcdungeon-db/
- config.json cấu hình DynamoDB bao gồm cổng, tên bảng, cài đặt container và Global Secondary Indexes
Thư mụcsrc/
- index.ts điểm vào và exports
- client.ts DynamoDB client singleton và phân giải tên bảng
Thư mụcentities/
- example.ts entity ElectroDB ví dụ (chúng ta sẽ thay thế cái này)
- index.ts entity exports
- project.json thêm các mục tiêu
devvàpull-image
Thư mụccommon/
Thư mụcscripts/
Thư mụcsrc/
Thư mụcdynamodb/
- create-local-table.ts tạo bảng trong DynamoDB Local
- pull-image.ts kéo image DynamoDB Local
- start-container.ts khởi động container DynamoDB Local
Thư mụcconstructs/
Thư mụcsrc/
Thư mụcapp/dynamodb/
- dungeon-db.ts construct để cung cấp bảng của bạn
Thư mụccore/
- dynamodb.ts construct bảng DynamoDB chung
src/client.ts được tạo xuất getDynamoDBClient() và resolveTableName(). Khi LOCAL_DEV=true (được đặt tự động bởi các mục tiêu dev) chúng kết nối với DynamoDB Local; nếu không chúng kết nối với AWS và phân giải tên bảng đã triển khai từ Runtime Configuration. Chúng ta sẽ mô hình hóa các entity Game và Inventory của chúng ta trong dự án này ở Module 2.
Để biết thêm chi tiết, hãy tham khảo hướng dẫn trình tạo ts#dynamodb.
Nhiệm vụ 6: Tạo Giao diện Người dùng (UI)
Phần tiêu đề “Nhiệm vụ 6: Tạo Giao diện Người dùng (UI)”Trong nhiệm vụ này, chúng ta sẽ tạo UI cho phép bạn tương tác với trò chơi.
Game UI: Website
Phần tiêu đề “Game UI: Website”Để tạo UI, tạo một website có tên GameUI bằng các bước sau:
- Cài đặt Nx Console VSCode Plugin nếu bạn chưa cài đặt
- Mở Nx Console trong VSCode
- Nhấp
Generate (UI)trong phần "Common Nx Commands" - Tìm kiếm
@aws/nx-plugin - ts#website - Điền các tham số bắt buộc
- name: GameUI
- ux: shadcn
- Nhấp
Generate
pnpm nx g @aws/nx-plugin:ts#website --name=GameUI --ux=shadcn --no-interactiveyarn nx g @aws/nx-plugin:ts#website --name=GameUI --ux=shadcn --no-interactivenpx nx g @aws/nx-plugin:ts#website --name=GameUI --ux=shadcn --no-interactivebunx nx g @aws/nx-plugin:ts#website --name=GameUI --ux=shadcn --no-interactiveBạn cũng có thể thực hiện chạy thử để xem những tệp nào sẽ bị thay đổi
pnpm nx g @aws/nx-plugin:ts#website --name=GameUI --ux=shadcn --no-interactive --dry-runyarn nx g @aws/nx-plugin:ts#website --name=GameUI --ux=shadcn --no-interactive --dry-runnpx nx g @aws/nx-plugin:ts#website --name=GameUI --ux=shadcn --no-interactive --dry-runbunx nx g @aws/nx-plugin:ts#website --name=GameUI --ux=shadcn --no-interactive --dry-runBạn sẽ thấy một số tệp mới xuất hiện trong cây tệp của mình.
Các tệp được cập nhật bởi ts#website
ts#website tạo các tệp này. Hãy xem xét một số tệp chính được đánh dấu trong cây tệp:
Thư mụcpackages/
Thư mụccommon/
Thư mụcconstructs/
Thư mụcsrc/
Thư mụcapp/ các cdk construct cụ thể cho ứng dụng
Thư mụcstatic-websites/
- game-ui.ts cdk construct để tạo Game UI của bạn
Thư mụccore/
- static-website.ts construct website tĩnh chung
Thư mụcgame-ui/
Thư mụcpublic/
- …
Thư mụcsrc/
Thư mụccomponents/
Thư mụcAppLayout/
- index.tsx bố cục trang tổng thể sử dụng shadcn
SidebarProvider+ header
- index.tsx bố cục trang tổng thể sử dụng shadcn
- app-sidebar.tsx sidebar shadcn mặc định với các mục nav
- alert.tsx, spinner.tsx các primitive phản hồi được bọc bởi shadcn
Thư mụcroutes/ các tuyến đường dựa trên tệp của @tanstack/react-router
- index.tsx trang gốc ’/’
- __root.tsx tất cả các trang sử dụng component này làm cơ sở
- config.ts
- main.tsx điểm vào React
- routeTree.gen.ts tệp này được cập nhật tự động bởi @tanstack/react-router
- styles.css import các global shadcn được chia sẻ (Tailwind v4)
- index.html
- project.json
- vite.config.mts
- …
Thư mụccommon/
Thư mụcshadcn/ thư viện shadcn/ui được chia sẻ (token chủ đề,
Button,Card,Input,Sidebar, …) được import bởi mọi websiteuxProvider=Shadcn- src/components/ui/*
- src/styles/globals.css Tailwind + token thiết kế shadcn
- …
import * as url from 'url';import { Construct } from 'constructs';import { StaticWebsite } from '../../core/index.js';
export class GameUI extends StaticWebsite { constructor(scope: Construct, id: string) { super(scope, id, { websiteName: 'GameUI', websiteFilePath: url.fileURLToPath( new URL( '../../../../../../dist/packages/game-ui/bundle', import.meta.url, ), ), }); }}Đây là CDK construct định nghĩa GameUI của chúng ta. Nó đã cấu hình đường dẫn tệp đến gói được tạo cho UI dựa trên Vite của chúng ta. Điều này có nghĩa là tại thời điểm build, việc đóng gói xảy ra trong mục tiêu build của dự án game-ui và đầu ra được sử dụng ở đây.
import React from 'react';import { createRoot } from 'react-dom/client';import { RouterProvider, createRouter } from '@tanstack/react-router';import { routeTree } from './routeTree.gen';import './styles.css';
export type RouterProviderContext = {};
const router = createRouter({ routeTree, context: {} });
declare module '@tanstack/react-router' {  interface Register {    router: typeof router;  }}
const App = () => <RouterProvider router={router} context={{}} />;
const root = document.getElementById('root');root && createRoot(root).render( <React.StrictMode> <App /> </React.StrictMode>, );Đây là điểm vào nơi React được gắn kết. Kiểu dáng đến từ các token Tailwind v4 được import qua styles.css. @tanstack/react-router được cấu hình trong chế độ file-based routing: miễn là máy chủ dev đang chạy, bất kỳ tệp nào bạn tạo dưới routes/ đều được nhận tự động và cây route được tạo lại. Các trình tạo sau này (auth, connection) sẽ AST-patch tệp này để bọc <App /> trong các provider bổ sung.
import { createFileRoute } from '@tanstack/react-router';
export const Route = createFileRoute('/')({  component: RouteComponent,});
function RouteComponent() { return ( <div className="text-center"> <header> <h1>Welcome</h1> <p>Welcome to your new React website!</p> </header> </div> );}Một component sẽ được render khi điều hướng đến tuyến đường /. @tanstack/react-router sẽ quản lý Route cho bạn bất cứ khi nào bạn tạo/di chuyển tệp này (miễn là máy chủ dev đang chạy).
Game UI: Auth
Phần tiêu đề “Game UI: Auth”Hãy cấu hình Game UI của chúng ta để yêu cầu truy cập được xác thực qua Amazon Cognito bằng các bước sau:
- Cài đặt Nx Console VSCode Plugin nếu bạn chưa cài đặt
- Mở Nx Console trong VSCode
- Nhấp
Generate (UI)trong phần "Common Nx Commands" - Tìm kiếm
@aws/nx-plugin - ts#website#auth - Điền các tham số bắt buộc
- cognitoDomain: game-ui
- project: @dungeon-adventure/game-ui
- allowSignup: true
- Nhấp
Generate
pnpm nx g @aws/nx-plugin:ts#website#auth --cognitoDomain=game-ui --project=@dungeon-adventure/game-ui --allowSignup=true --no-interactiveyarn nx g @aws/nx-plugin:ts#website#auth --cognitoDomain=game-ui --project=@dungeon-adventure/game-ui --allowSignup=true --no-interactivenpx nx g @aws/nx-plugin:ts#website#auth --cognitoDomain=game-ui --project=@dungeon-adventure/game-ui --allowSignup=true --no-interactivebunx nx g @aws/nx-plugin:ts#website#auth --cognitoDomain=game-ui --project=@dungeon-adventure/game-ui --allowSignup=true --no-interactiveBạn cũng có thể thực hiện chạy thử để xem những tệp nào sẽ bị thay đổi
pnpm nx g @aws/nx-plugin:ts#website#auth --cognitoDomain=game-ui --project=@dungeon-adventure/game-ui --allowSignup=true --no-interactive --dry-runyarn nx g @aws/nx-plugin:ts#website#auth --cognitoDomain=game-ui --project=@dungeon-adventure/game-ui --allowSignup=true --no-interactive --dry-runnpx nx g @aws/nx-plugin:ts#website#auth --cognitoDomain=game-ui --project=@dungeon-adventure/game-ui --allowSignup=true --no-interactive --dry-runbunx nx g @aws/nx-plugin:ts#website#auth --cognitoDomain=game-ui --project=@dungeon-adventure/game-ui --allowSignup=true --no-interactive --dry-runBạn sẽ thấy một số tệp mới xuất hiện/thay đổi trong cây tệp của mình.
Các tệp được cập nhật bởi ts#website#auth
Trình tạo ts#website#auth cập nhật/tạo các tệp này. Hãy xem xét một số tệp chính được đánh dấu trong cây tệp:
Thư mụcpackages/
Thư mụccommon/
Thư mụcconstructs/
Thư mụcsrc/
Thư mụccore/
- user-identity.ts cdk construct để tạo user/identity pools
Thư mụcgame-ui/
Thư mụcsrc/
Thư mụccomponents/
Thư mụcAppLayout/
- index.tsx thêm người dùng đã đăng nhập/đăng xuất vào header
Thư mụcCognitoAuth/
- index.tsx quản lý đăng nhập vào Cognito
Thư mụcRuntimeConfig/
- index.tsx lấy
runtime-config.jsonvà cung cấp cho các children qua context
- index.tsx lấy
Thư mụchooks/
- useRuntimeConfig.tsx
- main.tsx Được cập nhật để thêm Cognito
import { useAuth } from 'react-oidc-context';import CognitoAuth from './components/CognitoAuth';import { useRuntimeConfig } from './hooks/useRuntimeConfig';import RuntimeConfigProvider from './components/RuntimeConfig';import React from 'react';import { createRoot } from 'react-dom/client';import { RouterProvider, createRouter } from '@tanstack/react-router';import { routeTree } from './routeTree.gen';import './styles.css';export type RouterProviderContext = {};export type RouterProviderContext = { runtimeConfig?: ReturnType<typeof useRuntimeConfig>; auth?: ReturnType<typeof useAuth>;};const router = createRouter({ routeTree, context: {} });const router = createRouter({ routeTree, context: { runtimeConfig: undefined, auth: undefined },});// Đăng ký instance router để đảm bảo kiểu an toàndeclare module '@tanstack/react-router' { interface Register { router: typeof router; }}const App = () => <RouterProvider router={router} context={{}} />;const App = () => { const auth = useAuth(); const runtimeConfig = useRuntimeConfig(); return <RouterProvider router={router} context={{ runtimeConfig, auth }} />;};const root = document.getElementById('root');root && createRoot(root).render( <React.StrictMode> <RuntimeConfigProvider> <CognitoAuth> <App /> </CognitoAuth> </RuntimeConfigProvider> </React.StrictMode>, );Các component RuntimeConfigProvider và CognitoAuth đã được thêm vào tệp main.tsx thông qua một biến đổi AST. Điều này cho phép component CognitoAuth xác thực với Amazon Cognito bằng cách lấy runtime-config.json chứa cấu hình kết nối cognito cần thiết để thực hiện các cuộc gọi backend đến đích chính xác.
Game UI: Kết nối với Game API
Phần tiêu đề “Game UI: Kết nối với Game API”Hãy cấu hình Game UI của chúng ta để kết nối với Game API đã tạo trước đó.
- Cài đặt Nx Console VSCode Plugin nếu bạn chưa cài đặt
- Mở Nx Console trong VSCode
- Nhấp
Generate (UI)trong phần "Common Nx Commands" - Tìm kiếm
@aws/nx-plugin - connection - Điền các tham số bắt buộc
- sourceProject: @dungeon-adventure/game-ui
- targetProject: @dungeon-adventure/game-api
- Nhấp
Generate
pnpm nx g @aws/nx-plugin:connection --sourceProject=@dungeon-adventure/game-ui --targetProject=@dungeon-adventure/game-api --no-interactiveyarn nx g @aws/nx-plugin:connection --sourceProject=@dungeon-adventure/game-ui --targetProject=@dungeon-adventure/game-api --no-interactivenpx nx g @aws/nx-plugin:connection --sourceProject=@dungeon-adventure/game-ui --targetProject=@dungeon-adventure/game-api --no-interactivebunx nx g @aws/nx-plugin:connection --sourceProject=@dungeon-adventure/game-ui --targetProject=@dungeon-adventure/game-api --no-interactiveBạn cũng có thể thực hiện chạy thử để xem những tệp nào sẽ bị thay đổi
pnpm nx g @aws/nx-plugin:connection --sourceProject=@dungeon-adventure/game-ui --targetProject=@dungeon-adventure/game-api --no-interactive --dry-runyarn nx g @aws/nx-plugin:connection --sourceProject=@dungeon-adventure/game-ui --targetProject=@dungeon-adventure/game-api --no-interactive --dry-runnpx nx g @aws/nx-plugin:connection --sourceProject=@dungeon-adventure/game-ui --targetProject=@dungeon-adventure/game-api --no-interactive --dry-runbunx nx g @aws/nx-plugin:connection --sourceProject=@dungeon-adventure/game-ui --targetProject=@dungeon-adventure/game-api --no-interactive --dry-runBạn sẽ thấy một số tệp mới xuất hiện/thay đổi trong cây tệp của mình.
Các tệp được cập nhật bởi connection từ UI -> tRPC
Trình tạo connection tạo/cập nhật các tệp này. Hãy xem xét một số tệp chính được đánh dấu trong cây tệp:
Thư mụcpackages/
Thư mụcgame-ui/
Thư mụcsrc/
Thư mụccomponents/
- GameApiClientProvider.tsx thiết lập client GameAPI
Thư mụchooks/
- useGameApi.tsx hooks để gọi GameApi
- main.tsx chèn các provider client trpc
- package.json
import { useContext } from 'react';import { GameApiTRPCContext } from '../components/GameApiClientProvider';
export const useGameApi = () => {  const container = useContext(GameApiTRPCContext);  if (!container) {    throw new Error('useGameApi must be used within GameApiClientProvider');  }  return container.optionsProxy;};
export const useGameApiClient = () => { const container = useContext(GameApiTRPCContext); if (!container) { throw new Error( 'useGameApiClient must be used within GameApiClientProvider', ); } return container.client;};Hook này cung cấp quyền truy cập vào tRPC client để gọi GameApi. Để xem ví dụ về cách gọi tRPC API, hãy tham khảo hướng dẫn sử dụng tRPC hook.
import GameApiClientProvider from './components/GameApiClientProvider';import QueryClientProvider from './components/QueryClientProvider';import { useAuth } from 'react-oidc-context';import CognitoAuth from './components/CognitoAuth';import { useRuntimeConfig } from './hooks/useRuntimeConfig';import RuntimeConfigProvider from './components/RuntimeConfig';import React from 'react';import { createRoot } from 'react-dom/client';import { RouterProvider, createRouter } from '@tanstack/react-router';import { routeTree } from './routeTree.gen';import './styles.css';...const root = document.getElementById('root');root && createRoot(root).render( <React.StrictMode> <RuntimeConfigProvider> <CognitoAuth> <QueryClientProvider> <GameApiClientProvider> <App /> </GameApiClientProvider> </QueryClientProvider> </CognitoAuth> </RuntimeConfigProvider> </React.StrictMode>, );Tệp main.tsx đã được cập nhật thông qua một biến đổi AST để chèn các provider tRPC.
Story Agent: Kết nối với Inventory MCP Server
Phần tiêu đề “Story Agent: Kết nối với Inventory MCP Server”Hãy kết nối Story Agent của chúng ta với máy chủ MCP Inventory để agent có thể khám phá và gọi các công cụ của máy chủ MCP.
- Cài đặt Nx Console VSCode Plugin nếu bạn chưa cài đặt
- Mở Nx Console trong VSCode
- Nhấp
Generate (UI)trong phần "Common Nx Commands" - Tìm kiếm
@aws/nx-plugin - connection - Điền các tham số bắt buộc
- sourceProject: story
- targetProject: inventory
- Nhấp
Generate
pnpm nx g @aws/nx-plugin:connection --sourceProject=story --targetProject=inventory --no-interactiveyarn nx g @aws/nx-plugin:connection --sourceProject=story --targetProject=inventory --no-interactivenpx nx g @aws/nx-plugin:connection --sourceProject=story --targetProject=inventory --no-interactivebunx nx g @aws/nx-plugin:connection --sourceProject=story --targetProject=inventory --no-interactiveBạn cũng có thể thực hiện chạy thử để xem những tệp nào sẽ bị thay đổi
pnpm nx g @aws/nx-plugin:connection --sourceProject=story --targetProject=inventory --no-interactive --dry-runyarn nx g @aws/nx-plugin:connection --sourceProject=story --targetProject=inventory --no-interactive --dry-runnpx nx g @aws/nx-plugin:connection --sourceProject=story --targetProject=inventory --no-interactive --dry-runbunx nx g @aws/nx-plugin:connection --sourceProject=story --targetProject=inventory --no-interactive --dry-runCác tệp được cập nhật bởi kết nối Story Agent -> Inventory MCP
Trình tạo connection tạo/cập nhật các tệp này:
Thư mụcpackages/
Thư mụccommon/
Thư mụcagent_connection/
Thư mụcdungeon_adventure_agent_connection/
Thư mụccore/
- agentcore_endpoints.py Giải quyết ARN/URL không phụ thuộc framework
- agentcore_mcp_transport.py MCP transport không phụ thuộc framework
- agentcore_mcp_client_strands.py Strands MCP client bao bọc transport
Thư mụcauth/
httpx.AuthSigV4 / chuyển tiếp session không phụ thuộc framework- …
Thư mụcapp/
- inventory_mcp_server_client_strands.py Strands client để kết nối với máy chủ MCP Inventory
- __init__.py Re-exports các client theo từng kết nối
Thư mụcstory/
Thư mụcdungeon_adventure_story/agent/
- agent.py Được sửa đổi để import và sử dụng MCP client
Trình tạo:
- Tạo một dự án Python
agent_connectionđược chia sẻ (nếu chưa tồn tại) vớiAgentCoreMCPClientStrandscốt lõi - Tạo một class
InventoryMcpServerClientStrandsxử lý kết nối đến máy chủ MCP cả cục bộ (HTTP trực tiếp) và khi được triển khai (qua AgentCore với xác thực IAM) - Biến đổi
agent.pyđể import client, tạo một instance và kết nối các công cụ của máy chủ MCP vào agent - Thêm dự án
agent_connectionlàm phụ thuộc workspace của dự án story - Cập nhật mục tiêu
devđể tự động khởi động máy chủ MCP khi chạy cục bộ
Để biết thêm chi tiết, hãy tham khảo hướng dẫn kết nối Python Agent với MCP.
Game UI: Kết nối với Story Agent
Phần tiêu đề “Game UI: Kết nối với Story Agent”Hãy kết nối Game UI của chúng ta với Story Agent. Vì agent giao tiếp bằng AG-UI, trình tạo connection kết nối CopilotKit: một component chat có chủ đề và một HttpAgent từ @ag-ui/client sẵn sàng để render.
- Cài đặt Nx Console VSCode Plugin nếu bạn chưa cài đặt
- Mở Nx Console trong VSCode
- Nhấp
Generate (UI)trong phần "Common Nx Commands" - Tìm kiếm
@aws/nx-plugin - connection - Điền các tham số bắt buộc
- sourceProject: @dungeon-adventure/game-ui
- targetProject: story
- Nhấp
Generate
pnpm nx g @aws/nx-plugin:connection --sourceProject=@dungeon-adventure/game-ui --targetProject=story --no-interactiveyarn nx g @aws/nx-plugin:connection --sourceProject=@dungeon-adventure/game-ui --targetProject=story --no-interactivenpx nx g @aws/nx-plugin:connection --sourceProject=@dungeon-adventure/game-ui --targetProject=story --no-interactivebunx nx g @aws/nx-plugin:connection --sourceProject=@dungeon-adventure/game-ui --targetProject=story --no-interactiveBạn cũng có thể thực hiện chạy thử để xem những tệp nào sẽ bị thay đổi
pnpm nx g @aws/nx-plugin:connection --sourceProject=@dungeon-adventure/game-ui --targetProject=story --no-interactive --dry-runyarn nx g @aws/nx-plugin:connection --sourceProject=@dungeon-adventure/game-ui --targetProject=story --no-interactive --dry-runnpx nx g @aws/nx-plugin:connection --sourceProject=@dungeon-adventure/game-ui --targetProject=story --no-interactive --dry-runbunx nx g @aws/nx-plugin:connection --sourceProject=@dungeon-adventure/game-ui --targetProject=story --no-interactive --dry-runCác tệp được cập nhật bởi kết nối UI -> Story Agent
Trình tạo connection tạo/cập nhật các tệp này:
Thư mụcpackages/
Thư mụcgame-ui/
Thư mụcsrc/
Thư mụccomponents/
- AguiProvider.tsx
CopilotKitProvidervới mọi AG-UI agent được kết nối đã đăng ký Thư mụccopilot/
- index.tsx
CopilotChat/CopilotSidebar/CopilotPopupvới chủ đề Shadcn - ShadcnAssistantMessage.tsx, ShadcnUserMessage.tsx, ShadcnChatInput.tsx, ShadcnCursor.tsx, copilot.css
- index.tsx
- AguiProvider.tsx
Thư mụchooks/
- useAguiStoryAgent.tsx Xây dựng một
HttpAgent, chèn token bearer Cognito và đệmthreadIdthành session id 33 ký tự của AgentCore
- useAguiStoryAgent.tsx Xây dựng một
- main.tsx Bọc
<App />trong<AguiProvider>
Trình tạo:
- Phát hiện
uxProvidercủa website React (Shadcn ở đây) và cung cấp các component chat phù hợp. - Đăng ký mọi agent được kết nối trên một
CopilotKitProviderduy nhất — chạy lại cho một agent khác chỉ thêm một hook khác. - Đọc ARN runtime của agent từ Runtime Configuration, xây dựng URL gọi AgentCore và đính kèm token bearer Cognito cộng với header session id của AgentCore.
Để biết thêm chi tiết, hãy tham khảo hướng dẫn kết nối React với AG-UI.
Kết nối Game API và máy chủ MCP Inventory với cơ sở dữ liệu
Phần tiêu đề “Kết nối Game API và máy chủ MCP Inventory với cơ sở dữ liệu”Cả Game API và máy chủ MCP Inventory đều đọc và ghi vào bảng DynamoDB của chúng ta, vì vậy hãy kết nối chúng với dự án DungeonDb. Trình tạo connection phát hiện rằng mục tiêu là một dự án ts#dynamodb và kết nối mục tiêu dev của mỗi dự án nguồn để tự động khởi động DynamoDB Local.
- Cài đặt Nx Console VSCode Plugin nếu bạn chưa cài đặt
- Mở Nx Console trong VSCode
- Nhấp
Generate (UI)trong phần "Common Nx Commands" - Tìm kiếm
@aws/nx-plugin - connection - Điền các tham số bắt buộc
- sourceProject: @dungeon-adventure/game-api
- targetProject: @dungeon-adventure/dungeon-db
- Nhấp
Generate
pnpm nx g @aws/nx-plugin:connection --sourceProject=@dungeon-adventure/game-api --targetProject=@dungeon-adventure/dungeon-db --no-interactiveyarn nx g @aws/nx-plugin:connection --sourceProject=@dungeon-adventure/game-api --targetProject=@dungeon-adventure/dungeon-db --no-interactivenpx nx g @aws/nx-plugin:connection --sourceProject=@dungeon-adventure/game-api --targetProject=@dungeon-adventure/dungeon-db --no-interactivebunx nx g @aws/nx-plugin:connection --sourceProject=@dungeon-adventure/game-api --targetProject=@dungeon-adventure/dungeon-db --no-interactiveBạn cũng có thể thực hiện chạy thử để xem những tệp nào sẽ bị thay đổi
pnpm nx g @aws/nx-plugin:connection --sourceProject=@dungeon-adventure/game-api --targetProject=@dungeon-adventure/dungeon-db --no-interactive --dry-runyarn nx g @aws/nx-plugin:connection --sourceProject=@dungeon-adventure/game-api --targetProject=@dungeon-adventure/dungeon-db --no-interactive --dry-runnpx nx g @aws/nx-plugin:connection --sourceProject=@dungeon-adventure/game-api --targetProject=@dungeon-adventure/dungeon-db --no-interactive --dry-runbunx nx g @aws/nx-plugin:connection --sourceProject=@dungeon-adventure/game-api --targetProject=@dungeon-adventure/dungeon-db --no-interactive --dry-run- Cài đặt Nx Console VSCode Plugin nếu bạn chưa cài đặt
- Mở Nx Console trong VSCode
- Nhấp
Generate (UI)trong phần "Common Nx Commands" - Tìm kiếm
@aws/nx-plugin - connection - Điền các tham số bắt buộc
- sourceProject: @dungeon-adventure/inventory
- targetProject: @dungeon-adventure/dungeon-db
- Nhấp
Generate
pnpm nx g @aws/nx-plugin:connection --sourceProject=@dungeon-adventure/inventory --targetProject=@dungeon-adventure/dungeon-db --no-interactiveyarn nx g @aws/nx-plugin:connection --sourceProject=@dungeon-adventure/inventory --targetProject=@dungeon-adventure/dungeon-db --no-interactivenpx nx g @aws/nx-plugin:connection --sourceProject=@dungeon-adventure/inventory --targetProject=@dungeon-adventure/dungeon-db --no-interactivebunx nx g @aws/nx-plugin:connection --sourceProject=@dungeon-adventure/inventory --targetProject=@dungeon-adventure/dungeon-db --no-interactiveBạn cũng có thể thực hiện chạy thử để xem những tệp nào sẽ bị thay đổi
pnpm nx g @aws/nx-plugin:connection --sourceProject=@dungeon-adventure/inventory --targetProject=@dungeon-adventure/dungeon-db --no-interactive --dry-runyarn nx g @aws/nx-plugin:connection --sourceProject=@dungeon-adventure/inventory --targetProject=@dungeon-adventure/dungeon-db --no-interactive --dry-runnpx nx g @aws/nx-plugin:connection --sourceProject=@dungeon-adventure/inventory --targetProject=@dungeon-adventure/dungeon-db --no-interactive --dry-runbunx nx g @aws/nx-plugin:connection --sourceProject=@dungeon-adventure/inventory --targetProject=@dungeon-adventure/dungeon-db --no-interactive --dry-runGame UI: Cơ sở hạ tầng
Phần tiêu đề “Game UI: Cơ sở hạ tầng”Hãy tạo dự án con cuối cùng cho cơ sở hạ tầng CDK.
- Cài đặt Nx Console VSCode Plugin nếu bạn chưa cài đặt
- Mở Nx Console trong VSCode
- Nhấp
Generate (UI)trong phần "Common Nx Commands" - Tìm kiếm
@aws/nx-plugin - ts#infra - Điền các tham số bắt buộc
- name: infra
- Nhấp
Generate
pnpm nx g @aws/nx-plugin:ts#infra --name=infra --no-interactiveyarn nx g @aws/nx-plugin:ts#infra --name=infra --no-interactivenpx nx g @aws/nx-plugin:ts#infra --name=infra --no-interactivebunx nx g @aws/nx-plugin:ts#infra --name=infra --no-interactiveBạn cũng có thể thực hiện chạy thử để xem những tệp nào sẽ bị thay đổi
pnpm nx g @aws/nx-plugin:ts#infra --name=infra --no-interactive --dry-runyarn nx g @aws/nx-plugin:ts#infra --name=infra --no-interactive --dry-runnpx nx g @aws/nx-plugin:ts#infra --name=infra --no-interactive --dry-runbunx nx g @aws/nx-plugin:ts#infra --name=infra --no-interactive --dry-runBạn sẽ thấy một số tệp mới xuất hiện/thay đổi trong cây tệp của mình.
Các tệp được cập nhật bởi ts#infra
Trình tạo ts#infra tạo/cập nhật các tệp này. Hãy xem xét một số tệp chính được đánh dấu trong cây tệp:
Thư mụcpackages/
Thư mụccommon/
Thư mụcconstructs/
Thư mụcsrc/
Thư mụccore/
- checkov.ts
- index.ts
Thư mụcinfra
Thư mụcsrc/
Thư mụcstages/
- application-stage.ts các cdk stack được định nghĩa ở đây
Thư mụcstacks/
- application-stack.ts các tài nguyên cdk được định nghĩa ở đây
- main.ts điểm vào định nghĩa tất cả các stage
- cdk.json
- checkov.yml
- project.json
- …
- package.json
- tsconfig.json thêm references
- tsconfig.base.json thêm alias
import { ApplicationStage } from './stages/application-stage.js';import { App } from ':dungeon-adventure/common-constructs';
const app = new App();
// Sử dụng cái này để triển khai môi trường sandbox của riêng bạn (giả định thông tin xác thực CLI của bạn)new ApplicationStage(app, 'dungeon-adventure-infra-sandbox', {  env: {    account: process.env.CDK_DEFAULT_ACCOUNT,    region: process.env.CDK_DEFAULT_REGION,  },});
app.synth();Đây là điểm vào cho ứng dụng CDK của bạn.
import { Stack, StackProps } from 'aws-cdk-lib';import { Construct } from 'constructs';
export class ApplicationStack extends Stack {  constructor(scope: Construct, id: string, props?: StackProps) {    super(scope, id, props);
// Mã định nghĩa stack của bạn ở đây }}Hãy khởi tạo các CDK construct của chúng ta để xây dựng trò chơi phiêu lưu hầm ngục.
Nhiệm vụ 7: Cập nhật cơ sở hạ tầng của chúng ta
Phần tiêu đề “Nhiệm vụ 7: Cập nhật cơ sở hạ tầng của chúng ta”Hãy cập nhật packages/infra/src/stacks/application-stack.ts để khởi tạo một số construct đã tạo của chúng ta:
import {  GameApi,  GameUI,  InventoryMcpServer,  StoryAgent,  UserIdentity,} from ':dungeon-adventure/common-constructs';import { Stack, StackProps, CfnOutput } from 'aws-cdk-lib';import { Construct } from 'constructs';export class ApplicationStack extends Stack {  constructor(scope: Construct, id: string, props?: StackProps) {    super(scope, id, props);
    const userIdentity = new UserIdentity(this, 'UserIdentity');
    const gameApi = new GameApi(this, 'GameApi', {      integrations: GameApi.defaultIntegrations(this).build(),    });
    const mcpServer = new InventoryMcpServer(this, 'InventoryMcpServer');
    // Use Cognito for user authentication with the agent    const storyAgent = new StoryAgent(this, 'StoryAgent', {      identity: userIdentity,    });
    new CfnOutput(this, 'StoryAgentArn', {      value: storyAgent.agentCoreRuntime.agentRuntimeArn,    });    new CfnOutput(this, 'InventoryMcpArn', {      value: mcpServer.agentCoreRuntime.agentRuntimeArn,    });
    // Grant the agent permissions to invoke our mcp server    mcpServer.grantInvokeAccess(storyAgent);
    // Grant the authenticated role access to invoke the api    gameApi.grantInvokeAccess(userIdentity.identityPool.authenticatedRole);
    new GameUI(this, 'GameUI');  }}
import { Stack, StackProps } from 'aws-cdk-lib';import { GameApi, GameUI, InventoryMcpServer, StoryAgent, UserIdentity,} from ':dungeon-adventure/common-constructs';import { Stack, StackProps, CfnOutput } from 'aws-cdk-lib';import { Construct } from 'constructs';
export class ApplicationStack extends Stack { constructor(scope: Construct, id: string, props?: StackProps) { super(scope, id, props);
// The code that defines your stack goes here const userIdentity = new UserIdentity(this, 'UserIdentity');
const gameApi = new GameApi(this, 'GameApi', { integrations: GameApi.defaultIntegrations(this).build(), });
const mcpServer = new InventoryMcpServer(this, 'InventoryMcpServer');
// Use Cognito for user authentication with the agent const storyAgent = new StoryAgent(this, 'StoryAgent', { identity: userIdentity, });
new CfnOutput(this, 'StoryAgentArn', { value: storyAgent.agentCoreRuntime.agentRuntimeArn, }); new CfnOutput(this, 'InventoryMcpArn', { value: mcpServer.agentCoreRuntime.agentRuntimeArn, });
// Grant the agent permissions to invoke our mcp server mcpServer.grantInvokeAccess(storyAgent);
// Grant the authenticated role access to invoke the api gameApi.grantInvokeAccess(userIdentity.identityPool.authenticatedRole);
new GameUI(this, 'GameUI'); }}Nhiệm vụ 8: Build mã
Phần tiêu đề “Nhiệm vụ 8: Build mã”Các lệnh Nx
Mục tiêu đơn lẻ vs nhiều mục tiêu
Phần tiêu đề “Mục tiêu đơn lẻ vs nhiều mục tiêu”Lệnh run-many sẽ chạy một mục tiêu trên nhiều dự án con được liệt kê (--all sẽ nhắm mục tiêu tất cả). Điều này đảm bảo các phụ thuộc được thực thi theo đúng thứ tự.
Bạn cũng có thể kích hoạt một build (hoặc bất kỳ tác vụ nào khác) cho một mục tiêu dự án đơn lẻ bằng cách chạy mục tiêu trực tiếp trên dự án. Ví dụ: để build dự án @dungeon-adventure/infra, chạy lệnh sau:
pnpm nx build infrayarn nx build infranpx nx build infrabunx nx build infraBạn cũng có thể bỏ qua scope và sử dụng cú pháp viết tắt của Nx nếu muốn:
pnpm nx build infrayarn nx build infranpx nx build infrabunx nx build infraTrực quan hóa các phụ thuộc của bạn
Phần tiêu đề “Trực quan hóa các phụ thuộc của bạn”Để trực quan hóa các phụ thuộc của bạn, chạy:
pnpm nx graphyarn nx graphnpx nx graphbunx nx graph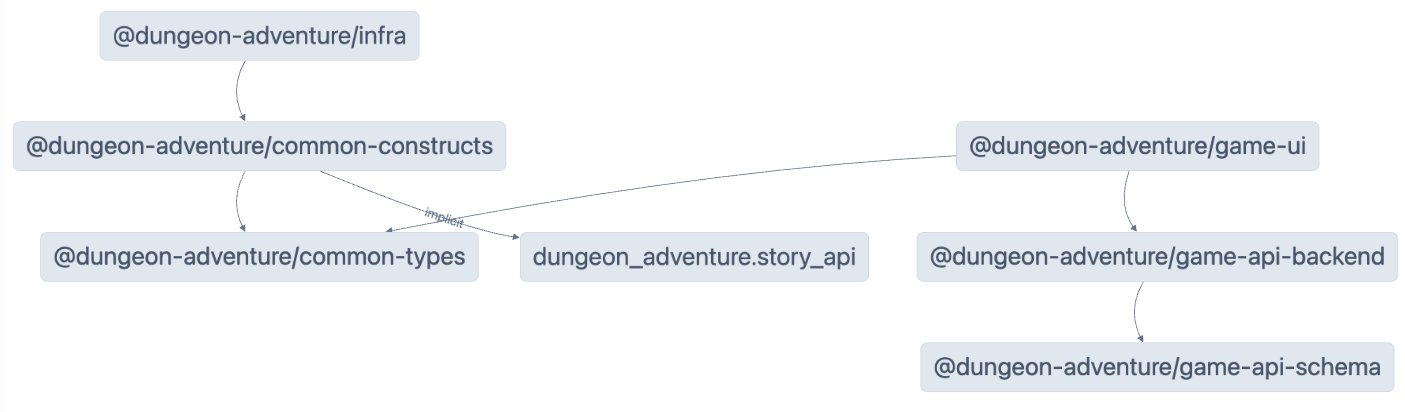
Caching
Phần tiêu đề “Caching”Nx dựa vào caching để bạn có thể tái sử dụng các artifact từ các build trước đó nhằm tăng tốc độ phát triển. Có một số cấu hình cần thiết để điều này hoạt động chính xác và có thể có những trường hợp bạn muốn thực hiện build mà không sử dụng cache. Để làm điều đó, chỉ cần thêm đối số --skip-nx-cache vào lệnh của bạn. Ví dụ:
pnpm nx build infra --skip-nx-cacheyarn nx build infra --skip-nx-cachenpx nx build infra --skip-nx-cachebunx nx build infra --skip-nx-cacheNếu vì bất kỳ lý do gì bạn muốn xóa cache của mình (được lưu trữ trong thư mục .nx), bạn có thể chạy lệnh sau:
pnpm nx resetyarn nx resetnpx nx resetbunx nx resetSử dụng dòng lệnh, chạy lệnh sau để sửa các lỗi lint trước:
pnpm lintyarn lintnpm run lintbun lintSau đó, chạy lệnh sau để thực hiện build đầy đủ:
pnpm buildyarn buildnpm run buildbun buildBạn sẽ được nhắc với thông báo sau:
 NX   The workspace is out of sync
[@nx/js:typescript-sync]: Some TypeScript configuration files are missing project references to the projects they depend on or contain outdated project references.
This will result in an error in CI.
? Would you like to sync the identified changes to get your workspace up to date? …Yes, sync the changes and run the tasksNo, run the tasks without syncing the changes
Thông báo này cho biết rằng NX đã phát hiện một số tệp có thể được cập nhật tự động cho bạn. Trong trường hợp này, nó đề cập đến các tệp tsconfig.json không có tham chiếu Typescript được thiết lập trên các dự án tham chiếu.
Chọn tùy chọn Yes, sync the changes and run the tasks để tiếp tục. Bạn sẽ nhận thấy tất cả các lỗi import liên quan đến IDE của bạn được tự động giải quyết vì trình tạo sync sẽ tự động thêm các tham chiếu typescript còn thiếu!
Tất cả các artifact đã build hiện có sẵn trong thư mục dist/ nằm ở gốc của monorepo. Đây là một thực hành tiêu chuẩn khi sử dụng các dự án được tạo bởi @aws/nx-plugin vì nó không làm ô nhiễm cây tệp của bạn với các tệp được tạo. Trong trường hợp bạn muốn dọn dẹp các tệp của mình, hãy xóa thư mục dist/ mà không phải lo lắng về các artifact build bị rải rác khắp cây tệp.
Chúc mừng! Bạn đã tạo tất cả các dự án con cần thiết để bắt đầu triển khai cốt lõi của trò chơi AI Dungeon Adventure của chúng ta. 🎉🎉🎉