Heterogenous Cluster
Adding Worker Groups to an existing cluster
SageMaker HyperPod gives you the ability to update your clusters to increase the size of an existing worker group, or create a new worker group to add additional instance-types to your cluster.
To increase the size of an existing worker-group, you can simply update the InstanceCount using the SageMaker HyperPod console.
If you wish to add a new worker-group with a new instance type to your cluster, we recommend you follow the steps provided here which use the update-cluster CLI command. When you update a cluster to create separate worker-groups for different instance types, this is called a heterogenous cluster.
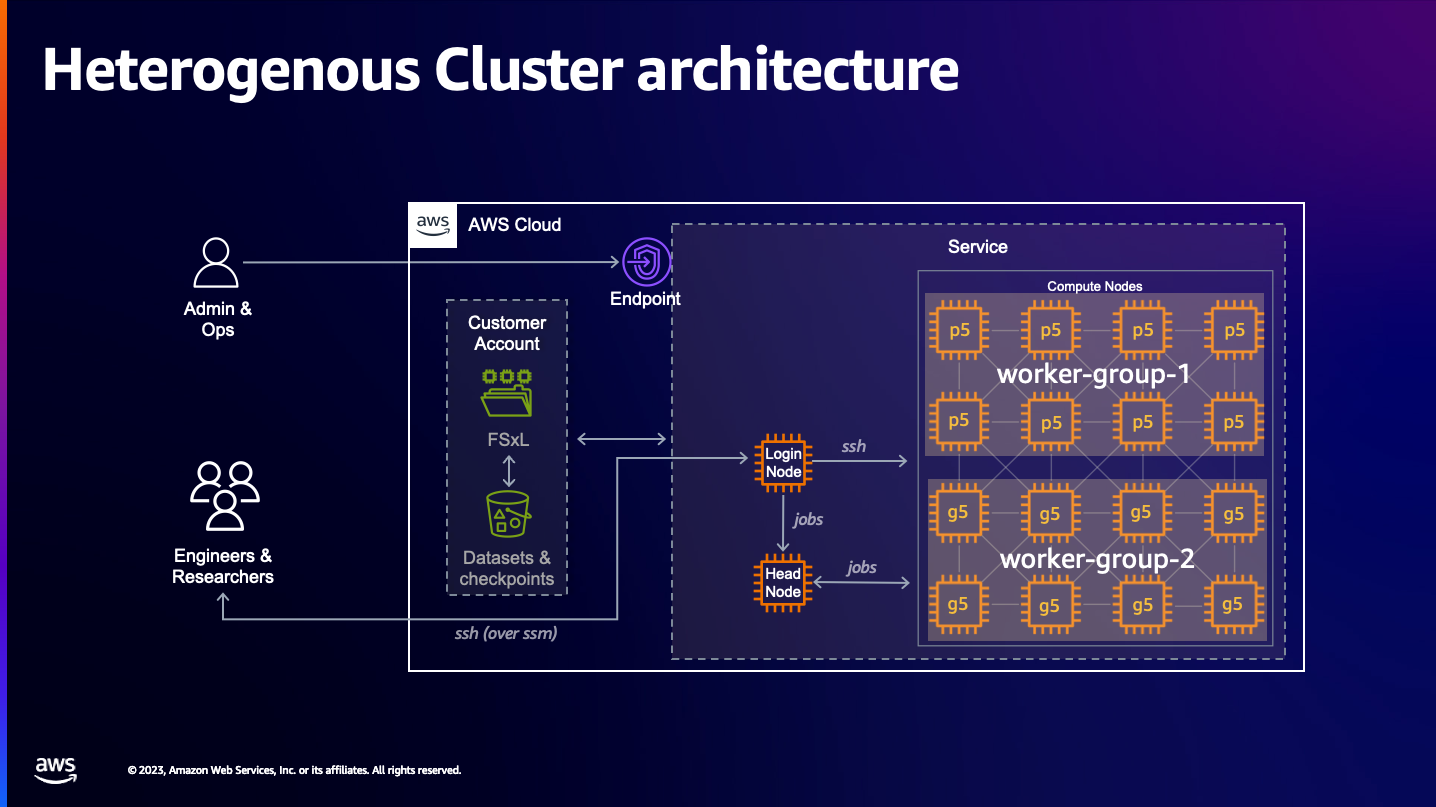
For heterogenous clusters, it is a recommended best practice to create a new partition for each worker-group / instance type, so that your ml-researchers can target partitions with the desired instance-types when they launch their jobs.
$ sinfo
PARTITION      AVAIL  TIMELIMIT  NODES  STATE NODELIST
dev*              up   infinite      2   idle ...
ml.p5.48xlarge    up   infinite      2   idle ...
ml.g5.48xlarge    up   infinite      2   idle ...
Having seperate partitions for each instance-type allows you to submit jobs targeting specific instances by specifying a partition as part of your sbatch job:
sbatch -p ml.p5.48xlarge submit.sh
Update Cluster Configuration
The following steps assume you are using the same deployment environment used to create your cluster. This could be a SageMaker Studio editor instance or a local development machine, depending on how you deployed your cluster originally. The below scripts assume you have an env_vars file defined, and access to your s3 lifecycle script bucket.
- Set enviornment variables in your local directory
# Set environment variables from cluster setup
source env_vars
- Our HyperPod clusters come with a
cluster-config.json. We will use that configuration file to write a new file calledupdate-cluster-config.json. The new file will include additional worker-groups which we will reference to update the cluster. Select the instance type you would like to use for your new worker-group from the below options and follow the scripts to create a new file calledupdate-cluster-config.json.
- trn1.32xlarge
- p4d.24xlarge
- p5.48xlarge
- g5.48xlarge
# Source environment variables
source env_vars

# Create additional worker group configuration
additional_worker_group=$(cat <<EOF
{
  "InstanceGroupName": "worker-group-2",
  "InstanceType": "ml.trn1.32xlarge",
  "InstanceCount": 1,
  "LifeCycleConfig": {
    "SourceS3Uri": "s3://${BUCKET}/src",
    "OnCreate": "on_create.sh"
  },
  "ExecutionRole": "${ROLE}",
  "ThreadsPerCore": 1
}
EOF
)

# Copy cluster-config.json to a temporary file
cp cluster-config.json temp-cluster-config.json

# Add additional worker group and remove VpcConfig section
jq --argjson additional_worker_group "$additional_worker_group" '.InstanceGroups += [$additional_worker_group] | del(.VpcConfig)' temp-cluster-config.json > update-cluster-config.json

# Remove the temporary file
rm temp-cluster-config.json
# Source environment variables
source env_vars

# Create additional worker group configuration
additional_worker_group=$(cat <<EOF
{
  "InstanceGroupName": "worker-group-2",
  "InstanceType": "ml.p4d.24xlarge",
  "InstanceCount": 1,
  "LifeCycleConfig": {
    "SourceS3Uri": "s3://${BUCKET}/src",
    "OnCreate": "on_create.sh"
  },
  "ExecutionRole": "${ROLE}",
  "ThreadsPerCore": 1
}
EOF
)

# Copy cluster-config.json to a temporary file
cp cluster-config.json temp-cluster-config.json

# Add additional worker group and remove VpcConfig section
jq --argjson additional_worker_group "$additional_worker_group" '.InstanceGroups += [$additional_worker_group] | del(.VpcConfig)' temp-cluster-config.json > update-cluster-config.json

# Remove the temporary file
rm temp-cluster-config.json
# Source environment variables
source env_vars

# Create additional worker group configuration
additional_worker_group=$(cat <<EOF
{
  "InstanceGroupName": "worker-group-2",
  "InstanceType": "ml.p5.48xlarge",
  "InstanceCount": 1,
  "LifeCycleConfig": {
    "SourceS3Uri": "s3://${BUCKET}/src",
    "OnCreate": "on_create.sh"
  },
  "ExecutionRole": "${ROLE}",
  "ThreadsPerCore": 1
}
EOF
)

# Copy cluster-config.json to a temporary file
cp cluster-config.json temp-cluster-config.json

# Add additional worker group and remove VpcConfig section
jq --argjson additional_worker_group "$additional_worker_group" '.InstanceGroups += [$additional_worker_group] | del(.VpcConfig)' temp-cluster-config.json > update-cluster-config.json

# Remove the temporary file
rm temp-cluster-config.json
# Source environment variables
source env_vars

# Create additional worker group configuration
additional_worker_group=$(cat <<EOF
{
  "InstanceGroupName": "worker-group-2",
  "InstanceType": "ml.g5.48xlarge",
  "InstanceCount": 1,
  "LifeCycleConfig": {
    "SourceS3Uri": "s3://${BUCKET}/src",
    "OnCreate": "on_create.sh"
  },
  "ExecutionRole": "${ROLE}",
  "ThreadsPerCore": 1
}
EOF
)

# Copy cluster-config.json to a temporary file
cp cluster-config.json temp-cluster-config.json

# Add additional worker group and remove VpcConfig section
jq --argjson additional_worker_group "$additional_worker_group" '.InstanceGroups += [$additional_worker_group] | del(.VpcConfig)' temp-cluster-config.json > update-cluster-config.json

# Remove the temporary file
rm temp-cluster-config.json
- Verify your updated configuration file.
cat update-cluster-config.json
Note it should contain the same name of your existing cluster and worker groups, as well as the new worker group created in step 2. We also removed the VpcConfig (not required for the update-cluster API we will call in the next step). Example:
{
    "ClusterName": "ml-cluster",
    "InstanceGroups": [
      {
        "InstanceGroupName": "controller-machine",
        "InstanceType": "ml.m5.12xlarge",
        "InstanceCount": 1,
        "LifeCycleConfig": {
          "SourceS3Uri": "s3://${BUCKET}/src",
          "OnCreate": "on_create.sh"
        },
        "ExecutionRole": "${ROLE}",
        "ThreadsPerCore": 2
      },
      {
        "InstanceGroupName": "worker-group-1",
        "InstanceType": "ml.p5.48xlarge",
        "InstanceCount": 2,
        "LifeCycleConfig": {
          "SourceS3Uri": "s3://${BUCKET}/src",
          "OnCreate": "on_create.sh"
        },
        "ExecutionRole": "${ROLE}",
        "ThreadsPerCore": 1
      },
      {
        "InstanceGroupName": "worker-group-2",
        "InstanceType": "ml.g5.48xlarge",
        "InstanceCount": 2,
        "LifeCycleConfig": {
          "SourceS3Uri": "s3://${BUCKET}/src",
          "OnCreate": "on_create.sh"
        },
        "ExecutionRole": "${ROLE}",
        "ThreadsPerCore": 1
      },
    ]
}
Update Provisioning Parameters
provisioning_parameters.json is a configuration for provisioning Slurm nodes on HyperPod. To register the new worker group and partition with the Slurm Controller you need to update the provisioning_parameters.json before you call the update-cluster API.
- Start by copying the current
provisoning_parameters.jsonfile to our local directory:
# copy file from S3 bucket
aws s3 cp s3://${BUCKET}/src/provisioning_parameters.json provisioning_parameters.json
- Open
provisoning_parameters.jsonfile in your preferred text editor (vim, vi, nano) and add the new worker group you just created to this file. In the example file below we have addedworker-group-2(lines 10-13). An example of an updatedprovisioning_parameteres.jsonfile is below:
{
  "version": "1.0.0",
  "workload_manager": "slurm",
  "controller_group": "controller-machine",
  "worker_groups": [
    {
      "instance_group_name": "worker-group-1",
      "partition_name": "ml.p5.48xlarge"
    },
    {
      "instance_group_name": "worker-group-2",
      "partition_name": "ml.g5.48xlarge"
    }
  ],
  "fsx_dns_name": "fs-XXXXXXXXXXXX.fsx.us-east-2.amazonaws.com",
  "fsx_mountname": "XXXXXXX"
}
- Upload the modified provisioning_parameters.json config to your LifeCycleScript S3 bucket.
# copy to the S3 Bucket
aws s3 cp provisioning_parameters.json s3://${BUCKET}/src/
Update-cluster
- With the new
provisioning_parameters.jsonfile uploaded to s3, and our newupdate-cluster-config.jsonwritten locally, we can now execute ourupdate-clustercommand.
aws sagemaker update-cluster \
    --cli-input-json file://update-cluster-config.json \
    --region $AWS_REGION
The cluster update will take approx 15-20 minutes to complete. You can monitor progress in HyperPod Console or by using aws sagemaker list-clusters.
Update Slurm Configuration on updated cluster (controller node)
Once the new nodes are added to your cluster, ClusterStatus will change to "InService". Do not proceed with the following steps until ClusterStatus changes to "InService".
- Connect to the controller node of your cluster (for a reminder of these steps, see ssh into cluster):
# SSH into controller node
./easy-ssh.sh -c controller-machine <YOUR CLUSTER NAME>
By default, instances from your new worker-group will be added to the default slurm partition in your cluster (dev*). An example of what you might see output by sinfo is below:
PARTITION      AVAIL  TIMELIMIT  NODES  STATE NODELIST
dev*              up   infinite      6   idle ip-10-1-5-148,ip-10-1-8-91,ip-10-1-22-213,ip-10-1-25-35,ip-10-1-46-41,ip-10-1-123-39
ml.p5.48xlarge    up   infinite      2   idle ip-10-1-22-213,ip-10-1-123-39
- Create a backup of
slurm.confandprovisoning_parameters.json.
#create a copy of the current slurm.conf configuration on the controller node
sudo cp /opt/slurm/etc/slurm.conf /opt/slurm/etc/slurm.conf.bak

#create a copy of the current provisoning_parameters.json on the controller node
sudo cp /opt/ml/config/provisioning_parameters.json /opt/ml/config/provisioning_parameters.json.bak
- Copy the latest
provisioning_parameters.jsonfrom your s3 LifeSycle Script bucket to /opt/ml/config/ on the controller node.
You can get the path for your s3 bucket in the SageMaker HyperPod console. Select your cluster > instance group > Lifecycle configuration.
You can also find this from your local deployment environment with: cat update-cluster-config.json | grep "SourceS3Uri".
#copy updated slurm configuration onto the head node
sudo aws s3 cp <s3URI>/provisioning_parameters.json /opt/ml/config/
sudo cat /opt/ml/config/provisioning_parameters.json
You should see the new worker groups reflected in /opt/ml/config/provisioning_parameters.json when cat'ed above.
- Edit slurm.conf. Delete the existing node name records (these will be repopulated when we restart the cluster agent). if you need to revert back to the old configuration for any reason, we created a backup called
/opt/slurm/etc/slurm.conf.bakin step 2.
sudo sed -i '/NodeName/d' /opt/slurm/etc/slurm.conf
- Stop the slurm controller daemon, restart cluster agent, and restart slurm controller daemon.
Note that stopping slurmctld below will temporarily disrupt job submission and slurm queue. This will not impact any running jobs, however it may impact any jobs that are submitted to the slurm queue during the period which slurmctld is stopped (approx 60 seconds).
sudo systemctl stop slurmctld
sudo systemctl restart sagemaker-cluster-agent
sudo systemctl start slurmctld
It will take approx 2 minutes for the sagemaker cluster agent to restart and slurmctld to recognize the new configuration. If you get get the following error, wait approx 60 seconds and try sinfo again: slurm_load_partitions: Unexpected message received
Running sinfo should now reflect your new slurm configuration, example provided below:
PARTITION      AVAIL  TIMELIMIT  NODES  STATE NODELIST
dev*              up   infinite      3   idle ip-10-1-100-222,ip-10-1-112-66,ip-10-1-125-167
ml.p5.48xlarge    up   infinite      2   idle ip-10-1-100-222,ip-10-1-112-66
ml.g5.48xlarge    up   infinite      1   idle ip-10-1-125-167
Congratulations! You have successfully updated your sagemaker HyperPod cluster to add a new worker-group and create a new partition!