SageMaker Managed MLflow
Amazon SageMaker offers a managed MLflow capability for machine learning (ML) and generative AI experimentation. This capability makes it easy for data scientists to use MLflow on SageMaker for model training, registration, and deployment. Admins can quickly set up secure and scalable MLflow environments on AWS. Data scientists and ML developers can efficiently track ML experiments and find the right model for a business problem.
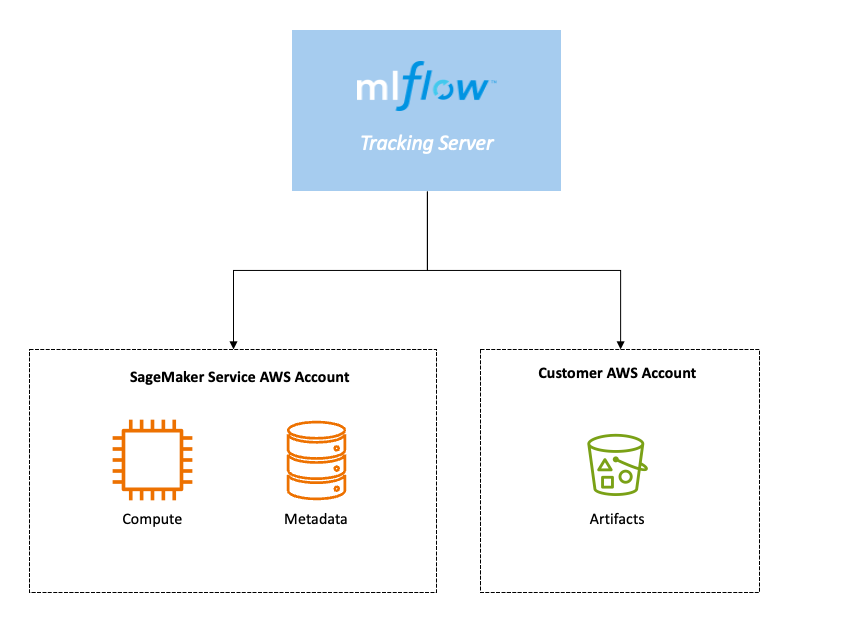
Core components of managed MLflow on SageMaker
The fully managed MLflow capability on SageMaker is built around three core components:
MLflow Tracking Server – With just a few steps, you can create an MLflow Tracking Server through the SageMaker Studio UI. This stand-alone HTTP server serves multiple REST API endpoints for tracking runs and experiments, enabling you to begin monitoring your ML experiments efficiently. For more granular security customization, you can also use the AWS Command Line Interface (AWS CLI).
MLflow backend metadata store – The metadata store is a critical part of the MLflow Tracking Server, where all metadata related to experiments, runs, and artifacts is persisted. This includes experiment names, run IDs, parameter values, metrics, tags, and artifact locations, ensuring comprehensive tracking and management of your ML experiments.
MLflow artifact store – This component provides a storage location for all artifacts generated during ML experiments, such as trained models, datasets, logs, and plots. Utilizing an Amazon Simple Storage Service (Amazon S3) bucket, it offers a customer-managed AWS account for storing these artifacts securely and efficiently.
Setup MLflow tracking server on SageMaker
Use MLflow with Amazon SageMaker to track, organize, view, analyze, and compare iterative ML experimentation to gain comparative insights and register and deploy your best performing models. To configure Mlflow we need to create a tracking server and then configure EKS cluster to use it.
Create MlFlow Tracking Server
To create tracking server please refer to the below Amazon SageMaker documentation
Create an MlFlow tracking server
Setup Mlflow Access in EKS.
We will create a service account with IAM permissions required to access the tracking server which can be used to track metrics.
- Create an IAM OIDC identity provider for your cluster with the following command:
eksctl utils associate-iam-oidc-provider --cluster $EKS_CLUSTER_NAME --approve
- Create an IAM policy
cat <<EOF> mlflowpolicy.json
{
    "Version": "2012-10-17",
    "Statement": [
        {
            "Effect": "Allow",
            "Action": [
                "sagemaker-mlflow:*",
                "sagemaker:CreateMlflowTrackingServer",
                "sagemaker:UpdateMlflowTrackingServer",
                "sagemaker:DeleteMlflowTrackingServer",
                "sagemaker:StartMlflowTrackingServer",
                "sagemaker:StopMlflowTrackingServer",
                "sagemaker:CreatePresignedMlflowTrackingServerUrl"
            ],
            "Resource": "*"
        }
    ]
}
EOF

aws iam create-policy \
    --policy-name SageMakerMlFlowAccessPolicy \
    --policy-document file://mlflowpolicy.json
- Create an IAM role
To Access MLFlow tracking server we need to create an IAM service account with a role that uses the above created policy. This section shows how to create an IAM role to delegate these permissions. To create this role we will use eksctl.
ROLE_NAME=SM_MLFLOW_ACCESS_ROLE
POLICY_ARN=$(aws iam list-policies --query 'Policies[?PolicyName==`SageMakerMlFlowAccessPolicy`]' | jq '.[0].Arn' |  tr -d '"')

eksctl create iamserviceaccount \
    --name sagemaker-mlflow-sa \
    --namespace kubeflow \
    --cluster $EKS_CLUSTER_NAME \
    --attach-policy-arn $POLICY_ARN \
    --approve \
    --role-name $ROLE_NAME \
    --region $AWS_REGION \
Track experiments with Mlflow
Amazon SageMaker uses an MLflow plugin to customize the behavior of the MLflow Python client and integrate AWS tooling. The AWS MLflow plugin authenticates API calls made with MLflow using AWS Signature Version 4. The AWS MLflow plugin allows you to connect to your MLflow tracking server using the tracking server ARN. For more information about plugins, see MLflow Plugins in the MLflow documentation.
1. Install MLflow and the AWS MLflow plugin
When building the docker image for your application install the below dependencies
pip install mlflow==2.13.2 sagemaker-mlflow==0.1.0
2. Add Service account to job spec file
We need to add the service account created in the previous step to the job spec in order to assume the mlflow permissions as shown below
spec:
     serviceAccountName: sagemaker-mlflow-sa
2. Connect to your MLflow Tracking Server
import mlflow

arn = "YOUR-TRACKING-SERVER-ARN"
mlflow.set_tracking_uri(arn)
3. Log metrics
with mlflow.start_run():
    mlflow.log_metric("foo", 1)

print(mlflow.search_runs())
For more detailed info on tracking metrics , refer the documentation here
4. View the experiments in tracking server
You can view the tracked metrics in the tracking server managed by Amazon SageMaker. To generate an URI for access the tracking server UI refer the documentation here