Useful Links
- Okta Developer Site
- https://aws.amazon.com/premiumsupport/knowledge-center/cognito-okta-saml-identity-provider/
1 - Preparing Cognito User Pool
- Open the Cognito User Pool console:
https://console.aws.amazon.com/cognito/users/ - Select your User Pool (
orbit-{YOUR_ENV_NAME}) - In the left pane, click on
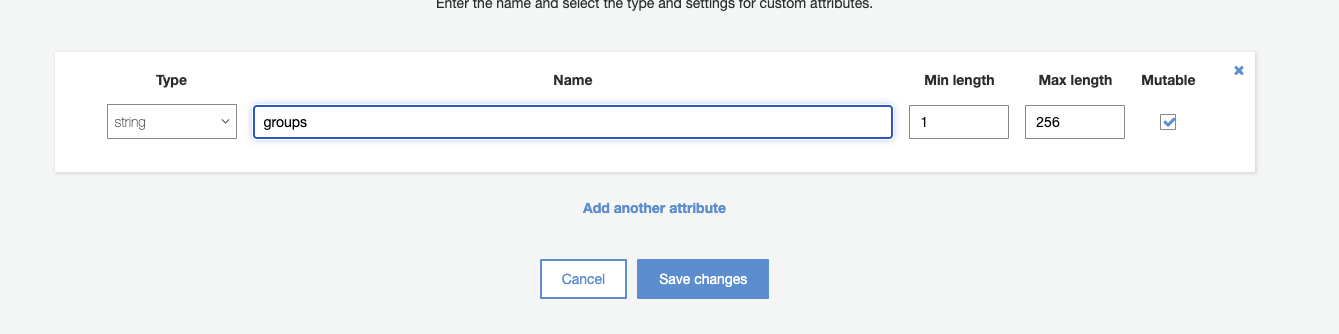
General settings>Attributes - In the page botton click on
Add custom attributeand then save it.
- In the left pane, click on
App integration>Domain name - Add any valid domain name

2 - Creating an Okta account
If you already have an Okta developer account, sign in and skip this topic.
- On the Okta Developer signup webpage, enter the required information, and then choose GET STARTED. The Okta Developer Team sends a verification email to the email address that you provided.
- In the verification email, find the sign-in information for your account. Choose ACTIVATE MY ACCOUNT, sign in, and finish creating your account.
3 - Configuring the Okta application
_Important: You must be in the Admin Console (Classic UI) to create a SAML app._--->For more information about the console, see The Okta Developer Console: All new, All you on the Okta Developer Blog.
- On the left-side menu, click on Applications > Application. Then choose Add Application.
- On the Add Application page, choose Create New App.
- In the Create a New Application Integration dialog, confirm that Platform is set to Web.
- For Sign on method, choose SAML 2.0.
- Choose Create.
For more information, see Prepare your integration in the Build a Single Sign-On (SSO) Integration guide on the Okta Developer website.
- On the Create SAML Integration page, under General Settings, enter a name for your app. (e.g. orbit-my-env)
- (Optional) Upload the Orbit Workbench logo and choose the visibility settings for your app.
- Choose Next.
- Under GENERAL, for Single sign on URL, enter
https://yourDomainPrefix.auth.region.amazoncognito.com/saml2/idpresponse.
Replace yourDomainPrefix and region with the values for your user pool. You can find these values in the Amazon Cognito console on the Domain name page for your user pool.
- For Audience URI (SP Entity ID), enter
urn:amazon:cognito:sp:yourUserPoolId.
Replace yourUserPoolId with your Amazon Cognito user pool ID. You can find this value in the Amazon Cognito console on the General settings page for your user pool.
- Under ATTRIBUTE STATEMENTS (OPTIONAL), add a statement with the following information:
- For Name, enter the SAML attribute name
http://schemas.xmlsoap.org/ws/2005/05/identity/claims/emailaddress. - For Value, enter
user.email.
- For Name, enter the SAML attribute name
- Under GROUP ATTRIBUTE STATEMENTS (OPTIONAL), add a statement with the following information:
- For Name, enter the SAML attribute name
http://schemas.xmlsoap.org/ws/2005/05/identity/claims/teams. - For Filter select
Matches regex. - For Value, enter
.*.
- For Name, enter the SAML attribute name

- For all other settings on the page, leave them as their default values or set them according to your preferences.
- Choose Next.
- Choose a feedback response for Okta Support.
- Choose Finish.
For more information, see Create your integration in the Build a Single Sign-On (SSO) Integration guide on the Okta Developer website.
4 - Assign a user to your Okta application
- On the Assignments tab for your Okta app, for Assign, choose Assign to People.
- Choose Assign next to the user that you want to assign.
If this is a new account, the only option available is to choose yourself (the admin) as the user.
- (Optional) For User Name, enter a user name, or leave it as the user’s email address, if you want.
- Choose Save and Go Back. Your user is assigned.
- Choose Done.
For more information, see Assign users in the Build a Single Sign-On (SSO) Integration guide on the Okta Developer website.
5 - Get the IdP metadata for your Okta application
- On the Sign On tab for your Okta app, find the Identity Provider metadata hyperlink. Right-click the hyperlink, and then copy the URL.
For more information, see Specify your integration settings in the Build a Single Sign-On (SSO) Integration guide on the Okta Developer website.
6 - Configuring Cognito User Pool - Identity Provider
- Open the Cognito User Pool console:
https://console.aws.amazon.com/cognito/users/ - Select your User Pool (
orbit-{YOUR_ENV_NAME}) - In the left navigation pane, under Federation, choose Identity providers.
- Choose SAML.
- Under Metadata document, paste the Identity Provider metadata URL that you copied.
- For Provider name, enter
okta. For more information, see Choosing SAML Identity Provider Names. - (Optional) Enter any SAML identifiers (Identifiers (Optional)) and enable sign-out from the IdP (Okta) when your users sign out from your user pool (Enable IdP sign out flow).
- Choose Create provider.
For more information, see Creating and managing a SAML identity provider for a user pool (AWS Management Console).
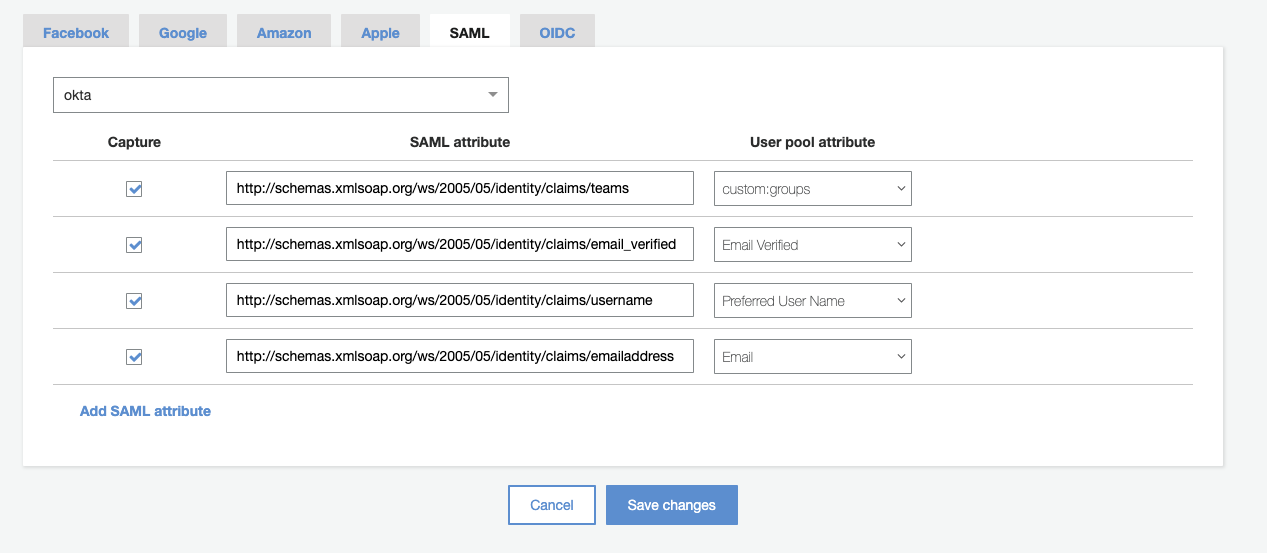
7 - Configuring Cognito User Pool - Attributes Mapping
- In the left navigation pane, under Federation, choose Attribute mapping.
- On the attribute mapping page, choose the SAML tab.
- Choose Add SAML attribute.
- Map the groups attributes
- For SAML attribute, enter the SAML attribute name
http://schemas.xmlsoap.org/ws/2005/05/identity/claims/teams. - For User pool attribute, choose
custom:groupsfrom the list.
- For SAML attribute, enter the SAML attribute name
- Map the e-mail attributes
- For SAML attribute, enter the SAML attribute name
http://schemas.xmlsoap.org/ws/2005/05/identity/claims/emailaddress. - For User pool attribute, choose
Emailfrom the list.
- For SAML attribute, enter the SAML attribute name
- Map the email_verified attributes
- For SAML attribute, enter the SAML attribute name
http://schemas.xmlsoap.org/ws/2005/05/identity/claims/email_verified. - For User pool attribute, choose
Email Verifiedfrom the list.
- For SAML attribute, enter the SAML attribute name
- Map the username attributes
- For SAML attribute, enter the SAML attribute name
http://schemas.xmlsoap.org/ws/2005/05/identity/claims/username. - For User pool attribute, choose
Preferred User Namefrom the list.
- For SAML attribute, enter the SAML attribute name
For more information, see Specifying identity provider attribute mappings for your user pool.
- Save Changes
8 - Get the Orbit Workbench URL
- Open the Systems Manager Console
- On the left, select
Parameter Store - Select /orbit/
{your-env-name}/context - Search for LandingPageUrl, you will need it below
- On the left, select
9 - Configuring Cognito User Pool - Client Settings
- In the left navigation pane, under General settings, get the
Pool Idof the User Pool
10 - Configuring the Orbit Workbench manifest file (YAML)
- Add these new attributes in the root level, and fill in
CognitoExternalProviderDomainandCognitoExternalProviderRedirectwith your configurations:
UserPoolId: us-west-X_xXXXxxXXx
CognitoExternalProvider: okta
CognitoExternalProviderLabel: OKTA
# The domain created in Coginto
CognitoExternalProviderDomain: domain.auth.region.amazoncognito.com
# The Orbit Workbench URL
CognitoExternalProviderRedirect: https://a12389bc893fa0980ce08f1000ecf89a.region.elb.amazonaws.com/orbit/login
- Deploy:
orbit deploy env -f YOUR_FILE.yaml
You should see a ‘Sign in with Okta’ button on the landing page
11 - Sign in
- Go back to your landing page and click on
Sign in with Okta- You will be prompted to login with with your Okta account
- You should see the Lake Creator and Lake user groups after you sign in