Developer Docs
NOTE: You do not need to follow these instructions to create the image & deploy the knfsd-file-cache solution on AWS.
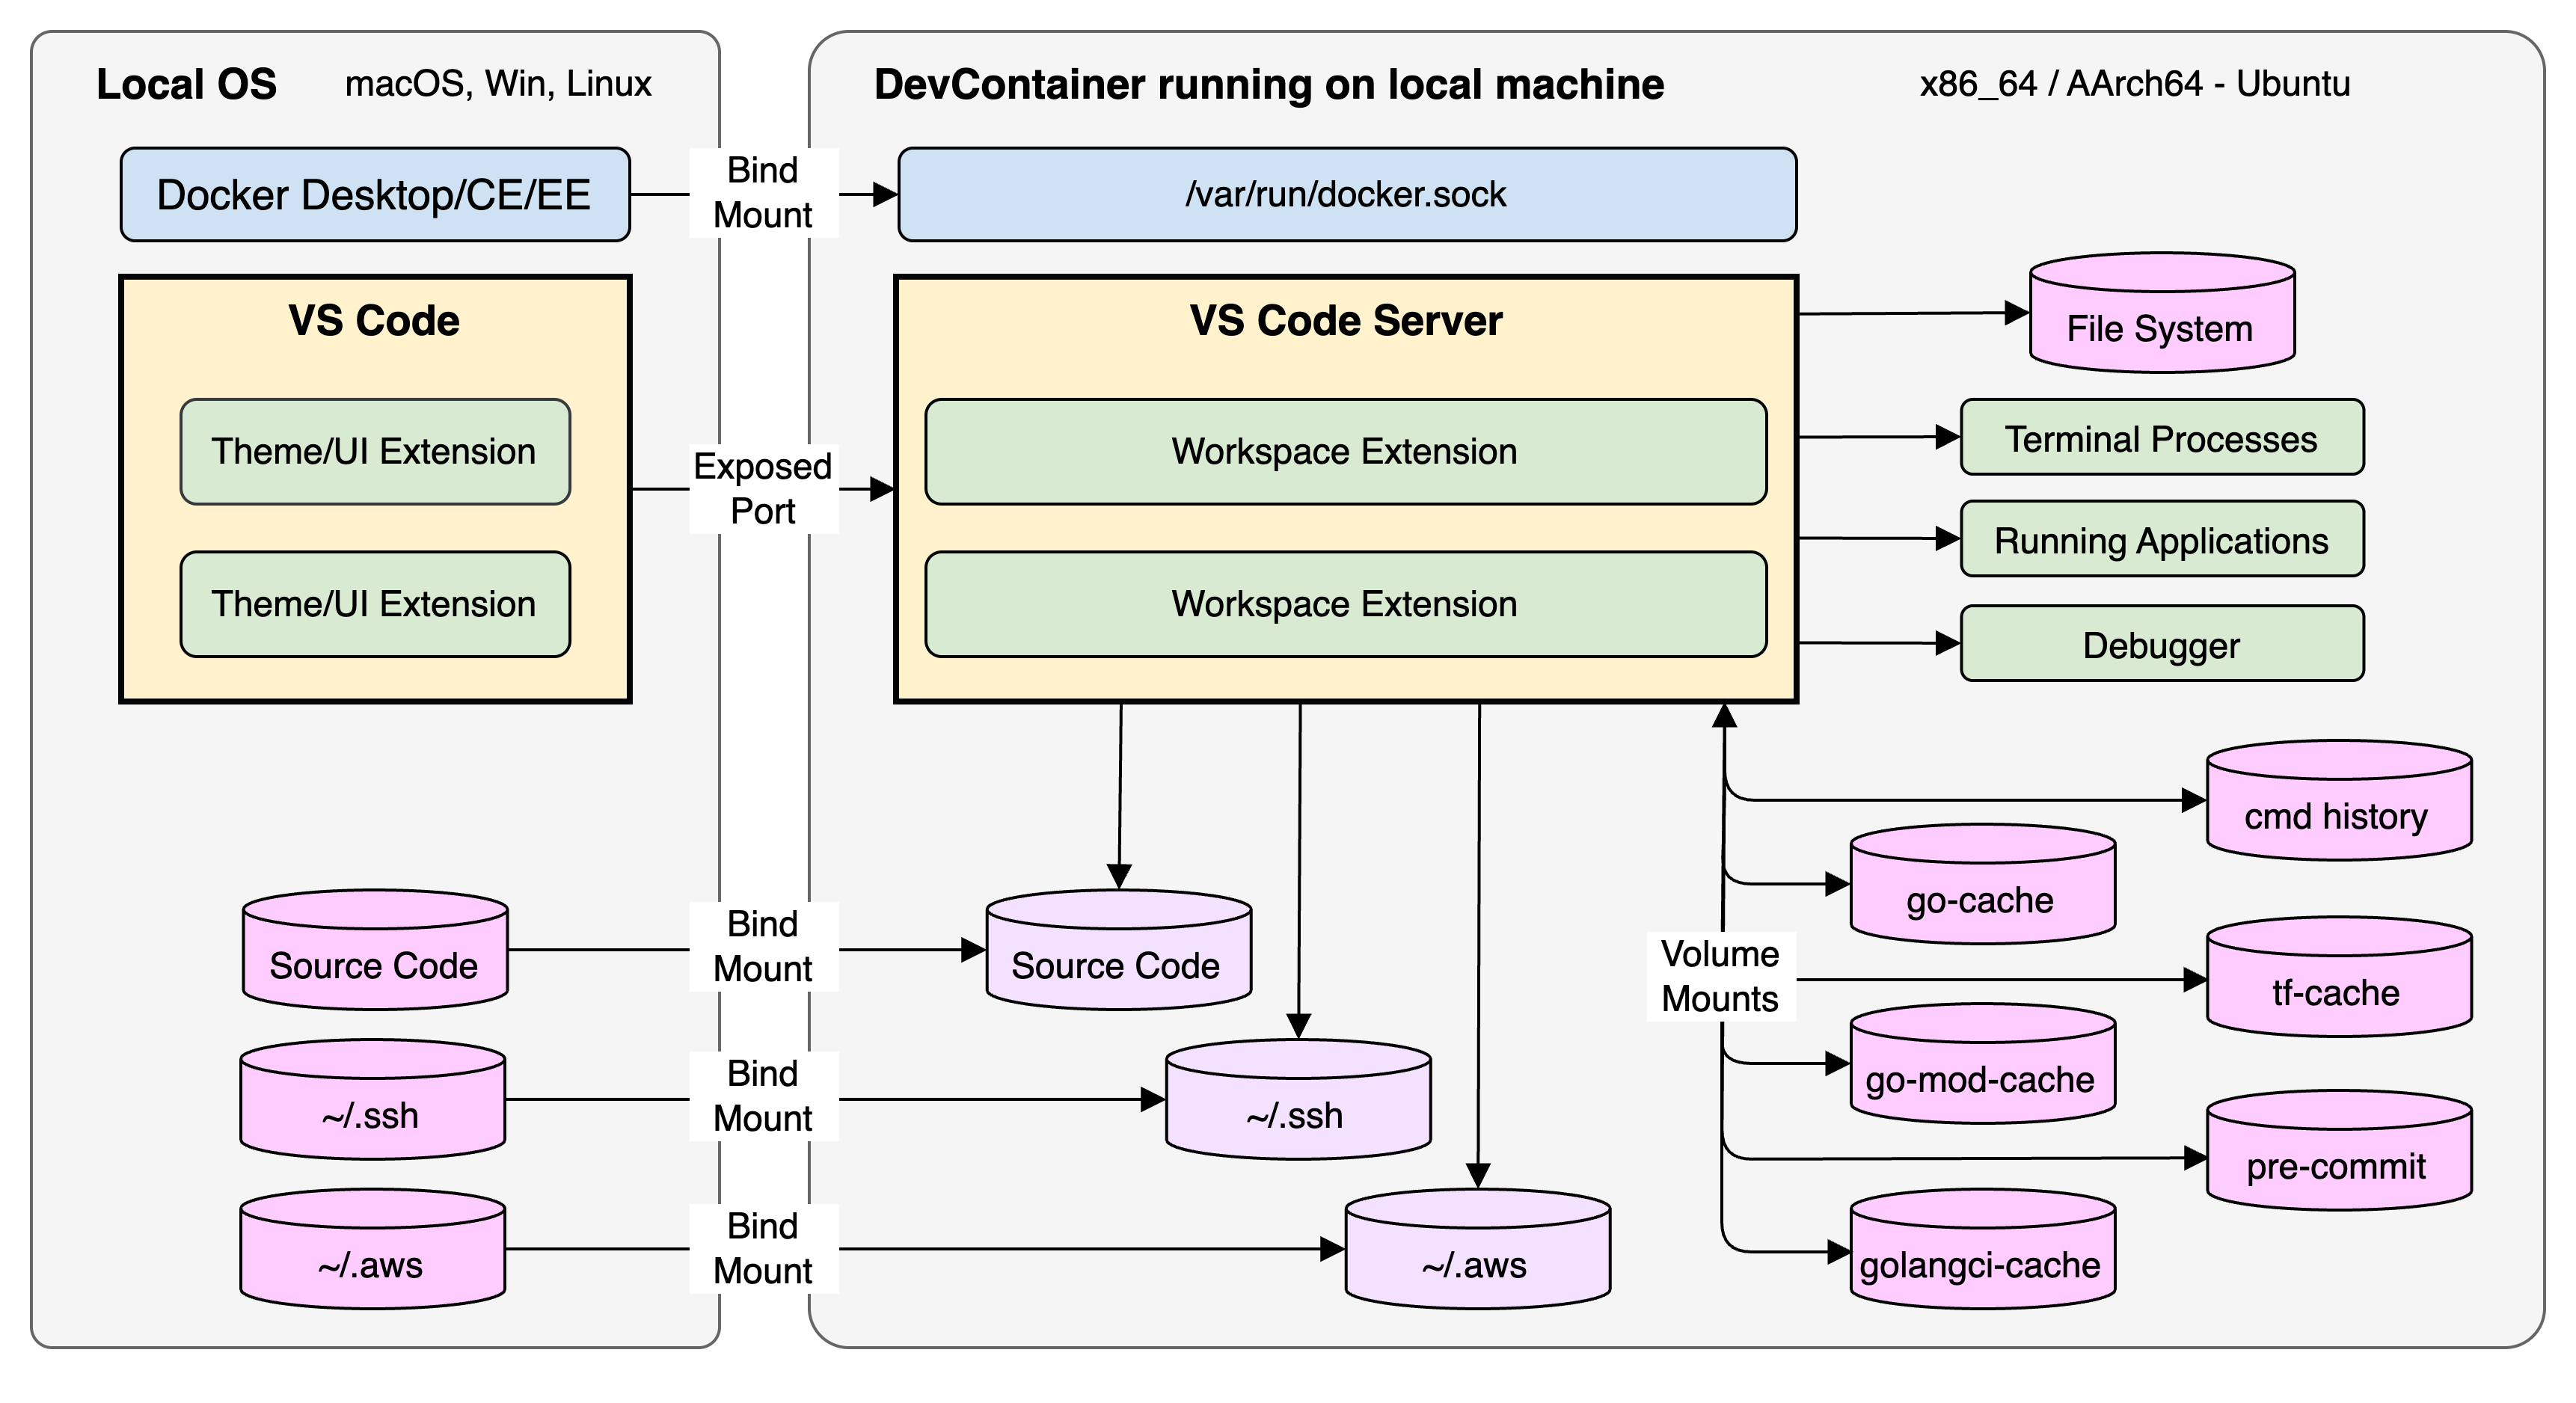
To allow rapid onboarding of developers to the integrated development environment (IDE) for this project, a devcontainer is provided for use in Visual Studio Code (VSC) locally (GitHub Codespaces/Loft Labs DevPod/GitPod are supported but untested). Using dev containers provides the following benefits:
-
Consistency: The biggest benefit of using dev containers is that they allow you to consistently reproduce your development environment. This means that you can be confident that your code will run the same way on any computer, regardless of the underlying operating system or installed software.
-
Collaboration: Dev containers make it easy for teams to collaborate on projects. Instead of each team member needing to set up their own development environment, everyone can use the same dev container. This ensures that everyone is working in the same environment, which can help to prevent conflicts and ensure that everyone is on the same page.
-
Portability: Because dev containers are self-contained, they can be easily moved from one computer to another. This makes it easy to work on your project on multiple computers or to share your development environment with others.
-
Isolation: Dev containers provide isolation, which means they won’t interfere with any other software or processes running on your computer. This can help to prevent conflicts, compatibility issues, or even damage, and it ensures that your development environment is clean and stable.
Prerequisites
- Linux, macOS, or Windows machine running Visual Studio Code v1.90.0+ or Cursor AI Code Editor v0.50.3 or newer.
- Docker Desktop v4.30.0 or newer.
PodmanandFinchare currently not supported fordevcontainerusage. - Dev Containers Extension v0.369.0 or newer.
- (Optional) Remote - SSH Extension v0.112.0 or newer. (alternatively, the Remote Development extension pack v0.25.0 includes Dev Containers & Remote - SSH).
Quick Install
-
Install all prerequisites. Ensure the Dev Containers Extension is installed in your VS Code on your host machine.
-
Start Docker Desktop on your host machine.
-
git clonethe knfsd-file-cache repository to a local directory on your host machine. -
Start VS Code and click "File -> Open Workspace from File..." (navigate to the root of your cloned git repo):
knfsd-dev.code-workspace
WARNING: Docker is about to generate a ~multiple GB image + volumes. Build time: ~10 minutes.
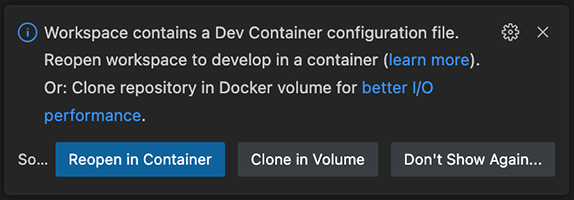
- Click the BLUE "Reopen in Container" button ("Clone in Volume" is not supported). Choose
devin the drop-down list.
- Click the BLUE "(show log)" text to view the progress of the container build.

Devcontainer: Considerations
-
The devcontainer uses
ubuntuas the default, non-root user. Typical devcontainer start-up time once fully cached is ~20 secs. The previous VSC session, including currently opened files and UI state should be reinstated upon devcontainer startup. -
There are considerable container image and 'cache' volume sizes (~15GB total) to be aware of in this setup:
-
Dockerfile: ~multiple GB Ubuntu: ~98MBBats: ~105MBDynamoDB Local: ~500MBknfsd-go-build-cachevolume: ~multiple GBknfsd-go-pkg-cachevolume: ~multiple GBknfsd-dev-trivy-cachevolume: ~1.3GB-
vscodevolume: ~266MB -
The
knfsd-dev.code-workspaceis respected independently of the devcontainer setup, with minimalgolangconfiguration. We are using a multi-root workspace, so all roots/folders will be opened in the same .devcontainer, regardless of whether there are configuration files at lower levels in this project. This is a known devcontainer limitation and explains why we provide only a single "monorepo" .devcontainer configuration at the root. -
All versions of software installed in the
Dockerfileare pinned to match the identical version being used in the.gitlab-ci.ymlfile. -
To override the default architecture (arm64/aarch64), set on your local OS the following 2 environment variables to the architecture you wish to build the devcontainer.
export BUILDPLATFORM=linux/amd64 # linux/arm64 (default) or linux/amd64
export BUILDARCH=amd64 # arm64 (default) or amd64
- If you modify any of the
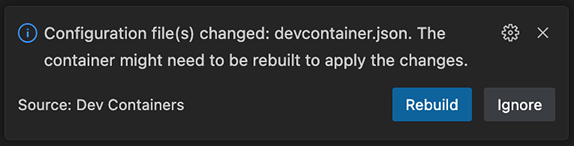
.devcontainer/dev/files, you will need torebuildthe container. TheDockerfilehas already been written to minimise the impact of rebuild times via Docker layers that are cached.
- Devcontainer commands such as:
Rebuild Container,Reopen Folder Locally, andClose Remote Connectioncan be easily accessed via the GREEN Remote Host menu, in the bottom-left corner of the VS Code: Status Bar. If your Status Bar isn't GREEN, you have missed the prerequisite step to install the Dev Containers Extension on your host machine. A restart of VS Code might be required.

-
To shutdown the devcontainer, you can
Close Remote Connectionor simply quit (cmd+q) the VS Code application. -
For more information on devcontainers, see the Advanced container configuration docs. Dev Containers have known limitations.
Devcontainer: API Throttling
Regardless of where you clone the knfsd-file-cache repository locally on your host machine; to avoid API throttling from GitHub whenever we pull golang 3rd party packages or use Packer, enter your GitHub classic Personal Access Token for the following environment variables into your /etc/environment file in your devcontainer. Open the file (sudo required) and insert your PAT ghp_* for both variables. The Post-Build validate-setup.sh script can be used to validate your devcontainer setup. Ensure you close/re-open VS Code or source /etc/environment each terminal to receive the updated environment variables. Alternatively, the devcontainer will attempt to use these ENV VARs if already present in your local OS environment.
$ sudo vim /etc/environment
GITHUB_COM_TOKEN=<GITHUB-CLASSIC-PAT>
PACKER_GITHUB_API_TOKEN=<GITHUB-CLASSIC-PAT>
Devcontainer: Mounts/Volumes
The workspaceMount/workspaceFolder have been configured to: /knfsd-file-cache; the git repo's root directory on the Ubuntu container.
The devcontainer extension provides out of the box support for using local git credentials from inside a container by automatically copying your local .gitconfig file into the container on startup, so you should not need to do this in the container itself. See Sharing Git credentials with your container for more information.
The devcontainer extension has been configured via: "dev.containers.cacheVolume"=true to cache the VS Code/Cursor server and third-party extensions in a Docker volume: vscode.
The devcontainer.json file has a number of custom mounts configured (see breakdown below). volume mounts are prefixed with: knfsd-dev- to ensure no conflict with any existing Docker volumes on the host system. To support different host OS, we use the technique of only one environment variable resolving on a particular OS. So, source=${localEnv:HOME}${localEnv:USERPROFILE} will either resolve to: ~ ($HOME) on macOS/Linux or to the user's folder: %USERPROFILE% on Windows.
    # Docker persistent volume: Terraform cache: $HOME/.terraform.d/plugin-cache
    "source=knfsd-dev-tf-cache,target=/home/ubuntu/.terraform.d/plugin-cache,type=volume",

    # Docker persistent volume: Packer cache: $HOME/.packer.d/plugins
    "source=knfsd-dev-packer-cache,target=/home/ubuntu/.packer.d/plugins,type=volume",

    # Docker persistent volume: go-build cache: $ go env GOCACHE ('/home/ubuntu/.cache/go-build')
    "source=knfsd-dev-go-build-cache,target=/home/ubuntu/.cache/go-build,type=volume",

    # Docker persistent volume: go package cache: $ go env GOMODCACHE ('/home/ubuntu/.cache/go/pkg')
    "source=knfsd-dev-go-pkg-cache,target=/home/ubuntu/.cache/go/pkg,type=volume",

    # Docker persistent volume: $GOLANGCI_LINT_CACHE ('/home/ubuntu/.cache/golangci-lint')
    "source=knfsd-dev-golangci-lint-cache,target=/home/ubuntu/.cache/golangci-lint,type=volume",

    # Docker persistent volume: pre-commit cache: $HOME/.cache/pre-commit
    "source=knfsd-dev-pre-commit-cache,target=/home/ubuntu/.cache/pre-commit,type=volume",

    # Docker persistent volume: $MYPY_CACHE_DIR: $HOME/.cache/mypy
    "source=knfsd-dev-mypy-cache,target=/home/ubuntu/.cache/mypy,type=volume",

    # Docker persistent volume: $TRIVY_CACHE_DIR: $HOME/.cache/trivy
    "source=knfsd-dev-trivy-cache,target=/home/ubuntu/.cache/trivy,type=volume",

    # Docker persistent volume: saves all terminal/shell history from container for future use
    "source=knfsd-dev-command-history,target=/home/ubuntu/.commandhistory,type=volume",

    # Docker persistent volume: uv cache: $HOME/.cache/uv
    "source=knfsd-dev-uv-cache,target=/home/ubuntu/.cache/uv,type=volume",

    # Docker bind mount: pass host docker.sock through to container docker.sock for Docker-from-Docker
    # "//var..." allows Windows host support
    "source=//var/run/docker.sock,target=/var/run/docker.sock,type=bind",

    # Docker bind mount: pass user's ~/.ssh directory through to container user's ~/.ssh directory
    "source=${localEnv:HOME}${localEnv:USERPROFILE}/.ssh,target=/home/ubuntu/.ssh,type=bind",

    # Docker bind mount: pass user's ~/.aws creds/config through to container user's ~/.aws
    "source=${localEnv:HOME}${localEnv:USERPROFILE}/.aws,target=/home/ubuntu/.aws,type=bind"

    # Docker bind mount: pass user's ~/.cursor directory through to container user's ~/.cursor directory
    "source=${localEnv:HOME}${localEnv:USERPROFILE}/.cursor,target=/home/ubuntu/.cursor,type=bind"
Devcontainer: Terminals
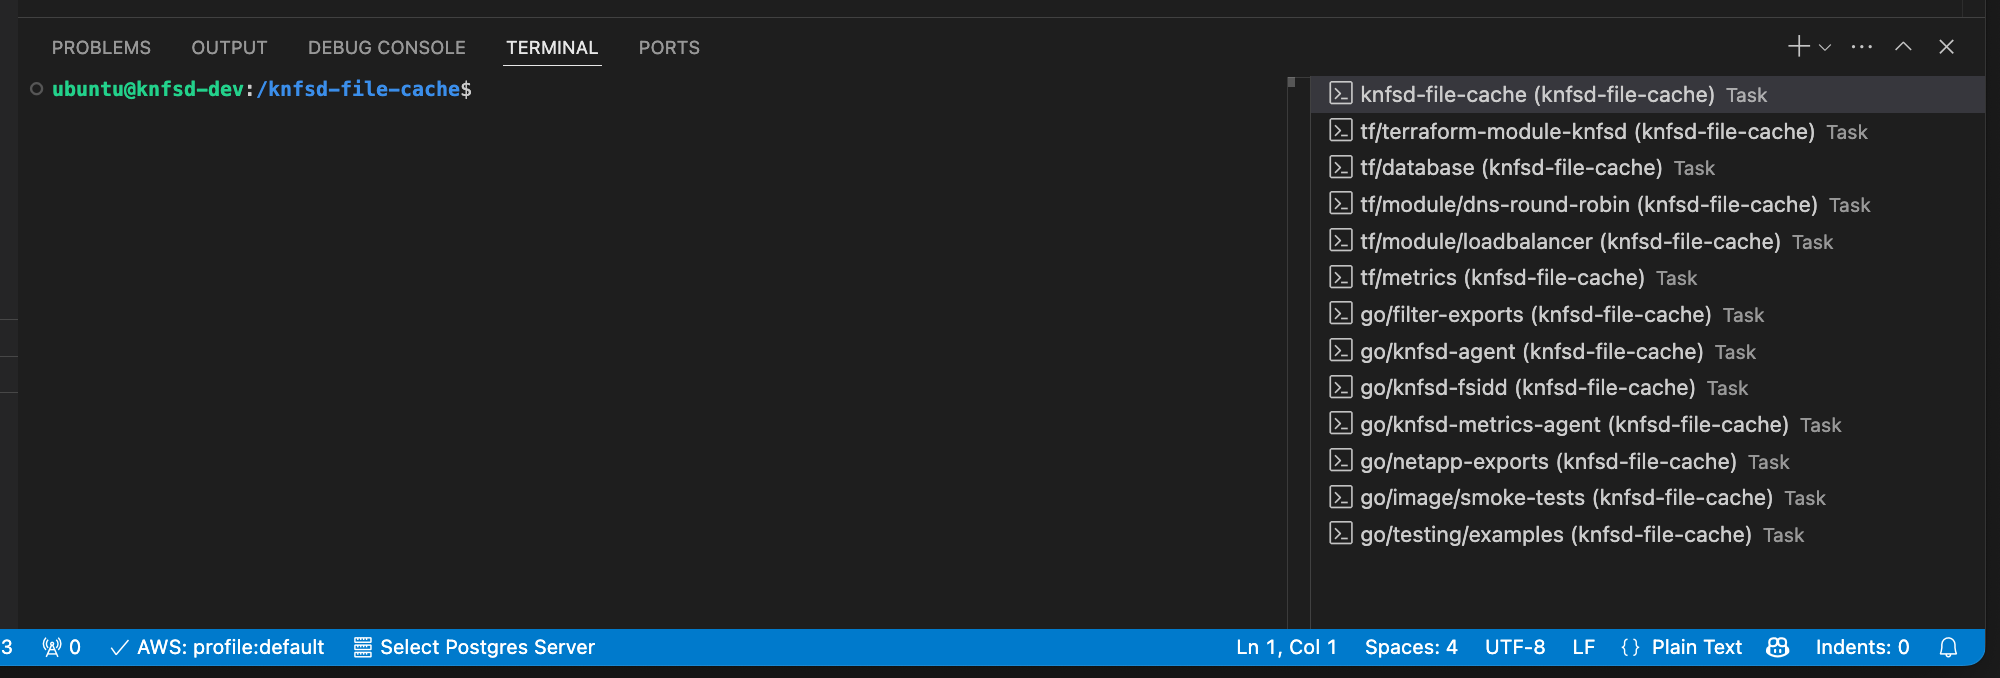
The knfsd-dev.code-workspace file contains tasks that automatically create a number of additional terminals upon startup; a terminal per golang project for faster navigation.
Devcontainer: Docker-from-Docker
In this project we sometimes run a Docker container from within this devcontainer environment for testing certain areas of code. We avoid using Docker-in-Docker (D-in-D) and instead use Docker-from-Docker (also known as Docker-outside-Docker) for these limited situations. We also use Docker "host" networking only throughout this project via .devcontainer.json configuration.
This means:
- No need for elevated
--privilegedmode on the parent container and subsequent nested containers. - No need to run container(s) as
root. - No need to access any host-based cache via D-in-D, as we create standalone caches as Docker volumes.
- No additional complexity with
cgroupsor/var/lib/dockerwith D-in-D configurations. - Better visibility on host machine's Docker Desktop GUI of any nested containers/images/volumes.
- We pass the following environment variables to allow
bindmounts in a nested container: "HOST_REPO_PATH": "${localWorkspaceFolder}"indevcontainer.json.CI=devcontainerinDockerfile.- At startup, we
chownthe devcontainer's/var/run/docker.sockto the currentremoteUserwhich isubuntu.
Post-Build
- The
validate-setup.shscript can be used to validate your devcontainer setup.
All ✓ means success! ✗ is an error (RED) or warning (YELLOW). - means info (BLUE).
✓ curl found
✓ dpkg found
✓ gcc found
✓ git found
...
✗ GITHUB_COM_TOKEN is not set
✗ PACKER_GITHUB_API_TOKEN is not set
✓ HOME is set to: /home/ubuntu
- Not running on EC2. IMDSv2 check skipped
- The
go-mod-download.shscript will hydrate the Dockerknfsd-dev-go-pkg-cachevolume ($ go env GOMODCACHE) with all requiredgolangpackages for all the go projects. Ideally, you should execute this script whilst connected to a fast internet link. Ensure your devcontainer has theGITHUB_COM_TOKENenvironment variable configured.
env | grep GITHUB_COM_TOKEN
cd /knfsd-file-cache/.devcontainer/dev
./go-mod-download.sh # execution time: ~15 minutes
When everything is cached, the script should take <1s to execute and stdout should look like this:
caching.../knfsd-file-cache/image/resources/knfsd-fsidd
retry_command: go mod tidy
retry_command: go mod download
...
caching.../knfsd-file-cache/image/smoke-tests
retry_command: go mod tidy
retry_command: go mod download
House Cleaning
Depending on usage, some house cleaning on a regular basis is recommended to minimise your storage footprint.
- Docker Desktop Dashboard -> Volumes, ensure you monitor the
knfsd-dev-go-build-cacheandknfsd-dev-go-pkg-cachevolume size growth. Although not a requirement for the devcontainer to operate, if you are logged into your Docker user account in Docker Desktop, then you can click on a specific volume andEmpty volumeto purge it. Note this will force a rebuild of your existing devcontainer. Alternatively (and not requiring a Docker user account login), the volume sizes can be queried and purged via the CLI within the devcontainer and not force a rebuild.
- Docker CLI, Docker caches can build up over time. These commands should be used carefully to reduce used disk space on the host machine.
Additional Notes
- Occasionally you may encounter a transient error or cache/extensions error during the build/rebuild process. Use the Docker Desktop -> Builds -> Build history logs to identify any errors in the build. Try clicking on
Retryin VS Code to resolve the issue or click theClean / Purge databutton via the Troubleshoot page in Docker Desktop.
WARNING:
Clean / Purge datawill delete all Docker volumes including theGOCACHE/GOMODCACHE.
-
In VS Code, press
F1orShift+Cmd+Pto access theCommand Paletteand type: >devconto see all possible commands, such as:Dev Containers: Rebuild Container Without Cache, which will force a full rebuild of the devcontainer, ignoring any Docker cached layers. -
To remove the Docker "hints and tips" stdout messages whenever you use a
dockerCLI command, uncheck theShow CLI hintscheckbox in Docker Desktop -> Settings -> General. ClickApply & restart(ensure devcontainers can be restarted) before restarting Docker Desktop.
Remote-SSH (Cloud Development Environment)
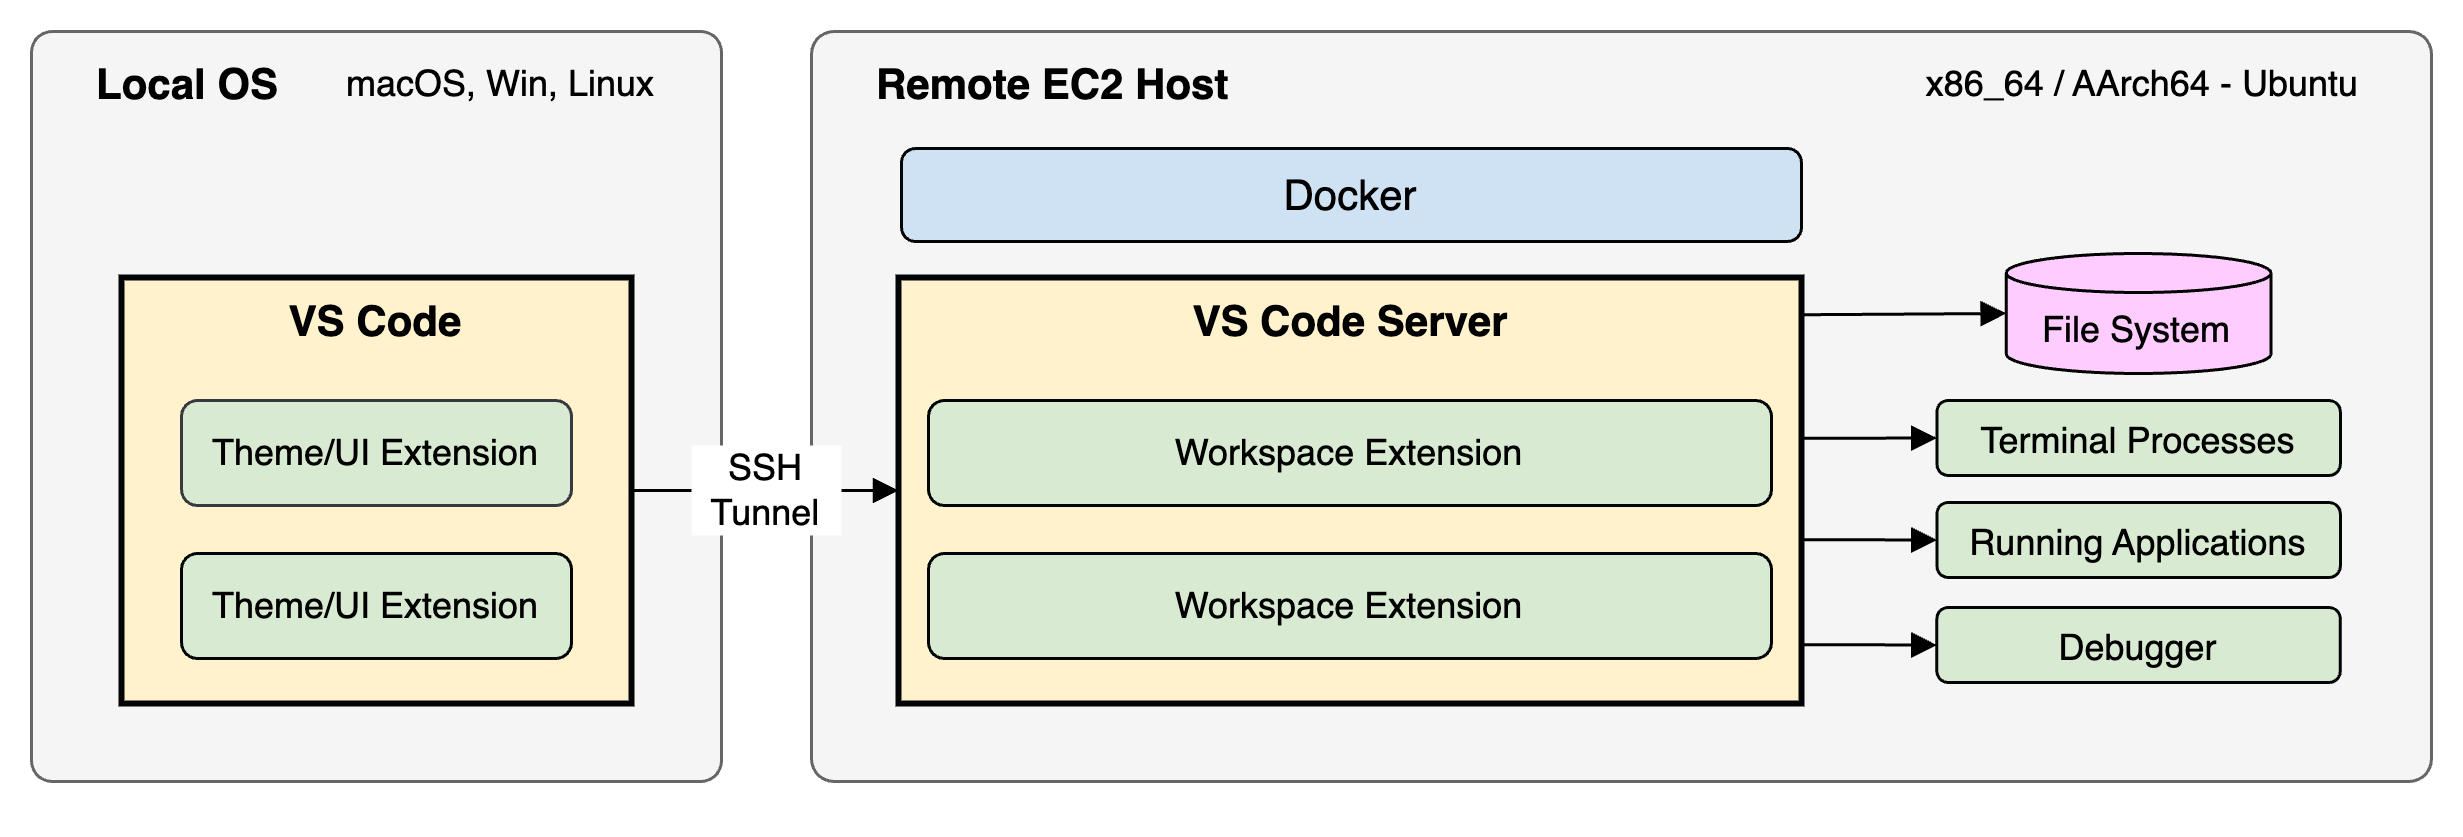
The Remote - SSH VS Code extension allows us to transport the devcontainer integrated development environment (IDE) for this project and host it on an AWS EC2 instance and access it securely over SSH from a location of your choice/control. This is known as a cloud development environment (CDE). We provide 2 possible setups. By default (./remote.sh new vm), we launch and build the CDE natively running on the EC2 host. Alternatively, we can launch (./remote.sh new docker) an optimized version on EC2 host with the devcontainer setup as per on-premises. Both setups provides a number of benefits for this project, including the ability to use larger (storage/network), faster or different architecture (x86, arm64) EC2 instances with access to IMDS. The default VM setup most closely replicates a production file-caching environment as it runs the custom knfsd kernel with various patches, NFS server/client and FS-Cache kernel modules. Both setups can run Docker on the EC2 host.
Bind mounts are not possible over SSH, so we localize the source-code (git clone or rsync transfer from local git repo) and optional, AWS credentials. We run Docker locally on the EC2 host. We use our local SSH forwarding-agent for SSH access to the EC2 host. The devcontainer.json & Dockerfile do not require any changes and thus can be reused in this new cloud development environment.
Additional Prerequisites
- AWS account with applicable IAM permissions. See IAM Permissions for the
remote-ssh.jsonandremote-ssh-instance-profile.jsonpolicies. - A supported OpenSSH compatible SSH client must be installed (macOS is pre-installed).
- (Optional) The AWS
session-manager-plugininstalled on your local host OS, required only when usingKNFSD_REMOTE_SSH_TUNNEL=ssm. It is preinstalled inside the devcontainer, but your local OSsshbinary executes theProxyCommandwhen VS Code Remote-SSH connects. - Remote - SSH Extension v0.112.0 or newer (alternatively, the Remote Development extension pack v0.25.0 includes Dev Containers & Remote - SSH).
- In VS Code, press
F1orShift+Cmd+Pto access theCommand Paletteand type: >Preferences: Open User Settings (JSON)and add the following to your local VS Code usersettings.jsonfile:
{
  "remote.SSH.defaultExtensions": [
    "DavidAnson.vscode-markdownlint",
    "EditorConfig.EditorConfig",
    "SirTori.indenticator",
    "Tyriar.sort-lines",
    "coolbear.systemd-unit-file",
    "donjayamanne.githistory",
    "golang.go",
    "hashicorp.terraform",
    "jetmartin.bats",
    "jianbingfang.dupchecker",
    "mkhl.shfmt",
    "ms-azuretools.vscode-docker",
    "oderwat.indent-rainbow",
    "redhat.vscode-yaml",
    "hashicorp.hcl"
  ]
}
Remote-SSH: Considerations
It is beyond the scope of this documentation to describe all possible SSH setups that can work here and are compliant to your security policies. For further reading, please consult the AWS public docs on how you can connect to your Linux instance. This documentation provides two opinionated SSH setups, selected via the KNFSD_REMOTE_SSH_TUNNEL environment variable, both of which tunnel SSH inside an identity-aware channel so that no inbound SSH (TCP:22) security group rule and no public IP address are required:
KNFSD_REMOTE_SSH_TUNNEL |
Type | Infrastructure to pre-create |
|---|---|---|
eice (default) |
EC2 Instance Connect (EIC) Endpoint | An EIC Endpoint in your VPC |
ssm |
AWS SSM Session Manager | None; the session-manager-plugin is installed locally |
Both options mean:
- Connect securely to your EC2 instance in a private subnet, with no public IP address.
- No IGW/NAT Gateway strictly required for connectivity (although the devcontainer build process downloads installable components, so you should provision a IGW/NAT, VPC endpoints, or use an offline solution for your needs).
- Security posture is raised via using SSH within a secure, identity-aware TCP tunnel with your AWS IAM credentials.
- All authentication and authorization is evaluated before traffic reaches your VPC.
- This routable traffic solution can work over public internet, VPN or DX to suit all customer needs.
The eice tunnel additionally means:
- No agent required, simply use the OpenSSH
ProxyCommandwithin your existing local SSH configuration. - The EIC endpoint has a maximum tunnel duration of 1 hour per SSH session. Simply re-connect to host to continue (UI state is restored).
- Further considerations and EIC Quotas.
The ssm tunnel additionally means:
- No VPC infrastructure to create, delete, or pay cross-AZ data transfer on.
- The AWS SSM agent must be running on the instance, and the instance's IAM instance profile must grant it permission to register (see IAM Permissions). The Ubuntu AMI ships the agent as a snap, and the user-data scripts refresh it at launch.
- The
session-manager-pluginmust be installed on the machine that runsssh. See Remote-SSH: AWS SSM Session Manager. - AWS SSM reachability is required from the instance subnet: either a NAT Gateway, or the
ssm,ssmmessages, andec2messagesinterface VPC endpoints (all three are provided by the vpc-endpoints module). - Sessions are subject to an idle timeout (Session Manager preferences, default 20 mins) and a maximum session duration (60 mins). The generated SSH config sets
ServerAliveIntervalto keep an active session from idling out. - Session Manager Quotas.
Remote-SSH: EC2 Instance Connect (EIC) Endpoint
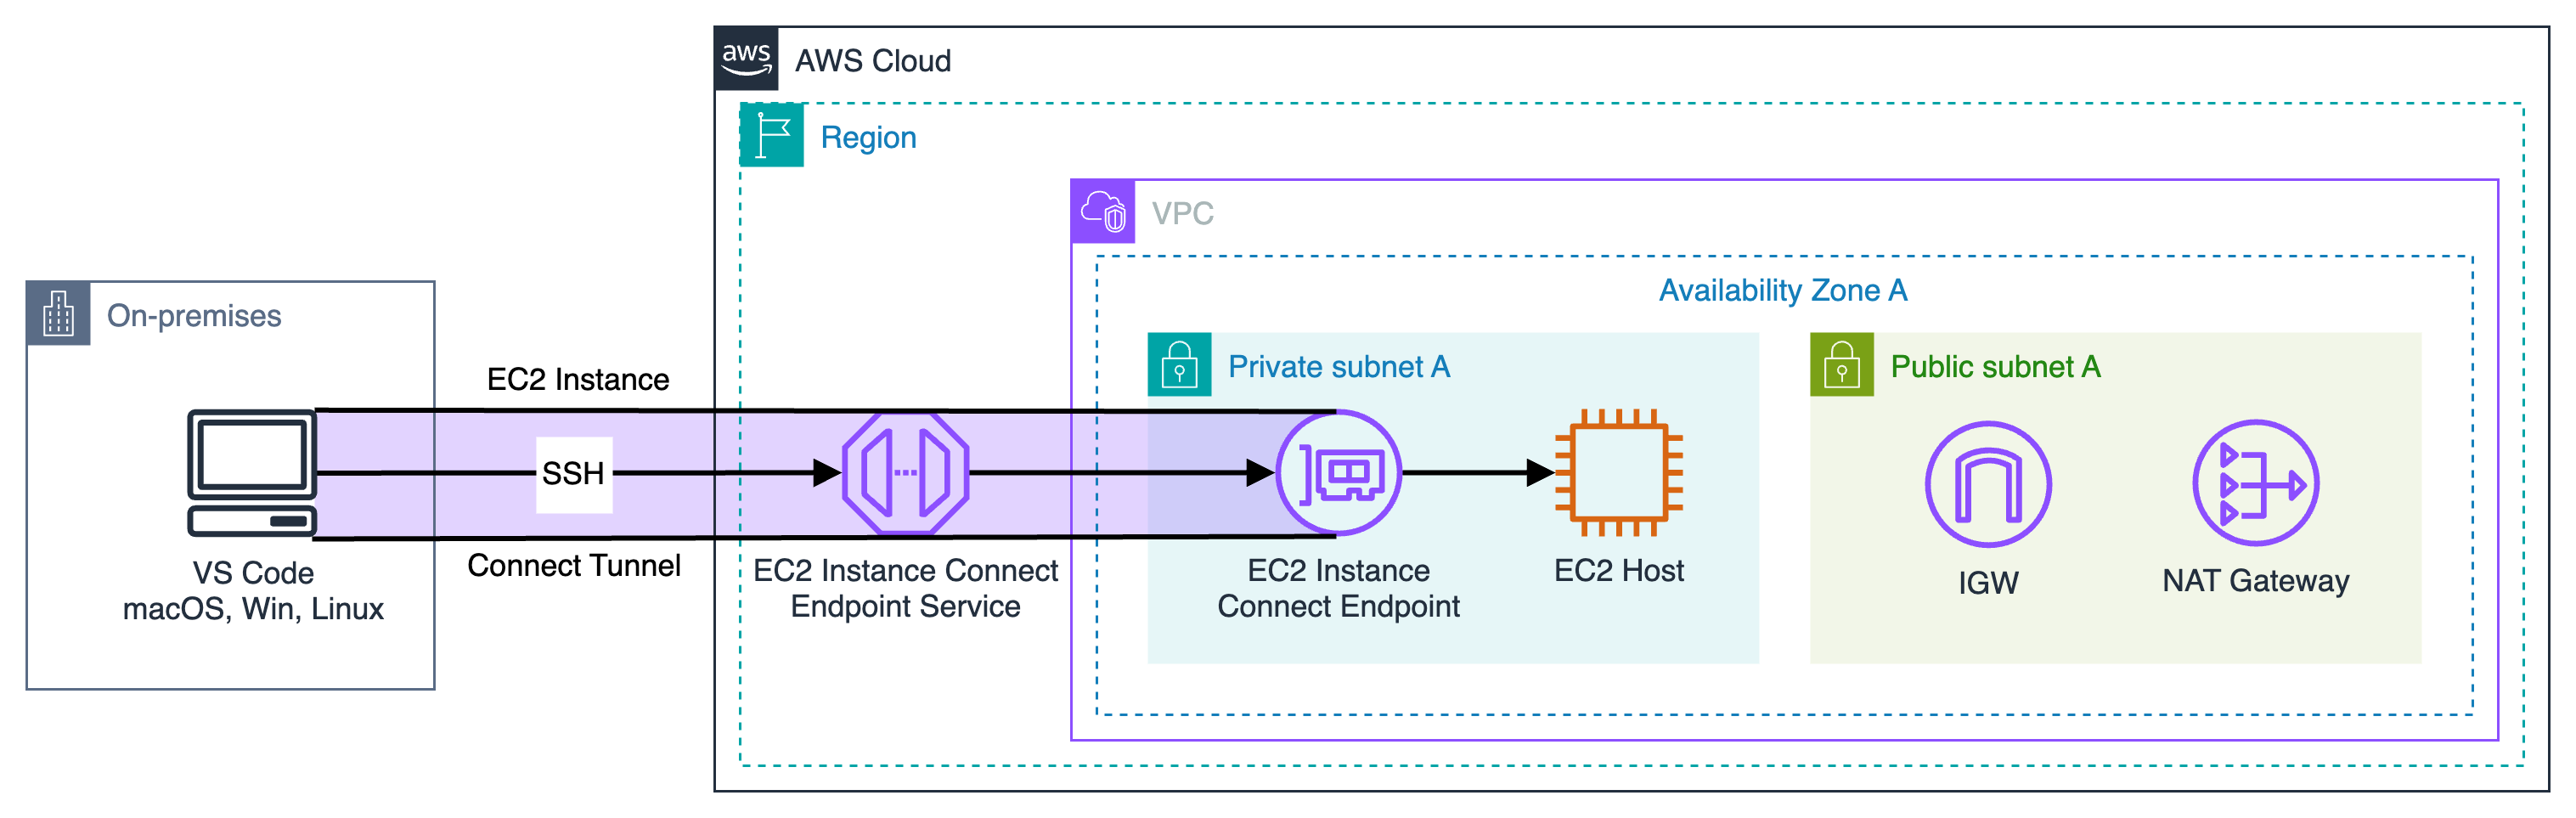
This blog post provides a good overview of how to provision and configure an EIC Endpoint, together with the official AWS documentation. Here is a summary of the steps:
- Create/access your AWS account.
- Choose which AWS region you are going to use.
- Create/import a key pair. We assume a 2048-bit SSH-2 RSA key is used.
- Create VPC or use default VPC, add private subnet, add IGW, add NAT Gateway, add routing table with subnet association to the private subnet and IGW/NAT (in public subnet) for public internet access (optional).
- IAM user with correct permissions to create EIC endpoint.
- Security Group(s) for EIC Endpoint (optional, the default is to use the default security group for the VPC) and/or EC2 instance.
- Create EIC Endpoint. Ensure you provision the endpoint in the same subnet that you intend to launch your EC2 instance to avoid any cross-AZ data transfer cost.
- IAM user with correct permissions to create, delete, start, stop an EC2 instance in the private subnet.
- Create EC2 instance in private subnet. See next section on the
remote.shwrapper script to handle workflow commands automatically. - Confirm EIC tunnel and ssh working correctly via AWS CLI.
Remote-SSH: AWS SSM Session Manager
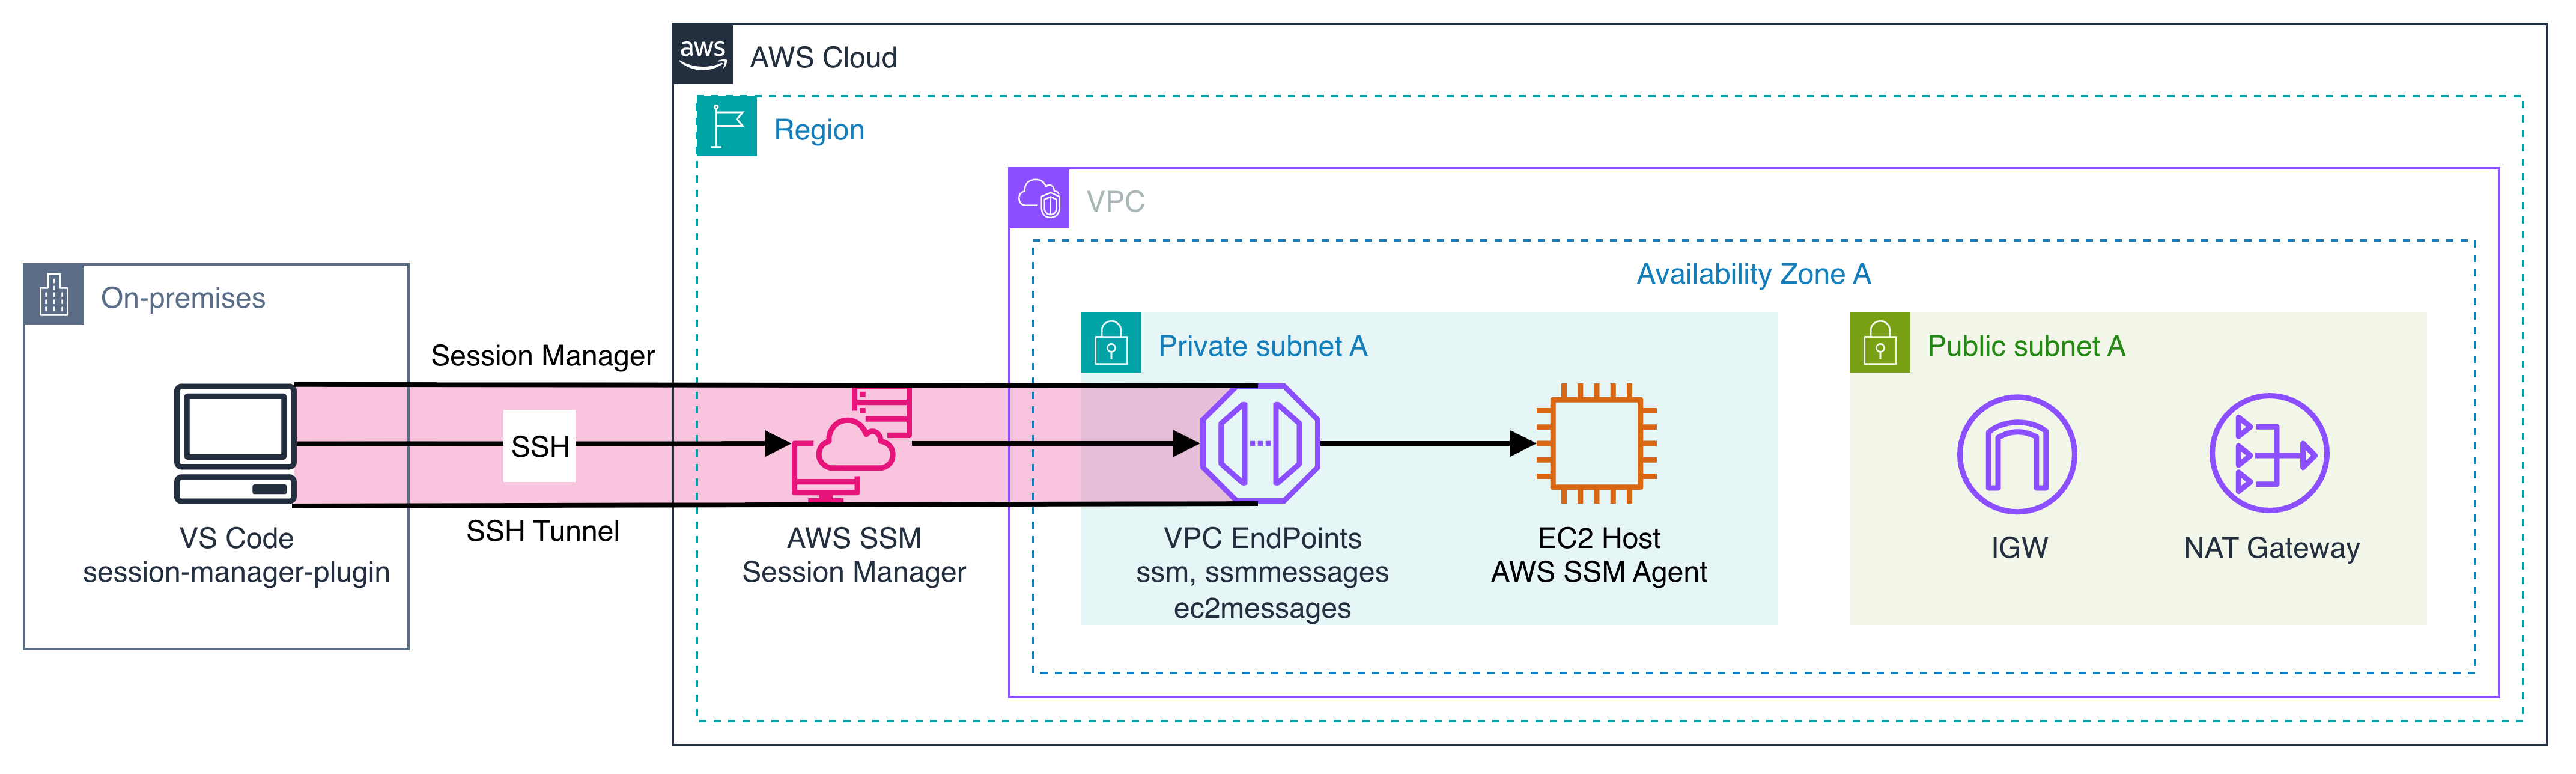
As an alternative to the EIC Endpoint, setting KNFSD_REMOTE_SSH_TUNNEL=ssm tunnels the SSH connection over AWS Systems Manager Session Manager using the AWS-StartSSHSession document. There is no VPC endpoint resource to create, delete, or pay cross-AZ data transfer on. AWS SSM only transports the TCP stream, so sshd on the instance still performs normal public-key authentication with your KNFSD_REMOTE_SSH_KEYPAIR key.
Here is a summary of the steps:
- Create/access your AWS account and choose which AWS region you are going to use.
- Create/import a key pair. We assume a 2048-bit SSH-2 RSA key is used.
- Install the
session-manager-pluginon the machine that runsssh. It is preinstalled in the.devcontainer/devand.devcontainer/prodconfigurations, but also install it on your local host OS:~/.ssh/configis bind mounted into the devcontainer, so theProxyCommandis executed by your local OSsshbinary when VS Code Remote-SSH connects.
- Create the IAM role and instance profile for the development instance and attach
docs/iam/remote-ssh-instance-profile.json, then reference it by name viaKNFSD_REMOTE_SSH_IAM_PROFILE_NAME. Without the AWS SSM agent permissions the tunnel cannot connect. See Remote-SSH development instance profile for the exactaws iamcommands. - Attach
docs/iam/remote-ssh.jsonto your own IAM identity, which grantsssm:StartSessionon theAWS-StartSSHSessiondocument plus the EC2 actions the wrapper script needs. - Ensure the instance subnet can reach AWS SSM: either a NAT Gateway, or the
ssm,ssmmessages, andec2messagesinterface VPC endpoints (all three are provided by the vpc-endpoints module). Thevmanddockersetup scripts also download packages from the internet, so a NAT/IGW is required for the initial build regardless. - The Security Group for the EC2 instance needs no inbound rule at all; only outbound HTTPS (TCP:443) to reach AWS SSM.
- Export the tunnel selection, then create the instance with the
remote.shwrapper script described in the next section.
- Confirm the AWS SSM agent has registered and an interactive session works correctly via AWS CLI.
aws ssm describe-instance-information \
  --filters "Key=InstanceIds,Values=<instance-id>" \
  --query 'InstanceInformationList[0].PingStatus'
aws ssm start-session --target <instance-id>
Remote-SSH: Remote Wrapper Script
To ensure a reliable workflow of provision, start, SSH config, stop, and terminate EC2 instance host, as well as various convenience functions, a shell script has been created in .devcontainer/dev/remote.sh.
4 environment variables are required to be present for the successful provisioning of an EC2 instance:
export KNFSD_REMOTE_SSH_IAM_PROFILE_NAME=<iam-profile-name> # "name" of the EC2 IAM instance profile
export KNFSD_REMOTE_SSH_KEYPAIR=<keypair-name> # "name" of the RSA key created/uploaded to your AWS account
export KNFSD_REMOTE_SSH_SUBNET=<subnet-id> # "id" of the private subnet where the EC2 instance will be launched
export KNFSD_REMOTE_SSH_SG_ID=<security-group-id> # "id" of the security group to be used for the EC2 instance
Optionally, you can select the tunnel type used to reach the instance (default: eice):
For the eice tunnel only, you can set the EC2 Instance Connect Endpoint ID (if not set, this is automatically inferred from the VPC that the instance is running in):
Optionally, you can change how long the script waits for a newly created instance to finish provisioning (the user-data script typically takes 3-4 minutes):
Usage of the shell script can be viewed via: .devcontainer/dev/remote.sh -h|help|--help.
Ensure AWS credentials/region are configured.

Commands:
  ./remote.sh help|-h|--help
      Show this message
    ./remote.sh
      Start the EC2 instance and add ssh-config (default)
    ./remote.sh create|new [<vm|docker>] [<amd64|arm64>] [<ami-id>](optional)
      Create a new EC2 VM (default) instance.
      Required ENV VARs:
        KNFSD_REMOTE_SSH_IAM_PROFILE_NAME
          The name of the EC2 IAM instance profile
        KNFSD_REMOTE_SSH_KEYPAIR
          The name of the EC2 keypair
        KNFSD_REMOTE_SSH_SUBNET
          The ID of the EC2 subnet
        KNFSD_REMOTE_SSH_SG_ID
          The ID of the EC2 security group
      Optional ENV VARs:
        KNFSD_REMOTE_SSH_TUNNEL
          Tunnel: eice (default) or ssm (AWS SSM Session Manager)
        KNFSD_REMOTE_SSH_EICE_ID
          EC2 Instance Connect Endpoint ID (eice tunnel only)
        KNFSD_REMOTE_SSH_WAIT_TIMEOUT
          Max seconds to wait for the instance to become ready (default: 600)
      [<vm|docker>] vm (default) or docker (devcontainer) on EC2 host [optional]
      [<amd64|arm64>] amd64 (default) or arm64 on EC2 host [optional]
      [<ami-id>] AMI ID [optional] or query AWS SSM parameter for "Ubuntu $RELEASE $ARCH $VOL_TYPE" AMI ID (default)
      ENV VAR: BUILDARCH=<amd64|arm64> also sets the architecture for the EC2 host [optional]
      Arguments can be provided in any order
    ./remote.sh up|start
      Start the EC2 instance and add ssh-config
    ./remote.sh down|stop
      Stop the EC2 instance
    ./remote.sh size <INSTANCE_TYPE>
      Modify the instance type of the EC2 instance
    ./remote.sh sync <push|pull> [<test>]
      <push> code changes from local <devcontainer> to <remote-ssh>
      <pull> code changes from <remote-ssh> to local <devcontainer>
      <test> run dry-run only [optional]
    ./remote.sh creds
      Copy local AWS config/creds to <remote-ssh>
    ./remote.sh delete|del|terminate
      Delete the EC2 instance and remove ssh-config
Remote-SSH: VM Setup
The first 3 steps can be skipped if you already have a running devcontainer locally, as per the previous instructions above.
- Local:
git clonethe knfsd-file-cache repository to a local directory on your host machine (you should already have done this as part of the local .devcontainer/dev setup). - Local: Start VS Code and click "File -> Open Workspace from File..." (navigate to the root of your cloned git repo):
knfsd-dev.code-workspace - Local: Re-open as a devcontainer.
- Local: In a terminal,
cd /knfsd-file-cache/.devcontainer/dev - Local: Execute
aws configure, enter your AWS credentials and AWS region (bind mounted already from your local host machine).
AWS Access Key ID [****************ABCD]:
AWS Secret Access Key [****************ABCD]:
Default region name [eu-west-2]:
Default output format [json]:
- Local: Ensure 4 environment variables are present in your terminal for the EC2 instance to be launched:
export KNFSD_REMOTE_SSH_IAM_PROFILE_NAME=<iam-profile-name>
export KNFSD_REMOTE_SSH_KEYPAIR=<keypair-name>
export KNFSD_REMOTE_SSH_SUBNET=<subnet-id>
export KNFSD_REMOTE_SSH_SG_ID=<security-group-id>
- Local: (optional) To use AWS SSM Session Manager instead of the default EC2 Instance Connect Endpoint tunnel:
- Local: Execute
./remote.sh new vmwill provision a new EC2 instance (default: c6in.2xlarge, amd64, 30GB EBS root) and automatically configure your local SSH config (~/.ssh/config) file. The EC2 host will be configured via thesetup-remote-vm.shuser-data script at launch. The script then waits for the instance to finish provisioning, which typically takes 3-4 mins (depending on the specific EC2 instance type used).
INFO: knfsd-dev-ec2: i-1234567890abcdef0 created as: EC2 VM
INFO: ssh config file: /home/ubuntu/.ssh/config
INFO: ssh config added: knfsd-dev-ec2 (tunnel: eice)
INFO: knfsd-dev-ec2: waiting for user-data script to complete...
INFO: knfsd-dev-ec2: ready
NOTE: The wrapper script polls the
knfsd-file-cache:statusEC2 tag that the user-data script sets. If provisioning fails, the tag reports anerror:status and the script exits immediately. The timeout defaults to 600 seconds and is configurable viaKNFSD_REMOTE_SSH_WAIT_TIMEOUT.
- Local: Press
F1orShift+Cmd+Pto access theCommand Paletteand start typing: >Remote-SSH: Open SSH Configuration File...-> select your SSH config file, such as:~/.ssh/config. In VS Code you can manually verify the newly createHost knfsd-dev-ec2entry that should look similar to below:
Host knfsd-dev-ec2
  User ubuntu
  HostName i-1234567890abcdef0
  IdentityFile ~/.ssh/id_rsa
  StrictHostKeyChecking no
  ForwardAgent yes
  IdentitiesOnly yes
  ConnectTimeout 30
  ServerAliveInterval 30
  ServerAliveCountMax 5
  ProxyCommand bash -c "aws ec2-instance-connect open-tunnel --instance-id %h"
With KNFSD_REMOTE_SSH_TUNNEL=ssm, only the ProxyCommand line differs. The AWS region is pinned explicitly because ~/.ssh/config is shared with your local host OS, which will not inherit the devcontainer environment (--profile is appended when AWS_PROFILE is set):
ProxyCommand bash -c "aws ssm start-session --target %h --document-name AWS-StartSSHSession --parameters 'portNumber=%p' --region eu-west-2"
- Local: Press
F1orShift+Cmd+Pto access theCommand Paletteand start typing: >Remote-SSH: Connect to Host.... Alternatively, click on GREEN status-bar in bottom left-hand corner of VS Code and select:Connect to Host...in the drop-down list. - Local: Select
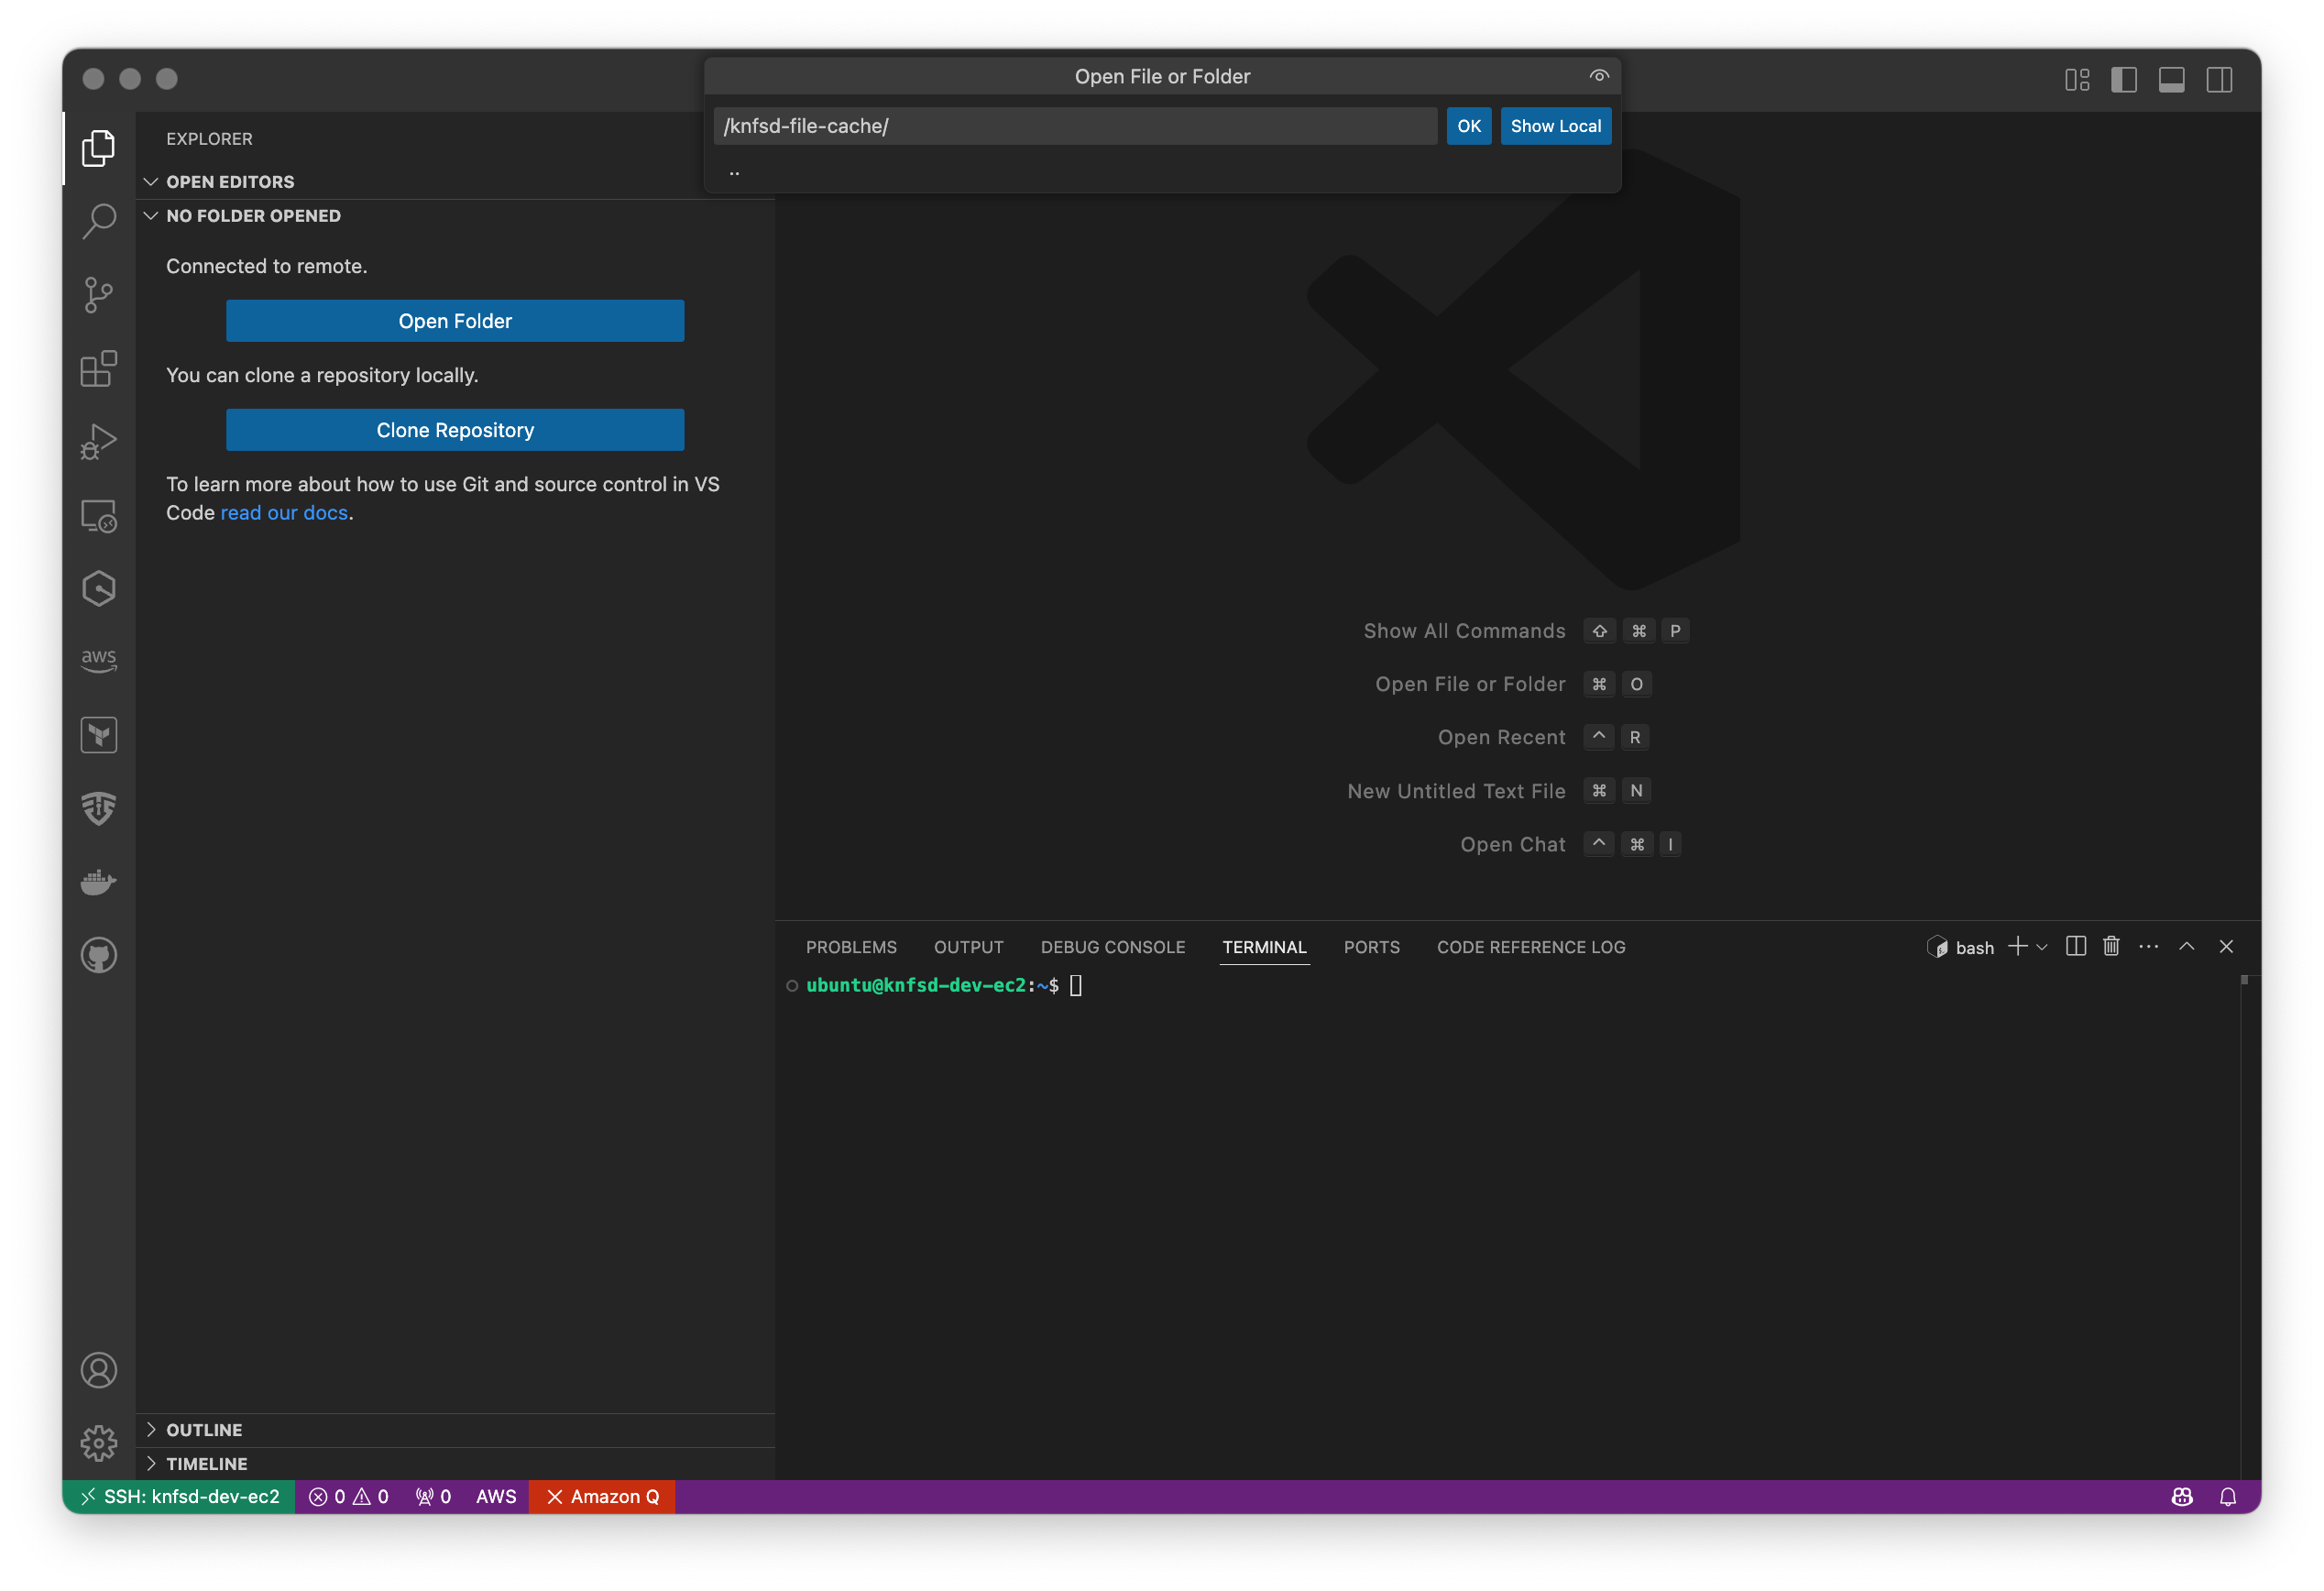
knfsd-dev-ec2to open a new VS Code window and SSH connection to your EC2 host. - Remote: Click Open Folder BLUE button or File -> Open ->
/knfsd-file-cache. This directory will be empty.
- Remote: If you have access to your git server, then using a terminal:
git clone <git-repo-path>/ .into/knfsd-file-cache. - Local: Alternatively, on your local machine, using a terminal:
./remote.sh sync pushto rsync your local/knfsd-file-cachegit repo to your remote-ssh host (excluding.gitdirectory). - Remote: Open the
knfsd-dev.code-workspacefile in VS Code (click on the BLUEOpen Workspacebutton). Ignore the pop-up dialog offering to "Reopen in Container". Click X to close pop-up dialog.
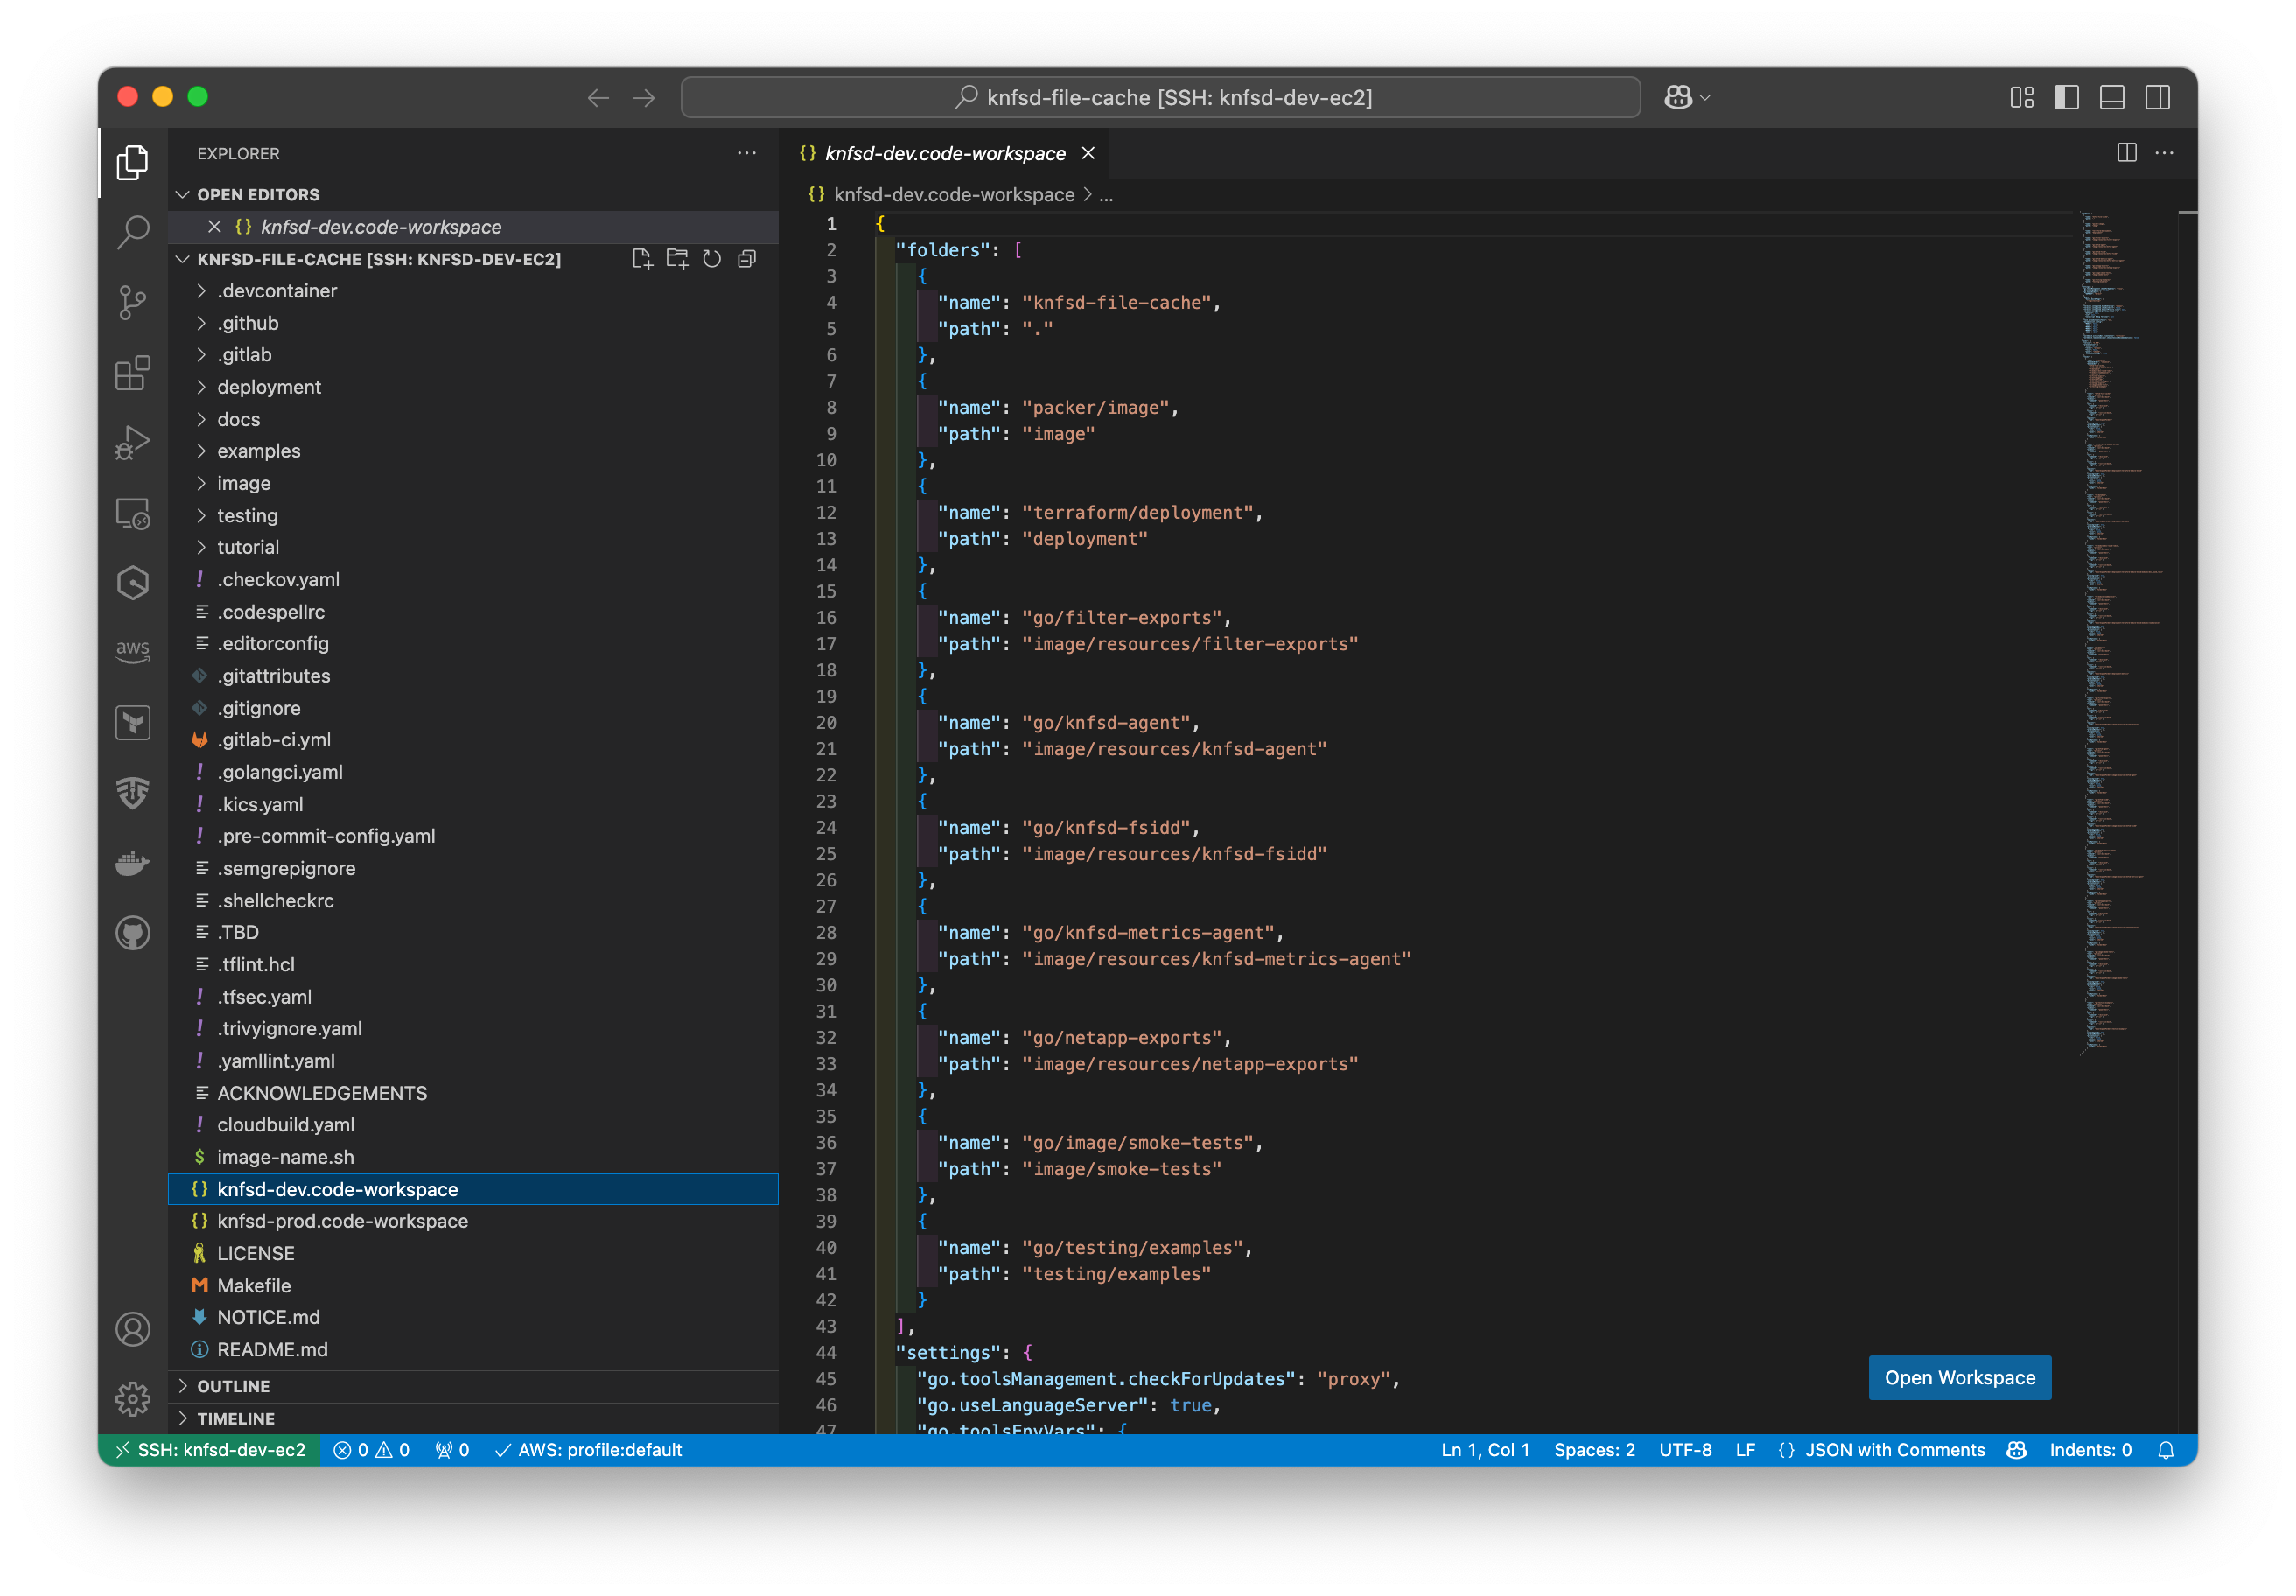
- Remote: VS Code will look identical to your local devcontainer setup. The GREEN status bar should display:
SSH: knfsd-dev-ec2, whereknfsd-dev-ec2is the EC2 instance hostname. - Local: (optional) Execute
./remote.sh credsto rsync your local (bind mounted)~/.awscredentials to your remote-ssh machine. - Remote: (recommended) The pre-existing
validate-setup.sh(validates IMDSv2 is working correctly) andgo-mod-download.shshell scripts will work identically to your local devcontainer setup.
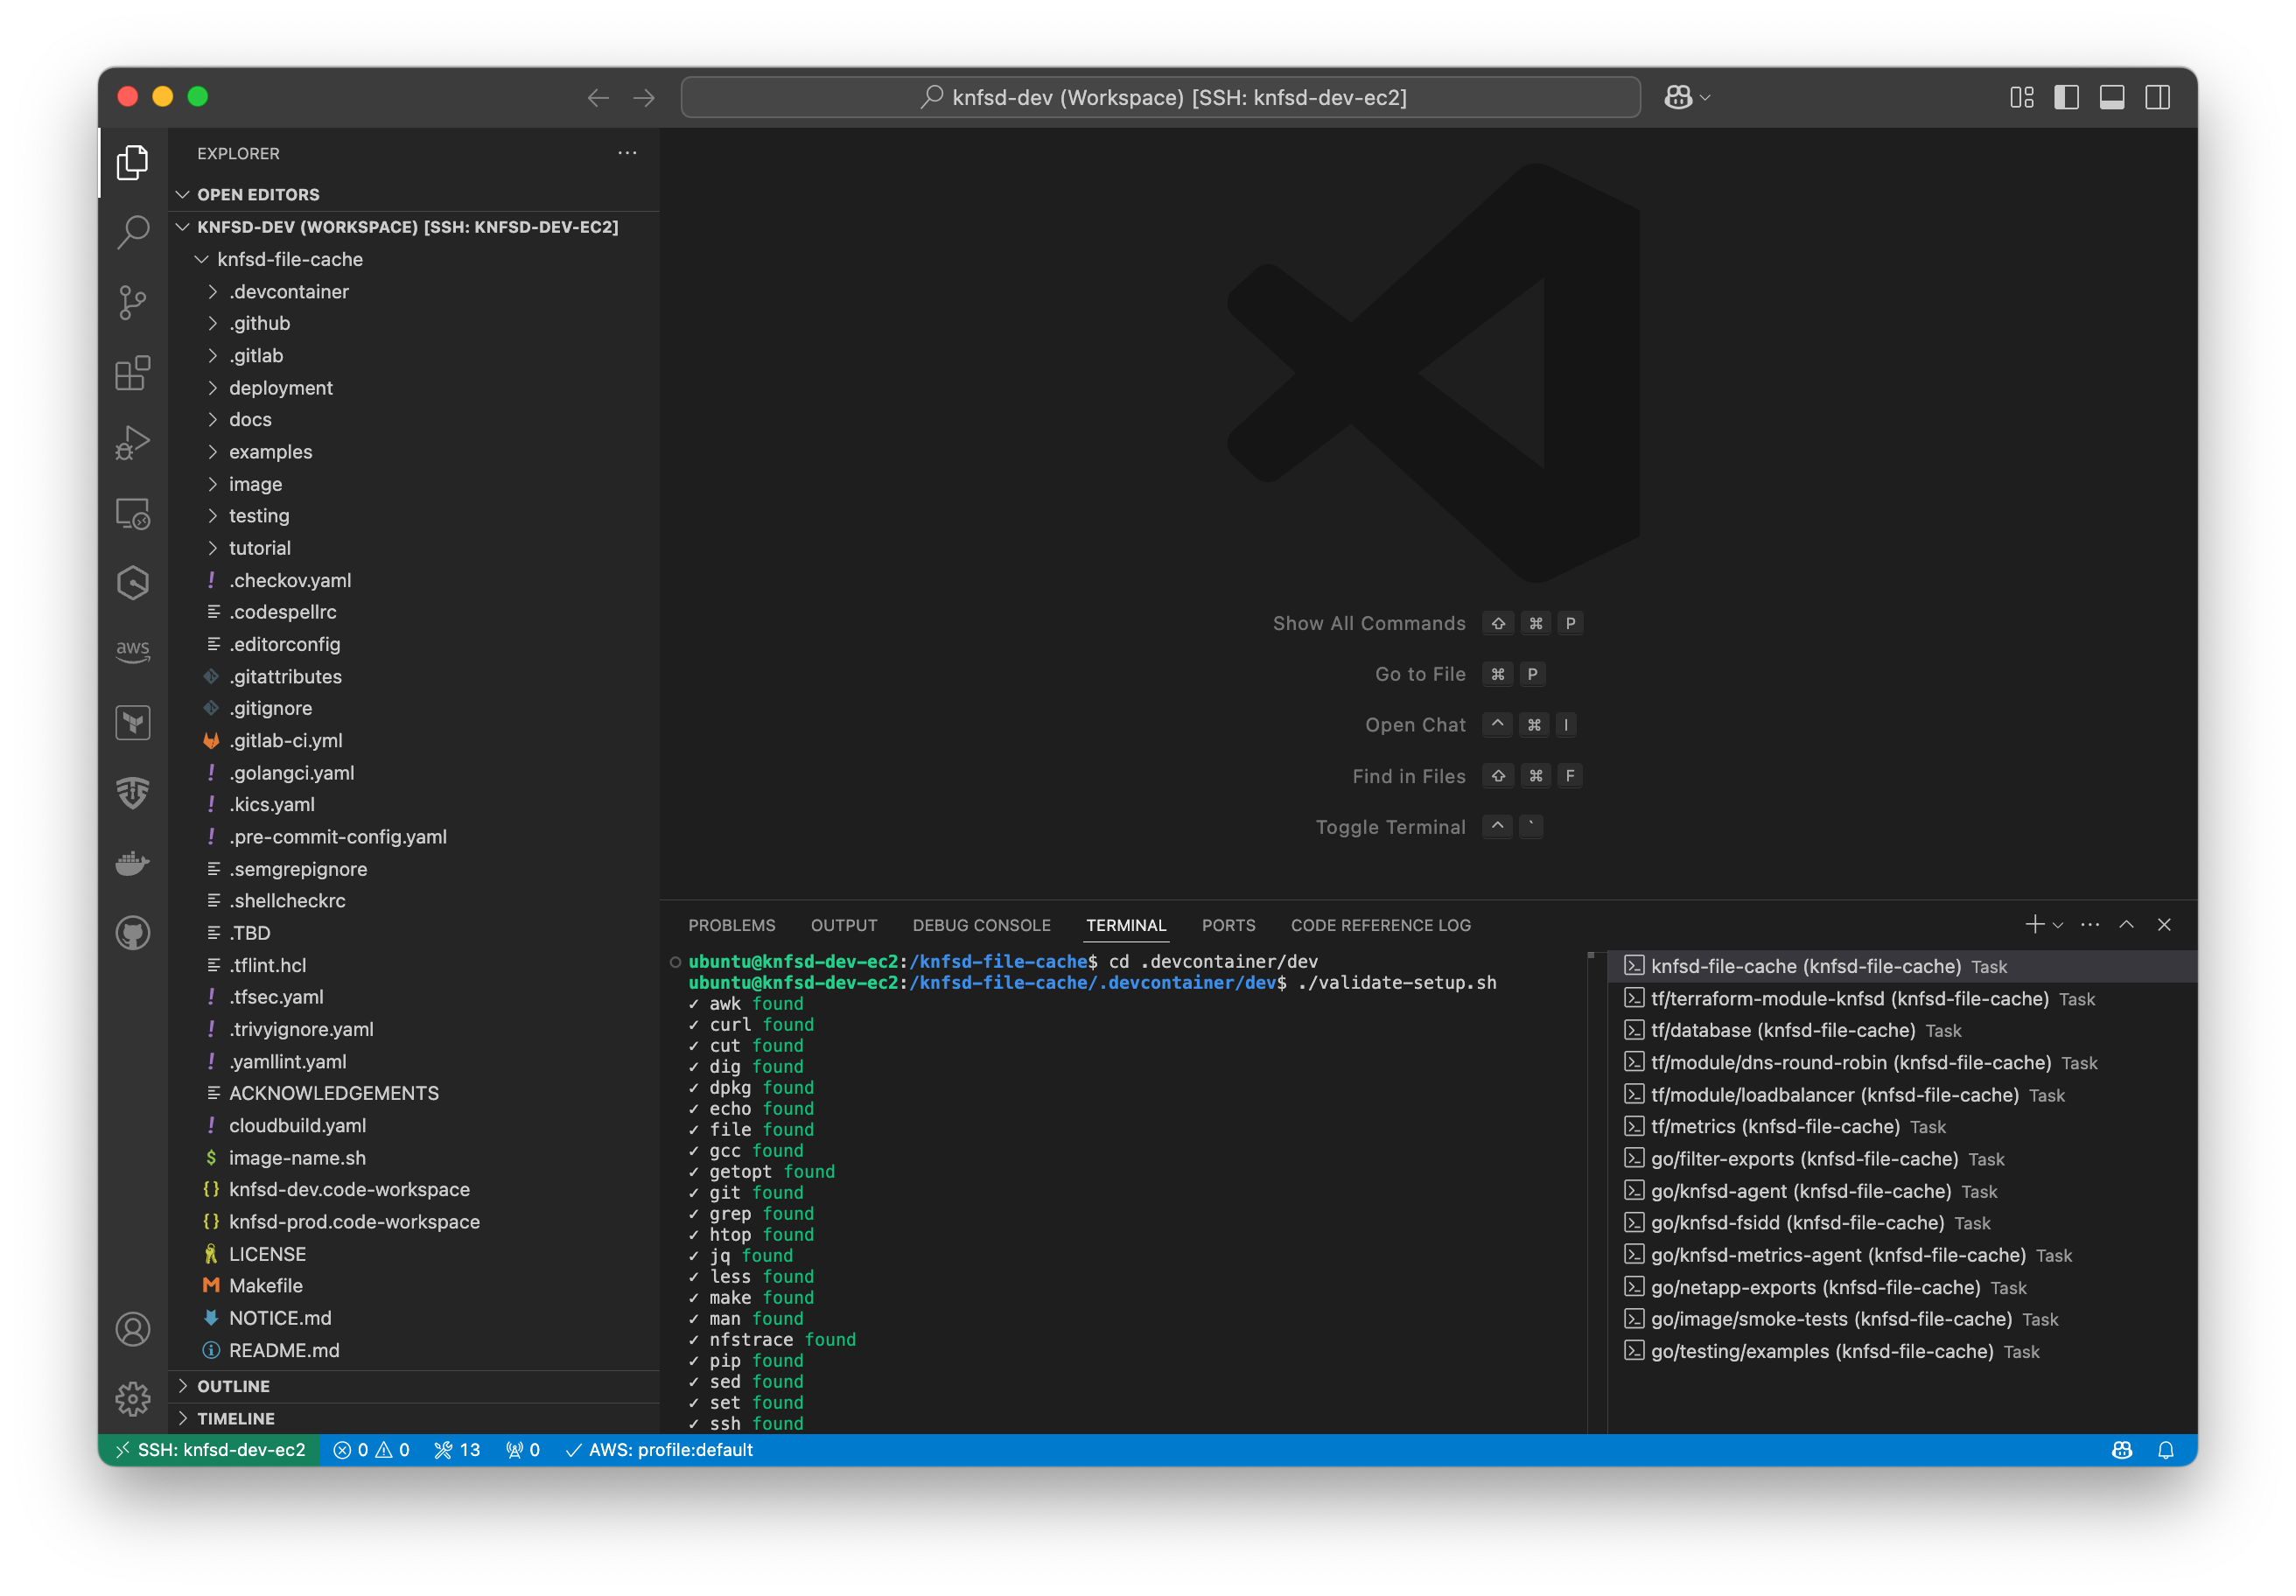
Remote-SSH: DevContainer Setup
As an alternative (optional) setup, you can run the devcontainer environment on the EC2 host.
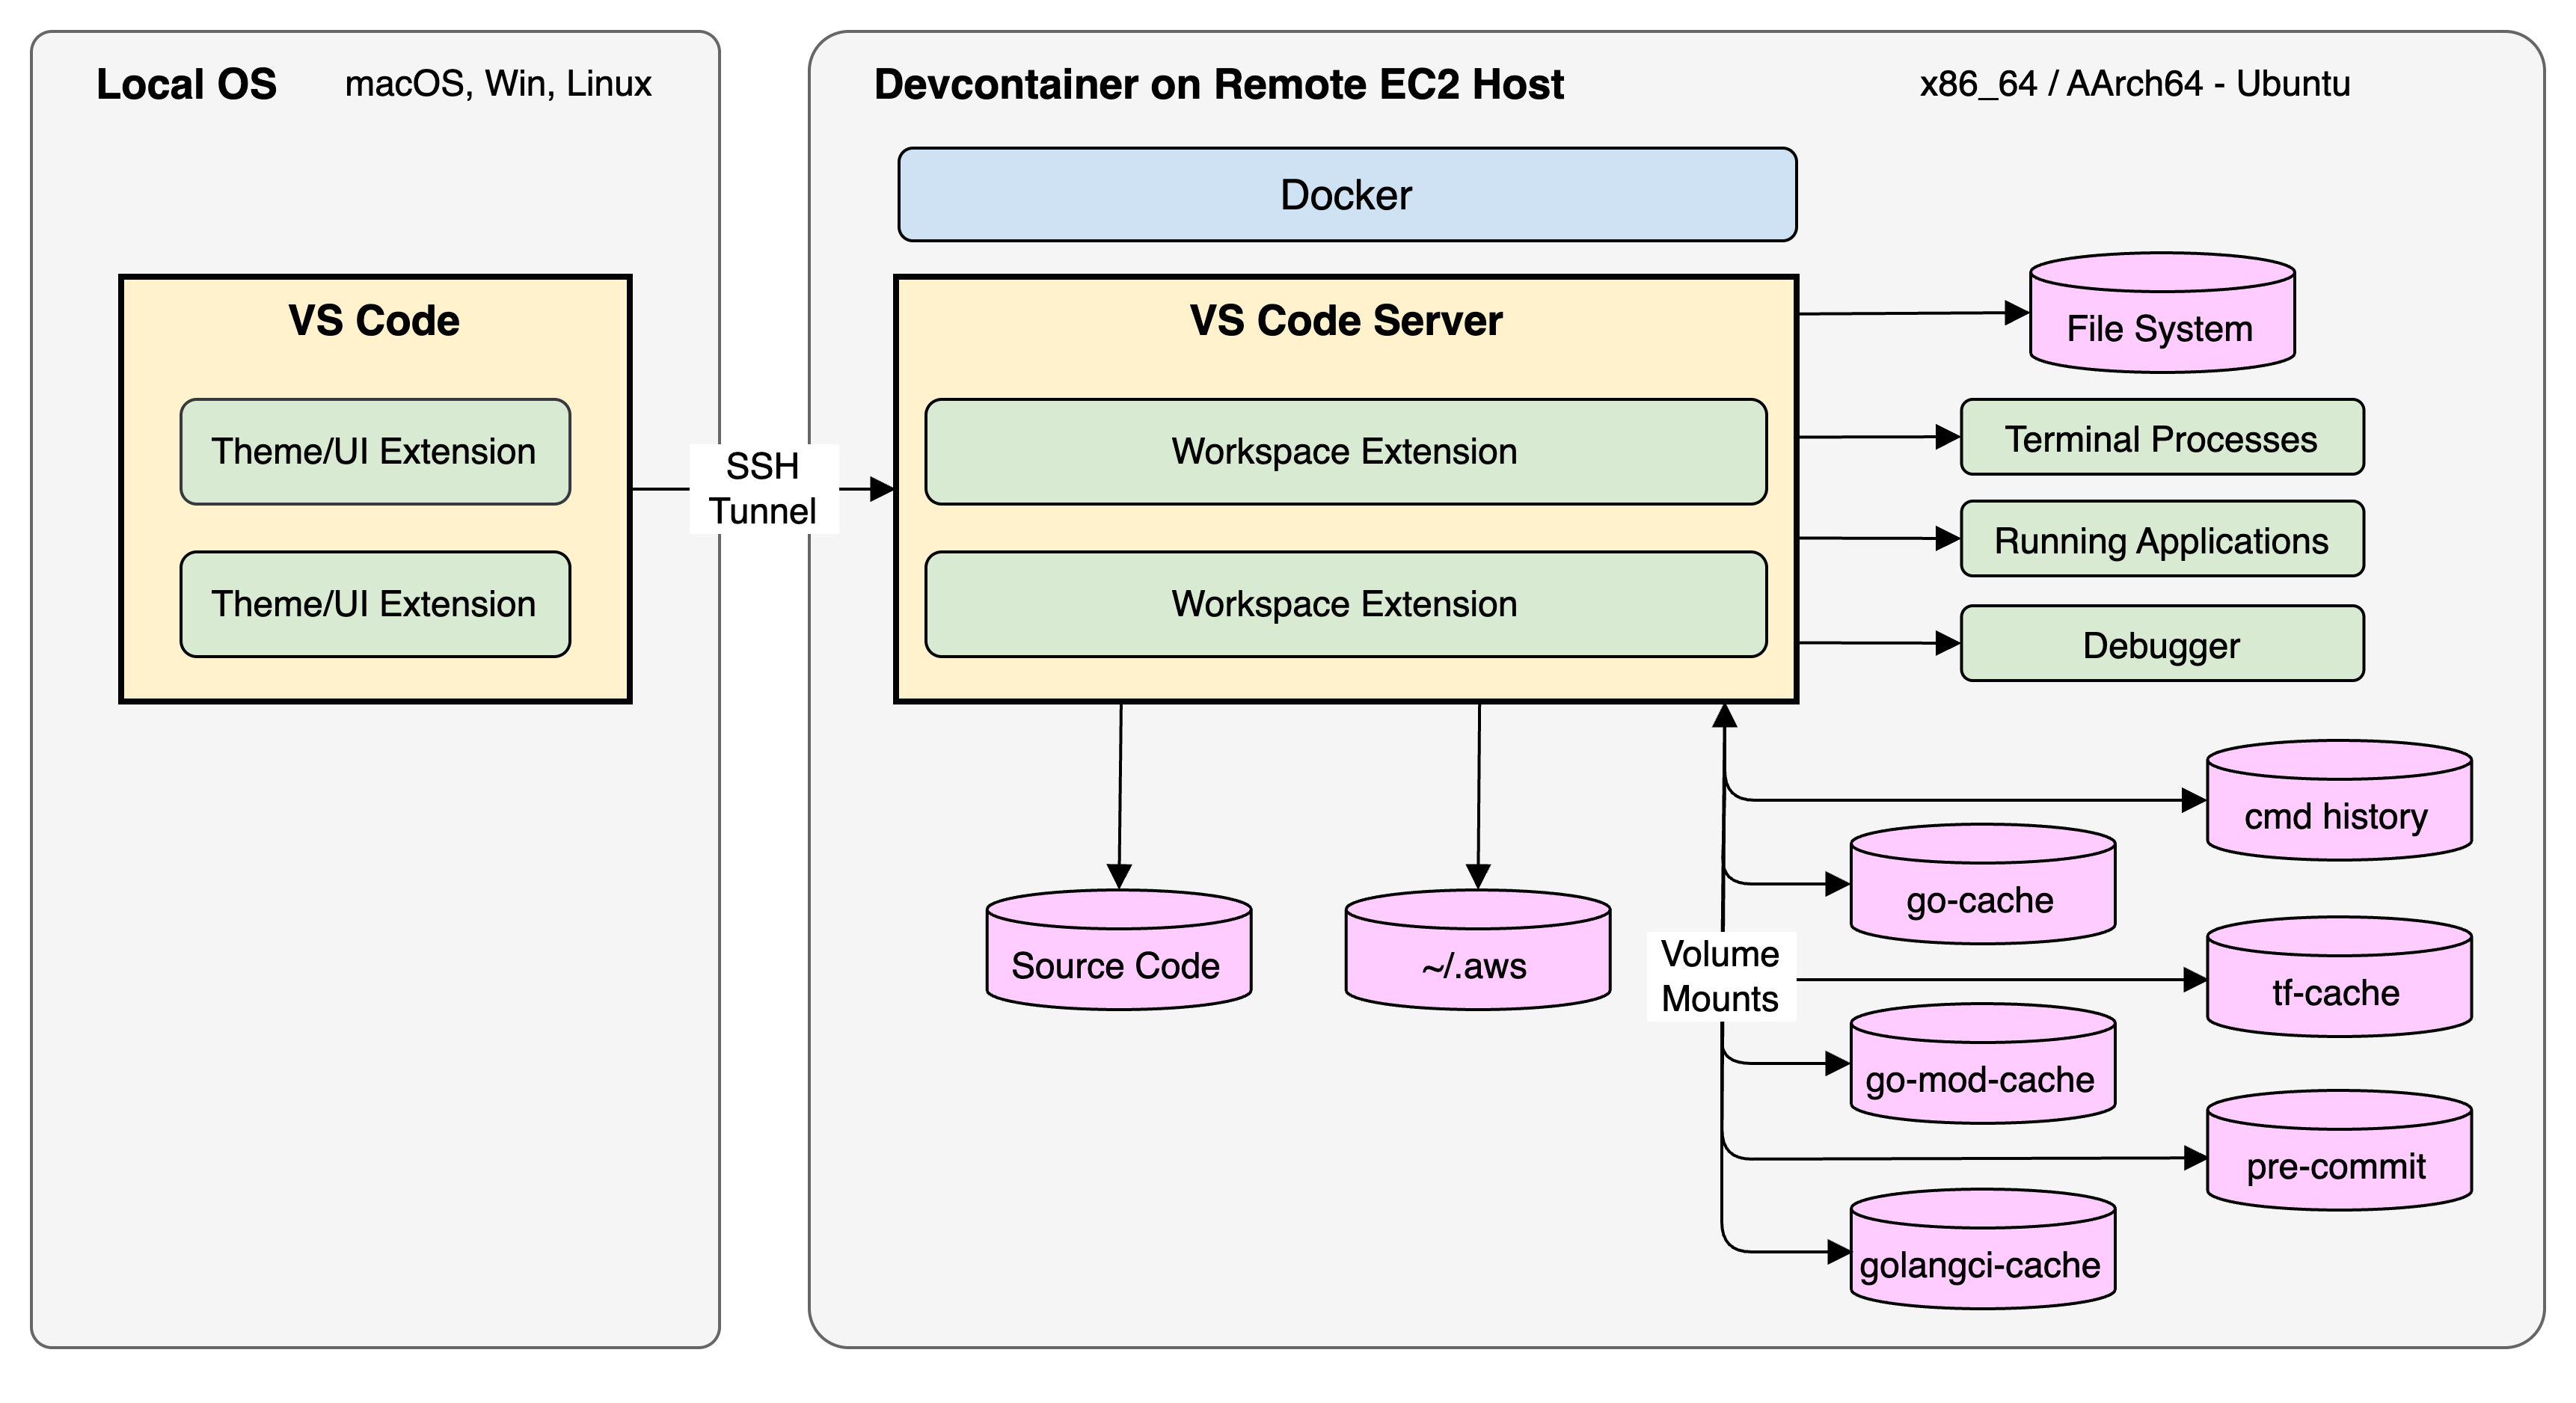
- Local: Follow all the previous steps. For optimal, minimal setup, use this alternative command option when creating the EC2 host:
./remote.sh new docker - Remote: Click GREEN
SSH: knfsd-dev-ec2bottom-left corner, status-bar and select in drop-down list: "Reopen in Container". Choosedevin the drop-down list. - Remote: The devcontainer will now be built from the
Dockerfile.
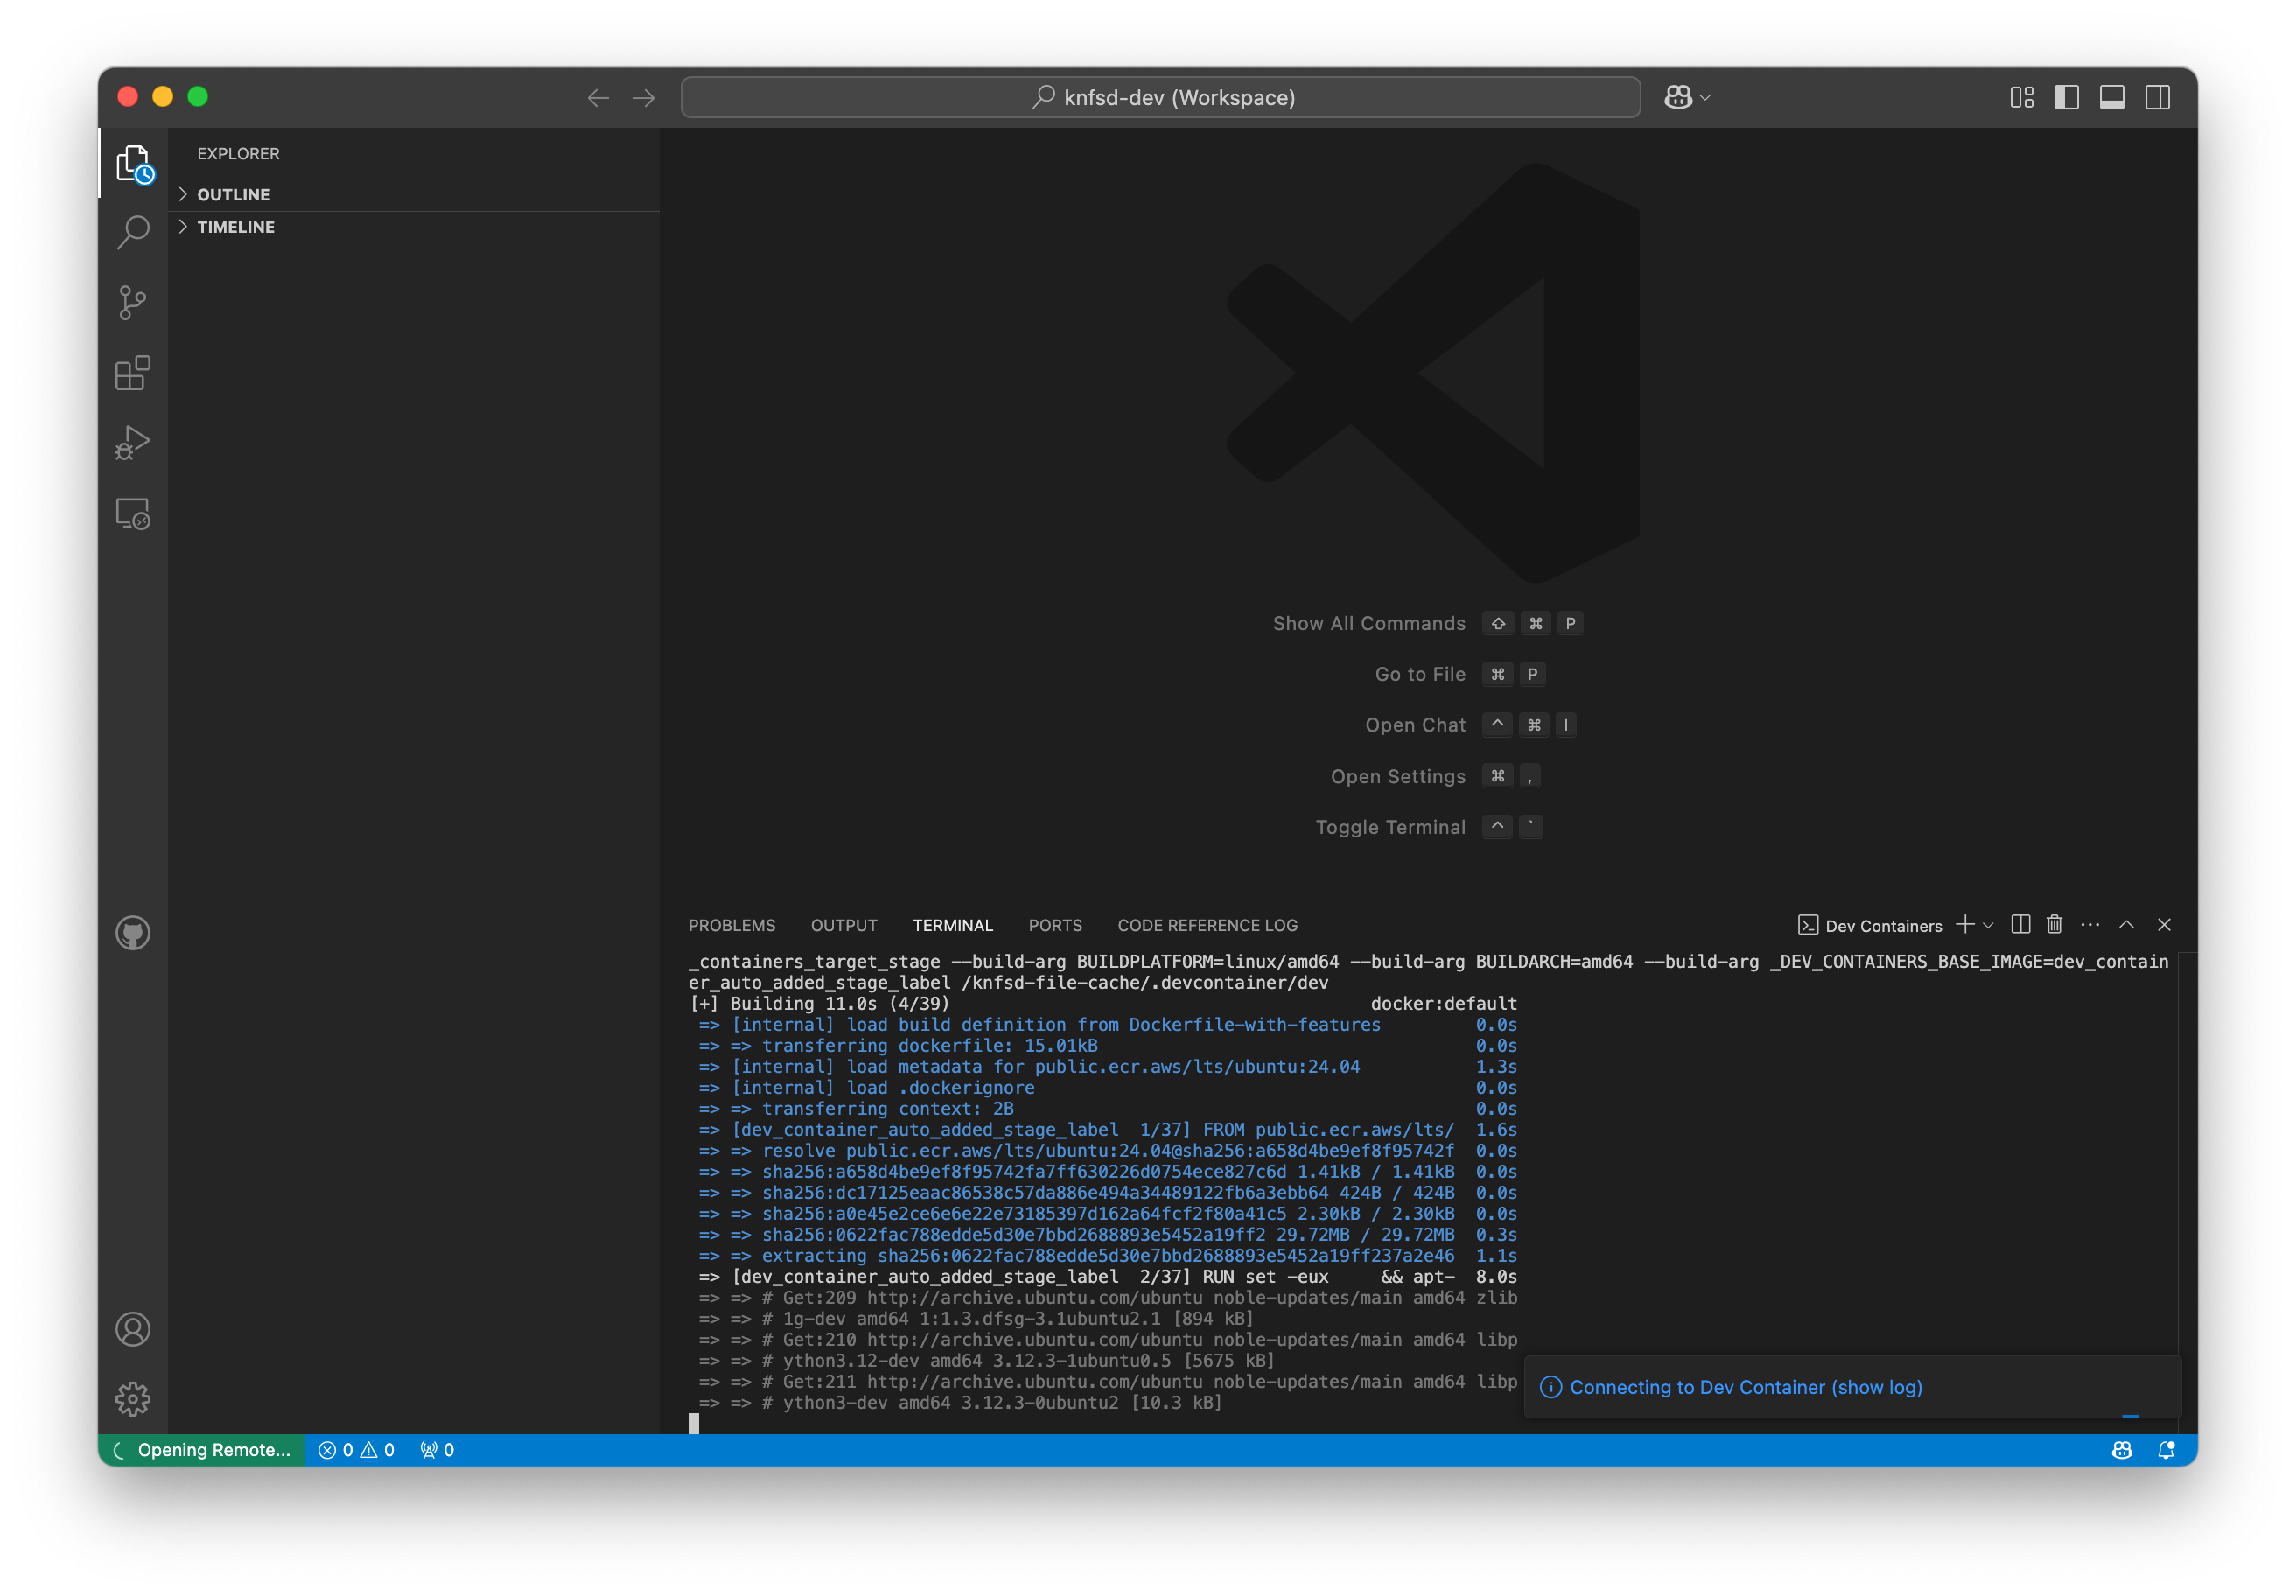
- Remote: At completion, VS Code will look identical to your local devcontainer setup. The GREEN status bar should display:
Dev Container: knfsd-dev @ knfsd-dev-ec2, whereknfsd-devis the devcontainer image name andknfsd-dev-ec2is the EC2 instance hostname.
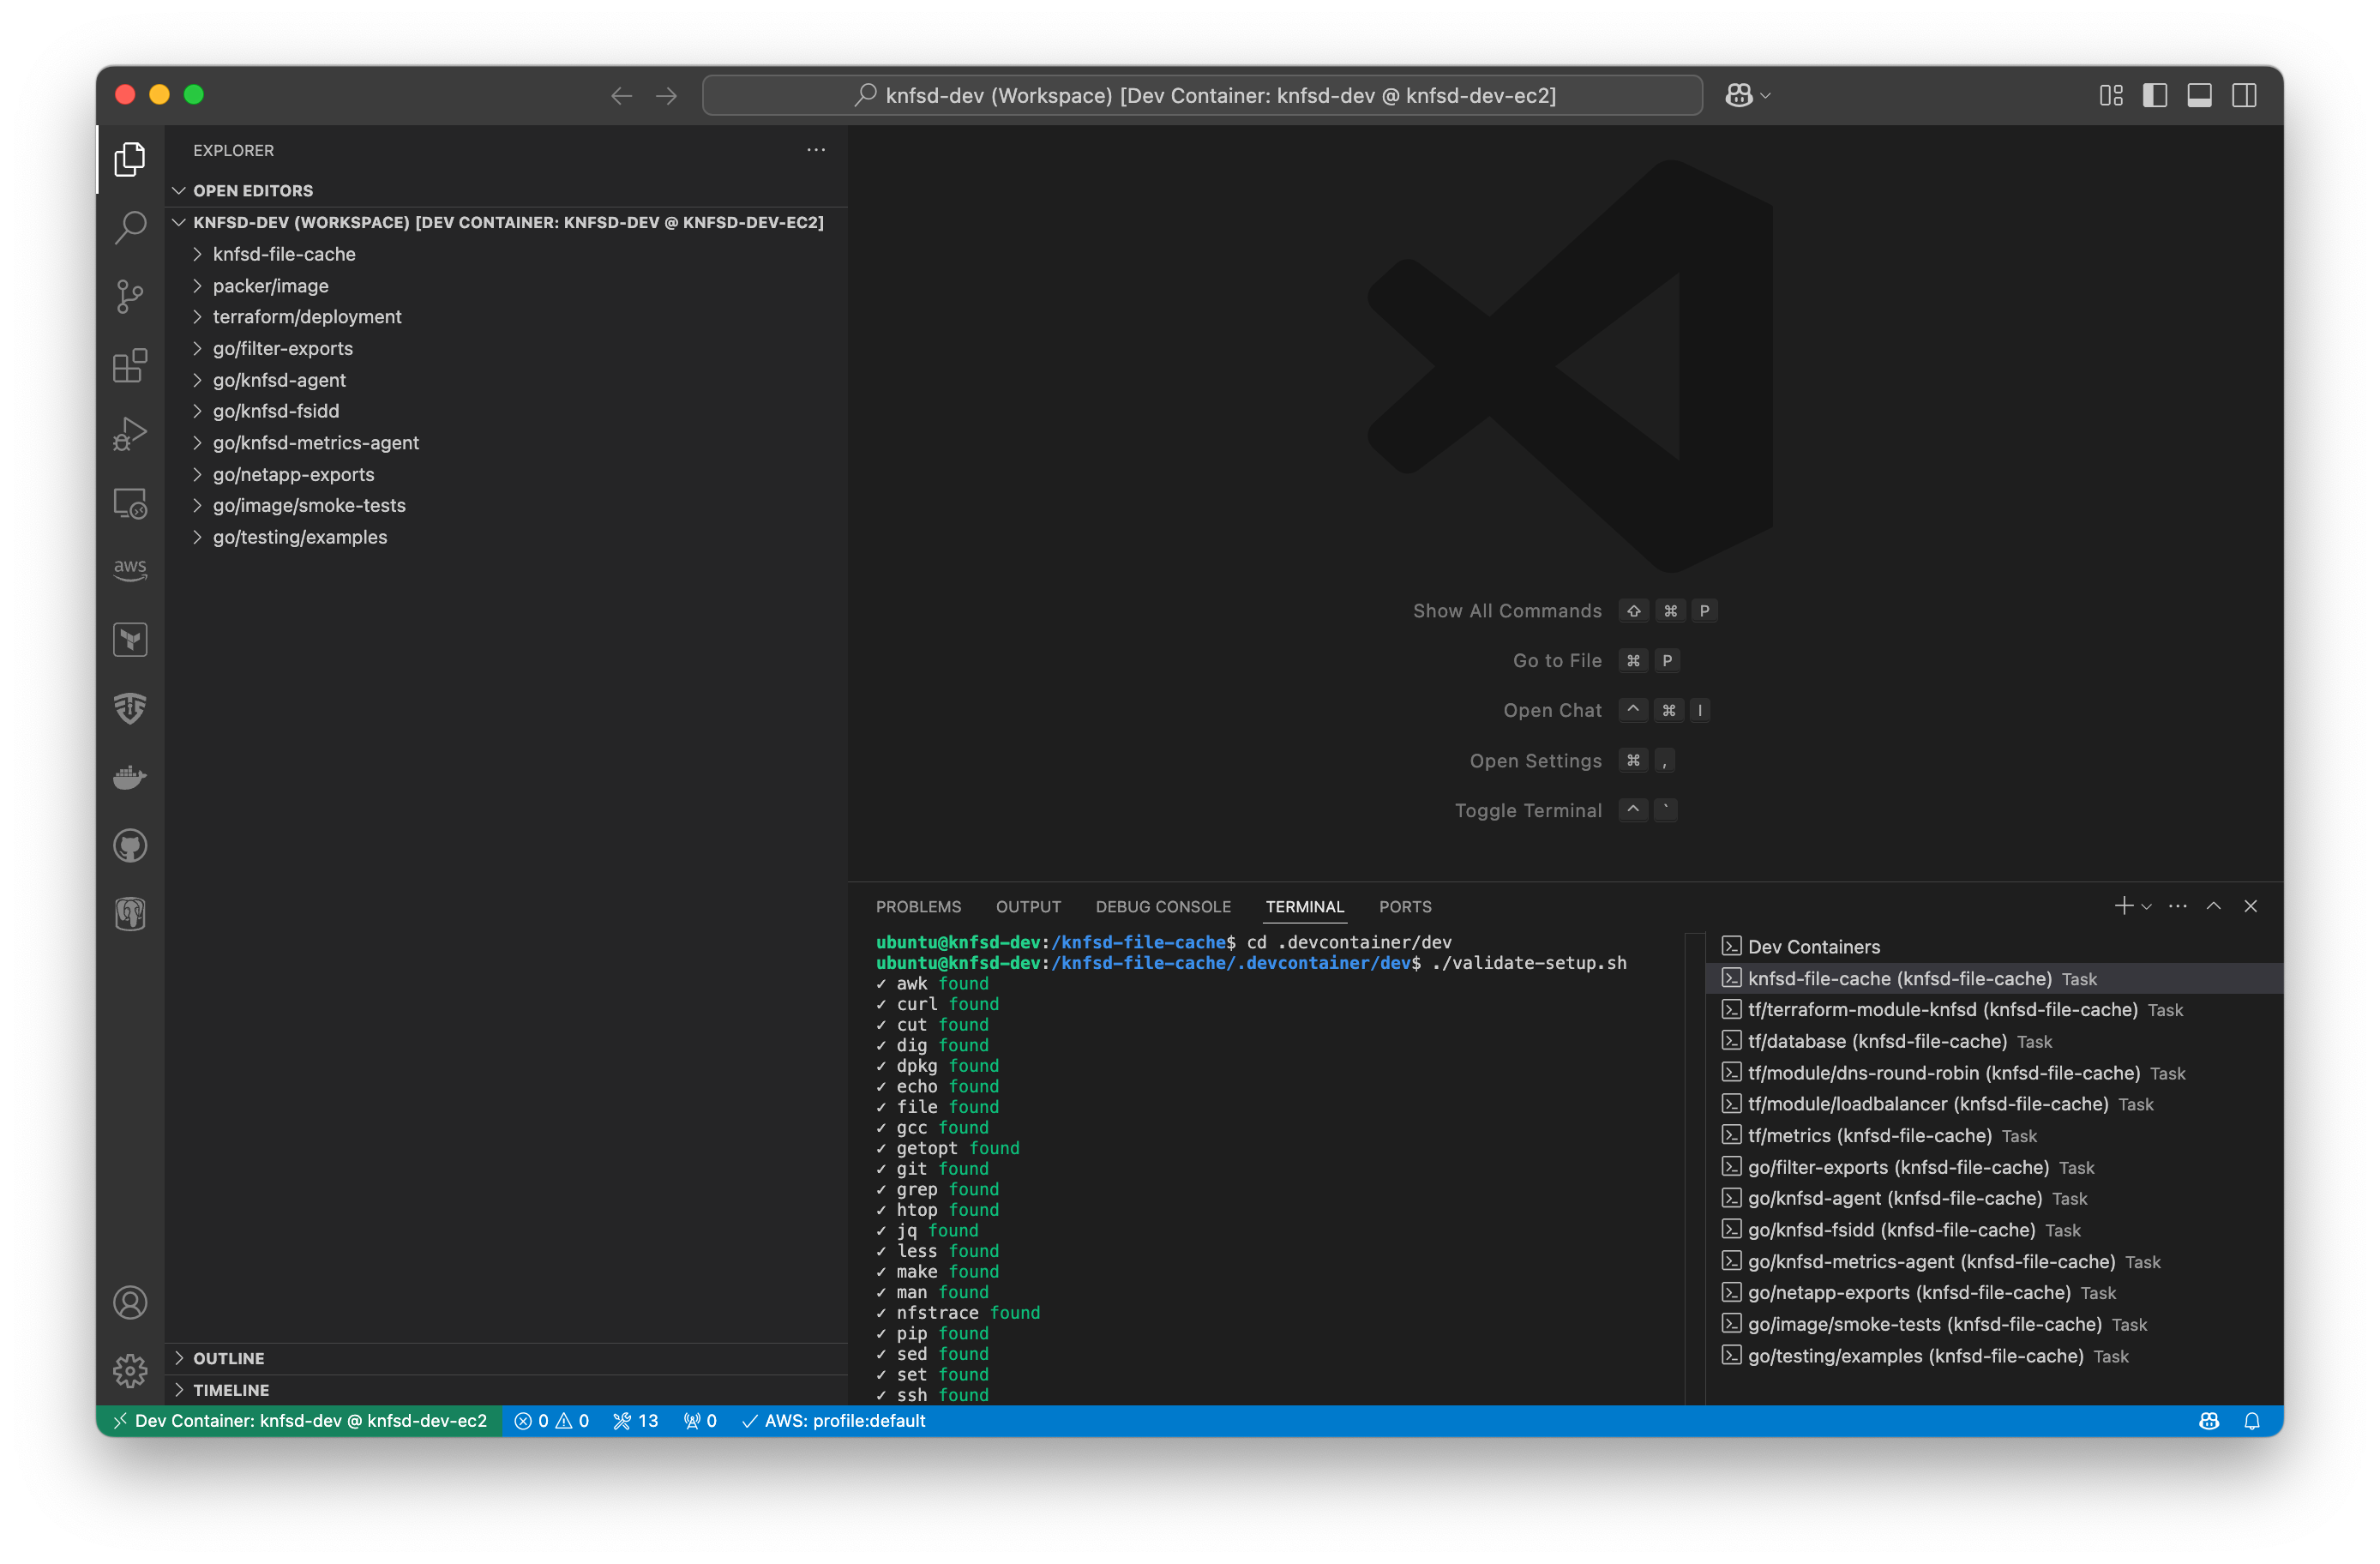
Remote-SSH: General Usage
Once Initial Setup is completed above, general usage of your cloud development environment is simply:
- Local: Execute
./remote.sh upor./remote.sh downto start or stop your host. - Local: Execute
./remote.sh sync <push|pull>to rsync PUSH (to Remote-SSH host) or rsync PULL (from Remote-SSH host) any source-code changes (as .git remains on your local machine only for source control). The (optional)<test>argument allows you to list what dirs/files will be synced as a dry-run (no action). - The EC2 IC Endpoint has a maximum tunnel duration for an established TCP connection of 1 hour (3,600 seconds) by default. With the
ssmtunnel, sessions are instead subject to the Session Manager idle timeout (default 20 mins) and maximum session duration (60 mins). In both cases, upon disconnection in your Remote-SSH window, simply click on the GREEN status-bar once and select:Reopen Folder in SSH. Additionally if using devcontainer, then select:Reopen in Container. All your currently opened files and UI state in VS Code will be reinstated.
Remote-SSH: Cleanup
- Local: Execute
./remote.sh delto delete (terminate) your EC2 instance when you won't need the instance for an extended period of time. Note: you will need to complete the Initial Setup again.
INFO: knfsd-dev-ec2: i-1234567890abcdef0 deleted
INFO: ssh config file: /home/ubuntu/.ssh/config
INFO: ssh config deleted: knfsd-dev-ec2
- Local: EIC Endpoint can be deleted when no longer required. See AWS documentation. There is nothing to clean up when using the
ssmtunnel, as no endpoint resource is created.
Remote-SSH: Troubleshooting
- Do NOT edit the AWS TAG
Name=knfsd-dev-ec2as this is how theremote.shwrapper script tracks which EC2 instance to control. - Although you can use any other API entry point, including the EC2 Console to start/stop/terminate your EC2 instance, it is recommended to use the
remote.shwrapper script as it cleans up your SSH config. - Ensure your SSH key has been added to your local ssh-agent on macOS.
ssh-add -l # should list fingerprints of all identities currently represented by the ssh-agent
ssh-add -K # to add default identities from local OS
ssh-agent # should list the current SSH_AUTH_SOCK and SSH_AGENT_PID
- The following (optional) global SSH options may prove useful in your SSH config file on macOS. Please consult your macOS SSH man page to understand these options.
Host *
  AddKeysToAgent yes
  IgnoreUnknown UseKeychain
  UseKeychain yes
  ServerAliveInterval 30
  ServerAliveCountMax  5
  PubkeyAcceptedAlgorithms +ssh-rsa-cert-v01@openssh.com
- Post Initial Setup, you may wish to modify the spec/size of EC2 instance type (c6in.2xlarge ~$0.45/hr OD in us-east-1) when it is stopped. The
./remote.shscript can be used.
- The
./remote.shscript can be used to provision an EC2 host with a different architecture. The<ami-id>argument can be used to specify a custom AMI ID, instead of the default Ubuntu AMI sourced from AWS SSM parameter store.
- When using
KNFSD_REMOTE_SSH_TUNNEL=ssm, aTargetNotConnectederror means the AWS SSM agent has not registered. Confirm the instance's IAM instance profile grants the agent permissions (remote-ssh-instance-profile.json), that the subnet can reach AWS SSM, and check the agent's ping status.
- If
sshreports thatsession-manager-plugincannot be found, the plugin is missing from the machine executing theProxyCommand. Remember this is your local host OS when connecting via VS Code Remote-SSH, not the devcontainer. - If the
ssmtunnel fails with a region or credentials error, verify the--regionvalue written into theProxyCommandin~/.ssh/configmatches the region the instance runs in, and that your local OS has valid AWS credentials (the devcontainer bind mounts~/.aws, so both normally share the same profile).