

Set up a monorepo
Task 1: Create a monorepo
Section titled “Task 1: Create a monorepo”To create a new monorepo, from within your desired directory, run the following command:
pnpm create @aws/nx-workspace dungeon-adventure --iac=cdkyarn create @aws/nx-workspace dungeon-adventure --iac=cdknpm create @aws/nx-workspace -- dungeon-adventure --iac=cdkbun create @aws/nx-workspace dungeon-adventure --iac=cdkThis will set up a NX monorepo within the dungeon-adventure directory. When you open the directory in VSCode, you will see this file structure:
Directory.nx/
- …
Directory.vscode/
- …
Directorynode_modules/
- …
Directorypackages/ this is where your sub-projects will reside
- …
- .gitignore
- biome.json configures Biome for linting and formatting
- nx.json configures the Nx CLI and monorepo defaults
- package.json all node dependencies are defined here
- pnpm-lock.yaml or bun.lock, yarn.lock, package-lock.json depending on package manager
- pnpm-workspace.yaml if using pnpm
- README.md
- tsconfig.base.json all node based sub-projects extend this
- tsconfig.json
- aws-nx-plugin.config.mts configuraton for the Nx Plugin for AWS
We can now start creating our different sub-projects using the @aws/nx-plugin.
Task 2: Create a Game API
Section titled “Task 2: Create a Game API”First, let’s create our Game API. To do this, create a tRPC API called GameApi using these steps:
- Install the Nx Console VSCode Plugin if you haven't already
- Open the Nx Console in VSCode
- Click
Generate (UI)in the "Common Nx Commands" section - Search for
@aws/nx-plugin - ts#api - Fill in the required parameters
- name: GameApi
- framework: trpc
- Click
Generate
pnpm nx g @aws/nx-plugin:ts#api --name=GameApi --framework=trpc --no-interactiveyarn nx g @aws/nx-plugin:ts#api --name=GameApi --framework=trpc --no-interactivenpx nx g @aws/nx-plugin:ts#api --name=GameApi --framework=trpc --no-interactivebunx nx g @aws/nx-plugin:ts#api --name=GameApi --framework=trpc --no-interactiveYou can also perform a dry-run to see what files would be changed
pnpm nx g @aws/nx-plugin:ts#api --name=GameApi --framework=trpc --no-interactive --dry-runyarn nx g @aws/nx-plugin:ts#api --name=GameApi --framework=trpc --no-interactive --dry-runnpx nx g @aws/nx-plugin:ts#api --name=GameApi --framework=trpc --no-interactive --dry-runbunx nx g @aws/nx-plugin:ts#api --name=GameApi --framework=trpc --no-interactive --dry-runYou will see some new files appear in your file tree.
ts#api updated files
Below is a list of all files which have been generated by the ts#api generator. We are going to examine some of the key files highlighted in the file tree:
Directorypackages/
Directorycommon/
Directoryconstructs/
Directorysrc/
Directoryapp/ app specific cdk constructs
Directoryapis/
- game-api.ts cdk construct to create your tRPC API
- index.ts
- …
- index.ts
Directorycore/ generic cdk constructs
Directoryapi/
- rest-api.ts base cdk construct for an API Gateway Rest API
- trpc-utils.ts utilities for trpc API CDK constructs
- utils.ts utilities for API constructs
- index.ts
- runtime-config.ts
- index.ts
- project.json
- …
Directorygame-api/ tRPC API
Directorysrc/
Directoryclient/ vanilla client typically used for ts machine to machine calls
- index.ts
Directorymiddleware/ powertools instrumentation
- error.ts
- index.ts
- logger.ts
- metrics.ts
- tracer.ts
Directoryschema/ definitions of inputs and outputs for your API
- index.ts
- echo.ts sample input and output schema
- z-async-iterable.ts wrapper Zod schema for tRPC subscription output
Directoryprocedures/ specific implementations for your API procedures/routes
- echo.ts sample procedure implementation
- index.ts
- init.ts sets up context and middleware
- handler.ts Lambda handler entrypoint (uses response streaming for REST APIs)
- local-server.ts used when running the tRPC server locally
- router.ts defines the tRPC router and all procedures
- project.json
- …
- vitest.workspace.ts
Let us look at these key files:
import { echo } from './procedures/echo.js';import { t } from './init.js';
export const router = t.router;
export const appRouter = router({  echo,});
export type AppRouter = typeof appRouter;The router defines the tRPC router for your API and is the place where you will declare all of your API methods. As you can see above, we have a method called echo with it’s implementation in the ./procedures/echo.ts file. The Lambda handler entrypoint is in handler.ts, which is configured automatically by the generator.
import { publicProcedure } from '../init.js';import {  EchoInputSchema,  EchoOutputSchema,} from '../schema/echo.js';
export const echo = publicProcedure .input(EchoInputSchema) .output(EchoOutputSchema) .query((opts) => ({ message: opts.input.message }));This file is the implementation of the echo method and as you can see is strongly typed by declaring its input and output data structures.
import { z } from 'zod';
export const EchoInputSchema = z.object({  message: z.string().max(1024),});
export type IEchoInput = z.TypeOf<typeof EchoInputSchema>;
export const EchoOutputSchema = z.object({  message: z.string().max(1024),});
export type IEchoOutput = z.TypeOf<typeof EchoOutputSchema>;All tRPC schema definitions are defined using Zod and are exported as typescript types via the z.TypeOf syntax.
import { Construct } from 'constructs';import * as url from 'url';import { Distribution } from 'aws-cdk-lib/aws-cloudfront';import {  Code,  Runtime,  Function,  FunctionProps,  Tracing,} from 'aws-cdk-lib/aws-lambda';import {  AuthorizationType,  LambdaIntegration,  ResponseTransferMode,} from 'aws-cdk-lib/aws-apigateway';import { Aspects, Duration } from 'aws-cdk-lib';import {  PolicyDocument,  PolicyStatement,  Effect,  AnyPrincipal,  IGrantable,  Grant,} from 'aws-cdk-lib/aws-iam';import {  IntegrationBuilder,  RestApiIntegration,} from '../../core/api/utils.js';import { AddCorsPreflightAspect, RestApi } from '../../core/api/rest-api.js';import { Procedures, routerToOperations } from '../../core/api/trpc-utils.js';import { AppRouter, appRouter } from '@dungeon-adventure/game-api';
// String union type for all API operation namestype Operations = Procedures<AppRouter>;
/** * Properties for creating a GameApi construct * * @template TIntegrations - Map of operation names to their integrations */export interface GameApiProps<  TIntegrations extends Record<Operations, RestApiIntegration>,> {  /**   * Map of operation names to their API Gateway integrations   */  integrations: TIntegrations;}
/** * A CDK construct that creates and configures an AWS API Gateway REST API * specifically for GameApi. * @template TIntegrations - Map of operation names to their integrations */export class GameApi<  TIntegrations extends Record<Operations, RestApiIntegration>,> extends RestApi<Operations, TIntegrations> {  private allowedOrigins: readonly string[] = ['*'];
  /**   * Creates default integrations for all operations, which implement each operation as   * its own individual lambda function.   *   * @param scope - The CDK construct scope   * @returns An IntegrationBuilder with default lambda integrations   */  public static defaultIntegrations = (scope: Construct) => {    return IntegrationBuilder.rest({      operations: routerToOperations(appRouter),      defaultIntegrationOptions: <FunctionProps>{        runtime: Runtime.NODEJS_LATEST,        handler: 'index.handler',        code: Code.fromAsset(          url.fileURLToPath(            new URL(              '../../../../../../dist/packages/game-api/bundle',              import.meta.url,            ),          ),        ),        timeout: Duration.seconds(30),        tracing: Tracing.ACTIVE,      },      buildDefaultIntegration: (op, props: FunctionProps) => {        const handler = new Function(scope, `GameApi${op}Handler`, props);        return {          handler,          integration: new LambdaIntegration(handler, {            responseTransferMode: ResponseTransferMode.STREAM,          }),        };      },    });  };
  constructor(    scope: Construct,    id: string,    props: GameApiProps<TIntegrations>,  ) {    super(scope, id, {      apiName: 'GameApi',      defaultMethodOptions: {        authorizationType: AuthorizationType.IAM,      },      deployOptions: {        tracingEnabled: true,      },      policy: new PolicyDocument({        statements: [          // Open up OPTIONS to allow browsers to make unauthenticated preflight requests          new PolicyStatement({            effect: Effect.ALLOW,            principals: [new AnyPrincipal()],            actions: ['execute-api:Invoke'],            resources: ['execute-api:/*/OPTIONS/*'],          }),        ],      }),      operations: routerToOperations(appRouter),      ...props,    });    Aspects.of(this).add(new AddCorsPreflightAspect(() => this.allowedOrigins));  }
  /**   * Restricts CORS to the provided origins   *   * Configures the CloudFront distribution domains or origin strings   * as the only permitted CORS origins in API Gateway preflight responses and the AWS   * Lambda integrations.   *   * @param origins - The origin strings, CloudFront distributions, or objects containing a CloudFront distribution to grant CORS from   */  public restrictCorsTo(    ...origins: (string | Distribution | { cloudFrontDistribution: Distribution })[]  ) {    const allowedOrigins = origins.map((origin) =>      typeof origin === 'string'        ? origin        : 'cloudFrontDistribution' in origin          ? `https://${origin.cloudFrontDistribution.distributionDomainName}`          : `https://${origin.distributionDomainName}`,    );
    this.allowedOrigins = allowedOrigins;
    // Set ALLOWED_ORIGINS environment variable for all Lambda integrations    Object.values(this.integrations).forEach((integration) => {      if ('handler' in integration && integration.handler instanceof Function) {        integration.handler.addEnvironment(          'ALLOWED_ORIGINS',          allowedOrigins.join(','),        );      }    });  }
  /**   * Grants IAM permissions to invoke any method on this API.   *   * @param grantee - The IAM principal to grant permissions to   */  public grantInvokeAccess(grantee: IGrantable) {    // Here we grant grantee permission to call the api.    // Machine to machine fine-grained access can be defined here using more specific principals (eg roles or    // users) and resources (eg which api paths may be invoked by which principal) if required.    this.api.addToResourcePolicy(      new PolicyStatement({        effect: Effect.ALLOW,        principals: [grantee.grantPrincipal],        actions: ['execute-api:Invoke'],        resources: ['execute-api:/*'],      }),    );
Grant.addToPrincipal({ grantee, actions: ['execute-api:Invoke'], resourceArns: [this.api.arnForExecuteApi('*', '/*', '*')], }); }}This is the CDK construct that defines our GameApi. It provides a defaultIntegrations method which automatically creates a Lambda function for each procedure in our tRPC API, pointing to the bundled API implementation. This means that at cdk synth time, bundling does not occur (opposed to using NodeJsFunction) as we have already bundled it as part of the backend project’s build target.
Task 3: Create Story agents
Section titled “Task 3: Create Story agents”Now let’s create our Story Agents.
Story agent: Python project
Section titled “Story agent: Python project”To create a Python project:
- Install the Nx Console VSCode Plugin if you haven't already
- Open the Nx Console in VSCode
- Click
Generate (UI)in the "Common Nx Commands" section - Search for
@aws/nx-plugin - py#project - Fill in the required parameters
- name: story
- Click
Generate
pnpm nx g @aws/nx-plugin:py#project --name=story --no-interactiveyarn nx g @aws/nx-plugin:py#project --name=story --no-interactivenpx nx g @aws/nx-plugin:py#project --name=story --no-interactivebunx nx g @aws/nx-plugin:py#project --name=story --no-interactiveYou can also perform a dry-run to see what files would be changed
pnpm nx g @aws/nx-plugin:py#project --name=story --no-interactive --dry-runyarn nx g @aws/nx-plugin:py#project --name=story --no-interactive --dry-runnpx nx g @aws/nx-plugin:py#project --name=story --no-interactive --dry-runbunx nx g @aws/nx-plugin:py#project --name=story --no-interactive --dry-runYou will see some new files appear in your file tree.
py#project updated files
The py#project generates these files:
Directory.venv/ single virtual env for monorepo
- …
Directorypackages/
Directorystory/
Directorydungeon_adventure_story/ python module
- …
Directorytests/
- …
- .python-version
- pyproject.toml
- project.json
- .python-version pinned uv python version
- pyproject.toml
- uv.lock
This has configured a Python project and UV Workspace with shared virtual environment.
Story agent
Section titled “Story agent”To add a Strands agent to the project with the py#agent generator:
- Install the Nx Console VSCode Plugin if you haven't already
- Open the Nx Console in VSCode
- Click
Generate (UI)in the "Common Nx Commands" section - Search for
@aws/nx-plugin - py#agent - Fill in the required parameters
- project: story
- auth: cognito
- protocol: ag-ui
- Click
Generate
pnpm nx g @aws/nx-plugin:py#agent --project=story --auth=cognito --protocol=ag-ui --no-interactiveyarn nx g @aws/nx-plugin:py#agent --project=story --auth=cognito --protocol=ag-ui --no-interactivenpx nx g @aws/nx-plugin:py#agent --project=story --auth=cognito --protocol=ag-ui --no-interactivebunx nx g @aws/nx-plugin:py#agent --project=story --auth=cognito --protocol=ag-ui --no-interactiveYou can also perform a dry-run to see what files would be changed
pnpm nx g @aws/nx-plugin:py#agent --project=story --auth=cognito --protocol=ag-ui --no-interactive --dry-runyarn nx g @aws/nx-plugin:py#agent --project=story --auth=cognito --protocol=ag-ui --no-interactive --dry-runnpx nx g @aws/nx-plugin:py#agent --project=story --auth=cognito --protocol=ag-ui --no-interactive --dry-runbunx nx g @aws/nx-plugin:py#agent --project=story --auth=cognito --protocol=ag-ui --no-interactive --dry-runYou will see some new files appear in your file tree.
py#agent updated files
The py#agent generates these files:
Directorypackages/
Directorystory/
Directorydungeon_adventure_story/ python module
Directoryagent/
- init.py sets up the FastAPI app and middleware
- main.py entrypoint for your agent in Bedrock AgentCore Runtime
- agent.py defines an example agent and tools
- Dockerfile defines the docker image for deployment to AgentCore Runtime
Directorycommon/constructs/
Directorysrc
Directoryapp/agents/story-agent/
- story-agent.ts construct for deploying your Story agent to AgentCore Runtime
Let’s take a look at some of the files in detail:
from contextlib import contextmanager
from strands import Agent, toolfrom strands_tools import current_time

@tooldef subtract(a: int, b: int) -> int:    return a - b

@contextmanagerdef get_agent(): yield Agent( name="StoryAgent", description="StoryAgent Agent", system_prompt="""You are a mathematical wizard.Use your tools for mathematical tasks.Refer to tools as your 'spellbook'.""", tools=[subtract, current_time], )This creates an example Strands agent and defines a subtraction tool.
import loggingimport uuid
from ag_ui_strands import StrandsAgent, create_strands_appfrom dungeon_adventure_agent_connection import session_id_contextfrom fastapi import Requestfrom starlette.middleware.base import BaseHTTPMiddleware
from .agent import get_agent
logging.basicConfig(level=logging.INFO)
SESSION_ID_HEADER = "x-amzn-bedrock-agentcore-runtime-session-id"
# Create AG-UI agent wrapper_agent_ctx = get_agent()_agent = _agent_ctx.__enter__()
agui_agent = StrandsAgent(    agent=_agent,    name="StoryAgent",    description="An Agent exposed via the AG-UI protocol.",)

class _SessionIdMiddleware(BaseHTTPMiddleware):    """Bind the session ID for this request so downstream MCP / A2A clients forward it on outbound calls."""
    async def dispatch(self, request: Request, call_next):        session_id = request.headers.get(SESSION_ID_HEADER) or str(uuid.uuid4())        with session_id_context(session_id):            return await call_next(request)

# Create FastAPI app with AG-UI endpoint and health checkapp = create_strands_app(agui_agent, path="/invocations")app.add_middleware(_SessionIdMiddleware)This is the entrypoint for the agent. Because we selected --protocol=ag-ui, the generator wraps our Strands Agent with StrandsAgent from ag_ui_strands and mounts it on a FastAPI app that speaks the AG-UI protocol — this is what CopilotKit will talk to from the React website. The _SessionIdMiddleware binds the inbound AgentCore runtime session ID onto a ContextVar so any downstream MCP/A2A client we wire up later (e.g. the Inventory MCP server in Module 2) automatically forwards it on its outbound calls. In Module 3 we’ll also add a session_manager_provider so each thread id gets its own S3SessionManager and conversation history persists across turns.
import { Lazy, Names } from 'aws-cdk-lib';import { Platform } from 'aws-cdk-lib/aws-ecr-assets';import { Construct } from 'constructs';import { execSync } from 'child_process';import * as path from 'path';import * as url from 'url';import {  AgentRuntimeArtifact,  ProtocolType,  Runtime,  RuntimeProps,} from 'aws-cdk-lib/aws-bedrockagentcore';import { IGrantable, IPrincipal } from 'aws-cdk-lib/aws-iam';
export type StoryAgentProps = Omit<  RuntimeProps,  'runtimeName' | 'protocolConfiguration' | 'agentRuntimeArtifact'>;
export class StoryAgent extends Construct implements IGrantable {  public readonly dockerImage: AgentRuntimeArtifact;  public readonly agentCoreRuntime: Runtime;
  constructor(scope: Construct, id: string, props?: StoryAgentProps) {    super(scope, id);
    this.dockerImage = AgentRuntimeArtifact.fromAsset(      path.dirname(url.fileURLToPath(new URL(import.meta.url))),      {        platform: Platform.LINUX_ARM64,        extraHash: execSync(          `docker inspect dungeon-adventure-story-agent:latest --format '{{.Id}}'`,          { encoding: 'utf-8' },        ).trim(),      },    );
    this.agentCoreRuntime = new Runtime(this, 'StoryAgent', {      runtimeName: Lazy.string({        produce: () =>          Names.uniqueResourceName(this.agentCoreRuntime, { maxLength: 40 }),      }),      protocolConfiguration: ProtocolType.HTTP,      agentRuntimeArtifact: this.dockerImage,      ...props,    });  }
public get grantPrincipal(): IPrincipal { return this.agentCoreRuntime.grantPrincipal; }}This configures a CDK AgentRuntimeArtifact which uploads your agent Docker image to ECR, and hosts it using AgentCore Runtime.
You may notice an extra Dockerfile, that references the Docker image from the story project, allowing us to co-locate the Dockerfile and agent source code.
Task 4: Set up inventory tools
Section titled “Task 4: Set up inventory tools”Inventory: TypeScript project
Section titled “Inventory: TypeScript project”Let us create an MCP server to provide tools for our Story Agent to manage a player’s inventory.
First, we create a TypeScript project:
- Install the Nx Console VSCode Plugin if you haven't already
- Open the Nx Console in VSCode
- Click
Generate (UI)in the "Common Nx Commands" section - Search for
@aws/nx-plugin - ts#project - Fill in the required parameters
- name: inventory
- Click
Generate
pnpm nx g @aws/nx-plugin:ts#project --name=inventory --no-interactiveyarn nx g @aws/nx-plugin:ts#project --name=inventory --no-interactivenpx nx g @aws/nx-plugin:ts#project --name=inventory --no-interactivebunx nx g @aws/nx-plugin:ts#project --name=inventory --no-interactiveYou can also perform a dry-run to see what files would be changed
pnpm nx g @aws/nx-plugin:ts#project --name=inventory --no-interactive --dry-runyarn nx g @aws/nx-plugin:ts#project --name=inventory --no-interactive --dry-runnpx nx g @aws/nx-plugin:ts#project --name=inventory --no-interactive --dry-runbunx nx g @aws/nx-plugin:ts#project --name=inventory --no-interactive --dry-runThis will create an empty TypeScript project.
ts#project updated files
The ts#project generator generates these files.
Directorypackages/
Directoryinventory/
Directorysrc/
- index.ts entry point with example function
- project.json project configuration
- vitest.config.mts test configuration
- tsconfig.json base typescript configuration for the project
- tsconfig.lib.json typescript configuration for the project targeted for compilation and bundling
- tsconfig.spec.json typescript configuration for tests
- tsconfig.base.json updated to configure an alias for other projects to reference this
Inventory: MCP server
Section titled “Inventory: MCP server”Next, we’ll add an MCP server to our TypeScript project:
- Install the Nx Console VSCode Plugin if you haven't already
- Open the Nx Console in VSCode
- Click
Generate (UI)in the "Common Nx Commands" section - Search for
@aws/nx-plugin - ts#mcp-server - Fill in the required parameters
- project: inventory
- Click
Generate
pnpm nx g @aws/nx-plugin:ts#mcp-server --project=inventory --no-interactiveyarn nx g @aws/nx-plugin:ts#mcp-server --project=inventory --no-interactivenpx nx g @aws/nx-plugin:ts#mcp-server --project=inventory --no-interactivebunx nx g @aws/nx-plugin:ts#mcp-server --project=inventory --no-interactiveYou can also perform a dry-run to see what files would be changed
pnpm nx g @aws/nx-plugin:ts#mcp-server --project=inventory --no-interactive --dry-runyarn nx g @aws/nx-plugin:ts#mcp-server --project=inventory --no-interactive --dry-runnpx nx g @aws/nx-plugin:ts#mcp-server --project=inventory --no-interactive --dry-runbunx nx g @aws/nx-plugin:ts#mcp-server --project=inventory --no-interactive --dry-runThis will add an MCP server.
ts#mcp-server updated files
The ts#mcp-server generator generates these files.
Directorypackages/
Directoryinventory/
Directorysrc/mcp-server/
- index.ts barrel export
- server.ts creates the MCP server
Directorytools/
- divide.ts example tool
Directoryresources/
- sample-guidance.ts example resource
- stdio.ts entry point for MCP with STDIO transport
- http.ts entry point for MCP with Streamable HTTP transport
- Dockerfile builds the image for AgentCore Runtime
- rolldown.config.ts configuration for bundling the MCP server for deployment to AgentCore
Directorycommon/constructs/
Directorysrc
Directoryapp/mcp-servers/inventory-mcp-server/
- inventory-mcp-server.ts construct for deploying your inventory MCP server to AgentCore Runtime
Task 5: Create the game database
Section titled “Task 5: Create the game database”Our game state — saved games and each player’s inventory — lives in Amazon DynamoDB. Create a DynamoDB project called DungeonDb with the ts#dynamodb generator:
- Install the Nx Console VSCode Plugin if you haven't already
- Open the Nx Console in VSCode
- Click
Generate (UI)in the "Common Nx Commands" section - Search for
@aws/nx-plugin - ts#dynamodb - Fill in the required parameters
- name: DungeonDb
- Click
Generate
pnpm nx g @aws/nx-plugin:ts#dynamodb --name=DungeonDb --no-interactiveyarn nx g @aws/nx-plugin:ts#dynamodb --name=DungeonDb --no-interactivenpx nx g @aws/nx-plugin:ts#dynamodb --name=DungeonDb --no-interactivebunx nx g @aws/nx-plugin:ts#dynamodb --name=DungeonDb --no-interactiveYou can also perform a dry-run to see what files would be changed
pnpm nx g @aws/nx-plugin:ts#dynamodb --name=DungeonDb --no-interactive --dry-runyarn nx g @aws/nx-plugin:ts#dynamodb --name=DungeonDb --no-interactive --dry-runnpx nx g @aws/nx-plugin:ts#dynamodb --name=DungeonDb --no-interactive --dry-runbunx nx g @aws/nx-plugin:ts#dynamodb --name=DungeonDb --no-interactive --dry-runYou will see some new files appear in your file tree.
ts#dynamodb updated files
The ts#dynamodb generator generates these files.
Directorypackages/
Directorydungeon-db/
- config.json DynamoDB configuration including port, table name, container settings and Global Secondary Indexes
Directorysrc/
- index.ts entry point and exports
- client.ts DynamoDB client singleton and table name resolution
Directoryentities/
- example.ts example ElectroDB entity (we will replace this)
- index.ts entity exports
- project.json adds the
devandpull-imagetargets
Directorycommon/
Directoryscripts/
Directorysrc/
Directorydynamodb/
- create-local-table.ts creates the table in DynamoDB Local
- pull-image.ts pulls the DynamoDB Local image
- start-container.ts starts the DynamoDB Local container
Directoryconstructs/
Directorysrc/
Directoryapp/dynamodb/
- dungeon-db.ts construct for provisioning your table
Directorycore/
- dynamodb.ts generic DynamoDB table construct
The generated src/client.ts exports getDynamoDBClient() and resolveTableName(). When LOCAL_DEV=true (set automatically by the dev targets) these connect to DynamoDB Local; otherwise they connect to AWS and resolve the deployed table name from Runtime Configuration. We’ll model our Game and Inventory entities in this project in Module 2.
For more details, refer to the ts#dynamodb generator guide.
Task 6: Create the User Interface (UI)
Section titled “Task 6: Create the User Interface (UI)”In this task, we will create the UI which will allow you to interact with the game.
Game UI: Website
Section titled “Game UI: Website”To create the UI, create a website called GameUI using these steps:
- Install the Nx Console VSCode Plugin if you haven't already
- Open the Nx Console in VSCode
- Click
Generate (UI)in the "Common Nx Commands" section - Search for
@aws/nx-plugin - ts#website - Fill in the required parameters
- name: GameUI
- ux: shadcn
- Click
Generate
pnpm nx g @aws/nx-plugin:ts#website --name=GameUI --ux=shadcn --no-interactiveyarn nx g @aws/nx-plugin:ts#website --name=GameUI --ux=shadcn --no-interactivenpx nx g @aws/nx-plugin:ts#website --name=GameUI --ux=shadcn --no-interactivebunx nx g @aws/nx-plugin:ts#website --name=GameUI --ux=shadcn --no-interactiveYou can also perform a dry-run to see what files would be changed
pnpm nx g @aws/nx-plugin:ts#website --name=GameUI --ux=shadcn --no-interactive --dry-runyarn nx g @aws/nx-plugin:ts#website --name=GameUI --ux=shadcn --no-interactive --dry-runnpx nx g @aws/nx-plugin:ts#website --name=GameUI --ux=shadcn --no-interactive --dry-runbunx nx g @aws/nx-plugin:ts#website --name=GameUI --ux=shadcn --no-interactive --dry-runYou will see some new files appear in your file tree.
ts#website updated files
The ts#website generates these files. Let us examine some of the key files highlighted in the file tree:
Directorypackages/
Directorycommon/
Directoryconstructs/
Directorysrc/
Directoryapp/ app specific cdk constructs
Directorystatic-websites/
- game-ui.ts cdk construct to create your Game UI
Directorycore/
- static-website.ts generic static website construct
Directorygame-ui/
Directorypublic/
- …
Directorysrc/
Directorycomponents/
DirectoryAppLayout/
- index.tsx overall page layout using shadcn
SidebarProvider+ header
- index.tsx overall page layout using shadcn
- app-sidebar.tsx default shadcn sidebar with nav items
- alert.tsx, spinner.tsx shadcn-wrapped feedback primitives
Directoryroutes/ @tanstack/react-router file based routes
- index.tsx root ’/’ page
- __root.tsx all pages use this component as a base
- config.ts
- main.tsx React entrypoint
- routeTree.gen.ts this is automatically updated by @tanstack/react-router
- styles.css imports shared shadcn globals (Tailwind v4)
- index.html
- project.json
- vite.config.mts
- …
Directorycommon/
Directoryshadcn/ shared shadcn/ui library (theme tokens,
Button,Card,Input,Sidebar, …) imported by everyux=shadcnwebsite- src/components/ui/*
- src/styles/globals.css Tailwind + shadcn design tokens
- …
import * as url from 'url';import { Construct } from 'constructs';import { StaticWebsite } from '../../core/index.js';
export class GameUI extends StaticWebsite { constructor(scope: Construct, id: string) { super(scope, id, { websiteName: 'GameUI', websiteFilePath: url.fileURLToPath( new URL( '../../../../../../dist/packages/game-ui/bundle', import.meta.url, ), ), }); }}This is the CDK construct that defines our GameUI. It has already configured the file path to the generated bundle for our Vite based UI. This means that at build time, bundling occurs within the game-ui project’s build target and the output is used here.
import React from 'react';import { createRoot } from 'react-dom/client';import { RouterProvider, createRouter } from '@tanstack/react-router';import { routeTree } from './routeTree.gen';import './styles.css';
export type RouterProviderContext = {};
const router = createRouter({ routeTree, context: {} });
declare module '@tanstack/react-router' {  interface Register {    router: typeof router;  }}
const App = () => <RouterProvider router={router} context={{}} />;
const root = document.getElementById('root');root && createRoot(root).render( <React.StrictMode> <App /> </React.StrictMode>, );This is the entry point where React is mounted. Styling comes from Tailwind v4 tokens imported via styles.css. @tanstack/react-router is configured in file-based routing mode: as long as the dev server is running, any file you create under routes/ is picked up automatically and the route tree is regenerated. Later generators (auth, connection) will AST-patch this file to wrap <App /> in additional providers.
import { createFileRoute } from '@tanstack/react-router';
export const Route = createFileRoute('/')({  component: RouteComponent,});
function RouteComponent() { return ( <div className="text-center"> <header> <h1>Welcome</h1> <p>Welcome to your new React website!</p> </header> </div> );}A component will be rendered when navigating to the / route. @tanstack/react-router will manage the Route for you whenever you create/move this file (as long as the dev server is running).
Game UI: Auth
Section titled “Game UI: Auth”Let us configure our Game UI to require authenticated access via Amazon Cognito using these steps:
- Install the Nx Console VSCode Plugin if you haven't already
- Open the Nx Console in VSCode
- Click
Generate (UI)in the "Common Nx Commands" section - Search for
@aws/nx-plugin - ts#website#auth - Fill in the required parameters
- cognitoDomain: game-ui
- project: @dungeon-adventure/game-ui
- allowSignup: true
- Click
Generate
pnpm nx g @aws/nx-plugin:ts#website#auth --cognitoDomain=game-ui --project=@dungeon-adventure/game-ui --allowSignup=true --no-interactiveyarn nx g @aws/nx-plugin:ts#website#auth --cognitoDomain=game-ui --project=@dungeon-adventure/game-ui --allowSignup=true --no-interactivenpx nx g @aws/nx-plugin:ts#website#auth --cognitoDomain=game-ui --project=@dungeon-adventure/game-ui --allowSignup=true --no-interactivebunx nx g @aws/nx-plugin:ts#website#auth --cognitoDomain=game-ui --project=@dungeon-adventure/game-ui --allowSignup=true --no-interactiveYou can also perform a dry-run to see what files would be changed
pnpm nx g @aws/nx-plugin:ts#website#auth --cognitoDomain=game-ui --project=@dungeon-adventure/game-ui --allowSignup=true --no-interactive --dry-runyarn nx g @aws/nx-plugin:ts#website#auth --cognitoDomain=game-ui --project=@dungeon-adventure/game-ui --allowSignup=true --no-interactive --dry-runnpx nx g @aws/nx-plugin:ts#website#auth --cognitoDomain=game-ui --project=@dungeon-adventure/game-ui --allowSignup=true --no-interactive --dry-runbunx nx g @aws/nx-plugin:ts#website#auth --cognitoDomain=game-ui --project=@dungeon-adventure/game-ui --allowSignup=true --no-interactive --dry-runYou will see some new files appear/change in your file tree.
ts#website#auth updated files
The ts#website#auth generator updates/generates these files. Let us examine some of the key files highlighted in the file tree:
Directorypackages/
Directorycommon/
Directoryconstructs/
Directorysrc/
Directorycore/
- user-identity.ts cdk construct for creating user/identity pools
Directorygame-ui/
Directorysrc/
Directorycomponents/
DirectoryAppLayout/
- index.tsx adds the logged in user/logout to the header
DirectoryCognitoAuth/
- index.tsx manages logging into Cognito
DirectoryRuntimeConfig/
- index.tsx fetches the
runtime-config.jsonand provides it to children via context
- index.tsx fetches the
Directoryhooks/
- useRuntimeConfig.tsx
- main.tsx Updated to add Cognito
import { useAuth } from 'react-oidc-context';import CognitoAuth from './components/CognitoAuth';import { useRuntimeConfig } from './hooks/useRuntimeConfig';import RuntimeConfigProvider from './components/RuntimeConfig';import React from 'react';import { createRoot } from 'react-dom/client';import { RouterProvider, createRouter } from '@tanstack/react-router';import { routeTree } from './routeTree.gen';import './styles.css';export type RouterProviderContext = {};export type RouterProviderContext = { runtimeConfig?: ReturnType<typeof useRuntimeConfig>; auth?: ReturnType<typeof useAuth>;};const router = createRouter({ routeTree, context: {} });const router = createRouter({ routeTree, context: { runtimeConfig: undefined, auth: undefined },});// Register the router instance for type safetydeclare module '@tanstack/react-router' { interface Register { router: typeof router; }}const App = () => <RouterProvider router={router} context={{}} />;const App = () => { const auth = useAuth(); const runtimeConfig = useRuntimeConfig(); return <RouterProvider router={router} context={{ runtimeConfig, auth }} />;};const root = document.getElementById('root');root && createRoot(root).render( <React.StrictMode> <RuntimeConfigProvider> <CognitoAuth> <App /> </CognitoAuth> </RuntimeConfigProvider> </React.StrictMode>, );The RuntimeConfigProvider and CognitoAuth components have been added to the main.tsx file via an AST transform. This allows the CognitoAuth component to authenticate with Amazon Cognito by fetching the runtime-config.json which contains the required cognito connection configuration in order to make the backend calls to the correct destination.
Game UI: Connect to Game API
Section titled “Game UI: Connect to Game API”Let us configure our Game UI to connect to our previously created Game API.
- Install the Nx Console VSCode Plugin if you haven't already
- Open the Nx Console in VSCode
- Click
Generate (UI)in the "Common Nx Commands" section - Search for
@aws/nx-plugin - connection - Fill in the required parameters
- sourceProject: @dungeon-adventure/game-ui
- targetProject: @dungeon-adventure/game-api
- Click
Generate
pnpm nx g @aws/nx-plugin:connection --sourceProject=@dungeon-adventure/game-ui --targetProject=@dungeon-adventure/game-api --no-interactiveyarn nx g @aws/nx-plugin:connection --sourceProject=@dungeon-adventure/game-ui --targetProject=@dungeon-adventure/game-api --no-interactivenpx nx g @aws/nx-plugin:connection --sourceProject=@dungeon-adventure/game-ui --targetProject=@dungeon-adventure/game-api --no-interactivebunx nx g @aws/nx-plugin:connection --sourceProject=@dungeon-adventure/game-ui --targetProject=@dungeon-adventure/game-api --no-interactiveYou can also perform a dry-run to see what files would be changed
pnpm nx g @aws/nx-plugin:connection --sourceProject=@dungeon-adventure/game-ui --targetProject=@dungeon-adventure/game-api --no-interactive --dry-runyarn nx g @aws/nx-plugin:connection --sourceProject=@dungeon-adventure/game-ui --targetProject=@dungeon-adventure/game-api --no-interactive --dry-runnpx nx g @aws/nx-plugin:connection --sourceProject=@dungeon-adventure/game-ui --targetProject=@dungeon-adventure/game-api --no-interactive --dry-runbunx nx g @aws/nx-plugin:connection --sourceProject=@dungeon-adventure/game-ui --targetProject=@dungeon-adventure/game-api --no-interactive --dry-runYou will see some new files have appear/change in your file tree.
UI -> tRPC connection updated files
The connection generator generates/updates these files. Let us examine some of the key files highlighted in the file tree:
Directorypackages/
Directorygame-ui/
Directorysrc/
Directorycomponents/
- GameApiClientProvider.tsx sets up the GameAPI client
Directoryhooks/
- useGameApi.tsx hooks to call the GameApi
- main.tsx injects the trpc client providers
- package.json
import { useContext } from 'react';import { GameApiTRPCContext } from '../components/GameApiClientProvider';
export const useGameApi = () => {  const container = useContext(GameApiTRPCContext);  if (!container) {    throw new Error('useGameApi must be used within GameApiClientProvider');  }  return container.optionsProxy;};
export const useGameApiClient = () => { const container = useContext(GameApiTRPCContext); if (!container) { throw new Error( 'useGameApiClient must be used within GameApiClientProvider', ); } return container.client;};This hook provides access to the tRPC client for calling the GameApi. For examples on how to call tRPC APIs, refer to the using the tRPC hook guide.
import GameApiClientProvider from './components/GameApiClientProvider';import QueryClientProvider from './components/QueryClientProvider';import { useAuth } from 'react-oidc-context';import CognitoAuth from './components/CognitoAuth';import { useRuntimeConfig } from './hooks/useRuntimeConfig';import RuntimeConfigProvider from './components/RuntimeConfig';import React from 'react';import { createRoot } from 'react-dom/client';import { RouterProvider, createRouter } from '@tanstack/react-router';import { routeTree } from './routeTree.gen';import './styles.css';...const root = document.getElementById('root');root && createRoot(root).render( <React.StrictMode> <RuntimeConfigProvider> <CognitoAuth> <QueryClientProvider> <GameApiClientProvider> <App /> </GameApiClientProvider> </QueryClientProvider> </CognitoAuth> </RuntimeConfigProvider> </React.StrictMode>, );The main.tsx file has been updated via an AST transform to inject the tRPC providers.
Story Agent: Connect to Inventory MCP Server
Section titled “Story Agent: Connect to Inventory MCP Server”Let us connect our Story Agent to the Inventory MCP server so the agent can discover and invoke the MCP server’s tools.
- Install the Nx Console VSCode Plugin if you haven't already
- Open the Nx Console in VSCode
- Click
Generate (UI)in the "Common Nx Commands" section - Search for
@aws/nx-plugin - connection - Fill in the required parameters
- sourceProject: story
- targetProject: inventory
- Click
Generate
pnpm nx g @aws/nx-plugin:connection --sourceProject=story --targetProject=inventory --no-interactiveyarn nx g @aws/nx-plugin:connection --sourceProject=story --targetProject=inventory --no-interactivenpx nx g @aws/nx-plugin:connection --sourceProject=story --targetProject=inventory --no-interactivebunx nx g @aws/nx-plugin:connection --sourceProject=story --targetProject=inventory --no-interactiveYou can also perform a dry-run to see what files would be changed
pnpm nx g @aws/nx-plugin:connection --sourceProject=story --targetProject=inventory --no-interactive --dry-runyarn nx g @aws/nx-plugin:connection --sourceProject=story --targetProject=inventory --no-interactive --dry-runnpx nx g @aws/nx-plugin:connection --sourceProject=story --targetProject=inventory --no-interactive --dry-runbunx nx g @aws/nx-plugin:connection --sourceProject=story --targetProject=inventory --no-interactive --dry-runStory Agent -> Inventory MCP connection updated files
The connection generator generates/updates these files:
Directorypackages/
Directorycommon/
Directoryagent_connection/
Directorydungeon_adventure_agent_connection/
Directorycore/
- agentcore_endpoints.py Framework-agnostic ARN/URL resolution
- agentcore_mcp_transport.py Framework-agnostic MCP transport
- agentcore_mcp_client_strands.py Strands MCP client wrapping the transport
Directoryauth/ Framework-agnostic SigV4 / session-forwarding
httpx.Auth- …
Directoryapp/
- inventory_mcp_server_client_strands.py Strands client for connecting to the Inventory MCP server
- __init__.py Re-exports per-connection clients
Directorystory/
Directorydungeon_adventure_story/agent/
- agent.py Modified to import and use the MCP client
The generator:
- Creates a shared
agent_connectionPython project (if it doesn’t already exist) with the coreAgentCoreMCPClientStrands - Generates an
InventoryMcpServerClientStrandsclass that handles connecting to the MCP server both locally (direct HTTP) and when deployed (via AgentCore with IAM auth) - Transforms
agent.pyto import the client, create an instance, and wire the MCP server’s tools into the agent - Adds the
agent_connectionproject as a workspace dependency of the story project - Updates the
devtarget to automatically start the MCP server when running locally
For more details, refer to the Python Agent to MCP connection guide.
Game UI: Connect to Story Agent
Section titled “Game UI: Connect to Story Agent”Let us connect our Game UI to the Story Agent. Since the agent speaks AG-UI, the connection generator wires up CopilotKit: a themed chat component and an @ag-ui/client HttpAgent ready to render.
- Install the Nx Console VSCode Plugin if you haven't already
- Open the Nx Console in VSCode
- Click
Generate (UI)in the "Common Nx Commands" section - Search for
@aws/nx-plugin - connection - Fill in the required parameters
- sourceProject: @dungeon-adventure/game-ui
- targetProject: story
- Click
Generate
pnpm nx g @aws/nx-plugin:connection --sourceProject=@dungeon-adventure/game-ui --targetProject=story --no-interactiveyarn nx g @aws/nx-plugin:connection --sourceProject=@dungeon-adventure/game-ui --targetProject=story --no-interactivenpx nx g @aws/nx-plugin:connection --sourceProject=@dungeon-adventure/game-ui --targetProject=story --no-interactivebunx nx g @aws/nx-plugin:connection --sourceProject=@dungeon-adventure/game-ui --targetProject=story --no-interactiveYou can also perform a dry-run to see what files would be changed
pnpm nx g @aws/nx-plugin:connection --sourceProject=@dungeon-adventure/game-ui --targetProject=story --no-interactive --dry-runyarn nx g @aws/nx-plugin:connection --sourceProject=@dungeon-adventure/game-ui --targetProject=story --no-interactive --dry-runnpx nx g @aws/nx-plugin:connection --sourceProject=@dungeon-adventure/game-ui --targetProject=story --no-interactive --dry-runbunx nx g @aws/nx-plugin:connection --sourceProject=@dungeon-adventure/game-ui --targetProject=story --no-interactive --dry-runUI -> Story Agent connection updated files
The connection generator generates/updates these files:
Directorypackages/
Directorygame-ui/
Directorysrc/
Directorycomponents/
- AguiProvider.tsx
CopilotKitProviderwith every connected AG-UI agent registered Directorycopilot/
- index.tsx Shadcn-themed
CopilotChat/CopilotSidebar/CopilotPopup - ShadcnAssistantMessage.tsx, ShadcnUserMessage.tsx, ShadcnChatInput.tsx, ShadcnCursor.tsx, copilot.css
- index.tsx Shadcn-themed
- AguiProvider.tsx
Directoryhooks/
- useAguiStoryAgent.tsx Builds an
HttpAgent, injects the Cognito bearer token, and padsthreadIdto AgentCore’s 33-char session id
- useAguiStoryAgent.tsx Builds an
- main.tsx Wraps
<App />in<AguiProvider>
The generator:
- Detects the React website’s
ux(Shadcn here) and vends matching chat components. - Registers every connected agent on a single
CopilotKitProvider— re-running for another agent just adds another hook. - Reads the agent’s runtime ARN from Runtime Configuration, builds the AgentCore invocation URL, and attaches the Cognito bearer token plus the AgentCore session id header.
For more details, refer to the React to AG-UI connection guide.
Connect the Game API and Inventory MCP server to the database
Section titled “Connect the Game API and Inventory MCP server to the database”Both the Game API and the Inventory MCP server read and write our DynamoDB table, so let us connect them to the DungeonDb project. The connection generator detects that the target is a ts#dynamodb project and wires each source project’s dev target to start DynamoDB Local automatically.
- Install the Nx Console VSCode Plugin if you haven't already
- Open the Nx Console in VSCode
- Click
Generate (UI)in the "Common Nx Commands" section - Search for
@aws/nx-plugin - connection - Fill in the required parameters
- sourceProject: @dungeon-adventure/game-api
- targetProject: @dungeon-adventure/dungeon-db
- Click
Generate
pnpm nx g @aws/nx-plugin:connection --sourceProject=@dungeon-adventure/game-api --targetProject=@dungeon-adventure/dungeon-db --no-interactiveyarn nx g @aws/nx-plugin:connection --sourceProject=@dungeon-adventure/game-api --targetProject=@dungeon-adventure/dungeon-db --no-interactivenpx nx g @aws/nx-plugin:connection --sourceProject=@dungeon-adventure/game-api --targetProject=@dungeon-adventure/dungeon-db --no-interactivebunx nx g @aws/nx-plugin:connection --sourceProject=@dungeon-adventure/game-api --targetProject=@dungeon-adventure/dungeon-db --no-interactiveYou can also perform a dry-run to see what files would be changed
pnpm nx g @aws/nx-plugin:connection --sourceProject=@dungeon-adventure/game-api --targetProject=@dungeon-adventure/dungeon-db --no-interactive --dry-runyarn nx g @aws/nx-plugin:connection --sourceProject=@dungeon-adventure/game-api --targetProject=@dungeon-adventure/dungeon-db --no-interactive --dry-runnpx nx g @aws/nx-plugin:connection --sourceProject=@dungeon-adventure/game-api --targetProject=@dungeon-adventure/dungeon-db --no-interactive --dry-runbunx nx g @aws/nx-plugin:connection --sourceProject=@dungeon-adventure/game-api --targetProject=@dungeon-adventure/dungeon-db --no-interactive --dry-run- Install the Nx Console VSCode Plugin if you haven't already
- Open the Nx Console in VSCode
- Click
Generate (UI)in the "Common Nx Commands" section - Search for
@aws/nx-plugin - connection - Fill in the required parameters
- sourceProject: @dungeon-adventure/inventory
- targetProject: @dungeon-adventure/dungeon-db
- Click
Generate
pnpm nx g @aws/nx-plugin:connection --sourceProject=@dungeon-adventure/inventory --targetProject=@dungeon-adventure/dungeon-db --no-interactiveyarn nx g @aws/nx-plugin:connection --sourceProject=@dungeon-adventure/inventory --targetProject=@dungeon-adventure/dungeon-db --no-interactivenpx nx g @aws/nx-plugin:connection --sourceProject=@dungeon-adventure/inventory --targetProject=@dungeon-adventure/dungeon-db --no-interactivebunx nx g @aws/nx-plugin:connection --sourceProject=@dungeon-adventure/inventory --targetProject=@dungeon-adventure/dungeon-db --no-interactiveYou can also perform a dry-run to see what files would be changed
pnpm nx g @aws/nx-plugin:connection --sourceProject=@dungeon-adventure/inventory --targetProject=@dungeon-adventure/dungeon-db --no-interactive --dry-runyarn nx g @aws/nx-plugin:connection --sourceProject=@dungeon-adventure/inventory --targetProject=@dungeon-adventure/dungeon-db --no-interactive --dry-runnpx nx g @aws/nx-plugin:connection --sourceProject=@dungeon-adventure/inventory --targetProject=@dungeon-adventure/dungeon-db --no-interactive --dry-runbunx nx g @aws/nx-plugin:connection --sourceProject=@dungeon-adventure/inventory --targetProject=@dungeon-adventure/dungeon-db --no-interactive --dry-runGame UI: Infrastructure
Section titled “Game UI: Infrastructure”Let us create the final sub-project for the CDK infrastructure.
- Install the Nx Console VSCode Plugin if you haven't already
- Open the Nx Console in VSCode
- Click
Generate (UI)in the "Common Nx Commands" section - Search for
@aws/nx-plugin - ts#infra - Fill in the required parameters
- name: infra
- Click
Generate
pnpm nx g @aws/nx-plugin:ts#infra --name=infra --no-interactiveyarn nx g @aws/nx-plugin:ts#infra --name=infra --no-interactivenpx nx g @aws/nx-plugin:ts#infra --name=infra --no-interactivebunx nx g @aws/nx-plugin:ts#infra --name=infra --no-interactiveYou can also perform a dry-run to see what files would be changed
pnpm nx g @aws/nx-plugin:ts#infra --name=infra --no-interactive --dry-runyarn nx g @aws/nx-plugin:ts#infra --name=infra --no-interactive --dry-runnpx nx g @aws/nx-plugin:ts#infra --name=infra --no-interactive --dry-runbunx nx g @aws/nx-plugin:ts#infra --name=infra --no-interactive --dry-runYou will see some new files have appear/change in your file tree.
ts#infra updated files
The ts#infra generator generates/updates these. Let us examine some of the key files highlighted in the file tree:
Directorypackages/
Directorycommon/
Directoryconstructs/
Directorysrc/
Directorycore/
- checkov.ts
- index.ts
Directoryinfra
Directorysrc/
Directorystages/
- application-stage.ts cdk stacks defined here
Directorystacks/
- application-stack.ts cdk resources defined here
- main.ts entrypoint which defines all stages
- cdk.json
- checkov.yml
- project.json
- …
- package.json
- tsconfig.json add references
- tsconfig.base.json add alias
import { ApplicationStage } from './stages/application-stage.js';import { App } from '@dungeon-adventure/common-constructs';
const app = new App();
// Use this to deploy your own sandbox environment (assumes your CLI credentials)new ApplicationStage(app, 'dungeon-adventure-infra-sandbox', {  env: {    account: process.env.CDK_DEFAULT_ACCOUNT,    region: process.env.CDK_DEFAULT_REGION,  },});
app.synth();This is the entry point for your CDK application.
import { Stack, StackProps } from 'aws-cdk-lib';import { Construct } from 'constructs';
export class ApplicationStack extends Stack {  constructor(scope: Construct, id: string, props?: StackProps) {    super(scope, id, props);
// The code that defines your stack goes here }}Let us instantiate our CDK constructs to build our dungeon adventure game.
Task 7: Update our infrastructure
Section titled “Task 7: Update our infrastructure”Let’s update packages/infra/src/stacks/application-stack.ts to instantiate some of our generated constructs:
import {  GameApi,  GameUI,  InventoryMcpServer,  StoryAgent,  UserIdentity,} from '@dungeon-adventure/common-constructs';import { Stack, StackProps, CfnOutput } from 'aws-cdk-lib';import { Construct } from 'constructs';export class ApplicationStack extends Stack {  constructor(scope: Construct, id: string, props?: StackProps) {    super(scope, id, props);
    const userIdentity = new UserIdentity(this, 'UserIdentity');
    const gameApi = new GameApi(this, 'GameApi', {      integrations: GameApi.defaultIntegrations(this).build(),    });
    const mcpServer = new InventoryMcpServer(this, 'InventoryMcpServer');
    // Use Cognito for user authentication with the agent    const storyAgent = new StoryAgent(this, 'StoryAgent', {      identity: userIdentity,    });
    new CfnOutput(this, 'StoryAgentArn', {      value: storyAgent.agentCoreRuntime.agentRuntimeArn,    });    new CfnOutput(this, 'InventoryMcpArn', {      value: mcpServer.agentCoreRuntime.agentRuntimeArn,    });
    // Grant the agent permissions to invoke our mcp server    mcpServer.grantInvokeAccess(storyAgent);
    // Grant the authenticated role access to invoke the api    gameApi.grantInvokeAccess(userIdentity.identityPool.authenticatedRole);
    new GameUI(this, 'GameUI');  }}
import { Stack, StackProps } from 'aws-cdk-lib';import { GameApi, GameUI, InventoryMcpServer, StoryAgent, UserIdentity,} from '@dungeon-adventure/common-constructs';import { Stack, StackProps, CfnOutput } from 'aws-cdk-lib';import { Construct } from 'constructs';
export class ApplicationStack extends Stack { constructor(scope: Construct, id: string, props?: StackProps) { super(scope, id, props);
// The code that defines your stack goes here const userIdentity = new UserIdentity(this, 'UserIdentity');
const gameApi = new GameApi(this, 'GameApi', { integrations: GameApi.defaultIntegrations(this).build(), });
const mcpServer = new InventoryMcpServer(this, 'InventoryMcpServer');
// Use Cognito for user authentication with the agent const storyAgent = new StoryAgent(this, 'StoryAgent', { identity: userIdentity, });
new CfnOutput(this, 'StoryAgentArn', { value: storyAgent.agentCoreRuntime.agentRuntimeArn, }); new CfnOutput(this, 'InventoryMcpArn', { value: mcpServer.agentCoreRuntime.agentRuntimeArn, });
// Grant the agent permissions to invoke our mcp server mcpServer.grantInvokeAccess(storyAgent);
// Grant the authenticated role access to invoke the api gameApi.grantInvokeAccess(userIdentity.identityPool.authenticatedRole);
new GameUI(this, 'GameUI'); }}Task 8: Build the code
Section titled “Task 8: Build the code”Nx commands
Single vs Multiple targets
Section titled “Single vs Multiple targets”The run-many command will run a target on multiple listed subprojects (--all will target them all). This ensures dependencies are executed in the correct order.
You can also trigger a build (or any other task) for a single project target by running the target on the project directly. For example, to build the @dungeon-adventure/infra project, run the following command:
pnpm nx build infrayarn nx build infranpx nx build infrabunx nx build infraYou can also omit the scope, and use the Nx shorthand syntax if you prefer:
pnpm nx build infrayarn nx build infranpx nx build infrabunx nx build infraVisualizing your dependencies
Section titled “Visualizing your dependencies”To visualize your dependencies, run:
pnpm nx graphyarn nx graphnpx nx graphbunx nx graph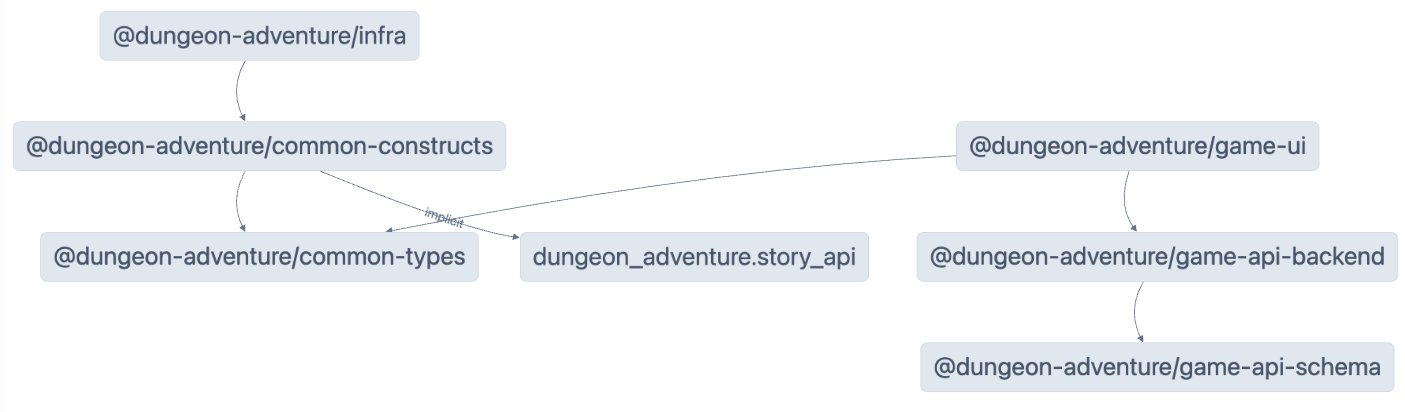
Caching
Section titled “Caching”Nx relies on caching so that you can re-use artifacts from previous builds in order to speed up development. There is some configuration required to get this to work correctly and there may be cases where you want to perform a build without using the cache. To do that, simply append the --skip-nx-cache argument to your command. For example:
pnpm nx build infra --skip-nx-cacheyarn nx build infra --skip-nx-cachenpx nx build infra --skip-nx-cachebunx nx build infra --skip-nx-cacheIf for whatever reason you ever wanted to clear your cache (stored in the .nx folder), you can run the following command:
pnpm nx resetyarn nx resetnpx nx resetbunx nx resetUsing the command line, run the following command to fix any lint issues first:
pnpm lintyarn lintnpm run lintbun lintThen, run the following command for a full build:
pnpm buildyarn buildnpm run buildbun buildYou will be prompted with the following:
 NX   The workspace is out of sync
[@nx/js:typescript-sync]: Some TypeScript configuration files are missing project references to the projects they depend on or contain outdated project references.
This will result in an error in CI.
? Would you like to sync the identified changes to get your workspace up to date? …Yes, sync the changes and run the tasksNo, run the tasks without syncing the changes
This message indicates that NX has detected some files which can be updated automatically for you. In this case, it is referring to the tsconfig.json files which do not have Typescript references set up on references projects.
Select the Yes, sync the changes and run the tasks option to proceed. You should notice all of you IDE related import errors get automatically resolved as the sync generator will add the missing typescript references automatically!
All built artifacts are now available within the dist/ folder located at the root of the monorepo. This is a standard pactice when using projects generated by the @aws/nx-plugin as it does not pollute your file-tree with generated files. In the event you want to clean your files, delete the dist/ folder without worrying about build artifacts being littered throughout the file tree.
Congratulations! You’ve created all of the required sub-projects required to start implementing the core of our AI Dungeon Adventure game. 🎉🎉🎉