

Construir la UI
Tarea 1: Ejecutar todo localmente
Sección titulada «Tarea 1: Ejecutar todo localmente»Inicia el stack local completo — el servidor de desarrollo game-ui junto con una Game API local y un Story Agent AG-UI local (que a su vez arranca el servidor MCP de Inventario) — con un solo comando:
pnpm nx dev game-uiyarn nx dev game-uinpx nx dev game-uibunx nx dev game-uiEl target dev en game-ui tiene dependsOn en game-api:dev y dungeon_adventure.story:agent-dev, por lo que Nx inicia el servidor local de cada proyecto en paralelo. A través de las conexiones que configuramos en el Módulo 1, estos a su vez arrancan el servidor MCP de Inventario y DynamoDB Local. Asegúrate de que tu motor de contenedores esté en ejecución, luego abre el servidor de desarrollo en un navegador.
Tarea 2: Dónde CopilotKit ya está conectado
Sección titulada «Tarea 2: Dónde CopilotKit ya está conectado»Cuando ejecutaste el generador connection para game-ui → story en el Módulo 1, la integración AG-UI del sitio web Shadcn se generó para ti. Vale la pena echarle un vistazo rápido:
Directoriopackages/game-ui/src/
Directoriocomponents/
- AguiProvider.tsx Single
CopilotKitProviderregistered with every AG-UI agent. Directoriocopilot/
- index.tsx Re-exports themed
CopilotChat/CopilotSidebar/CopilotPopup. - ShadcnAssistantMessage.tsx, ShadcnUserMessage.tsx, ShadcnChatInput.tsx, ShadcnCursor.tsx, copilot.css
- index.tsx Re-exports themed
- AguiProvider.tsx Single
Directoriohooks/
- useAguiStoryAgent.tsx Instantiates an
@ag-ui/clientHttpAgentpointing at the deployed Story Agent and padsthreadIdto AgentCore’s 33-character minimum session id.
- useAguiStoryAgent.tsx Instantiates an
- main.tsx Wraps
<App />in<AguiProvider>
Todo lo que necesitamos hacer es colocar un <CopilotChat agentId="agent" threadId={...} /> en una ruta. Para más detalles sobre cómo se ensambla la integración, consulta la guía de conexión React → AG-UI.
Tarea 3: Rediseñar para la mazmorra
Sección titulada «Tarea 3: Rediseñar para la mazmorra»Reemplaza packages/game-ui/src/styles.css — este es el único archivo que cambiamos para el estilo. Importa los estilos globales compartidos de Shadcn, sobrescribe la paleta a un tema de mazmorra iluminada por antorchas, y hace que CopilotKit herede esos colores:
@import '../../common/shadcn/src/styles/globals.css';@source './**/*.{ts,tsx}';
/* Dungeon theme — torch-lit parchment on stone. Applied to `:root` for the * page and to `[data-copilotkit][data-copilotkit]` for CopilotKit's chat * surface; CopilotKit ships a same-specificity `[data-copilotkit]` rule that * resets `--background` back to white, so we bump specificity with the * doubled selector. */:root,[data-copilotkit][data-copilotkit] {  --background: oklch(0.18 0.02 60);  --foreground: oklch(0.92 0.04 85);  --card: oklch(0.22 0.03 60);  --card-foreground: oklch(0.92 0.04 85);  --popover: oklch(0.2 0.02 60);  --popover-foreground: oklch(0.92 0.04 85);  --primary: oklch(0.75 0.15 75);  --primary-foreground: oklch(0.15 0.02 60);  --secondary: oklch(0.28 0.04 60);  --secondary-foreground: oklch(0.92 0.04 85);  --muted: oklch(0.25 0.02 60);  --muted-foreground: oklch(0.7 0.04 85);  --accent: oklch(0.4 0.12 30);  --accent-foreground: oklch(0.95 0.04 85);  --destructive: oklch(0.55 0.22 25);  --border: oklch(0.35 0.03 60);  --input: oklch(0.3 0.03 60);  --ring: oklch(0.75 0.15 75);  --sidebar: oklch(0.15 0.02 60);  --sidebar-foreground: oklch(0.88 0.04 85);  --sidebar-primary: oklch(0.75 0.15 75);  --sidebar-primary-foreground: oklch(0.15 0.02 60);  --sidebar-accent: oklch(0.28 0.04 60);  --sidebar-accent-foreground: oklch(0.92 0.04 85);  --sidebar-border: oklch(0.3 0.03 60);  --sidebar-ring: oklch(0.75 0.15 75);}
body {  font-family: 'Georgia', 'Cambria', serif;  background:    radial-gradient(circle at 20% 10%, oklch(0.25 0.05 70 / 0.4), transparent 40%),    radial-gradient(circle at 80% 90%, oklch(0.25 0.1 30 / 0.3), transparent 40%),    var(--background);}
h1, h2, h3 {  letter-spacing: 0.05em;}
Tarea 4: Crear las rutas del juego
Sección titulada «Tarea 4: Crear las rutas del juego»Necesitamos dos rutas — una para elegir un héroe, otra para jugar. Ambas usan componentes de shadcn y el chat de CopilotKit; no hay una interfaz de chat hecha a mano.
import { useInfiniteQuery, useMutation } from '@tanstack/react-query';import { createFileRoute, useNavigate } from '@tanstack/react-router';import { useEffect, useMemo, useRef, useState } from 'react';import { Button } from ':dungeon-adventure/common-shadcn/components/ui/button';import { Input } from ':dungeon-adventure/common-shadcn/components/ui/input';import { Card, CardContent,} from ':dungeon-adventure/common-shadcn/components/ui/card';import { Spinner } from ':dungeon-adventure/common-shadcn/components/ui/spinner';import { useGameApi } from '../hooks/useGameApi';import type { IGame } from ':dungeon-adventure/game-api';
const GENRES = ['medieval', 'zombie', 'superhero'] as const;
export const Route = createFileRoute('/')({ component: RouteComponent });
function RouteComponent() { const [playerName, setPlayerName] = useState(''); const [pending, setPending] = useState<IGame['genre'] | null>(null); const navigate = useNavigate(); const gameApi = useGameApi(); const saveGame = useMutation(gameApi.games.save.mutationOptions()); const games = useInfiniteQuery( gameApi.games.query.infiniteQueryOptions( { limit: 10 }, { getNextPageParam: ({ cursor }) => cursor ?? undefined }, ), ); const savedGames = useMemo( () => games.data?.pages.flatMap((p) => p.items) ?? [], [games.data], );
// Auto-fetch subsequent pages when the sentinel at the bottom of the list // scrolls into view — keeps the homepage a simple infinite scroll without // a "Load more" button. const sentinel = useRef<HTMLDivElement | null>(null); useEffect(() => { const el = sentinel.current; if (!el || !games.hasNextPage) return; const io = new IntersectionObserver( (entries) => { if ( entries.some((e) => e.isIntersecting) && !games.isFetchingNextPage ) { void games.fetchNextPage(); } }, { rootMargin: '120px' }, ); io.observe(el); return () => io.disconnect(); }, [games.hasNextPage, games.isFetchingNextPage, games.fetchNextPage]);
const startGame = async (player: string, genre: IGame['genre']) => { if (!player.trim()) return; setPending(genre); try { if (!savedGames.find((g) => g.playerName === player)) { await saveGame.mutateAsync({ playerName: player, genre }); } await navigate({ to: '/game/$playerName', params: { playerName: player }, search: { genre }, }); } finally { setPending(null); } };
const busy = pending !== null; const firstLoad = games.isLoading;
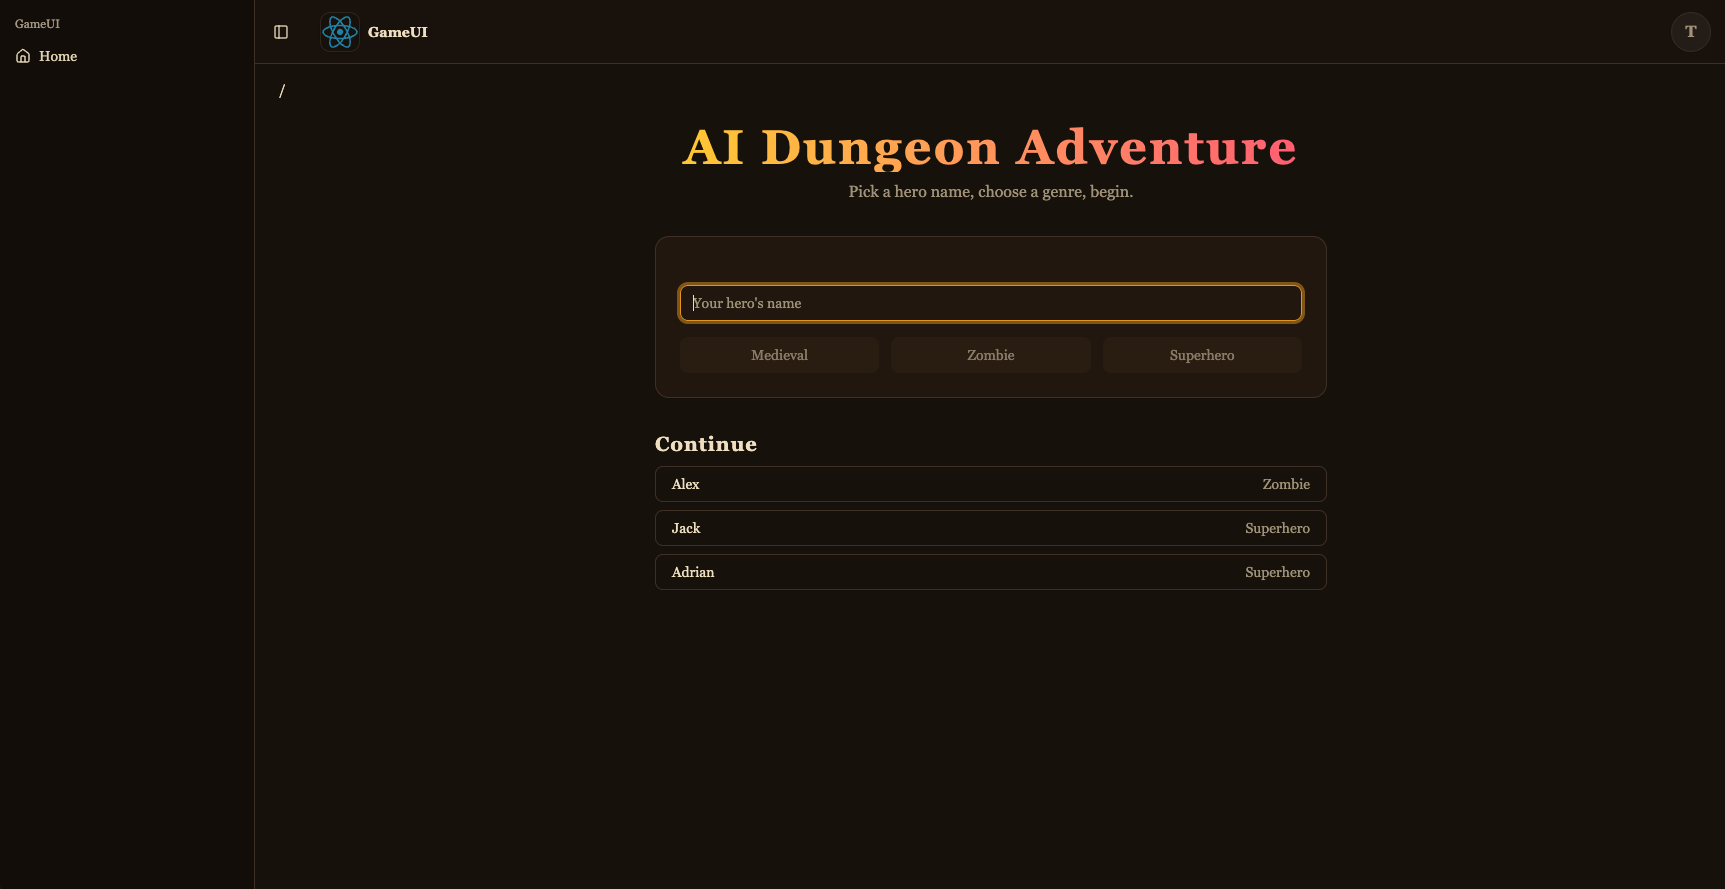
return ( <div className="mx-auto flex w-full max-w-2xl flex-col gap-8"> <div className="text-center"> <h1 className="bg-gradient-to-r from-amber-300 to-rose-400 bg-clip-text text-5xl font-bold text-transparent"> AI Dungeon Adventure </h1> <p className="text-muted-foreground mt-2"> Pick a hero name, choose a genre, begin. </p> </div>
<Card> <CardContent className="flex flex-col gap-4 pt-6"> <Input placeholder="Your hero's name" value={playerName} disabled={busy} onChange={(e) => setPlayerName(e.target.value)} /> <div className="grid grid-cols-3 gap-3"> {GENRES.map((genre) => ( <Button key={genre} variant="secondary" disabled={!playerName.trim() || busy} onClick={() => startGame(playerName, genre)} > {pending === genre && <Spinner />} {genre[0].toUpperCase() + genre.slice(1)} </Button> ))} </div> </CardContent> </Card>
<div className="flex flex-col gap-2"> <h2 className="flex items-center gap-2 text-xl font-semibold"> Continue {(firstLoad || games.isFetching) && <Spinner className="size-4" />} </h2> {!firstLoad && savedGames.length === 0 && ( <p className="text-muted-foreground text-sm"> No saved games yet — start a new adventure above. </p> )} {savedGames.map((g) => ( <Button key={g.playerName} variant="outline" className="justify-between" disabled={busy} onClick={() => startGame(g.playerName, g.genre)} > <span>{g.playerName}</span> <span className="text-muted-foreground text-sm"> {g.genre[0].toUpperCase() + g.genre.slice(1)} </span> </Button> ))} <div ref={sentinel} aria-hidden className="h-1" /> {games.isFetchingNextPage && ( <div className="flex justify-center py-2"> <Spinner /> </div> )} </div> </div> );}import { createFileRoute } from '@tanstack/react-router';import { useInfiniteQuery, useMutation } from '@tanstack/react-query';import { createFileRoute, useNavigate } from '@tanstack/react-router';import { useEffect, useMemo, useRef, useState } from 'react';import { Button } from ':dungeon-adventure/common-shadcn/components/ui/button';import { Input } from ':dungeon-adventure/common-shadcn/components/ui/input';import { Card, CardContent,} from ':dungeon-adventure/common-shadcn/components/ui/card';import { Spinner } from ':dungeon-adventure/common-shadcn/components/ui/spinner';import { useGameApi } from '../hooks/useGameApi';import type { IGame } from ':dungeon-adventure/game-api';
export const Route = createFileRoute('/')({ component: RouteComponent,});const GENRES = ['medieval', 'zombie', 'superhero'] as const;
export const Route = createFileRoute('/')({ component: RouteComponent });
function RouteComponent() { const [playerName, setPlayerName] = useState(''); const [pending, setPending] = useState<IGame['genre'] | null>(null); const navigate = useNavigate(); const gameApi = useGameApi(); const saveGame = useMutation(gameApi.games.save.mutationOptions()); const games = useInfiniteQuery( gameApi.games.query.infiniteQueryOptions( { limit: 10 }, { getNextPageParam: ({ cursor }) => cursor ?? undefined }, ), ); const savedGames = useMemo( () => games.data?.pages.flatMap((p) => p.items) ?? [], [games.data], );
// Auto-fetch subsequent pages when the sentinel at the bottom of the list // scrolls into view — keeps the homepage a simple infinite scroll without // a "Load more" button. const sentinel = useRef<HTMLDivElement | null>(null); useEffect(() => { const el = sentinel.current; if (!el || !games.hasNextPage) return; const io = new IntersectionObserver( (entries) => { if ( entries.some((e) => e.isIntersecting) && !games.isFetchingNextPage ) { void games.fetchNextPage(); } }, { rootMargin: '120px' }, ); io.observe(el); return () => io.disconnect(); }, [games.hasNextPage, games.isFetchingNextPage, games.fetchNextPage]);
const startGame = async (player: string, genre: IGame['genre']) => { if (!player.trim()) return; setPending(genre); try { if (!savedGames.find((g) => g.playerName === player)) { await saveGame.mutateAsync({ playerName: player, genre }); } await navigate({ to: '/game/$playerName', params: { playerName: player }, search: { genre }, }); } finally { setPending(null); } };
const busy = pending !== null; const firstLoad = games.isLoading;
return ( <div className="text-center"> <header> <h1>Welcome</h1> <p>Welcome to your new React website!</p> </header> <div className="mx-auto flex w-full max-w-2xl flex-col gap-8"> <div className="text-center"> <h1 className="bg-gradient-to-r from-amber-300 to-rose-400 bg-clip-text text-5xl font-bold text-transparent"> AI Dungeon Adventure </h1> <p className="text-muted-foreground mt-2"> Pick a hero name, choose a genre, begin. </p> </div>
<Card> <CardContent className="flex flex-col gap-4 pt-6"> <Input placeholder="Your hero's name" value={playerName} disabled={busy} onChange={(e) => setPlayerName(e.target.value)} /> <div className="grid grid-cols-3 gap-3"> {GENRES.map((genre) => ( <Button key={genre} variant="secondary" disabled={!playerName.trim() || busy} onClick={() => startGame(playerName, genre)} > {pending === genre && <Spinner />} {genre[0].toUpperCase() + genre.slice(1)} </Button> ))} </div> </CardContent> </Card>
<div className="flex flex-col gap-2"> <h2 className="flex items-center gap-2 text-xl font-semibold"> Continue {(firstLoad || games.isFetching) && <Spinner className="size-4" />} </h2> {!firstLoad && savedGames.length === 0 && ( <p className="text-muted-foreground text-sm"> No saved games yet — start a new adventure above. </p> )} {savedGames.map((g) => ( <Button key={g.playerName} variant="outline" className="justify-between" disabled={busy} onClick={() => startGame(g.playerName, g.genre)} > <span>{g.playerName}</span> <span className="text-muted-foreground text-sm"> {g.genre[0].toUpperCase() + g.genre.slice(1)} </span> </Button> ))} <div ref={sentinel} aria-hidden className="h-1" /> {games.isFetchingNextPage && ( <div className="flex justify-center py-2"> <Spinner /> </div> )} </div> </div> );}Este es el selector de juego: formulario de nuevo juego (shadcn Input + Button + Card) más una lista de “Continuar” alimentada por useGameApi().games.query con useInfiniteQuery — un <div> centinela inferior observado por un IntersectionObserver llama automáticamente a fetchNextPage() cuando se desplaza a la vista, y los spinners junto al encabezado y debajo de la lista muestran el estado de carga. Iniciar un juego guarda con saveGame el par (playerName, genre) (para que aparezca la próxima vez) y navega a la ruta de juego.
import { UseAgentUpdate, useAgent } from '@copilotkit/react-core/v2';import { useQuery } from '@tanstack/react-query';import { createFileRoute } from '@tanstack/react-router';import { useEffect, useMemo, useRef } from 'react';import { CopilotChat } from '../../components/copilot';import { useGameApi } from '../../hooks/useGameApi';import type { IGame } from ':dungeon-adventure/game-api';
// AgentCore session ids must be at least 33 characters. The AG-UI hook pads// the threadId to this length before sending, so the thread id is stable for// a given (player, genre) pair — revisiting the URL continues the same story.const buildThreadId = (playerName: string, genre: string) => `${playerName}-${genre}`.padEnd(33, '0');
export const Route = createFileRoute('/game/$playerName')({ component: RouteComponent, validateSearch: (search: Record<string, unknown>) => ({ genre: search.genre as IGame['genre'], }),});
function RouteComponent() { const { playerName } = Route.useParams(); const { genre } = Route.useSearch(); const threadId = useMemo( () => buildThreadId(playerName, genre), [playerName, genre], );
const gameApi = useGameApi(); const inventory = useQuery( gameApi.inventory.query.queryOptions({ playerName, limit: 100 }), ); // Conversation history persisted by the agent's ``S3SessionManager``. Each // turn is stored as ``session_<threadId>/agents/agent_default/messages/…``. // // `staleTime: 0` + `refetchOnMount: 'always'` together force a fresh read // on every visit — the cached snapshot from the *first* time we loaded // this route (before the agent had written any turns back to S3) would // otherwise look like an empty thread on revisit and trigger re-priming. const pastActions = useQuery({ ...gameApi.actions.query.queryOptions({ sessionId: threadId }), staleTime: 0, refetchOnMount: 'always', });
const { agent } = useAgent({ agentId: 'agent', updates: [UseAgentUpdate.OnMessagesChanged], });
// Hydrate the chat once the history query resolves. For a fresh thread // (no stored messages) the agent's system prompt expects the player's // name and genre in the first user message, so send that priming line. // // We wait for `isFetching` to go false (rather than just `isLoading`) so // that revisits with a cached empty result from the first visit aren't // mistaken for a fresh thread — the background refetch is what sees the // turns the agent wrote since. const primedRef = useRef(false); useEffect(() => { if (!agent || primedRef.current) return; if (pastActions.isFetching || !pastActions.isSuccess) return; primedRef.current = true; const items = pastActions.data.items; if (items.length > 0) { agent.setMessages( items.map((a) => ({ id: `m-${a.messageId}`, role: a.role, content: a.content, })), ); return; } agent.addMessage({ id: crypto.randomUUID(), role: 'user', content: `My name is ${playerName}. Start my ${genre} adventure.`, }); void agent.runAgent(); }, [ agent, pastActions.data, pastActions.isFetching, pastActions.isSuccess, playerName, genre, ]);
// The agent's ``add-to-inventory`` tool calls mutate DynamoDB directly, so // the inventory query needs a nudge to refetch as turns complete. The // ``useAgent({ updates: [OnMessagesChanged] })`` subscription re-renders // this route on each message event — refetch whenever the message count // changes, which covers both the initial populate and every subsequent // turn. const seenMessages = useRef(0); useEffect(() => { if (!agent) return; if (agent.messages.length !== seenMessages.current) { seenMessages.current = agent.messages.length; void inventory.refetch(); } });
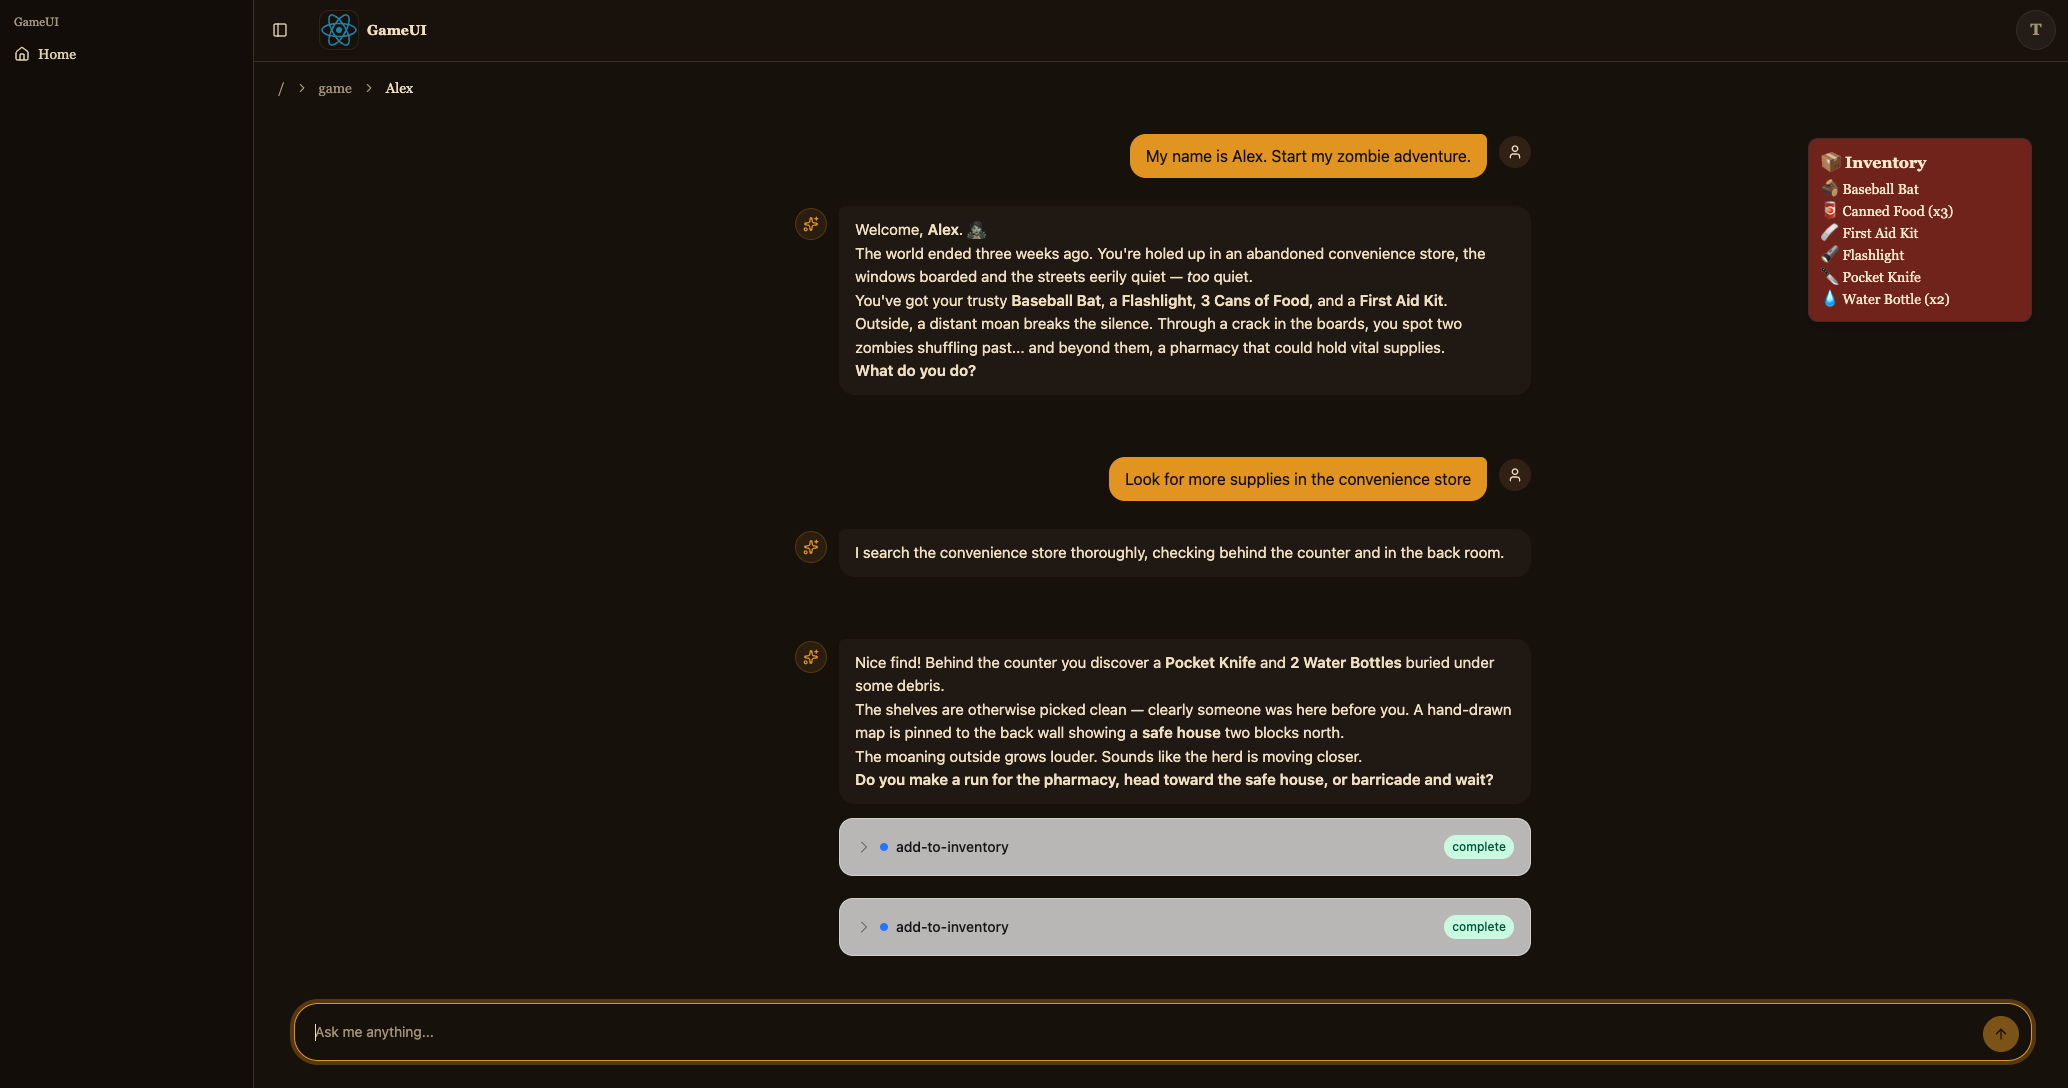
return ( <div className="relative flex h-[calc(100vh-10rem)] min-h-0 flex-col"> {!!inventory.data?.items.length && ( <aside className="bg-accent text-accent-foreground pointer-events-none absolute right-4 top-4 z-10 w-56 rounded-lg border p-3 shadow-lg"> <div className="mb-1 font-semibold">📦 Inventory</div> <ul className="flex flex-col gap-0.5 text-sm"> {inventory.data.items.map((item) => ( <li key={item.itemName}> {item.emoji ?? '•'} {item.itemName} {item.quantity > 1 ? ` (x${item.quantity})` : ''} </li> ))} </ul> </aside> )} <CopilotChat agentId="agent" threadId={threadId} labels={{ chatInputPlaceholder: 'What do you do?', welcomeMessageText: `${playerName}'s ${genre} adventure`, }} /> </div> );}Esta es la ruta de juego. Construye el threadId determinístico ({player}-{genre} rellenado a 33 caracteres — el hook AG-UI lo enviará tal cual como el id de sesión de AgentCore), renderiza <CopilotChat agentId="agent" threadId={threadId} />, y superpone el inventario de useGameApi().inventory.query encima. Al montarse, useGameApi().actions.query({ sessionId: threadId }) lee el historial de conversación que el agente ha almacenado en S3 y — si hay alguno — llama a agent.setMessages(...) para rehidratar el chat; de lo contrario, envía un mensaje de usuario de preparación para iniciar la historia. agent.messages está suscrito mediante useAgent({ updates: [OnMessagesChanged] }) por lo que cada nuevo turno también vuelve a obtener la consulta del inventario (las llamadas a herramientas MCP mutan DynamoDB directamente).
Una vez guardado, el servidor de desarrollo en http://localhost:4200/ ahora debería permitirte iniciar una aventura y chatear con el Agente de Historia.
Tarea 5: Desplegar a AWS
Sección titulada «Tarea 5: Desplegar a AWS»Tu juego está completo y has probado cada pieza localmente. Ahora vamos a desplegarlo a AWS para que puedas jugarlo desde cualquier lugar.
Compilar tu código
Sección titulada «Compilar tu código»pnpm buildyarn buildnpm run buildbun buildImplementar tu aplicación
Sección titulada «Implementar tu aplicación»pnpm nx deploy infra "dungeon-adventure-infra-sandbox/*"yarn nx deploy infra "dungeon-adventure-infra-sandbox/*"npx nx deploy infra "dungeon-adventure-infra-sandbox/*"bunx nx deploy infra "dungeon-adventure-infra-sandbox/*"Tu primer despliegue tomará alrededor de 6 minutos en completarse ya que espera a que todos los recursos se estabilicen completamente. Los despliegues posteriores son más rápidos. Para acelerar la iteración durante el desarrollo, puedes optar por el modo express de CloudFormation pasando la bandera --express, que completa cada operación de recurso tan pronto como se aplica su configuración en lugar de esperar la estabilización completa.
Una vez que el despliegue se complete, verás salidas similares a las siguientes:
dungeon-adventure-infra-sandbox-Applicationdungeon-adventure-infra-sandbox-Application: deploying... [2/2]
 ✅  dungeon-adventure-infra-sandbox-Application
✨  Deployment time: 354s
Outputs:dungeon-adventure-infra-sandbox-Application.GameApiEndpointXXX = https://xxx.execute-api.region.amazonaws.com/prod/dungeon-adventure-infra-sandbox-Application.GameUIDistributionDomainNameXXX = xxx.cloudfront.netdungeon-adventure-infra-sandbox-Application.InventoryMcpArn = arn:aws:bedrock-agentcore:region:xxxxxxx:runtime/dungeonadventureventoryMcpServerXXXX-YYYYdungeon-adventure-infra-sandbox-Application.RuntimeConfigApplicationId = xxxxdungeon-adventure-infra-sandbox-Application.StoryAgentArn = arn:aws:bedrock-agentcore:region:xxxxxxx:runtime/dungeonadventurecationStoryAgentXXXX-YYYYdungeon-adventure-infra-sandbox-Application.UserIdentityUserIdentityIdentityPoolIdXXX = region:xxxdungeon-adventure-infra-sandbox-Application.UserIdentityUserIdentityUserPoolClientIdXXX = xxxxxxxxxxdungeon-adventure-infra-sandbox-Application.UserIdentityUserIdentityUserPoolIdXXX = region_xxx
Navega a tu URL de CloudFront (GameUIDistributionDomainName de las salidas de CDK), regístrate para una nueva cuenta, ¡y juega tu juego ejecutándose completamente en AWS!
Tarea 6: Mezclar componentes locales y desplegados
Sección titulada «Tarea 6: Mezclar componentes locales y desplegados»Has visto dos extremos del espectro: todo local (serve-local) y todo desplegado. Durante el desarrollo diario a menudo es útil mezclar ambos — por ejemplo, iterar en el código del sitio web contra la API y el agente reales desplegados, o ejecutar la API localmente contra la tabla real de DynamoDB.
La clave es la variable de entorno RUNTIME_CONFIG_APP_ID. Cuando un proyecto se ejecuta sin SERVE_LOCAL=true, las búsquedas de configuración en tiempo de ejecución obtienen su configuración de AWS AppConfig usando este id de aplicación — el valor RuntimeConfigApplicationId de tus salidas de CDK.
Cada sitio web tiene un target load:runtime-config que descarga el runtime-config.json desplegado (pool de Cognito, endpoints de API, ARN del agente) en el servidor de desarrollo local. Algunas combinaciones útiles:
-
Sitio web local → backend desplegado. Descarga la configuración desplegada una vez, luego ejecuta el target
servesimple para que la UI se comunique con la API y el agente desplegados:Terminal window pnpm nx run game-ui:load:runtime-configTerminal window yarn nx run game-ui:load:runtime-configTerminal window npx nx run game-ui:load:runtime-configTerminal window bunx nx run game-ui:load:runtime-configTerminal window pnpm nx serve game-uiTerminal window yarn nx serve game-uiTerminal window npx nx serve game-uiTerminal window bunx nx serve game-ui -
API local → tabla real de DynamoDB. Ejecuta el target
servesimple conRUNTIME_CONFIG_APP_IDconfigurado al id de aplicación desplegado:Terminal window RUNTIME_CONFIG_APP_ID=<RuntimeConfigApplicationId from CDK outputs> pnpm nx serve game-apiTerminal window RUNTIME_CONFIG_APP_ID=<RuntimeConfigApplicationId from CDK outputs> yarn nx serve game-apiTerminal window RUNTIME_CONFIG_APP_ID=<RuntimeConfigApplicationId from CDK outputs> npx nx serve game-apiTerminal window RUNTIME_CONFIG_APP_ID=<RuntimeConfigApplicationId from CDK outputs> bunx nx serve game-api
Esta flexibilidad te permite probar exactamente la parte en la que estás trabajando, contra los componentes — locales o desplegados — que tengan sentido.
¡Felicitaciones! Has construido, probado y desplegado tu Juego de Aventuras de Mazmorra Agéntico. 🎉🎉🎉