

Configurer un monorepo
Tâche 1 : Créer un monorepo
Section intitulée « Tâche 1 : Créer un monorepo »Pour créer un nouveau monorepo, depuis le répertoire de votre choix, exécutez la commande suivante :
pnpm create @aws/nx-workspace dungeon-adventure --iacProvider=CDKyarn create @aws/nx-workspace dungeon-adventure --iacProvider=CDKnpm create @aws/nx-workspace -- dungeon-adventure --iacProvider=CDKbun create @aws/nx-workspace dungeon-adventure --iacProvider=CDKCela configurera un monorepo NX dans le répertoire dungeon-adventure. Lorsque vous ouvrez le répertoire dans VSCode, vous verrez cette structure de fichiers :
Répertoire.nx/
- …
Répertoire.vscode/
- …
Répertoirenode_modules/
- …
Répertoirepackages/ c’est ici que résideront vos sous-projets
- …
- .gitignore
- .prettierignore
- .prettierrc
- nx.json configure le CLI Nx et les paramètres par défaut du monorepo
- package.json toutes les dépendances Node sont définies ici
- pnpm-lock.yaml ou bun.lock, yarn.lock, package-lock.json selon le gestionnaire de paquets
- pnpm-workspace.yaml si utilisation de pnpm
- README.md
- tsconfig.base.json tous les sous-projets Node étendent ce fichier
- tsconfig.json
- aws-nx-plugin.config.mts configuration du plugin Nx pour AWS
Nous pouvons maintenant commencer à créer nos différents sous-projets en utilisant le @aws/nx-plugin.
Tâche 2 : Créer une API de jeu
Section intitulée « Tâche 2 : Créer une API de jeu »Tout d’abord, créons notre API de jeu. Pour ce faire, créez une API tRPC appelée GameApi en suivant ces étapes :
- Installez le Nx Console VSCode Plugin si ce n'est pas déjà fait
- Ouvrez la console Nx dans VSCode
- Cliquez sur
Generate (UI)dans la section "Common Nx Commands" - Recherchez
@aws/nx-plugin - ts#trpc-api - Remplissez les paramètres requis
- name: GameApi
- Cliquez sur
Generate
pnpm nx g @aws/nx-plugin:ts#trpc-api --name=GameApi --no-interactiveyarn nx g @aws/nx-plugin:ts#trpc-api --name=GameApi --no-interactivenpx nx g @aws/nx-plugin:ts#trpc-api --name=GameApi --no-interactivebunx nx g @aws/nx-plugin:ts#trpc-api --name=GameApi --no-interactiveVous pouvez également effectuer une simulation pour voir quels fichiers seraient modifiés
pnpm nx g @aws/nx-plugin:ts#trpc-api --name=GameApi --no-interactive --dry-runyarn nx g @aws/nx-plugin:ts#trpc-api --name=GameApi --no-interactive --dry-runnpx nx g @aws/nx-plugin:ts#trpc-api --name=GameApi --no-interactive --dry-runbunx nx g @aws/nx-plugin:ts#trpc-api --name=GameApi --no-interactive --dry-runVous verrez de nouveaux fichiers apparaître dans votre arborescence de fichiers.
Fichiers modifiés par ts#trpc-api
Voici la liste de tous les fichiers générés par le générateur ts#trpc-api. Nous allons examiner certains des fichiers clés mis en évidence dans l’arborescence :
Répertoirepackages/
Répertoirecommon/
Répertoireconstructs/
Répertoiresrc/
Répertoireapp/ constructs CDK spécifiques à l’application
Répertoireapis/
- game-api.ts construct CDK pour créer votre API tRPC
- index.ts
- …
- index.ts
Répertoirecore/ constructs CDK génériques
Répertoireapi/
- rest-api.ts construct CDK de base pour une API Gateway Rest API
- trpc-utils.ts utilitaires pour les constructs CDK d’API tRPC
- utils.ts utilitaires pour les constructs d’API
- index.ts
- runtime-config.ts
- index.ts
- project.json
- …
Répertoiregame-api/ API tRPC
Répertoiresrc/
Répertoireclient/ client vanilla typiquement utilisé pour les appels TypeScript machine à machine
- index.ts
Répertoiremiddleware/ instrumentation Powertools
- error.ts
- index.ts
- logger.ts
- metrics.ts
- tracer.ts
Répertoireschema/ définitions des entrées et sorties pour votre API
- index.ts
- echo.ts exemple de schéma d’entrée et de sortie
- z-async-iterable.ts wrapper schéma Zod pour la sortie d’abonnement tRPC
Répertoireprocedures/ implémentations spécifiques pour vos procédures/routes d’API
- echo.ts exemple d’implémentation de procédure
- index.ts
- init.ts configure le contexte et le middleware
- handler.ts point d’entrée du handler Lambda (utilise le streaming de réponse pour les API REST)
- local-server.ts utilisé lors de l’exécution du serveur tRPC localement
- router.ts définit le routeur tRPC et toutes les procédures
- project.json
- …
- eslint.config.mjs
- vitest.workspace.ts
Examinons ces fichiers clés :
import { echo } from './procedures/echo.js';import { t } from './init.js';
export const router = t.router;
export const appRouter = router({  echo,});
export type AppRouter = typeof appRouter;Le routeur définit le routeur tRPC de votre API et c’est l’endroit où vous déclarerez toutes vos méthodes d’API. Comme vous pouvez le voir ci-dessus, nous avons une méthode appelée echo avec son implémentation dans le fichier ./procedures/echo.ts. Le point d’entrée du handler Lambda se trouve dans handler.ts, qui est configuré automatiquement par le générateur.
import { publicProcedure } from '../init.js';import {  EchoInputSchema,  EchoOutputSchema,} from '../schema/echo.js';
export const echo = publicProcedure .input(EchoInputSchema) .output(EchoOutputSchema) .query((opts) => ({ result: opts.input.message }));Ce fichier est l’implémentation de la méthode echo et comme vous pouvez le voir, elle est fortement typée en déclarant ses structures de données d’entrée et de sortie.
import { z } from 'zod';
export const EchoInputSchema = z.object({  message: z.string(),});
export type IEchoInput = z.TypeOf<typeof EchoInputSchema>;
export const EchoOutputSchema = z.object({  result: z.string(),});
export type IEchoOutput = z.TypeOf<typeof EchoOutputSchema>;Toutes les définitions de schéma tRPC sont définies en utilisant Zod et sont exportées en tant que types TypeScript via la syntaxe z.TypeOf.
import { Construct } from 'constructs';import * as url from 'url';import { Distribution } from 'aws-cdk-lib/aws-cloudfront';import {  Code,  Runtime,  Function,  FunctionProps,  Tracing,} from 'aws-cdk-lib/aws-lambda';import {  AuthorizationType,  LambdaIntegration,  ResponseTransferMode,} from 'aws-cdk-lib/aws-apigateway';import { Aspects, Duration } from 'aws-cdk-lib';import {  PolicyDocument,  PolicyStatement,  Effect,  AnyPrincipal,  IGrantable,  Grant,} from 'aws-cdk-lib/aws-iam';import {  IntegrationBuilder,  RestApiIntegration,} from '../../core/api/utils.js';import { AddCorsPreflightAspect, RestApi } from '../../core/api/rest-api.js';import { Procedures, routerToOperations } from '../../core/api/trpc-utils.js';import { AppRouter, appRouter } from ':dungeon-adventure/game-api';
// Type d'union de chaînes pour tous les noms d'opérations d'APItype Operations = Procedures<AppRouter>;
/** * Propriétés pour créer un construct GameApi * * @template TIntegrations - Map des noms d'opérations vers leurs intégrations */export interface GameApiProps<  TIntegrations extends Record<Operations, RestApiIntegration>,> {  /**   * Map des noms d'opérations vers leurs intégrations API Gateway   */  integrations: TIntegrations;}
/** * Un construct CDK qui crée et configure une API REST AWS API Gateway * spécifiquement pour GameApi. * @template TIntegrations - Map des noms d'opérations vers leurs intégrations */export class GameApi<  TIntegrations extends Record<Operations, RestApiIntegration>,> extends RestApi<Operations, TIntegrations> {  private allowedOrigins: readonly string[] = ['*'];
  /**   * Crée des intégrations par défaut pour toutes les opérations, qui implémentent chaque opération en tant   * que sa propre fonction Lambda individuelle.   *   * @param scope - La portée du construct CDK   * @returns Un IntegrationBuilder avec des intégrations Lambda par défaut   */  public static defaultIntegrations = (scope: Construct) => {    return IntegrationBuilder.rest({      operations: routerToOperations(appRouter),      defaultIntegrationOptions: <FunctionProps>{        runtime: Runtime.NODEJS_LATEST,        handler: 'index.handler',        code: Code.fromAsset(          url.fileURLToPath(            new URL(              '../../../../../../dist/packages/game-api/bundle',              import.meta.url,            ),          ),        ),        timeout: Duration.seconds(30),        tracing: Tracing.ACTIVE,      },      buildDefaultIntegration: (op, props: FunctionProps) => {        const handler = new Function(scope, `GameApi${op}Handler`, props);        return {          handler,          integration: new LambdaIntegration(handler, {            responseTransferMode: ResponseTransferMode.STREAM,          }),        };      },    });  };
  constructor(    scope: Construct,    id: string,    props: GameApiProps<TIntegrations>,  ) {    super(scope, id, {      apiName: 'GameApi',      defaultMethodOptions: {        authorizationType: AuthorizationType.IAM,      },      deployOptions: {        tracingEnabled: true,      },      policy: new PolicyDocument({        statements: [          // Ouvrir OPTIONS pour permettre aux navigateurs de faire des requêtes de pré-vérification non authentifiées          new PolicyStatement({            effect: Effect.ALLOW,            principals: [new AnyPrincipal()],            actions: ['execute-api:Invoke'],            resources: ['execute-api:/*/OPTIONS/*'],          }),        ],      }),      operations: routerToOperations(appRouter),      ...props,    });    Aspects.of(this).add(new AddCorsPreflightAspect(() => this.allowedOrigins));  }
  /**   * Restreint CORS aux origines fournies   *   * Configure les domaines de distribution CloudFront ou les chaînes d'origine   * comme les seules origines CORS autorisées dans les réponses de pré-vérification d'API Gateway et les   * intégrations AWS Lambda.   *   * @param origins - Les chaînes d'origine, distributions CloudFront, ou objets contenant une distribution CloudFront à partir desquels accorder CORS   */  public restrictCorsTo(    ...origins: (string | Distribution | { cloudFrontDistribution: Distribution })[]  ) {    const allowedOrigins = origins.map((origin) =>      typeof origin === 'string'        ? origin        : 'cloudFrontDistribution' in origin          ? `https://${origin.cloudFrontDistribution.distributionDomainName}`          : `https://${origin.distributionDomainName}`,    );
    this.allowedOrigins = allowedOrigins;
    // Définir la variable d'environnement ALLOWED_ORIGINS pour toutes les intégrations Lambda    Object.values(this.integrations).forEach((integration) => {      if ('handler' in integration && integration.handler instanceof Function) {        integration.handler.addEnvironment(          'ALLOWED_ORIGINS',          allowedOrigins.join(','),        );      }    });  }
  /**   * Accorde les permissions IAM pour invoquer n'importe quelle méthode sur cette API.   *   * @param grantee - Le principal IAM auquel accorder les permissions   */  public grantInvokeAccess(grantee: IGrantable) {    // Ici, nous accordons au bénéficiaire la permission d'appeler l'API.    // Un accès machine à machine plus fin peut être défini ici en utilisant des principaux    // plus spécifiques (par exemple, des rôles ou des utilisateurs) et des ressources (par exemple, quels chemins d'API    // peuvent être invoqués par quel principal) si nécessaire.    this.api.addToResourcePolicy(      new PolicyStatement({        effect: Effect.ALLOW,        principals: [grantee.grantPrincipal],        actions: ['execute-api:Invoke'],        resources: ['execute-api:/*'],      }),    );
Grant.addToPrincipal({ grantee, actions: ['execute-api:Invoke'], resourceArns: [this.api.arnForExecuteApi('*', '/*', '*')], }); }}C’est le construct CDK qui définit notre GameApi. Il fournit une méthode defaultIntegrations qui crée automatiquement une fonction Lambda pour chaque procédure de notre API tRPC, pointant vers l’implémentation d’API empaquetée. Cela signifie qu’au moment de cdk synth, l’empaquetage ne se produit pas (contrairement à l’utilisation de NodeJsFunction) car nous l’avons déjà empaqueté dans le cadre de la cible de build du projet backend.
Tâche 3 : Créer des agents de narration
Section intitulée « Tâche 3 : Créer des agents de narration »Créons maintenant nos agents de narration.
Agent de narration : Projet Python
Section intitulée « Agent de narration : Projet Python »Pour créer un projet Python :
- Installez le Nx Console VSCode Plugin si ce n'est pas déjà fait
- Ouvrez la console Nx dans VSCode
- Cliquez sur
Generate (UI)dans la section "Common Nx Commands" - Recherchez
@aws/nx-plugin - py#project - Remplissez les paramètres requis
- name: story
- Cliquez sur
Generate
pnpm nx g @aws/nx-plugin:py#project --name=story --no-interactiveyarn nx g @aws/nx-plugin:py#project --name=story --no-interactivenpx nx g @aws/nx-plugin:py#project --name=story --no-interactivebunx nx g @aws/nx-plugin:py#project --name=story --no-interactiveVous pouvez également effectuer une simulation pour voir quels fichiers seraient modifiés
pnpm nx g @aws/nx-plugin:py#project --name=story --no-interactive --dry-runyarn nx g @aws/nx-plugin:py#project --name=story --no-interactive --dry-runnpx nx g @aws/nx-plugin:py#project --name=story --no-interactive --dry-runbunx nx g @aws/nx-plugin:py#project --name=story --no-interactive --dry-runVous verrez de nouveaux fichiers apparaître dans votre arborescence de fichiers.
Fichiers modifiés par py#project
Le générateur py#project génère ces fichiers :
Répertoire.venv/ environnement virtuel unique pour le monorepo
- …
Répertoirepackages/
Répertoirestory/
Répertoiredungeon_adventure_story/ module Python
- …
Répertoiretests/
- …
- .python-version
- pyproject.toml
- project.json
- .python-version version Python uv figée
- pyproject.toml
- uv.lock
Cela a configuré un projet Python et un UV Workspace avec un environnement virtuel partagé.
Agent de narration : Agent Strands
Section intitulée « Agent de narration : Agent Strands »Pour ajouter un agent Strands au projet avec le générateur py#agent :
- Installez le Nx Console VSCode Plugin si ce n'est pas déjà fait
- Ouvrez la console Nx dans VSCode
- Cliquez sur
Generate (UI)dans la section "Common Nx Commands" - Recherchez
@aws/nx-plugin - py#agent - Remplissez les paramètres requis
- project: story
- auth: Cognito
- protocol: AG-UI
- Cliquez sur
Generate
pnpm nx g @aws/nx-plugin:py#agent --project=story --auth=Cognito --protocol=AG-UI --no-interactiveyarn nx g @aws/nx-plugin:py#agent --project=story --auth=Cognito --protocol=AG-UI --no-interactivenpx nx g @aws/nx-plugin:py#agent --project=story --auth=Cognito --protocol=AG-UI --no-interactivebunx nx g @aws/nx-plugin:py#agent --project=story --auth=Cognito --protocol=AG-UI --no-interactiveVous pouvez également effectuer une simulation pour voir quels fichiers seraient modifiés
pnpm nx g @aws/nx-plugin:py#agent --project=story --auth=Cognito --protocol=AG-UI --no-interactive --dry-runyarn nx g @aws/nx-plugin:py#agent --project=story --auth=Cognito --protocol=AG-UI --no-interactive --dry-runnpx nx g @aws/nx-plugin:py#agent --project=story --auth=Cognito --protocol=AG-UI --no-interactive --dry-runbunx nx g @aws/nx-plugin:py#agent --project=story --auth=Cognito --protocol=AG-UI --no-interactive --dry-runVous verrez de nouveaux fichiers apparaître dans votre arborescence de fichiers.
Fichiers modifiés par py#agent
Le générateur py#agent génère ces fichiers :
Répertoirepackages/
Répertoirestory/
Répertoiredungeon_adventure_story/ module Python
Répertoireagent/
- init.py configure l’application FastAPI et le middleware
- main.py point d’entrée pour votre agent dans Bedrock AgentCore Runtime
- agent.py définit un exemple d’agent et d’outils
- Dockerfile définit l’image Docker pour le déploiement sur AgentCore Runtime
Répertoirecommon/constructs/
Répertoiresrc
Répertoireapp/agents/story-agent/
- story-agent.ts construct pour déployer votre agent Story sur AgentCore Runtime
Examinons certains fichiers en détail :
from contextlib import contextmanager
from strands import Agent, toolfrom strands_tools import current_time

@tooldef subtract(a: int, b: int) -> int:    return a - b

@contextmanagerdef get_agent(): yield Agent( name="StoryAgent", description="StoryAgent Agent", system_prompt="""Vous êtes un sorcier mathématique.Utilisez vos outils pour les tâches mathématiques.Référez-vous aux outils comme votre 'grimoire'.""", tools=[subtract, current_time], )Cela crée un exemple d’agent Strands et définit un outil de soustraction.
import loggingimport uuid
from ag_ui_strands import StrandsAgent, create_strands_appfrom dungeon_adventure_agent_connection import session_id_contextfrom fastapi import Requestfrom starlette.middleware.base import BaseHTTPMiddleware
from .agent import get_agent
logging.basicConfig(level=logging.INFO)
SESSION_ID_HEADER = "x-amzn-bedrock-agentcore-runtime-session-id"
# Create AG-UI agent wrapper_agent_ctx = get_agent()_agent = _agent_ctx.__enter__()
agui_agent = StrandsAgent(    agent=_agent,    name="StoryAgent",    description="A Agent exposed via the AG-UI protocol.",)

class _SessionIdMiddleware(BaseHTTPMiddleware):    """Bind the session ID for this request so downstream MCP / A2A clients forward it on outbound calls."""
    async def dispatch(self, request: Request, call_next):        session_id = request.headers.get(SESSION_ID_HEADER) or str(uuid.uuid4())        with session_id_context(session_id):            return await call_next(request)

# Create FastAPI app with AG-UI endpoint and health checkapp = create_strands_app(agui_agent, path="/invocations")app.add_middleware(_SessionIdMiddleware)C’est le point d’entrée de l’agent. Parce que nous avons sélectionné --protocol=AG-UI, le générateur enveloppe notre Agent Strands avec StrandsAgent de ag_ui_strands et le monte sur une application FastAPI qui parle le protocole AG-UI — c’est ce à quoi CopilotKit parlera depuis le site web React. Le _SessionIdMiddleware lie l’ID de session du runtime AgentCore entrant à un ContextVar afin que tout client MCP/A2A en aval que nous connecterons plus tard (par exemple, le serveur MCP d’inventaire dans le Module 2) le transmette automatiquement lors de ses appels sortants. Dans le Module 3, nous ajouterons également un session_manager_provider pour que chaque thread id obtienne son propre S3SessionManager et que l’historique de conversation persiste entre les tours.
import { Lazy, Names } from 'aws-cdk-lib';import { Platform } from 'aws-cdk-lib/aws-ecr-assets';import { Construct } from 'constructs';import { execSync } from 'child_process';import * as path from 'path';import * as url from 'url';import {  AgentRuntimeArtifact,  ProtocolType,  Runtime,  RuntimeProps,} from 'aws-cdk-lib/aws-bedrockagentcore';import { IGrantable, IPrincipal } from 'aws-cdk-lib/aws-iam';
export type StoryAgentProps = Omit<  RuntimeProps,  'runtimeName' | 'protocolConfiguration' | 'agentRuntimeArtifact'>;
export class StoryAgent extends Construct implements IGrantable {  public readonly dockerImage: AgentRuntimeArtifact;  public readonly agentCoreRuntime: Runtime;
  constructor(scope: Construct, id: string, props?: StoryAgentProps) {    super(scope, id);
    this.dockerImage = AgentRuntimeArtifact.fromAsset(      path.dirname(url.fileURLToPath(new URL(import.meta.url))),      {        platform: Platform.LINUX_ARM64,        extraHash: execSync(          `docker inspect dungeon-adventure-story-agent:latest --format '{{.Id}}'`,          { encoding: 'utf-8' },        ).trim(),      },    );
    this.agentCoreRuntime = new Runtime(this, 'StoryAgent', {      runtimeName: Lazy.string({        produce: () =>          Names.uniqueResourceName(this.agentCoreRuntime, { maxLength: 40 }),      }),      protocolConfiguration: ProtocolType.HTTP,      agentRuntimeArtifact: this.dockerImage,      ...props,    });  }
public get grantPrincipal(): IPrincipal { return this.agentCoreRuntime.grantPrincipal; }}Cela configure un AgentRuntimeArtifact CDK qui télécharge votre image Docker d’agent vers ECR et l’héberge en utilisant AgentCore Runtime.
Vous remarquerez peut-être un Dockerfile supplémentaire qui référence l’image Docker du projet story, nous permettant de co-localiser le Dockerfile et le code source de l’agent.
Tâche 4 : Configurer les outils d’inventaire
Section intitulée « Tâche 4 : Configurer les outils d’inventaire »Inventaire : Projet TypeScript
Section intitulée « Inventaire : Projet TypeScript »Créons un serveur MCP pour fournir des outils à notre agent Story afin de gérer l’inventaire d’un joueur.
Tout d’abord, nous créons un projet TypeScript :
- Installez le Nx Console VSCode Plugin si ce n'est pas déjà fait
- Ouvrez la console Nx dans VSCode
- Cliquez sur
Generate (UI)dans la section "Common Nx Commands" - Recherchez
@aws/nx-plugin - ts#project - Remplissez les paramètres requis
- name: inventory
- Cliquez sur
Generate
pnpm nx g @aws/nx-plugin:ts#project --name=inventory --no-interactiveyarn nx g @aws/nx-plugin:ts#project --name=inventory --no-interactivenpx nx g @aws/nx-plugin:ts#project --name=inventory --no-interactivebunx nx g @aws/nx-plugin:ts#project --name=inventory --no-interactiveVous pouvez également effectuer une simulation pour voir quels fichiers seraient modifiés
pnpm nx g @aws/nx-plugin:ts#project --name=inventory --no-interactive --dry-runyarn nx g @aws/nx-plugin:ts#project --name=inventory --no-interactive --dry-runnpx nx g @aws/nx-plugin:ts#project --name=inventory --no-interactive --dry-runbunx nx g @aws/nx-plugin:ts#project --name=inventory --no-interactive --dry-runCela créera un projet TypeScript vide.
Fichiers modifiés par ts#project
Le générateur ts#project génère ces fichiers.
Répertoirepackages/
Répertoireinventory/
Répertoiresrc/
- index.ts point d’entrée avec fonction d’exemple
- project.json configuration du projet
- eslint.config.mjs configuration du linter
- vitest.config.mts configuration des tests
- tsconfig.json configuration TypeScript de base pour le projet
- tsconfig.lib.json configuration TypeScript pour le projet ciblée pour la compilation et l’empaquetage
- tsconfig.spec.json configuration TypeScript pour les tests
- tsconfig.base.json mis à jour pour configurer un alias permettant aux autres projets de référencer celui-ci
Inventaire : Serveur MCP
Section intitulée « Inventaire : Serveur MCP »Ensuite, nous allons ajouter un serveur MCP à notre projet TypeScript :
- Installez le Nx Console VSCode Plugin si ce n'est pas déjà fait
- Ouvrez la console Nx dans VSCode
- Cliquez sur
Generate (UI)dans la section "Common Nx Commands" - Recherchez
@aws/nx-plugin - ts#mcp-server - Remplissez les paramètres requis
- project: inventory
- Cliquez sur
Generate
pnpm nx g @aws/nx-plugin:ts#mcp-server --project=inventory --no-interactiveyarn nx g @aws/nx-plugin:ts#mcp-server --project=inventory --no-interactivenpx nx g @aws/nx-plugin:ts#mcp-server --project=inventory --no-interactivebunx nx g @aws/nx-plugin:ts#mcp-server --project=inventory --no-interactiveVous pouvez également effectuer une simulation pour voir quels fichiers seraient modifiés
pnpm nx g @aws/nx-plugin:ts#mcp-server --project=inventory --no-interactive --dry-runyarn nx g @aws/nx-plugin:ts#mcp-server --project=inventory --no-interactive --dry-runnpx nx g @aws/nx-plugin:ts#mcp-server --project=inventory --no-interactive --dry-runbunx nx g @aws/nx-plugin:ts#mcp-server --project=inventory --no-interactive --dry-runCela ajoutera un serveur MCP.
Fichiers modifiés par ts#mcp-server
Le générateur ts#mcp-server génère ces fichiers.
Répertoirepackages/
Répertoireinventory/
Répertoiresrc/mcp-server/
- index.ts barrel export
- server.ts crée le serveur MCP
Répertoiretools/
- divide.ts outil d’exemple
Répertoireresources/
- sample-guidance.ts ressource d’exemple
- stdio.ts point d’entrée pour MCP avec transport STDIO
- http.ts point d’entrée pour MCP avec transport HTTP streamable
- Dockerfile construit l’image pour AgentCore Runtime
- rolldown.config.ts configuration pour empaqueter le serveur MCP pour le déploiement sur AgentCore
Répertoirecommon/constructs/
Répertoiresrc
Répertoireapp/mcp-servers/inventory-mcp-server/
- inventory-mcp-server.ts construct pour déployer votre serveur MCP d’inventaire sur AgentCore Runtime
Tâche 5 : Créer l’interface utilisateur (UI)
Section intitulée « Tâche 5 : Créer l’interface utilisateur (UI) »Dans cette tâche, nous allons créer l’interface utilisateur qui vous permettra d’interagir avec le jeu.
Interface utilisateur du jeu : Site web
Section intitulée « Interface utilisateur du jeu : Site web »Pour créer l’interface utilisateur, créez un site web appelé GameUI en suivant ces étapes :
- Installez le Nx Console VSCode Plugin si ce n'est pas déjà fait
- Ouvrez la console Nx dans VSCode
- Cliquez sur
Generate (UI)dans la section "Common Nx Commands" - Recherchez
@aws/nx-plugin - ts#react-website - Remplissez les paramètres requis
- name: GameUI
- uxProvider: Shadcn
- Cliquez sur
Generate
pnpm nx g @aws/nx-plugin:ts#react-website --name=GameUI --uxProvider=Shadcn --no-interactiveyarn nx g @aws/nx-plugin:ts#react-website --name=GameUI --uxProvider=Shadcn --no-interactivenpx nx g @aws/nx-plugin:ts#react-website --name=GameUI --uxProvider=Shadcn --no-interactivebunx nx g @aws/nx-plugin:ts#react-website --name=GameUI --uxProvider=Shadcn --no-interactiveVous pouvez également effectuer une simulation pour voir quels fichiers seraient modifiés
pnpm nx g @aws/nx-plugin:ts#react-website --name=GameUI --uxProvider=Shadcn --no-interactive --dry-runyarn nx g @aws/nx-plugin:ts#react-website --name=GameUI --uxProvider=Shadcn --no-interactive --dry-runnpx nx g @aws/nx-plugin:ts#react-website --name=GameUI --uxProvider=Shadcn --no-interactive --dry-runbunx nx g @aws/nx-plugin:ts#react-website --name=GameUI --uxProvider=Shadcn --no-interactive --dry-runVous verrez de nouveaux fichiers apparaître dans votre arborescence de fichiers.
Fichiers modifiés par ts#react-website
Le générateur ts#react-website génère ces fichiers. Examinons certains des fichiers clés mis en évidence dans l’arborescence :
Répertoirepackages/
Répertoirecommon/
Répertoireconstructs/
Répertoiresrc/
Répertoireapp/ constructs CDK spécifiques à l’application
Répertoirestatic-websites/
- game-ui.ts construct CDK pour créer votre interface utilisateur du jeu
Répertoirecore/
- static-website.ts construct générique de site web statique
Répertoiregame-ui/
Répertoirepublic/
- …
Répertoiresrc/
Répertoirecomponents/
RépertoireAppLayout/
- index.tsx mise en page globale utilisant shadcn
SidebarProvider+ en-tête
- index.tsx mise en page globale utilisant shadcn
- app-sidebar.tsx barre latérale shadcn par défaut avec éléments de navigation
- alert.tsx, spinner.tsx primitives de feedback enveloppées dans shadcn
Répertoireroutes/ routes basées sur des fichiers @tanstack/react-router
- index.tsx page racine ’/’
- __root.tsx toutes les pages utilisent ce composant comme base
- config.ts
- main.tsx point d’entrée React
- routeTree.gen.ts automatiquement mis à jour par @tanstack/react-router
- styles.css importe les globaux shadcn partagés (Tailwind v4)
- index.html
- project.json
- vite.config.mts
- …
Répertoirecommon/
Répertoireshadcn/ bibliothèque shadcn/ui partagée (tokens de thème,
Button,Card,Input,Sidebar, …) importée par chaque site webuxProvider=Shadcn- src/components/ui/*
- src/styles/globals.css Tailwind + tokens de design shadcn
- …
import * as url from 'url';import { Construct } from 'constructs';import { StaticWebsite } from '../../core/index.js';
export class GameUI extends StaticWebsite { constructor(scope: Construct, id: string) { super(scope, id, { websiteName: 'GameUI', websiteFilePath: url.fileURLToPath( new URL( '../../../../../../dist/packages/game-ui/bundle', import.meta.url, ), ), }); }}C’est le construct CDK qui définit notre GameUI. Il a déjà configuré le chemin de fichier vers le bundle généré pour notre interface utilisateur basée sur Vite. Cela signifie qu’au moment du build, l’empaquetage se produit dans la cible de build du projet game-ui et la sortie est utilisée ici.
import React from 'react';import { createRoot } from 'react-dom/client';import { RouterProvider, createRouter } from '@tanstack/react-router';import { routeTree } from './routeTree.gen';import './styles.css';
// eslint-disable-next-line @typescript-eslint/no-empty-object-typeexport type RouterProviderContext = {};
const router = createRouter({ routeTree, context: {} });
declare module '@tanstack/react-router' {  interface Register {    router: typeof router;  }}
const App = () => <RouterProvider router={router} context={{}} />;
const root = document.getElementById('root');root && createRoot(root).render( <React.StrictMode> <App /> </React.StrictMode>, );C’est le point d’entrée où React est monté. Le style provient des tokens Tailwind v4 importés via styles.css. @tanstack/react-router est configuré en mode file-based routing : tant que le serveur de développement est en cours d’exécution, tout fichier que vous créez sous routes/ est automatiquement détecté et l’arbre de routes est régénéré. Les générateurs ultérieurs (auth, connection) patcheront ce fichier via AST pour envelopper <App /> dans des fournisseurs supplémentaires.
import { createFileRoute } from '@tanstack/react-router';
export const Route = createFileRoute('/')({  component: RouteComponent,});
function RouteComponent() { return ( <div className="text-center"> <header> <h1>Welcome</h1> <p>Welcome to your new React website!</p> </header> </div> );}Un composant sera rendu lors de la navigation vers la route /. @tanstack/react-router gérera la Route pour vous chaque fois que vous créez/déplacez ce fichier (tant que le serveur de développement est en cours d’exécution).
Interface utilisateur du jeu : Authentification
Section intitulée « Interface utilisateur du jeu : Authentification »Configurons notre interface utilisateur du jeu pour exiger un accès authentifié via Amazon Cognito en suivant ces étapes :
- Installez le Nx Console VSCode Plugin si ce n'est pas déjà fait
- Ouvrez la console Nx dans VSCode
- Cliquez sur
Generate (UI)dans la section "Common Nx Commands" - Recherchez
@aws/nx-plugin - ts#react-website#auth - Remplissez les paramètres requis
- cognitoDomain: game-ui
- project: @dungeon-adventure/game-ui
- allowSignup: true
- Cliquez sur
Generate
pnpm nx g @aws/nx-plugin:ts#react-website#auth --cognitoDomain=game-ui --project=@dungeon-adventure/game-ui --allowSignup=true --no-interactiveyarn nx g @aws/nx-plugin:ts#react-website#auth --cognitoDomain=game-ui --project=@dungeon-adventure/game-ui --allowSignup=true --no-interactivenpx nx g @aws/nx-plugin:ts#react-website#auth --cognitoDomain=game-ui --project=@dungeon-adventure/game-ui --allowSignup=true --no-interactivebunx nx g @aws/nx-plugin:ts#react-website#auth --cognitoDomain=game-ui --project=@dungeon-adventure/game-ui --allowSignup=true --no-interactiveVous pouvez également effectuer une simulation pour voir quels fichiers seraient modifiés
pnpm nx g @aws/nx-plugin:ts#react-website#auth --cognitoDomain=game-ui --project=@dungeon-adventure/game-ui --allowSignup=true --no-interactive --dry-runyarn nx g @aws/nx-plugin:ts#react-website#auth --cognitoDomain=game-ui --project=@dungeon-adventure/game-ui --allowSignup=true --no-interactive --dry-runnpx nx g @aws/nx-plugin:ts#react-website#auth --cognitoDomain=game-ui --project=@dungeon-adventure/game-ui --allowSignup=true --no-interactive --dry-runbunx nx g @aws/nx-plugin:ts#react-website#auth --cognitoDomain=game-ui --project=@dungeon-adventure/game-ui --allowSignup=true --no-interactive --dry-runVous verrez de nouveaux fichiers apparaître/changer dans votre arborescence de fichiers.
Fichiers modifiés par ts#react-website#auth
Le générateur ts#react-website#auth met à jour/génère ces fichiers. Examinons certains des fichiers clés mis en évidence dans l’arborescence :
Répertoirepackages/
Répertoirecommon/
Répertoireconstructs/
Répertoiresrc/
Répertoirecore/
- user-identity.ts construct CDK pour créer des pools d’utilisateurs/d’identité
Répertoiregame-ui/
Répertoiresrc/
Répertoirecomponents/
RépertoireAppLayout/
- index.tsx ajoute l’utilisateur connecté/déconnexion à l’en-tête
RépertoireCognitoAuth/
- index.tsx gère la connexion à Cognito
RépertoireRuntimeConfig/
- index.tsx récupère le
runtime-config.jsonet le fournit aux enfants via le contexte
- index.tsx récupère le
Répertoirehooks/
- useRuntimeConfig.tsx
- main.tsx Mis à jour pour ajouter Cognito
import { useAuth } from 'react-oidc-context';import CognitoAuth from './components/CognitoAuth';import { useRuntimeConfig } from './hooks/useRuntimeConfig';import RuntimeConfigProvider from './components/RuntimeConfig';import React from 'react';import { createRoot } from 'react-dom/client';import { RouterProvider, createRouter } from '@tanstack/react-router';import { routeTree } from './routeTree.gen';import './styles.css';// eslint-disable-next-line @typescript-eslint/no-empty-object-typeexport type RouterProviderContext = {};export type RouterProviderContext = { runtimeConfig?: ReturnType<typeof useRuntimeConfig>; auth?: ReturnType<typeof useAuth>;};const router = createRouter({ routeTree, context: {} });const router = createRouter({ routeTree, context: { runtimeConfig: undefined, auth: undefined },});// Enregistrer l'instance du routeur pour la sécurité des typesdeclare module '@tanstack/react-router' { interface Register { router: typeof router; }}const App = () => <RouterProvider router={router} context={{}} />;const App = () => { const auth = useAuth(); const runtimeConfig = useRuntimeConfig(); return <RouterProvider router={router} context={{ runtimeConfig, auth }} />;};const root = document.getElementById('root');root && createRoot(root).render( <React.StrictMode> <RuntimeConfigProvider> <CognitoAuth> <App /> </CognitoAuth> </RuntimeConfigProvider> </React.StrictMode>, );Les composants RuntimeConfigProvider et CognitoAuth ont été ajoutés au fichier main.tsx via une transformation AST. Cela permet au composant CognitoAuth de s’authentifier avec Amazon Cognito en récupérant le runtime-config.json qui contient la configuration de connexion Cognito requise pour effectuer les appels backend vers la bonne destination.
Interface utilisateur du jeu : Connexion à l’API du jeu
Section intitulée « Interface utilisateur du jeu : Connexion à l’API du jeu »Configurons notre interface utilisateur du jeu pour se connecter à notre API GameApi créée précédemment.
- Installez le Nx Console VSCode Plugin si ce n'est pas déjà fait
- Ouvrez la console Nx dans VSCode
- Cliquez sur
Generate (UI)dans la section "Common Nx Commands" - Recherchez
@aws/nx-plugin - connection - Remplissez les paramètres requis
- sourceProject: @dungeon-adventure/game-ui
- targetProject: @dungeon-adventure/game-api
- Cliquez sur
Generate
pnpm nx g @aws/nx-plugin:connection --sourceProject=@dungeon-adventure/game-ui --targetProject=@dungeon-adventure/game-api --no-interactiveyarn nx g @aws/nx-plugin:connection --sourceProject=@dungeon-adventure/game-ui --targetProject=@dungeon-adventure/game-api --no-interactivenpx nx g @aws/nx-plugin:connection --sourceProject=@dungeon-adventure/game-ui --targetProject=@dungeon-adventure/game-api --no-interactivebunx nx g @aws/nx-plugin:connection --sourceProject=@dungeon-adventure/game-ui --targetProject=@dungeon-adventure/game-api --no-interactiveVous pouvez également effectuer une simulation pour voir quels fichiers seraient modifiés
pnpm nx g @aws/nx-plugin:connection --sourceProject=@dungeon-adventure/game-ui --targetProject=@dungeon-adventure/game-api --no-interactive --dry-runyarn nx g @aws/nx-plugin:connection --sourceProject=@dungeon-adventure/game-ui --targetProject=@dungeon-adventure/game-api --no-interactive --dry-runnpx nx g @aws/nx-plugin:connection --sourceProject=@dungeon-adventure/game-ui --targetProject=@dungeon-adventure/game-api --no-interactive --dry-runbunx nx g @aws/nx-plugin:connection --sourceProject=@dungeon-adventure/game-ui --targetProject=@dungeon-adventure/game-api --no-interactive --dry-runVous verrez de nouveaux fichiers apparaître/changer dans votre arborescence de fichiers.
Fichiers modifiés par connexion UI -> tRPC
Le générateur connection génère/met à jour ces fichiers. Examinons certains des fichiers clés mis en évidence dans l’arborescence :
Répertoirepackages/
Répertoiregame-ui/
Répertoiresrc/
Répertoirecomponents/
- GameApiClientProvider.tsx configure le client GameAPI
Répertoirehooks/
- useGameApi.tsx hooks pour appeler l’API GameApi
- main.tsx injecte les fournisseurs de client tRPC
- package.json
import { useContext } from 'react';import { GameApiTRPCContext } from '../components/GameApiClientProvider';
export const useGameApi = () => {  const container = useContext(GameApiTRPCContext);  if (!container) {    throw new Error('useGameApi must be used within GameApiClientProvider');  }  return container.optionsProxy;};
export const useGameApiClient = () => { const container = useContext(GameApiTRPCContext); if (!container) { throw new Error( 'useGameApiClient must be used within GameApiClientProvider', ); } return container.client;};Ce hook fournit un accès au client tRPC pour appeler le GameApi. Pour des exemples sur la façon d’appeler des API tRPC, consultez le guide d’utilisation du hook tRPC.
import GameApiClientProvider from './components/GameApiClientProvider';import QueryClientProvider from './components/QueryClientProvider';import { useAuth } from 'react-oidc-context';import CognitoAuth from './components/CognitoAuth';import { useRuntimeConfig } from './hooks/useRuntimeConfig';import RuntimeConfigProvider from './components/RuntimeConfig';import React from 'react';import { createRoot } from 'react-dom/client';import { RouterProvider, createRouter } from '@tanstack/react-router';import { routeTree } from './routeTree.gen';import './styles.css';...const root = document.getElementById('root');root && createRoot(root).render( <React.StrictMode> <RuntimeConfigProvider> <CognitoAuth> <QueryClientProvider> <GameApiClientProvider> <App /> </GameApiClientProvider> </QueryClientProvider> </CognitoAuth> </RuntimeConfigProvider> </React.StrictMode>, );Le fichier main.tsx a été mis à jour via une transformation AST pour injecter les fournisseurs tRPC.
Agent de narration : Connexion au serveur MCP d’inventaire
Section intitulée « Agent de narration : Connexion au serveur MCP d’inventaire »Connectons notre agent Story au serveur MCP d’inventaire afin que l’agent puisse découvrir et invoquer les outils du serveur MCP.
- Installez le Nx Console VSCode Plugin si ce n'est pas déjà fait
- Ouvrez la console Nx dans VSCode
- Cliquez sur
Generate (UI)dans la section "Common Nx Commands" - Recherchez
@aws/nx-plugin - connection - Remplissez les paramètres requis
- sourceProject: story
- targetProject: inventory
- Cliquez sur
Generate
pnpm nx g @aws/nx-plugin:connection --sourceProject=story --targetProject=inventory --no-interactiveyarn nx g @aws/nx-plugin:connection --sourceProject=story --targetProject=inventory --no-interactivenpx nx g @aws/nx-plugin:connection --sourceProject=story --targetProject=inventory --no-interactivebunx nx g @aws/nx-plugin:connection --sourceProject=story --targetProject=inventory --no-interactiveVous pouvez également effectuer une simulation pour voir quels fichiers seraient modifiés
pnpm nx g @aws/nx-plugin:connection --sourceProject=story --targetProject=inventory --no-interactive --dry-runyarn nx g @aws/nx-plugin:connection --sourceProject=story --targetProject=inventory --no-interactive --dry-runnpx nx g @aws/nx-plugin:connection --sourceProject=story --targetProject=inventory --no-interactive --dry-runbunx nx g @aws/nx-plugin:connection --sourceProject=story --targetProject=inventory --no-interactive --dry-runFichiers modifiés par connexion Agent Story -> Inventaire MCP
Le générateur connection génère/met à jour ces fichiers :
Répertoirepackages/
Répertoirecommon/
Répertoireagent_connection/
Répertoiredungeon_adventure_agent_connection/
Répertoirecore/
- agentcore_mcp_client.py Client MCP AgentCore principal
Répertoireapp/
- inventory_mcp_server_client.py Client pour se connecter au serveur MCP d’inventaire
- __init__.py Ré-exporte les clients par connexion
Répertoirestory/
Répertoiredungeon_adventure_story/agent/
- agent.py Modifié pour importer et utiliser le client MCP
Le générateur :
- Crée un projet Python partagé
agent_connection(s’il n’existe pas déjà) avec leAgentCoreMCPClientprincipal - Génère une classe
InventoryMcpServerClientqui gère la connexion au serveur MCP à la fois localement (HTTP direct) et lors du déploiement (via AgentCore avec authentification IAM) - Transforme
agent.pypour importer le client, créer une instance et connecter les outils du serveur MCP à l’agent - Ajoute le projet
agent_connectionen tant que dépendance workspace du projet story - Met à jour la cible
serve-localpour démarrer automatiquement le serveur MCP lors de l’exécution locale
Pour plus de détails, consultez le guide de connexion Python Agent vers MCP.
Interface utilisateur du jeu : Connexion à l’agent Story
Section intitulée « Interface utilisateur du jeu : Connexion à l’agent Story »Connectons notre interface utilisateur du jeu à l’agent Story. Puisque l’agent parle AG-UI, le générateur connection câble CopilotKit : un composant de chat thématisé et un HttpAgent @ag-ui/client prêt à rendre.
- Installez le Nx Console VSCode Plugin si ce n'est pas déjà fait
- Ouvrez la console Nx dans VSCode
- Cliquez sur
Generate (UI)dans la section "Common Nx Commands" - Recherchez
@aws/nx-plugin - connection - Remplissez les paramètres requis
- sourceProject: @dungeon-adventure/game-ui
- targetProject: story
- Cliquez sur
Generate
pnpm nx g @aws/nx-plugin:connection --sourceProject=@dungeon-adventure/game-ui --targetProject=story --no-interactiveyarn nx g @aws/nx-plugin:connection --sourceProject=@dungeon-adventure/game-ui --targetProject=story --no-interactivenpx nx g @aws/nx-plugin:connection --sourceProject=@dungeon-adventure/game-ui --targetProject=story --no-interactivebunx nx g @aws/nx-plugin:connection --sourceProject=@dungeon-adventure/game-ui --targetProject=story --no-interactiveVous pouvez également effectuer une simulation pour voir quels fichiers seraient modifiés
pnpm nx g @aws/nx-plugin:connection --sourceProject=@dungeon-adventure/game-ui --targetProject=story --no-interactive --dry-runyarn nx g @aws/nx-plugin:connection --sourceProject=@dungeon-adventure/game-ui --targetProject=story --no-interactive --dry-runnpx nx g @aws/nx-plugin:connection --sourceProject=@dungeon-adventure/game-ui --targetProject=story --no-interactive --dry-runbunx nx g @aws/nx-plugin:connection --sourceProject=@dungeon-adventure/game-ui --targetProject=story --no-interactive --dry-runFichiers modifiés par connexion UI -> Agent Story
Le générateur connection génère/met à jour ces fichiers :
Répertoirepackages/
Répertoiregame-ui/
Répertoiresrc/
Répertoirecomponents/
- AguiProvider.tsx
CopilotKitProvideravec chaque agent AG-UI connecté enregistré Répertoirecopilot/
- index.tsx
CopilotChat/CopilotSidebar/CopilotPopupthématisés Shadcn - ShadcnAssistantMessage.tsx, ShadcnUserMessage.tsx, ShadcnChatInput.tsx, ShadcnCursor.tsx, copilot.css
- index.tsx
- AguiProvider.tsx
Répertoirehooks/
- useAguiStoryAgent.tsx Construit un
HttpAgent, injecte le token bearer Cognito et remplitthreadIdà l’id de session de 33 caractères d’AgentCore
- useAguiStoryAgent.tsx Construit un
- main.tsx Enveloppe
<App />dans<AguiProvider>
Le générateur :
- Détecte le
uxProviderdu site web React (Shadcn ici) et fournit les composants de chat correspondants. - Enregistre chaque agent connecté sur un seul
CopilotKitProvider— réexécuter pour un autre agent ajoute simplement un autre hook. - Lit l’ARN du runtime de l’agent depuis Runtime Configuration, construit l’URL d’invocation AgentCore et attache le token bearer Cognito plus l’en-tête d’id de session AgentCore.
Pour plus de détails, consultez le guide de connexion React vers AG-UI.
Interface utilisateur du jeu : Infrastructure
Section intitulée « Interface utilisateur du jeu : Infrastructure »Créons le sous-projet final pour l’infrastructure CDK.
- Installez le Nx Console VSCode Plugin si ce n'est pas déjà fait
- Ouvrez la console Nx dans VSCode
- Cliquez sur
Generate (UI)dans la section "Common Nx Commands" - Recherchez
@aws/nx-plugin - ts#infra - Remplissez les paramètres requis
- name: infra
- Cliquez sur
Generate
pnpm nx g @aws/nx-plugin:ts#infra --name=infra --no-interactiveyarn nx g @aws/nx-plugin:ts#infra --name=infra --no-interactivenpx nx g @aws/nx-plugin:ts#infra --name=infra --no-interactivebunx nx g @aws/nx-plugin:ts#infra --name=infra --no-interactiveVous pouvez également effectuer une simulation pour voir quels fichiers seraient modifiés
pnpm nx g @aws/nx-plugin:ts#infra --name=infra --no-interactive --dry-runyarn nx g @aws/nx-plugin:ts#infra --name=infra --no-interactive --dry-runnpx nx g @aws/nx-plugin:ts#infra --name=infra --no-interactive --dry-runbunx nx g @aws/nx-plugin:ts#infra --name=infra --no-interactive --dry-runVous verrez de nouveaux fichiers apparaître/changer dans votre arborescence de fichiers.
Fichiers modifiés par ts#infra
Le générateur ts#infra génère/met à jour ces fichiers. Examinons certains des fichiers clés mis en évidence dans l’arborescence :
Répertoirepackages/
Répertoirecommon/
Répertoireconstructs/
Répertoiresrc/
Répertoirecore/
- checkov.ts
- index.ts
Répertoireinfra
Répertoiresrc/
Répertoirestages/
- application-stage.ts stacks CDK définis ici
Répertoirestacks/
- application-stack.ts ressources CDK définies ici
- main.ts point d’entrée qui définit toutes les étapes
- cdk.json
- checkov.yml
- project.json
- …
- package.json
- tsconfig.json ajoute des références
- tsconfig.base.json ajoute un alias
import { ApplicationStage } from './stages/application-stage.js';import { App } from ':dungeon-adventure/common-constructs';
const app = new App();
// Utilisez ceci pour déployer votre propre environnement sandbox (suppose vos informations d'identification CLI)new ApplicationStage(app, 'dungeon-adventure-infra-sandbox', {  env: {    account: process.env.CDK_DEFAULT_ACCOUNT,    region: process.env.CDK_DEFAULT_REGION,  },});
app.synth();C’est le point d’entrée de votre application CDK.
import { Stack, StackProps } from 'aws-cdk-lib';import { Construct } from 'constructs';
export class ApplicationStack extends Stack {  constructor(scope: Construct, id: string, props?: StackProps) {    super(scope, id, props);
// Le code qui définit votre stack va ici }}Instancions nos constructs CDK pour construire notre jeu d’aventure de donjon.
Tâche 6 : Mettre à jour notre infrastructure
Section intitulée « Tâche 6 : Mettre à jour notre infrastructure »Mettons à jour packages/infra/src/stacks/application-stack.ts pour instancier certains de nos constructs générés :
import {  GameApi,  GameUI,  InventoryMcpServer,  StoryAgent,  UserIdentity,} from ':dungeon-adventure/common-constructs';import { Stack, StackProps, CfnOutput } from 'aws-cdk-lib';import { Construct } from 'constructs';export class ApplicationStack extends Stack {  constructor(scope: Construct, id: string, props?: StackProps) {    super(scope, id, props);
    const userIdentity = new UserIdentity(this, 'UserIdentity');
    const gameApi = new GameApi(this, 'GameApi', {      integrations: GameApi.defaultIntegrations(this).build(),    });
    const mcpServer = new InventoryMcpServer(this, 'InventoryMcpServer');
    // Use Cognito for user authentication with the agent    const storyAgent = new StoryAgent(this, 'StoryAgent', {      identity: userIdentity,    });
    new CfnOutput(this, 'StoryAgentArn', {      value: storyAgent.agentCoreRuntime.agentRuntimeArn,    });    new CfnOutput(this, 'InventoryMcpArn', {      value: mcpServer.agentCoreRuntime.agentRuntimeArn,    });
    // Grant the agent permissions to invoke our mcp server    mcpServer.grantInvokeAccess(storyAgent);
    // Grant the authenticated role access to invoke the api    gameApi.grantInvokeAccess(userIdentity.identityPool.authenticatedRole);
    new GameUI(this, 'GameUI');  }}
import { Stack, StackProps } from 'aws-cdk-lib';import { GameApi, GameUI, InventoryMcpServer, StoryAgent, UserIdentity,} from ':dungeon-adventure/common-constructs';import { Stack, StackProps, CfnOutput } from 'aws-cdk-lib';import { Construct } from 'constructs';
export class ApplicationStack extends Stack { constructor(scope: Construct, id: string, props?: StackProps) { super(scope, id, props);
// The code that defines your stack goes here const userIdentity = new UserIdentity(this, 'UserIdentity');
const gameApi = new GameApi(this, 'GameApi', { integrations: GameApi.defaultIntegrations(this).build(), });
const mcpServer = new InventoryMcpServer(this, 'InventoryMcpServer');
// Use Cognito for user authentication with the agent const storyAgent = new StoryAgent(this, 'StoryAgent', { identity: userIdentity, });
new CfnOutput(this, 'StoryAgentArn', { value: storyAgent.agentCoreRuntime.agentRuntimeArn, }); new CfnOutput(this, 'InventoryMcpArn', { value: mcpServer.agentCoreRuntime.agentRuntimeArn, });
// Grant the agent permissions to invoke our mcp server mcpServer.grantInvokeAccess(storyAgent);
// Grant the authenticated role access to invoke the api gameApi.grantInvokeAccess(userIdentity.identityPool.authenticatedRole);
new GameUI(this, 'GameUI'); }}Tâche 7 : Construire le code
Section intitulée « Tâche 7 : Construire le code »Commandes Nx
Cibles uniques vs multiples
Section intitulée « Cibles uniques vs multiples »La commande run-many exécutera une cible sur plusieurs sous-projets listés (--all les ciblera tous). Cela garantit que les dépendances sont exécutées dans le bon ordre.
Vous pouvez également déclencher un build (ou toute autre tâche) pour une cible de projet unique en exécutant la cible directement sur le projet. Par exemple, pour construire le projet @dungeon-adventure/infra, exécutez la commande suivante :
pnpm nx build infrayarn nx build infranpx nx build infrabunx nx build infraVous pouvez également omettre la portée et utiliser la syntaxe abrégée Nx si vous préférez :
pnpm nx build infrayarn nx build infranpx nx build infrabunx nx build infraVisualiser vos dépendances
Section intitulée « Visualiser vos dépendances »Pour visualiser vos dépendances, exécutez :
pnpm nx graphyarn nx graphnpx nx graphbunx nx graph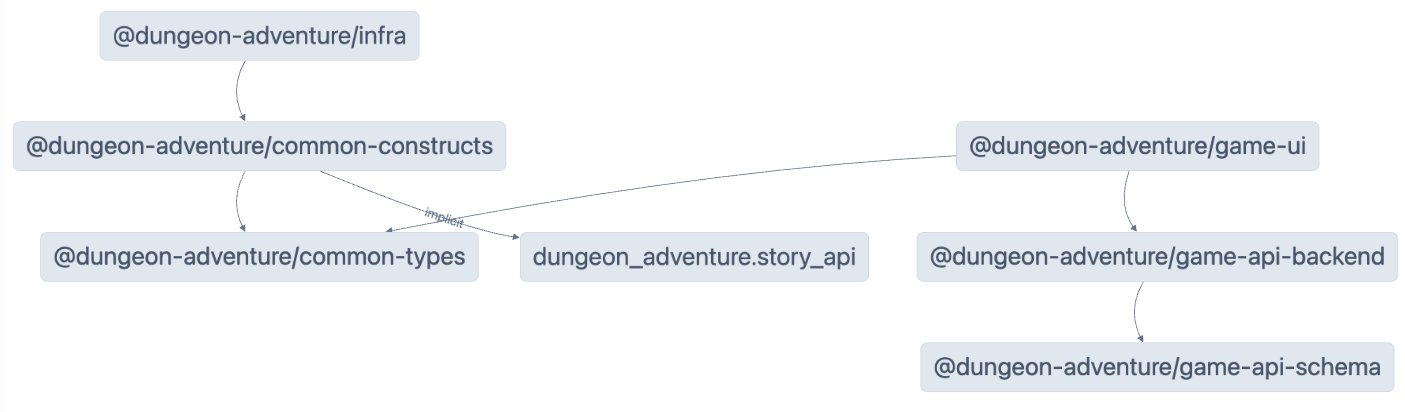
Mise en cache
Section intitulée « Mise en cache »Nx s’appuie sur la mise en cache pour que vous puissiez réutiliser les artefacts de builds précédents afin d’accélérer le développement. Il y a une certaine configuration requise pour que cela fonctionne correctement et il peut y avoir des cas où vous souhaitez effectuer un build sans utiliser le cache. Pour ce faire, ajoutez simplement l’argument --skip-nx-cache à votre commande. Par exemple :
pnpm nx build infra --skip-nx-cacheyarn nx build infra --skip-nx-cachenpx nx build infra --skip-nx-cachebunx nx build infra --skip-nx-cacheSi pour une raison quelconque vous souhaitez vider votre cache (stocké dans le dossier .nx), vous pouvez exécuter la commande suivante :
pnpm nx resetyarn nx resetnpx nx resetbunx nx resetEn utilisant la ligne de commande, exécutez la commande suivante pour corriger d’abord les problèmes de lint :
pnpm lintyarn lintnpm run lintbun lintEnsuite, exécutez la commande suivante pour un build complet :
pnpm buildyarn buildnpm run buildbun buildVous serez invité avec le message suivant :
 NX   The workspace is out of sync
[@nx/js:typescript-sync]: Certains fichiers de configuration TypeScript manquent de références de projet aux projets dont ils dépendent ou contiennent des références de projet obsolètes.
Cela entraînera une erreur en CI.
? Souhaitez-vous synchroniser les changements identifiés pour mettre à jour votre workspace ? …Oui, synchroniser les changements et exécuter les tâchesNon, exécuter les tâches sans synchroniser les changements
Ce message indique que NX a détecté certains fichiers qui peuvent être mis à jour automatiquement pour vous. Dans ce cas, il fait référence aux fichiers tsconfig.json qui n’ont pas de références TypeScript configurées sur les projets référencés.
Sélectionnez l’option Oui, synchroniser les changements et exécuter les tâches pour continuer. Vous devriez remarquer que toutes vos erreurs d’importation liées à l’IDE sont automatiquement résolues car le générateur de synchronisation ajoutera automatiquement les références TypeScript manquantes !
Tous les artefacts construits sont maintenant disponibles dans le dossier dist/ situé à la racine du monorepo. C’est une pratique standard lors de l’utilisation de projets générés par le @aws/nx-plugin car cela ne pollue pas votre arborescence de fichiers avec des fichiers générés. Si vous souhaitez nettoyer vos fichiers, supprimez le dossier dist/ sans vous soucier des artefacts de build dispersés dans l’arborescence de fichiers.
Félicitations ! Vous avez créé tous les sous-projets requis pour commencer à implémenter le cœur de notre jeu d’aventure de donjon IA. 🎉🎉🎉