

모노레포 설정하기
작업 1: 모노레포 생성하기
섹션 제목: “작업 1: 모노레포 생성하기”새 모노레포를 생성하려면 원하는 디렉토리 내에서 다음 명령을 실행하세요:
워크스페이스 생성@aws/nx-workspace
pnpm create @aws/nx-workspace dungeon-adventure --iac=cdk yarn create @aws/nx-workspace dungeon-adventure --iac=cdk npm create @aws/nx-workspace -- dungeon-adventure --iac=cdk bun create @aws/nx-workspace dungeon-adventure --iac=cdk이 단계의 옵션2
필수
이렇게 하면 dungeon-adventure 디렉토리 내에 NX 모노레포가 설정됩니다. VSCode에서 디렉토리를 열면 다음과 같은 파일 구조를 볼 수 있습니다:
디렉터리.nx/
- …
디렉터리.vscode/
- …
디렉터리node_modules/
- …
디렉터리packages/ 하위 프로젝트가 위치할 곳
- …
- .gitignore
- biome.json Biome을 린팅 및 포맷팅을 위해 구성
- nx.json Nx CLI 및 모노레포 기본값 구성
- package.json 모든 node 의존성이 여기에 정의됨
- pnpm-lock.yaml 또는 패키지 매니저에 따라 bun.lock, yarn.lock, package-lock.json
- pnpm-workspace.yaml pnpm 사용 시
- README.md
- tsconfig.base.json 모든 node 기반 하위 프로젝트가 이를 확장함
- tsconfig.json
- aws-nx-plugin.config.mts Nx Plugin for AWS 구성
작업 2: 던전 어드벤처 게임 스캐폴딩하기
섹션 제목: “작업 2: 던전 어드벤처 게임 스캐폴딩하기”워크스페이스가 준비되면 게임의 하위 프로젝트들(Game API, Story Agent, Inventory MCP 서버, 게임 데이터베이스, 웹사이트)과 이들을 연결하는 연결을 스캐폴딩합니다. 두 가지 방법이 있습니다:
- 빠른 방법 — 아래 다이어그램에서 명령을 직접 복사하여 실행합니다. 동일한 시작점에 도달하는 가장 빠른 방법입니다.
- 단계별 방법 — 아래 섹션을 펼쳐 각 제너레이터를 직접 실행하고 각각이 생성하는 것을 정확히 확인합니다.
아래 다이어그램은 던전 어드벤처 워크스페이스 그 자체입니다: 이 모듈에서 구축할 모든 프로젝트, 컴포넌트, 연결이 포함되어 있습니다. 명령 복사를 눌러 전체 시리즈를 가져온 다음, 작업 1에서 생성한 dungeon-adventure 디렉토리 내에서 실행하세요.
단계별
명령을 한 번에 복사하는 대신 각 제너레이터를 개별적으로 실행할 수 있습니다. 이는 각 제너레이터가 워크스페이스에 추가하는 것을 이해하는 가장 좋은 방법입니다. 작업 1에서 생성한 dungeon-adventure 디렉토리 내에서 각 제너레이터를 차례로 실행하세요.
Game API 생성하기
섹션 제목: “Game API 생성하기”먼저 Game API를 생성하겠습니다. 이를 위해 다음 단계를 사용하여 GameApi라는 tRPC API를 생성합니다:
이 제너레이터 실행@aws/nx-plugin:ts#api
pnpm nx g @aws/nx-plugin:ts#api --no-interactive yarn nx g @aws/nx-plugin:ts#api --no-interactive npx nx g @aws/nx-plugin:ts#api --no-interactive bunx nx g @aws/nx-plugin:ts#api --no-interactive- 설치 Nx Console VSCode Plugin 아직 설치하지 않았다면
- VSCode에서 Nx 콘솔 열기
- 클릭
Generate (UI)"Common Nx Commands" 섹션에서 - 검색
@aws/nx-plugin - ts#api - 필수 매개변수 입력
- 클릭
Generate
이 단계의 옵션2
필수
파일 트리에 새 파일들이 나타나는 것을 볼 수 있습니다.
생성된 ts#api 파일을 자세히 살펴보기
다음은 ts#api 제너레이터에 의해 생성된 모든 파일의 목록입니다. 파일 트리에서 강조 표시된 주요 파일 중 일부를 살펴보겠습니다:
디렉터리packages/
디렉터리common/
디렉터리constructs/
디렉터리src/
디렉터리app/ 앱 특정 cdk 구성
디렉터리apis/
- game-api.ts tRPC API를 생성하는 cdk 구성
- index.ts
- …
- index.ts
디렉터리core/ 일반 cdk 구성
디렉터리api/
- rest-api.ts API Gateway Rest API를 위한 기본 cdk 구성
- trpc-utils.ts trpc API CDK 구성을 위한 유틸리티
- utils.ts API 구성을 위한 유틸리티
- index.ts
- runtime-config.ts
- index.ts
- project.json
- …
디렉터리game-api/ tRPC API
디렉터리src/
디렉터리client/ ts 머신 간 호출에 일반적으로 사용되는 바닐라 클라이언트
- index.ts
디렉터리middleware/ powertools 계측
- error.ts
- index.ts
- logger.ts
- metrics.ts
- tracer.ts
디렉터리schema/ API의 입력 및 출력 정의
- index.ts
- echo.ts 샘플 입력 및 출력 스키마
- z-async-iterable.ts tRPC 구독 출력을 위한 래퍼 Zod 스키마
디렉터리procedures/ API 프로시저/라우트의 특정 구현
- echo.ts 샘플 프로시저 구현
- index.ts
- init.ts 컨텍스트 및 미들웨어 설정
- handler.ts Lambda 핸들러 진입점 (REST API를 위한 응답 스트리밍 사용)
- local-server.ts tRPC 서버를 로컬에서 실행할 때 사용
- router.ts tRPC 라우터 및 모든 프로시저 정의
- project.json
- …
- vitest.workspace.ts
주요 파일들을 살펴보겠습니다:
import { echo } from './procedures/echo.js';import { t } from './init.js';
export const router = t.router;
export const appRouter = router({  echo,});
export type AppRouter = typeof appRouter;라우터는 API의 tRPC 라우터를 정의하며 모든 API 메서드를 선언할 곳입니다. 위에서 볼 수 있듯이 ./procedures/echo.ts 파일에 구현이 있는 echo라는 메서드가 있습니다. Lambda 핸들러 진입점은 handler.ts에 있으며, 제너레이터에 의해 자동으로 구성됩니다.
import { publicProcedure } from '../init.js';import { EchoInputSchema, EchoOutputSchema } from '../schema/index.js';
export const echo = publicProcedure .input(EchoInputSchema) .output(EchoOutputSchema) .query((opts) => ({ message: opts.input.message }));이 파일은 echo 메서드의 구현이며, 입력 및 출력 데이터 구조를 선언하여 강력하게 타입이 지정되어 있습니다.
import { z } from 'zod';
export const EchoInputSchema = z.object({  message: z.string().max(1024),});
export type IEchoInput = z.TypeOf<typeof EchoInputSchema>;
export const EchoOutputSchema = z.object({  message: z.string().max(1024),});
export type IEchoOutput = z.TypeOf<typeof EchoOutputSchema>;모든 tRPC 스키마 정의는 Zod를 사용하여 정의되며 z.TypeOf 구문을 통해 TypeScript 타입으로 내보내집니다.
import { Construct } from 'constructs';import * as url from 'url';import { Distribution } from 'aws-cdk-lib/aws-cloudfront';import {  Code,  Runtime,  Function,  FunctionProps,  Tracing,} from 'aws-cdk-lib/aws-lambda';import { RuntimeConfig } from '../../core/runtime-config.js';import {  AuthorizationType,  LambdaIntegration,  ResponseTransferMode,} from 'aws-cdk-lib/aws-apigateway';import { Aspects, Duration } from 'aws-cdk-lib';import {  PolicyDocument,  PolicyStatement,  Effect,  AnyPrincipal,  IGrantable,  Grant,} from 'aws-cdk-lib/aws-iam';import {  ApiIntegrations,  IntegrationBuilder,  RestApiIntegration,} from '../../core/api/utils.js';import { findCloudFrontDomainNames } from '../../core/cloudfront.js';import { AddCorsPreflightAspect, RestApi } from '../../core/api/rest-api.js';import { Procedures, routerToOperations } from '../../core/api/trpc-utils.js';import { AppRouter, appRouter } from '@dungeon-adventure/game-api';
// String union type for all API operation namestype Operations = Procedures<AppRouter>;
/** * Properties for creating a GameApi construct * * @template TIntegrations - Map of operation names to their integrations */export interface GameApiProps<  TIntegrations extends ApiIntegrations<Operations, RestApiIntegration>,> {  /**   * Map of operation names to their API Gateway integrations   */  integrations: TIntegrations;  /**   * Whether to enable AWS WAFv2 with the default managed ruleset on the API's default stage.   *   * @default true   */  enableWaf?: boolean;}
/** * A CDK construct that creates and configures an AWS API Gateway REST API * specifically for GameApi. * @template TIntegrations - Map of operation names to their integrations */export class GameApi<  TIntegrations extends ApiIntegrations<Operations, RestApiIntegration>,> extends RestApi<Operations, TIntegrations> {  private allowedOrigins: readonly string[] = ['*'];
  /**   * Creates default integrations for all operations, which implement each operation as   * its own individual lambda function.   *   * @param scope - The CDK construct scope   * @returns An IntegrationBuilder with default lambda integrations   */  public static defaultIntegrations = (scope: Construct) => {    const rc = RuntimeConfig.ensure(scope);    return IntegrationBuilder.rest({      pattern: 'isolated',      operations: routerToOperations(appRouter),      defaultIntegrationOptions: {        runtime: Runtime.NODEJS_24_X,        handler: 'index.handler',        code: Code.fromAsset(          url.fileURLToPath(            new URL(              '../../../../../../dist/packages/game-api/bundle',              import.meta.url,            ),          ),        ),        timeout: Duration.seconds(30),        tracing: Tracing.ACTIVE,      } as FunctionProps,      buildDefaultIntegration: (op, props: FunctionProps) => {        const handler = new Function(scope, `GameApi${op}Handler`, props);        handler.addEnvironment(          'RUNTIME_CONFIG_APP_ID',          rc.appConfigApplicationId,        );        rc.grantReadAppConfig(handler);        return {          handler,          integration: new LambdaIntegration(handler, {            responseTransferMode: ResponseTransferMode.STREAM,          }),        };      },    });  };
  constructor(    scope: Construct,    id: string,    props: GameApiProps<TIntegrations>,  ) {    super(scope, id, {      apiName: 'GameApi',      defaultMethodOptions: {        authorizationType: AuthorizationType.IAM,      },      deployOptions: {        tracingEnabled: true,      },      policy: new PolicyDocument({        statements: [          // Open up OPTIONS to allow browsers to make unauthenticated preflight requests          new PolicyStatement({            effect: Effect.ALLOW,            principals: [new AnyPrincipal()],            actions: ['execute-api:Invoke'],            resources: ['execute-api:/*/OPTIONS/*'],          }),        ],      }),      operations: routerToOperations(appRouter),      ...props,    });    Aspects.of(this).add(new AddCorsPreflightAspect(() => this.allowedOrigins));  }
  /**   * Restricts CORS to the provided origins   *   * Configures the CloudFront distribution domains or origin strings   * as the only permitted CORS origins in API Gateway preflight responses and the AWS   * Lambda integrations. Any custom domain names (aliases) configured on a CloudFront   * distribution are included automatically alongside its default `*.cloudfront.net`   * domain.   *   * @param origins - The origin strings, CloudFront distributions, or objects containing a CloudFront distribution to grant CORS from   */  public restrictCorsTo(    ...origins: (string | Distribution | { cloudFrontDistribution: Distribution })[]  ) {    const allowedOrigins = origins.flatMap((origin) =>      typeof origin === 'string'        ? [origin]        : findCloudFrontDomainNames(            'cloudFrontDistribution' in origin              ? origin.cloudFrontDistribution              : origin,          ).map((domain) => `https://${domain}`),    );
    this.allowedOrigins = allowedOrigins;
    // Set ALLOWED_ORIGINS environment variable for all Lambda integrations    Object.values(this.integrations).forEach((integration) => {      if ('handler' in integration && integration.handler instanceof Function) {        integration.handler.addEnvironment(          'ALLOWED_ORIGINS',          allowedOrigins.join(','),        );      }    });  }
  /**   * Grants IAM permissions to invoke any method on this API.   *   * @param grantee - The IAM principal to grant permissions to   */  public grantInvokeAccess(grantee: IGrantable) {    // Here we grant grantee permission to call the api.    // Machine to machine fine-grained access can be defined here using more specific principals (eg roles or    // users) and resources (eg which api paths may be invoked by which principal) if required.    this.api.addToResourcePolicy(      new PolicyStatement({        effect: Effect.ALLOW,        principals: [grantee.grantPrincipal],        actions: ['execute-api:Invoke'],        resources: ['execute-api:/*'],      }),    );
Grant.addToPrincipal({ grantee, actions: ['execute-api:Invoke'], resourceArns: [this.api.arnForExecuteApi('*', '/*', '*')], }); }}이것은 GameApi를 정의하는 CDK 구성입니다. tRPC API의 각 프로시저에 대해 Lambda 함수를 자동으로 생성하는 defaultIntegrations 메서드를 제공하며, 번들된 API 구현을 가리킵니다. 이는 백엔드 프로젝트의 빌드 타겟의 일부로 이미 번들링했기 때문에 cdk synth 시점에 번들링이 발생하지 않음을 의미합니다(NodeJsFunction 사용과 반대).
Story Agent 생성하기
섹션 제목: “Story Agent 생성하기”이제 Story Agent를 생성하겠습니다.
Story agent: Python 프로젝트
섹션 제목: “Story agent: Python 프로젝트”Python 프로젝트를 생성하려면:
이 제너레이터 실행@aws/nx-plugin:py#project
pnpm nx g @aws/nx-plugin:py#project --no-interactive yarn nx g @aws/nx-plugin:py#project --no-interactive npx nx g @aws/nx-plugin:py#project --no-interactive bunx nx g @aws/nx-plugin:py#project --no-interactive- 설치 Nx Console VSCode Plugin 아직 설치하지 않았다면
- VSCode에서 Nx 콘솔 열기
- 클릭
Generate (UI)"Common Nx Commands" 섹션에서 - 검색
@aws/nx-plugin - py#project - 필수 매개변수 입력
- 클릭
Generate
이 단계의 옵션1
필수
파일 트리에 새 파일들이 나타나는 것을 볼 수 있습니다.
생성된 py#project 파일을 자세히 살펴보기
py#project는 다음 파일들을 생성합니다:
디렉터리.venv/ 모노레포를 위한 단일 가상 환경
- …
디렉터리packages/
디렉터리story/
디렉터리dungeon_adventure_story/ python 모듈
- …
디렉터리tests/
- …
- .python-version
- pyproject.toml
- project.json
- .python-version 고정된 uv python 버전
- pyproject.toml
- uv.lock
이것은 공유 가상 환경을 가진 Python 프로젝트와 UV Workspace를 구성했습니다.
Story agent
섹션 제목: “Story agent”py#agent 제너레이터를 사용하여 프로젝트에 Strands 에이전트를 추가하려면:
이 제너레이터 실행@aws/nx-plugin:py#agent
pnpm nx g @aws/nx-plugin:py#agent --no-interactive yarn nx g @aws/nx-plugin:py#agent --no-interactive npx nx g @aws/nx-plugin:py#agent --no-interactive bunx nx g @aws/nx-plugin:py#agent --no-interactive- 설치 Nx Console VSCode Plugin 아직 설치하지 않았다면
- VSCode에서 Nx 콘솔 열기
- 클릭
Generate (UI)"Common Nx Commands" 섹션에서 - 검색
@aws/nx-plugin - py#agent - 필수 매개변수 입력
- 클릭
Generate
이 단계의 옵션3
필수
infra = agentcore | agentcore-ecr
파일 트리에 새 파일들이 나타나는 것을 볼 수 있습니다.
생성된 py#agent 파일을 자세히 살펴보기
py#agent는 다음 파일들을 생성합니다:
디렉터리packages/
디렉터리story/
디렉터리dungeon_adventure_story/ python 모듈
디렉터리agent/
- main.py Bedrock AgentCore Runtime에서 에이전트의 진입점
- agent.py 예제 에이전트 및 도구 정의
- session.py 대화 상태를 유지하기 위한 SessionManager 해결
디렉터리middleware/
- session_id_middleware.py 요청에 대한 인바운드 AgentCore 세션 ID 바인딩
- Dockerfile AgentCore Runtime에 배포하기 위한 도커 이미지 정의
디렉터리common/constructs/
디렉터리src
디렉터리app/agents/story-agent/
- story-agent.ts Story 에이전트를 AgentCore Runtime에 배포하기 위한 구성
파일 중 일부를 자세히 살펴보겠습니다:
from contextlib import contextmanager
from strands import Agent, toolfrom strands.hooks import HookCallback, HookProviderfrom strands_tools import current_timefrom dungeon_adventure_agent_connection import log_model_errors, log_tool_errors

@tooldef subtract(a: int, b: int) -> int:    return a - b

AGENT_HOOKS: list[HookProvider | HookCallback] = [log_model_errors, log_tool_errors]

@contextmanagerdef get_agent(): yield Agent( name="StoryAgent", description="StoryAgent Strands Agent", system_prompt="""You are a mathematical wizard.Use your tools for mathematical tasks.Refer to tools as your 'spellbook'.""", tools=[subtract, current_time], hooks=AGENT_HOOKS, )이것은 예제 Strands 에이전트를 생성하고 빼기 도구를 정의합니다. log_model_errors와 log_tool_errors는 공유 dungeon_adventure_agent_connection 프로젝트의 훅으로, 모델/도구 실패를 조용히 실패하도록 두는 대신 로깅합니다.
import uuid
from fastapi import Requestfrom starlette.middleware.base import BaseHTTPMiddleware
from dungeon_adventure_agent_connection import session_id_context
SESSION_ID_HEADER = "x-amzn-bedrock-agentcore-runtime-session-id"

class SessionIdMiddleware(BaseHTTPMiddleware):    """Bind the session ID for this request so downstream MCP / A2A clients forward it on outbound calls."""
async def dispatch(self, request: Request, call_next): session_id = request.headers.get(SESSION_ID_HEADER) or str(uuid.uuid4()) with session_id_context(session_id): return await call_next(request)SessionIdMiddleware는 요청 기간 동안 인바운드 AgentCore 런타임 세션 ID를 ContextVar에 바인딩합니다.
import loggingimport uuidfrom contextlib import asynccontextmanager
from ag_ui.core import EventType, RunAgentInput, RunErrorEventfrom ag_ui.encoder import EventEncoderfrom ag_ui_strands import StrandsAgent, StrandsAgentConfigfrom dungeon_adventure_agent_connection import get_current_session_id, session_id_contextfrom fastapi import FastAPI, Requestfrom fastapi.middleware.cors import CORSMiddlewarefrom fastapi.responses import StreamingResponse
from .agent import AGENT_HOOKS, get_agentfrom .middleware.session_id_middleware import SESSION_ID_HEADER, SessionIdMiddlewarefrom .session import get_session_manager
logging.basicConfig(level=logging.INFO)

@asynccontextmanagerasync def lifespan(app: FastAPI):    with get_agent() as agent:        app.state.agui_agent = StrandsAgent(            agent=agent,            name="StoryAgent",            description="A Strands Agent exposed via the AG-UI protocol.",            # A per-thread session manager, not the template Agent's own, since            # AG-UI caches one Strands agent per thread_id.            config=StrandsAgentConfig(session_manager_provider=lambda _input_data: get_session_manager()),            # Required as well as on the template Agent: AG-UI keeps only the            # built HookRegistry, so hooks it can't read back are never            # registered and model/tool failures go unreported.            hooks=AGENT_HOOKS,        )        yield

app = FastAPI(title="AWS Strands - StoryAgent", lifespan=lifespan)app.add_middleware(    CORSMiddleware,    allow_origins=["*"],    allow_credentials=True,    allow_methods=["*"],    allow_headers=["*"],)app.add_middleware(SessionIdMiddleware)

@app.post("/invocations")async def invocations(request: Request):    # Validate the body manually since AgentCore may omit Content-Type.    encoder = EventEncoder(accept=request.headers.get("accept") or "")    raw = await request.body()    try:        input_data = RunAgentInput.model_validate_json(raw)    except Exception as exc:        message = f"Invalid RunAgentInput: {str(exc)[:200]}"
        async def _bad():            yield encoder.encode(RunErrorEvent(type=EventType.RUN_ERROR, message=message, code="BAD_REQUEST"))
        return StreamingResponse(_bad(), media_type=encoder.get_content_type())
    session_id = request.headers.get(SESSION_ID_HEADER) or get_current_session_id()
    async def event_generator():        # Re-bind the session: the streaming body runs outside the middleware.        with session_id_context(session_id or str(uuid.uuid4())):            async for event in request.app.state.agui_agent.run(input_data):                try:                    yield encoder.encode(event)                except Exception as e:                    error_event = RunErrorEvent(                        type=EventType.RUN_ERROR,                        message=f"Encoding error: {e}",                        code="ENCODING_ERROR",                    )                    yield encoder.encode(error_event)                    break
    return StreamingResponse(event_generator(), media_type=encoder.get_content_type())

@app.get("/ping")async def ping(): return {"status": "healthy"}이것은 에이전트의 진입점입니다. --protocol=ag-ui를 선택했기 때문에 제너레이터는 Strands Agent를 ag_ui_strands의 StrandsAgent로 래핑하고 AG-UI 프로토콜을 사용하는 FastAPI 앱에 마운트합니다. 이것이 React 웹사이트에서 CopilotKit가 통신할 대상입니다. 에이전트는 lifespan 핸들러 내부에서 빌드되며 임포트 시점이 아닙니다. 따라서 컨테이너 시작이 구성을 소유하며 각 AgentCore 세션은 자체 컨테이너를 가집니다. 위에서 본 SessionIdMiddleware는 인바운드 AgentCore 런타임 세션 ID를 전달하므로 나중에 연결할 다운스트림 MCP/A2A 클라이언트(예: 모듈 2의 Inventory MCP 서버)가 아웃바운드 호출에서 자동으로 전달합니다. AG-UI는 thread_id당 하나의 Strands 에이전트를 캐시하므로 템플릿 에이전트 자체의 세션 매니저가 아닌 session_manager_provider를 연결합니다. 이렇게 하면 각 스레드가 자체 SessionManager를 가지므로 대화 기록이 턴 간에 유지됩니다. 그 get_session_manager() 함수는 생성된 session.py 형제에서 가져옵니다: 배포 시 제너레이터가 자동으로 프로비저닝하는 S3 버킷으로 백업되는 strands.session.S3SessionManager를 반환합니다. agent-dev(LOCAL_DEV=true) 하에서는 배포된 구성과 관계없이 항상 로컬 임시 디렉토리에 쓰는 FileSessionManager를 반환합니다.
import { Fn, Lazy, Names, RemovalPolicy, Stack } from 'aws-cdk-lib';import { Connections, IConnectable } from 'aws-cdk-lib/aws-ec2';import {  BlockPublicAccess,  Bucket,  BucketEncryption,} from 'aws-cdk-lib/aws-s3';import { Key } from 'aws-cdk-lib/aws-kms';import {  CfnDelivery,  CfnDeliveryDestination,  CfnDeliverySource,  LogGroup,  RetentionDays,} from 'aws-cdk-lib/aws-logs';import { Construct } from 'constructs';import * as path from 'path';import * as url from 'url';import {  AgentCoreRuntime,  AgentRuntimeArtifact,  ProtocolType,  Runtime,  RuntimeProps,  RuntimeAuthorizerConfiguration,} from 'aws-cdk-lib/aws-bedrockagentcore';import {  PolicyStatement,  Effect,  ServicePrincipal,  IGrantable,  IPrincipal,} from 'aws-cdk-lib/aws-iam';import { IUserPool, IUserPoolClient } from 'aws-cdk-lib/aws-cognito';import { suppressRules } from '../../../core/checkov.js';import { RuntimeConfig } from '../../../core/runtime-config.js';import { findWorkspaceRoot } from '../../../core/workspace.js';
export type StoryAgentProps = Omit<  RuntimeProps,  | 'runtimeName'  | 'protocolConfiguration'  | 'agentRuntimeArtifact'  | 'authorizerConfiguration'> & {  /**   * Identity details for Cognito Authentication   */  identity: {    userPool: IUserPool;    userPoolClient: IUserPoolClient;  };  /**   * Removal policy for the session bucket holding the agent's conversation   * history. Defaults to retaining it so a stack `destroy` doesn't silently   * delete session data — set to `RemovalPolicy.DESTROY` for sandbox/CI teardown.   *   * @default RemovalPolicy.RETAIN   */  readonly sessionBucketRemovalPolicy?: RemovalPolicy;};
export class StoryAgent extends Construct implements IGrantable, IConnectable {  public readonly code: AgentRuntimeArtifact;  public readonly agentCoreRuntime: Runtime;  /** Default Gateway target name for this agent. */  public readonly agentName = 'story-agent';  /** Inbound auth — a fronting Gateway uses this to pick its outbound credential. */  public readonly auth = 'cognito';
  constructor(scope: Construct, id: string, props: StoryAgentProps) {    super(scope, id);
    const rc = RuntimeConfig.ensure(this);
    // Resolve the packaged code directory, uploaded as a zip asset    const bundleDir = path.join(      findWorkspaceRoot(url.fileURLToPath(new URL(import.meta.url))),      'dist/packages/story/package/story-agent',    );
    // The `opentelemetry-instrument` prefix auto-instruments with the AWS Distro    // for OpenTelemetry packaged alongside the code.    // https://docs.aws.amazon.com/bedrock-agentcore/latest/devguide/observability-configure.html    this.code = AgentRuntimeArtifact.fromCodeAsset({      path: bundleDir,      runtime: AgentCoreRuntime.PYTHON_3_14,      entrypoint: ['opentelemetry-instrument', 'main.py'],    });
    const {      identity,      sessionBucketRemovalPolicy = RemovalPolicy.RETAIN,      ...restProps    } = props ?? {};
    const sessionKey = new Key(this, 'SessionKey', {      enableKeyRotation: true,    });
    // Allow CloudWatch Logs to use the session key for server access log delivery.    const stack = Stack.of(this);    sessionKey.addToResourcePolicy(      new PolicyStatement({        effect: Effect.ALLOW,        principals: [          new ServicePrincipal(`logs.${stack.region}.amazonaws.com`),        ],        actions: [          'kms:Encrypt',          'kms:Decrypt',          'kms:ReEncrypt*',          'kms:GenerateDataKey*',          'kms:DescribeKey',        ],        resources: ['*'],        conditions: {          ArnLike: {            'kms:EncryptionContext:aws:logs:arn': `arn:aws:logs:${stack.region}:${stack.account}:log-group:*`,          },        },      }),    );
    const sessionAccessLogs = new LogGroup(this, 'SessionAccessLogs', {      retention: RetentionDays.ONE_YEAR,      encryptionKey: sessionKey,      removalPolicy: RemovalPolicy.DESTROY,    });
    const sessionBucket = new Bucket(this, 'SessionBucket', {      enforceSSL: true,      removalPolicy: sessionBucketRemovalPolicy,      encryption: BucketEncryption.KMS,      encryptionKey: sessionKey,      blockPublicAccess: BlockPublicAccess.BLOCK_ALL,    });    suppressRules(      sessionBucket,      ['CKV_AWS_21'],      'Session data does not need versioning enabled',    );    suppressRules(      sessionBucket,      ['CKV2_AWS_61'],      'Lifecycle configuration not required for session data',    );    suppressRules(      sessionBucket,      ['CKV_AWS_144'],      'Cross-region replication not required for session data',    );    suppressRules(      sessionBucket,      ['CKV2_AWS_62'],      'Event notifications not required for session data',    );    suppressRules(      sessionBucket,      ['CKV_AWS_18'],      'Server access logs are delivered to CloudWatch Logs',    );
    const sessionAccessLogsSource: CfnDeliverySource = new CfnDeliverySource(      this,      'SessionAccessLogsSource',      {        name: Lazy.string({          produce: () =>            Names.uniqueResourceName(sessionAccessLogsSource, {              maxLength: 60,            }),        }),        logType: 'S3_SERVER_ACCESS_LOGS',        resourceArn: sessionBucket.bucketArn,      },    );    const sessionBucketPolicy = sessionBucket.policy;    if (sessionBucketPolicy) {      sessionAccessLogsSource.node.addDependency(sessionBucketPolicy);    }    const sessionAccessLogsDestination: CfnDeliveryDestination =      new CfnDeliveryDestination(this, 'SessionAccessLogsDestination', {        name: Lazy.string({          produce: () =>            Names.uniqueResourceName(sessionAccessLogsDestination, {              maxLength: 60,            }),        }),        destinationResourceArn: sessionAccessLogs.logGroupArn,      });    const sessionAccessLogsDelivery = new CfnDelivery(      this,      'SessionAccessLogsDelivery',      {        deliverySourceName: sessionAccessLogsSource.name,        deliveryDestinationArn: sessionAccessLogsDestination.attrArn,      },    );    sessionAccessLogsDelivery.addDependency(sessionAccessLogsSource);
    this.agentCoreRuntime = new Runtime(this, 'StoryAgent', {      runtimeName: Lazy.string({        produce: () =>          Names.uniqueResourceName(this.agentCoreRuntime, { maxLength: 40 }),      }),      protocolConfiguration: ProtocolType.HTTP,      agentRuntimeArtifact: this.code,      authorizerConfiguration: RuntimeAuthorizerConfiguration.usingCognito(        identity.userPool,        [identity.userPoolClient],      ),      // Receive the caller's Authorization header (validated by the authorizer).      requestHeaderConfiguration: {        allowlistedHeaders: ['Authorization'],      },      ...restProps,      environmentVariables: {        RUNTIME_CONFIG_APP_ID: rc.appConfigApplicationId,        ...restProps?.environmentVariables,      },    });
    // Grant access for the agent to invoke bedrock models    this.agentCoreRuntime.addToRolePolicy(      new PolicyStatement({        actions: [          'bedrock:InvokeModel',          'bedrock:InvokeModelWithResponseStream',        ],        resources: [          'arn:aws:bedrock:*:*:foundation-model/*',          'arn:aws:bedrock:*:*:inference-profile/*',        ],      }),    );
    sessionBucket.grantReadWrite(this.agentCoreRuntime);
    rc.grantReadAppConfig(this.agentCoreRuntime);
    rc.set('agentcore', 'agentRuntimes', {      ...rc.get('agentcore').agentRuntimes,      StoryAgent: {        arn: this.agentCoreRuntime.agentRuntimeArn,        session: {          bucketName: sessionBucket.bucketName,        },      },    });
    rc.set('connection', 'agentRuntimes', {      ...rc.get('connection').agentRuntimes,      StoryAgent: this.agentCoreRuntime.agentRuntimeArn,    });  }
  /**   * The principal to grant permissions to.   */  public get grantPrincipal(): IPrincipal {    return this.agentCoreRuntime.grantPrincipal;  }
  /**   * Network connections for this agent runtime.   */  public get connections(): Connections {    return this.agentCoreRuntime.connections;  }
/** * The HTTPS invocation URL of the runtime. */ public get invocationUrl(): string { // The URL must URL-encode the runtime ARN (':' -> '%3A', '/' -> '%2F'). // The ARN is a CDK token, so encode at deploy time via Fn.join/Fn.split. const encodedArn = Fn.join( '%2F', Fn.split( '/', Fn.join('%3A', Fn.split(':', this.agentCoreRuntime.agentRuntimeArn)), ), ); return `https://bedrock-agentcore.${Stack.of(this).region}.amazonaws.com/runtimes/${encodedArn}/invocations?qualifier=DEFAULT`; }}이것은 CDK AgentRuntimeArtifact를 구성하여 에이전트 Docker 이미지를 ECR에 업로드하고 AgentCore Runtime을 사용하여 호스팅합니다. --auth=cognito를 선택했기 때문에 구성은 사용자 풀/클라이언트 identity를 요구하고 Cognito를 통해 AgentCore Runtime 호출을 인증하며 호출자의 Authorization 헤더를 전달합니다. 또한 Story Agent의 session.py가 런타임에 읽는 세션 버킷(CloudWatch Logs로 전달되는 서버 액세스 로그가 있는 KMS 암호화 S3 버킷)을 프로비저닝하고, 에이전트에 읽기/쓰기 액세스 권한을 부여하고, Bedrock 모델 호출 액세스 권한을 부여하며, ARN과 버킷 이름을 RuntimeConfig에 등록하여 에이전트(런타임에 AppConfig를 통해)와 Game API(synth 시점에 invocationUrl을 통해) 모두 찾을 수 있도록 합니다.
story 프로젝트의 Docker 이미지를 참조하는 추가 Dockerfile이 있어 Dockerfile과 에이전트 소스 코드를 함께 배치할 수 있습니다.
Inventory 도구 설정하기
섹션 제목: “Inventory 도구 설정하기”Inventory: TypeScript 프로젝트
섹션 제목: “Inventory: TypeScript 프로젝트”Story Agent가 플레이어의 인벤토리를 관리할 수 있도록 도구를 제공하는 MCP 서버를 생성하겠습니다.
먼저 TypeScript 프로젝트를 생성합니다:
이 제너레이터 실행@aws/nx-plugin:ts#project
pnpm nx g @aws/nx-plugin:ts#project --no-interactive yarn nx g @aws/nx-plugin:ts#project --no-interactive npx nx g @aws/nx-plugin:ts#project --no-interactive bunx nx g @aws/nx-plugin:ts#project --no-interactive- 설치 Nx Console VSCode Plugin 아직 설치하지 않았다면
- VSCode에서 Nx 콘솔 열기
- 클릭
Generate (UI)"Common Nx Commands" 섹션에서 - 검색
@aws/nx-plugin - ts#project - 필수 매개변수 입력
- 클릭
Generate
이 단계의 옵션1
필수
이렇게 하면 빈 TypeScript 프로젝트가 생성됩니다.
생성된 ts#project 파일을 자세히 살펴보기
ts#project 제너레이터는 다음 파일들을 생성합니다.
디렉터리packages/
디렉터리inventory/
디렉터리src/
- index.ts 예제 함수가 있는 진입점
- project.json 프로젝트 구성
- vitest.config.mts 테스트 구성
- tsconfig.json 프로젝트의 기본 typescript 구성
- tsconfig.lib.json 컴파일 및 번들링을 위한 typescript 구성
- tsconfig.spec.json 테스트를 위한 typescript 구성
- tsconfig.base.json 다른 프로젝트가 이를 참조할 수 있도록 별칭 구성 업데이트
Inventory: MCP 서버
섹션 제목: “Inventory: MCP 서버”다음으로 TypeScript 프로젝트에 MCP 서버를 추가하겠습니다:
이 제너레이터 실행@aws/nx-plugin:ts#mcp-server
pnpm nx g @aws/nx-plugin:ts#mcp-server --no-interactive yarn nx g @aws/nx-plugin:ts#mcp-server --no-interactive npx nx g @aws/nx-plugin:ts#mcp-server --no-interactive bunx nx g @aws/nx-plugin:ts#mcp-server --no-interactive- 설치 Nx Console VSCode Plugin 아직 설치하지 않았다면
- VSCode에서 Nx 콘솔 열기
- 클릭
Generate (UI)"Common Nx Commands" 섹션에서 - 검색
@aws/nx-plugin - ts#mcp-server - 필수 매개변수 입력
- 클릭
Generate
이 단계의 옵션1
필수
이렇게 하면 MCP 서버가 추가됩니다.
생성된 ts#mcp-server 파일을 자세히 살펴보기
ts#mcp-server 제너레이터는 다음 파일들을 생성합니다.
디렉터리packages/
디렉터리inventory/
디렉터리src/mcp-server/
- index.ts 배럴 내보내기
- server.ts MCP 서버 생성
디렉터리tools/
- divide.ts 예제 도구
디렉터리resources/
- sample-guidance.ts 예제 리소스
- stdio.ts STDIO 전송을 사용하는 MCP 진입점
- http.ts Streamable HTTP 전송을 사용하는 MCP 진입점
- Dockerfile AgentCore Runtime에 배포하기 위한 이미지 빌드
- rolldown.config.ts AgentCore에 배포하기 위한 MCP 서버 번들링 구성
디렉터리common/constructs/
디렉터리src
디렉터리app/mcp-servers/inventory-mcp-server/
- inventory-mcp-server.ts inventory MCP 서버를 AgentCore Runtime에 배포하기 위한 구성
게임 데이터베이스 생성하기
섹션 제목: “게임 데이터베이스 생성하기”게임 상태(저장된 게임 및 각 플레이어의 인벤토리)는 Amazon DynamoDB에 저장됩니다. ts#dynamodb 제너레이터를 사용하여 DungeonDb라는 DynamoDB 프로젝트를 생성합니다:
이 제너레이터 실행@aws/nx-plugin:ts#dynamodb
pnpm nx g @aws/nx-plugin:ts#dynamodb --no-interactive yarn nx g @aws/nx-plugin:ts#dynamodb --no-interactive npx nx g @aws/nx-plugin:ts#dynamodb --no-interactive bunx nx g @aws/nx-plugin:ts#dynamodb --no-interactive- 설치 Nx Console VSCode Plugin 아직 설치하지 않았다면
- VSCode에서 Nx 콘솔 열기
- 클릭
Generate (UI)"Common Nx Commands" 섹션에서 - 검색
@aws/nx-plugin - ts#dynamodb - 필수 매개변수 입력
- 클릭
Generate
이 단계의 옵션1
필수
파일 트리에 새 파일들이 나타나는 것을 볼 수 있습니다.
생성된 ts#dynamodb 파일을 자세히 살펴보기
ts#dynamodb 제너레이터는 다음 파일들을 생성합니다.
디렉터리packages/
디렉터리dungeon-db/
- config.json 포트, 테이블 이름, 컨테이너 설정 및 Global Secondary Indexes를 포함한 DynamoDB 구성
디렉터리src/
- index.ts 진입점 및 내보내기
- client.ts DynamoDB 클라이언트 싱글톤 및 테이블 이름 해결
디렉터리entities/
- example.ts 예제 ElectroDB 엔티티 (이것을 교체할 예정)
- index.ts 엔티티 내보내기
- project.json
dev및pull-image타겟 추가
디렉터리common/
디렉터리scripts/
디렉터리src/
디렉터리dynamodb/
- create-local-table.ts DynamoDB Local에 테이블 생성
- pull-image.ts DynamoDB Local 이미지 가져오기
- start-container.ts DynamoDB Local 컨테이너 시작
디렉터리constructs/
디렉터리src/
디렉터리app/dynamodb/
- dungeon-db.ts 테이블 프로비저닝을 위한 구성
디렉터리core/
- dynamodb.ts 일반 DynamoDB 테이블 구성
생성된 src/client.ts는 getDynamoDBClient()와 resolveTableName()을 내보냅니다. LOCAL_DEV=true(자동으로 dev 타겟에 의해 설정됨)일 때 이들은 DynamoDB Local에 연결하고, 그렇지 않으면 AWS에 연결하고 Runtime Configuration에서 배포된 테이블 이름을 해결합니다. 모듈 2에서 이 프로젝트에 Game 및 Inventory 엔티티를 모델링할 것입니다.
자세한 내용은 ts#dynamodb 제너레이터 가이드를 참조하세요.
사용자 인터페이스(UI) 생성하기
섹션 제목: “사용자 인터페이스(UI) 생성하기”다음으로 게임과 상호 작용할 수 있는 UI를 생성하겠습니다.
Game UI: 웹사이트
섹션 제목: “Game UI: 웹사이트”UI를 생성하려면 다음 단계를 사용하여 GameUI라는 웹사이트를 생성합니다:
이 제너레이터 실행@aws/nx-plugin:ts#website
pnpm nx g @aws/nx-plugin:ts#website --no-interactive yarn nx g @aws/nx-plugin:ts#website --no-interactive npx nx g @aws/nx-plugin:ts#website --no-interactive bunx nx g @aws/nx-plugin:ts#website --no-interactive- 설치 Nx Console VSCode Plugin 아직 설치하지 않았다면
- VSCode에서 Nx 콘솔 열기
- 클릭
Generate (UI)"Common Nx Commands" 섹션에서 - 검색
@aws/nx-plugin - ts#website - 필수 매개변수 입력
- 클릭
Generate
이 단계의 옵션2
필수
파일 트리에 새 파일들이 나타나는 것을 볼 수 있습니다.
생성된 ts#website 파일을 자세히 살펴보기
ts#website는 다음 파일들을 생성합니다. 파일 트리에서 강조 표시된 주요 파일 중 일부를 살펴보겠습니다:
디렉터리packages/
디렉터리common/
디렉터리constructs/
디렉터리src/
디렉터리app/ 앱 특정 cdk 구성
디렉터리static-websites/
- game-ui.ts Game UI를 생성하는 cdk 구성
디렉터리core/
- static-website.ts 일반 정적 웹사이트 구성
디렉터리game-ui/
디렉터리public/
- …
디렉터리src/
디렉터리components/
디렉터리AppLayout/
- index.tsx shadcn
SidebarProvider+ 헤더를 사용한 전체 페이지 레이아웃
- index.tsx shadcn
- app-sidebar.tsx 네비게이션 항목이 있는 기본 shadcn 사이드바
- alert.tsx, spinner.tsx shadcn으로 래핑된 피드백 프리미티브
디렉터리routes/ @tanstack/react-router 파일 기반 라우트
- index.tsx 루트 ’/’ 페이지
- __root.tsx 모든 페이지가 이 컴포넌트를 기본으로 사용
- config.ts
- main.tsx React 진입점
- routeTree.gen.ts @tanstack/react-router에 의해 자동으로 업데이트됨
- styles.css 공유 shadcn 글로벌 임포트 (Tailwind v4)
- index.html
- project.json
- vite.config.mts
- …
디렉터리common/
디렉터리shadcn/ 모든
ux=shadcn웹사이트에서 임포트하는 공유 shadcn/ui 라이브러리 (테마 토큰,Button,Card,Input,Sidebar, …)- src/components/ui/*
- src/styles/globals.css Tailwind + shadcn 디자인 토큰
- …
import * as url from 'url';import { Construct } from 'constructs';import { StaticWebsite, StaticWebsiteProps } from '../../core/index.js';
export type GameUIProps = Omit<  StaticWebsiteProps,  'websiteName' | 'websiteFilePath'>;
export class GameUI extends StaticWebsite { constructor(scope: Construct, id: string, props?: GameUIProps) { super(scope, id, { ...props, websiteName: 'GameUI', websiteFilePath: url.fileURLToPath( new URL( '../../../../../../dist/packages/game-ui/bundle', import.meta.url, ), ), }); }}이것은 GameUI를 정의하는 CDK 구성입니다. Vite 기반 UI의 생성된 번들에 대한 파일 경로가 이미 구성되어 있습니다. 이는 build 시점에 game-ui 프로젝트의 빌드 타겟 내에서 번들링이 발생하고 출력이 여기에서 사용됨을 의미합니다.
import React from 'react';import { createRoot } from 'react-dom/client';import { RouterProvider, createRouter } from '@tanstack/react-router';import { routeTree } from './routeTree.gen';import './styles.css';
export type RouterProviderContext = {};
const router = createRouter({ routeTree, context: {} });
declare module '@tanstack/react-router' {  interface Register {    router: typeof router;  }}
const App = () => <RouterProvider router={router} context={{}} />;
const root = document.getElementById('root');root && createRoot(root).render( <React.StrictMode> <App /> </React.StrictMode>, );이것은 React가 마운트되는 진입점입니다. 스타일링은 styles.css를 통해 임포트된 Tailwind v4 토큰에서 가져옵니다. @tanstack/react-router는 파일 기반 라우팅 모드로 구성됩니다: 개발 서버가 실행 중인 한 routes/ 아래에 생성하는 모든 파일이 자동으로 선택되고 라우트 트리가 재생성됩니다. 나중 제너레이터(auth, connection)는 이 파일을 AST 패치하여 <App />를 추가 프로바이더로 래핑합니다.
import { createFileRoute } from '@tanstack/react-router';
export const Route = createFileRoute('/')({  component: RouteComponent,});
function RouteComponent() { return ( <div className="text-center"> <header> <h1>Welcome</h1> <p>Welcome to your new React website!</p> </header> </div> );}/ 라우트로 이동할 때 컴포넌트가 렌더링됩니다. @tanstack/react-router는 이 파일을 생성/이동할 때마다 Route를 관리합니다(개발 서버가 실행 중인 한).
Game UI: 인증
섹션 제목: “Game UI: 인증”Amazon Cognito를 통한 인증된 액세스를 요구하도록 Game UI를 구성하겠습니다:
이 제너레이터 실행@aws/nx-plugin:ts#website#auth
pnpm nx g @aws/nx-plugin:ts#website#auth --no-interactive yarn nx g @aws/nx-plugin:ts#website#auth --no-interactive npx nx g @aws/nx-plugin:ts#website#auth --no-interactive bunx nx g @aws/nx-plugin:ts#website#auth --no-interactive- 설치 Nx Console VSCode Plugin 아직 설치하지 않았다면
- VSCode에서 Nx 콘솔 열기
- 클릭
Generate (UI)"Common Nx Commands" 섹션에서 - 검색
@aws/nx-plugin - ts#website#auth - 필수 매개변수 입력
- 클릭
Generate
이 단계의 옵션3
필수
파일 트리에 새 파일들이 나타나거나 변경되는 것을 볼 수 있습니다.
생성된 ts#website#auth 파일을 자세히 살펴보기
ts#website#auth 제너레이터는 다음 파일들을 업데이트/생성합니다. 파일 트리에서 강조 표시된 주요 파일 중 일부를 살펴보겠습니다:
디렉터리packages/
디렉터리common/
디렉터리constructs/
디렉터리src/
디렉터리core/
- user-identity.ts 사용자/ID 풀 생성을 위한 cdk 구성
디렉터리game-ui/
디렉터리src/
디렉터리components/
디렉터리AppLayout/
- index.tsx 헤더에 로그인한 사용자/로그아웃 추가
디렉터리CognitoAuth/
- index.tsx Cognito 로그인 관리
디렉터리RuntimeConfig/
- index.tsx
runtime-config.json을 가져와 컨텍스트를 통해 자식에게 제공
- index.tsx
디렉터리hooks/
- useRuntimeConfig.tsx
- main.tsx Cognito를 추가하도록 업데이트됨
import { useAuth } from 'react-oidc-context';import CognitoAuth from './components/CognitoAuth';import { useRuntimeConfig } from './hooks/useRuntimeConfig';import RuntimeConfigProvider from './components/RuntimeConfig';import React from 'react';import { createRoot } from 'react-dom/client';import { RouterProvider, createRouter } from '@tanstack/react-router';import { routeTree } from './routeTree.gen';import './styles.css';export type RouterProviderContext = {};export type RouterProviderContext = { runtimeConfig?: ReturnType<typeof useRuntimeConfig>; auth?: ReturnType<typeof useAuth>;};const router = createRouter({ routeTree, context: {} });const router = createRouter({ routeTree, context: { runtimeConfig: undefined, auth: undefined },});// Register the router instance for type safetydeclare module '@tanstack/react-router' { interface Register { router: typeof router; }}const App = () => <RouterProvider router={router} context={{}} />;const App = () => { const auth = useAuth(); const runtimeConfig = useRuntimeConfig(); return <RouterProvider router={router} context={{ runtimeConfig, auth }} />;};const root = document.getElementById('root');root && createRoot(root).render( <React.StrictMode> <RuntimeConfigProvider> <CognitoAuth> <App /> </CognitoAuth> </RuntimeConfigProvider> </React.StrictMode>, );RuntimeConfigProvider와 CognitoAuth 컴포넌트가 AST 변환을 통해 main.tsx 파일에 추가되었습니다. 이를 통해 CognitoAuth 컴포넌트가 백엔드 호출을 올바른 대상으로 보내기 위해 필요한 cognito 연결 구성이 포함된 runtime-config.json을 가져와 Amazon Cognito로 인증할 수 있습니다.
Game UI: Game API에 연결하기
섹션 제목: “Game UI: Game API에 연결하기”이전에 생성한 Game API에 연결하도록 Game UI를 구성하겠습니다.
이 제너레이터 실행@aws/nx-plugin:connection
pnpm nx g @aws/nx-plugin:connection --no-interactive yarn nx g @aws/nx-plugin:connection --no-interactive npx nx g @aws/nx-plugin:connection --no-interactive bunx nx g @aws/nx-plugin:connection --no-interactive- 설치 Nx Console VSCode Plugin 아직 설치하지 않았다면
- VSCode에서 Nx 콘솔 열기
- 클릭
Generate (UI)"Common Nx Commands" 섹션에서 - 검색
@aws/nx-plugin - connection - 필수 매개변수 입력
- 클릭
Generate
이 단계의 옵션2
필수
필수
파일 트리에 새 파일들이 나타나거나 변경되는 것을 볼 수 있습니다.
UI → tRPC 연결 파일 살펴보기
connection 제너레이터는 다음 파일들을 생성/업데이트합니다. 파일 트리에서 강조 표시된 주요 파일 중 일부를 살펴보겠습니다:
디렉터리packages/
디렉터리game-ui/
디렉터리src/
디렉터리components/
- GameApiClientProvider.tsx GameAPI 클라이언트 설정
디렉터리hooks/
- useGameApi.tsx GameApi를 호출하는 훅
- main.tsx trpc 클라이언트 프로바이더 주입
- package.json
import { useContext } from 'react';import {  GameApiTRPCContext,  type GameApiTRPCContextValue,} from '../components/GameApiClientProvider';
export const useGameApi = (): GameApiTRPCContextValue['optionsProxy'] => {  const container = useContext(GameApiTRPCContext);  if (!container) {    throw new Error('useGameApi must be used within GameApiClientProvider');  }  return container.optionsProxy;};
export const useGameApiClient = (): GameApiTRPCContextValue['client'] => { const container = useContext(GameApiTRPCContext); if (!container) { throw new Error( 'useGameApiClient must be used within GameApiClientProvider', ); } return container.client;};이 훅은 GameApi를 호출하기 위한 tRPC 클라이언트에 대한 액세스를 제공합니다. tRPC API 호출 예제는 tRPC 훅 사용 가이드를 참조하세요.
import GameApiClientProvider from './components/GameApiClientProvider';import QueryClientProvider from './components/QueryClientProvider';import { useAuth } from 'react-oidc-context';import CognitoAuth from './components/CognitoAuth';import { useRuntimeConfig } from './hooks/useRuntimeConfig';import RuntimeConfigProvider from './components/RuntimeConfig';import React from 'react';import { createRoot } from 'react-dom/client';import { RouterProvider, createRouter } from '@tanstack/react-router';import { routeTree } from './routeTree.gen';import './styles.css';...const root = document.getElementById('root');root && createRoot(root).render( <React.StrictMode> <RuntimeConfigProvider> <CognitoAuth> <QueryClientProvider> <GameApiClientProvider> <App /> </GameApiClientProvider> </QueryClientProvider> </CognitoAuth> </RuntimeConfigProvider> </React.StrictMode>, );main.tsx 파일이 AST 변환을 통해 업데이트되어 trpc 프로바이더를 주입합니다.
Story Agent: Inventory MCP 서버에 연결하기
섹션 제목: “Story Agent: Inventory MCP 서버에 연결하기”에이전트가 MCP 서버의 도구를 발견하고 호출할 수 있도록 Story Agent를 Inventory MCP 서버에 연결하겠습니다.
이 제너레이터 실행@aws/nx-plugin:connection
pnpm nx g @aws/nx-plugin:connection --no-interactive yarn nx g @aws/nx-plugin:connection --no-interactive npx nx g @aws/nx-plugin:connection --no-interactive bunx nx g @aws/nx-plugin:connection --no-interactive- 설치 Nx Console VSCode Plugin 아직 설치하지 않았다면
- VSCode에서 Nx 콘솔 열기
- 클릭
Generate (UI)"Common Nx Commands" 섹션에서 - 검색
@aws/nx-plugin - connection - 필수 매개변수 입력
- 클릭
Generate
이 단계의 옵션2
필수
필수
Story Agent → Inventory MCP 연결 파일 살펴보기
connection 제너레이터는 다음 파일들을 생성/업데이트합니다:
디렉터리packages/
디렉터리common/
디렉터리agent_connection/
디렉터리dungeon_adventure_agent_connection/
디렉터리core/
- agentcore_endpoints.py 프레임워크 독립적인 ARN/URL 해결
- agentcore_mcp_transport.py 프레임워크 독립적인 MCP 전송
- agentcore_mcp_client_strands.py 전송을 래핑하는 Strands MCP 클라이언트
디렉터리auth/ 프레임워크 독립적인 SigV4 / 세션 전달
httpx.Auth- …
디렉터리app/
- inventory_mcp_server_client_strands.py Inventory MCP 서버에 연결하기 위한 Strands 클라이언트
- __init__.py 연결별 클라이언트 재내보내기
디렉터리story/
디렉터리dungeon_adventure_story/agent/
- agent.py MCP 클라이언트를 임포트하고 사용하도록 수정됨
제너레이터는:
- 핵심
AgentCoreMCPClientStrands를 포함하는 공유agent_connectionPython 프로젝트를 생성합니다(아직 존재하지 않는 경우) - 로컬(직접 HTTP) 및 배포 시(IAM 인증을 통한 AgentCore) 모두에서 MCP 서버에 연결하는 것을 처리하는
InventoryMcpServerClientStrands클래스를 생성합니다 agent.py를 변환하여 클라이언트를 임포트하고 인스턴스를 생성하며 MCP 서버의 도구를 에이전트에 연결합니다- story 프로젝트의 워크스페이스 의존성으로
agent_connection프로젝트를 추가합니다 - 로컬에서 실행할 때 MCP 서버를 자동으로 시작하도록
dev타겟을 업데이트합니다
자세한 내용은 Python Agent to MCP 연결 가이드를 참조하세요.
Game UI: Story Agent에 연결하기
섹션 제목: “Game UI: Story Agent에 연결하기”Game UI를 Story Agent에 연결하겠습니다. 에이전트가 AG-UI를 사용하므로 connection 제너레이터는 CopilotKit를 연결합니다: 테마가 적용된 채팅 컴포넌트와 렌더링할 준비가 된 @ag-ui/client HttpAgent.
이 제너레이터 실행@aws/nx-plugin:connection
pnpm nx g @aws/nx-plugin:connection --no-interactive yarn nx g @aws/nx-plugin:connection --no-interactive npx nx g @aws/nx-plugin:connection --no-interactive bunx nx g @aws/nx-plugin:connection --no-interactive- 설치 Nx Console VSCode Plugin 아직 설치하지 않았다면
- VSCode에서 Nx 콘솔 열기
- 클릭
Generate (UI)"Common Nx Commands" 섹션에서 - 검색
@aws/nx-plugin - connection - 필수 매개변수 입력
- 클릭
Generate
이 단계의 옵션2
필수
필수
UI → Story Agent 연결 파일 살펴보기
connection 제너레이터는 다음 파일들을 생성/업데이트합니다:
디렉터리packages/
디렉터리game-ui/
디렉터리src/
디렉터리components/
- AguiProvider.tsx 연결된 모든 AG-UI 에이전트가 등록된
CopilotKitProvider 디렉터리copilot/
- index.tsx Shadcn 테마의
CopilotChat/CopilotSidebar/CopilotPopup - ShadcnAssistantMessage.tsx, ShadcnUserMessage.tsx, ShadcnChatInput.tsx, ShadcnCursor.tsx, copilot.css
- index.tsx Shadcn 테마의
- AguiProvider.tsx 연결된 모든 AG-UI 에이전트가 등록된
디렉터리hooks/
- useAguiStoryAgent.tsx
HttpAgent를 빌드하고 Cognito 베어러 토큰을 주입하며threadId를 AgentCore의 33자 세션 id로 패딩
- useAguiStoryAgent.tsx
- main.tsx
<App />을<AguiProvider>로 래핑
제너레이터는:
- React 웹사이트의
ux(여기서는 Shadcn)를 감지하고 일치하는 채팅 컴포넌트를 제공합니다. - 연결된 모든 에이전트를 단일
CopilotKitProvider에 등록합니다. 다른 에이전트에 대해 다시 실행하면 다른 훅만 추가됩니다. - Runtime Configuration에서 에이전트의 런타임 ARN을 읽고 AgentCore 호출 URL을 빌드하며 Cognito 베어러 토큰과 AgentCore 세션 id 헤더를 첨부합니다.
자세한 내용은 React to AG-UI 연결 가이드를 참조하세요.
Game API와 Inventory MCP 서버를 데이터베이스에 연결하기
섹션 제목: “Game API와 Inventory MCP 서버를 데이터베이스에 연결하기”Game API와 Inventory MCP 서버 모두 DynamoDB 테이블을 읽고 쓰므로 DungeonDb 프로젝트에 연결하겠습니다. connection 제너레이터는 대상이 ts#dynamodb 프로젝트임을 감지하고 각 소스 프로젝트의 dev 타겟을 DynamoDB Local을 자동으로 시작하도록 연결합니다.
이 제너레이터 실행@aws/nx-plugin:connection
pnpm nx g @aws/nx-plugin:connection --no-interactive yarn nx g @aws/nx-plugin:connection --no-interactive npx nx g @aws/nx-plugin:connection --no-interactive bunx nx g @aws/nx-plugin:connection --no-interactive- 설치 Nx Console VSCode Plugin 아직 설치하지 않았다면
- VSCode에서 Nx 콘솔 열기
- 클릭
Generate (UI)"Common Nx Commands" 섹션에서 - 검색
@aws/nx-plugin - connection - 필수 매개변수 입력
- 클릭
Generate
이 단계의 옵션2
필수
필수
이 제너레이터 실행@aws/nx-plugin:connection
pnpm nx g @aws/nx-plugin:connection --no-interactive yarn nx g @aws/nx-plugin:connection --no-interactive npx nx g @aws/nx-plugin:connection --no-interactive bunx nx g @aws/nx-plugin:connection --no-interactive- 설치 Nx Console VSCode Plugin 아직 설치하지 않았다면
- VSCode에서 Nx 콘솔 열기
- 클릭
Generate (UI)"Common Nx Commands" 섹션에서 - 검색
@aws/nx-plugin - connection - 필수 매개변수 입력
- 클릭
Generate
이 단계의 옵션2
필수
필수
Game UI: 인프라
섹션 제목: “Game UI: 인프라”CDK 인프라를 위한 최종 하위 프로젝트를 생성하겠습니다.
이 제너레이터 실행@aws/nx-plugin:ts#infra
pnpm nx g @aws/nx-plugin:ts#infra --no-interactive yarn nx g @aws/nx-plugin:ts#infra --no-interactive npx nx g @aws/nx-plugin:ts#infra --no-interactive bunx nx g @aws/nx-plugin:ts#infra --no-interactive- 설치 Nx Console VSCode Plugin 아직 설치하지 않았다면
- VSCode에서 Nx 콘솔 열기
- 클릭
Generate (UI)"Common Nx Commands" 섹션에서 - 검색
@aws/nx-plugin - ts#infra - 필수 매개변수 입력
- 클릭
Generate
이 단계의 옵션1
필수
파일 트리에 새 파일들이 나타나거나 변경되는 것을 볼 수 있습니다.
생성된 ts#infra 파일을 자세히 살펴보기
ts#infra 제너레이터는 다음을 생성/업데이트합니다. 파일 트리에서 강조 표시된 주요 파일 중 일부를 살펴보겠습니다:
디렉터리packages/
디렉터리common/
디렉터리constructs/
디렉터리src/
디렉터리core/
- checkov.ts
- index.ts
디렉터리infra
디렉터리src/
디렉터리stages/
- application-stage.ts cdk 스택이 여기에 정의됨
디렉터리stacks/
- application-stack.ts cdk 리소스가 여기에 정의됨
- main.ts 모든 스테이지를 정의하는 진입점
- cdk.json
- checkov.yml
- project.json
- …
- package.json
- tsconfig.json 참조 추가
- tsconfig.base.json 별칭 추가
import { ApplicationStage } from './stages/application-stage.js';import { App } from '@dungeon-adventure/common-constructs';
const app = new App();
// Use this to deploy your own sandbox environment (assumes your CLI credentials)new ApplicationStage(app, 'dungeon-adventure-infra-sandbox', {  env: {    account: process.env.CDK_DEFAULT_ACCOUNT,    region: process.env.CDK_DEFAULT_REGION,  },});
// Define other instances of stages, such as beta and prod, below
app.synth();이것은 CDK 애플리케이션의 진입점입니다.
import { Stack, StackProps } from 'aws-cdk-lib';import { Construct } from 'constructs';
export class ApplicationStack extends Stack {  constructor(scope: Construct, id: string, props?: StackProps) {    super(scope, id, props);
// The code that defines your stack goes here }}던전 어드벤처 게임을 구축하기 위해 CDK 구성을 인스턴스화하겠습니다.
작업 3: 인프라 업데이트하기
섹션 제목: “작업 3: 인프라 업데이트하기”생성된 구성 중 일부를 인스턴스화하기 위해 packages/infra/src/stacks/application-stack.ts를 업데이트하겠습니다:
import {  GameApi,  GameUI,  InventoryMcpServer,  StoryAgent,  UserIdentity,} from '@dungeon-adventure/common-constructs';import { Stack, StackProps, CfnOutput } from 'aws-cdk-lib';import { Construct } from 'constructs';export class ApplicationStack extends Stack {  constructor(scope: Construct, id: string, props?: StackProps) {    super(scope, id, props);
    const userIdentity = new UserIdentity(this, 'UserIdentity');
    const gameApi = new GameApi(this, 'GameApi', {      integrations: GameApi.defaultIntegrations(this).build(),    });
    const mcpServer = new InventoryMcpServer(this, 'InventoryMcpServer');
    // Use Cognito for user authentication with the agent    const storyAgent = new StoryAgent(this, 'StoryAgent', {      identity: userIdentity,    });
    new CfnOutput(this, 'StoryAgentArn', {      value: storyAgent.agentCoreRuntime.agentRuntimeArn,    });    new CfnOutput(this, 'InventoryMcpArn', {      value: mcpServer.agentCoreRuntime.agentRuntimeArn,    });
    // Grant the agent permissions to invoke our mcp server    mcpServer.grantInvokeAccess(storyAgent);
    // Grant the authenticated role access to invoke the api    gameApi.grantInvokeAccess(userIdentity.identityPool.authenticatedRole);
    new GameUI(this, 'GameUI');  }}
import { Stack, StackProps } from 'aws-cdk-lib';import { GameApi, GameUI, InventoryMcpServer, StoryAgent, UserIdentity,} from '@dungeon-adventure/common-constructs';import { Stack, StackProps, CfnOutput } from 'aws-cdk-lib';import { Construct } from 'constructs';
export class ApplicationStack extends Stack { constructor(scope: Construct, id: string, props?: StackProps) { super(scope, id, props);
// The code that defines your stack goes here const userIdentity = new UserIdentity(this, 'UserIdentity');
const gameApi = new GameApi(this, 'GameApi', { integrations: GameApi.defaultIntegrations(this).build(), });
const mcpServer = new InventoryMcpServer(this, 'InventoryMcpServer');
// Use Cognito for user authentication with the agent const storyAgent = new StoryAgent(this, 'StoryAgent', { identity: userIdentity, });
new CfnOutput(this, 'StoryAgentArn', { value: storyAgent.agentCoreRuntime.agentRuntimeArn, }); new CfnOutput(this, 'InventoryMcpArn', { value: mcpServer.agentCoreRuntime.agentRuntimeArn, });
// Grant the agent permissions to invoke our mcp server mcpServer.grantInvokeAccess(storyAgent);
// Grant the authenticated role access to invoke the api gameApi.grantInvokeAccess(userIdentity.identityPool.authenticatedRole);
new GameUI(this, 'GameUI'); }}작업 4: 코드 빌드하기
섹션 제목: “작업 4: 코드 빌드하기”Nx 명령
단일 vs 다중 타겟
섹션 제목: “단일 vs 다중 타겟”run-many 명령은 나열된 여러 하위 프로젝트에서 타겟을 실행합니다(--all은 모두를 대상으로 함). 이렇게 하면 의존성이 올바른 순서로 실행됩니다.
프로젝트에서 직접 타겟을 실행하여 단일 프로젝트 타겟에 대한 빌드(또는 다른 작업)를 트리거할 수도 있습니다. 예를 들어 @dungeon-adventure/infra 프로젝트를 빌드하려면 다음 명령을 실행하세요:
pnpm nx build infrayarn nx build infranpx nx build infrabunx nx build infra원하는 경우 스코프를 생략하고 Nx 단축 구문을 사용할 수도 있습니다:
pnpm nx build infrayarn nx build infranpx nx build infrabunx nx build infra의존성 시각화하기
섹션 제목: “의존성 시각화하기”의존성을 시각화하려면 다음을 실행하세요:
pnpm nx graphyarn nx graphnpx nx graphbunx nx graph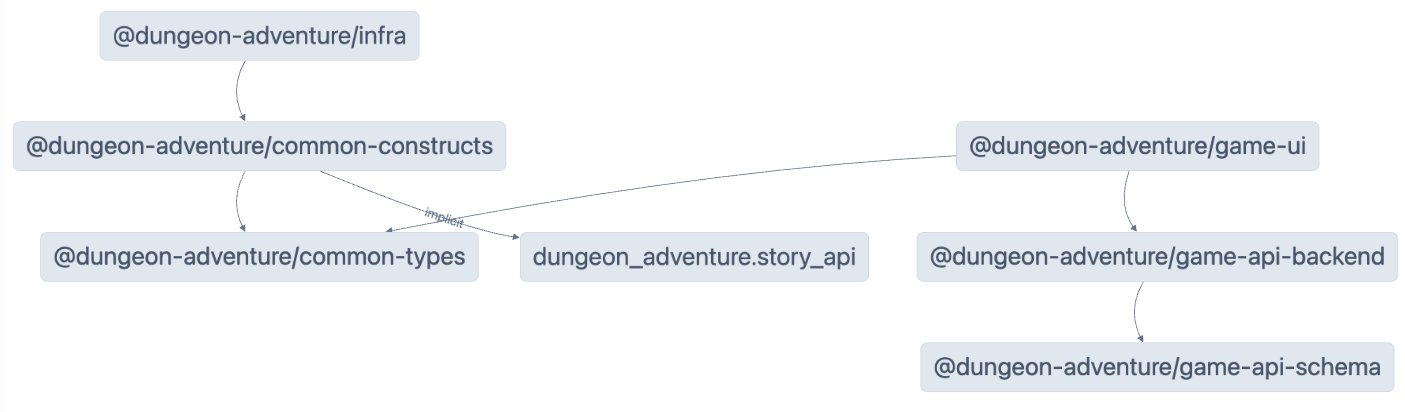
Nx는 캐싱에 의존하여 이전 빌드의 아티팩트를 재사용하여 개발 속도를 높일 수 있습니다. 이것이 올바르게 작동하려면 일부 구성이 필요하며 캐시를 사용하지 않고 빌드를 수행하려는 경우가 있을 수 있습니다. 그렇게 하려면 명령에 --skip-nx-cache 인수를 추가하기만 하면 됩니다. 예를 들어:
pnpm nx build infra --skip-nx-cacheyarn nx build infra --skip-nx-cachenpx nx build infra --skip-nx-cachebunx nx build infra --skip-nx-cache어떤 이유로든 캐시(.nx 폴더에 저장됨)를 지우려면 다음 명령을 실행할 수 있습니다:
pnpm nx resetyarn nx resetnpx nx resetbunx nx reset명령줄을 사용하여 다음 명령을 실행하여 먼저 린트 문제를 수정하세요:
pnpm lintyarn lintnpm run lintbun lint그런 다음 전체 빌드를 위해 다음 명령을 실행하세요:
pnpm buildyarn buildnpm run buildbun build다음과 같은 메시지가 표시됩니다:
 NX   The workspace is out of sync
[@nx/js:typescript-sync]: Some TypeScript configuration files are missing project references to the projects they depend on, contain stale project references, or have duplicate project references.[@aws/nx-plugin:ts#sync]: Some files are out of sync.
? Would you like to sync the identified changes to get your workspace up to date? …Yes, sync the changes and run the tasksNo, run the tasks without syncing the changes
이 메시지는 NX가 자동으로 업데이트할 수 있는 일부 파일을 감지했음을 나타냅니다. 이 경우 참조 프로젝트에 Typescript 참조가 설정되지 않은 tsconfig.json 파일을 가리킵니다.
Yes, sync the changes and run the tasks 옵션을 선택하여 진행하세요. sync 제너레이터가 누락된 typescript 참조를 자동으로 추가하면서 IDE 관련 임포트 오류가 자동으로 해결되는 것을 확인할 수 있습니다!
모든 빌드 아티팩트는 이제 모노레포 루트에 위치한 dist/ folder 내에서 사용할 수 있습니다. 이는 @aws/nx-plugin에서 생성된 프로젝트를 사용할 때의 표준 관행으로 파일 트리에 생성된 파일이 흩어지지 않습니다. 파일을 정리하려는 경우 빌드 아티팩트가 파일 트리 전체에 흩어져 있는 것에 대해 걱정하지 않고 dist/ 폴더를 삭제하세요.
축하합니다! AI 던전 어드벤처 게임의 핵심을 구현하기 시작하는 데 필요한 모든 하위 프로젝트를 생성했습니다. 🎉🎉🎉