

UI 빌드하기
작업 1: 모든 것을 로컬에서 실행하기
섹션 제목: “작업 1: 모든 것을 로컬에서 실행하기”전체 로컬 스택을 시작합니다 — game-ui 개발 서버와 로컬 Game API, 그리고 로컬 AG-UI Story Agent(이는 차례로 Inventory MCP 서버를 부팅합니다)를 하나의 명령으로 실행합니다:
pnpm nx dev game-uiyarn nx dev game-uinpx nx dev game-uibunx nx dev game-uigame-ui의 dev 타겟은 game-api:dev와 dungeon_adventure.story:agent-dev에 dependsOn이 설정되어 있어, Nx가 모든 프로젝트의 로컬 서버를 병렬로 시작합니다. 모듈 1에서 설정한 연결을 통해 이들은 차례로 Inventory MCP 서버와 DynamoDB Local을 부팅합니다. 컨테이너 엔진이 실행 중인지 확인한 다음 브라우저에서 http://localhost:4200/의 개발 서버를 엽니다.
작업 2: CopilotKit이 이미 연결된 위치
섹션 제목: “작업 2: CopilotKit이 이미 연결된 위치”모듈 1에서 game-ui → story에 대한 connection 제너레이터를 실행했을 때, Shadcn 웹사이트의 AG-UI 통합이 자동으로 생성되었습니다. 간단히 살펴볼 가치가 있습니다:
디렉터리packages/game-ui/src/
디렉터리components/
- AguiProvider.tsx 모든 AG-UI 에이전트에 등록된 단일
CopilotKitProvider. 디렉터리copilot/
- index.tsx 테마가 적용된
CopilotChat/CopilotSidebar/CopilotPopup을 재내보냅니다. - ShadcnAssistantMessage.tsx, ShadcnUserMessage.tsx, ShadcnChatInput.tsx, ShadcnCursor.tsx, copilot.css
- index.tsx 테마가 적용된
- story-agent-chat.tsx A
CopilotChatpre-bound to the Story Agent’sagentId.
- AguiProvider.tsx 모든 AG-UI 에이전트에 등록된 단일
디렉터리hooks/
- useAguiStoryAgent.tsx 배포된 Story Agent를 가리키는
@ag-ui/clientHttpAgent를 인스턴스화하고threadId를 AgentCore의 33자 최소 세션 ID로 패딩합니다.
- useAguiStoryAgent.tsx 배포된 Story Agent를 가리키는
- main.tsx
<App />을<AguiProvider>로 래핑합니다.
우리가 해야 할 일은 라우트에 <CopilotChat agentId="agent" threadId={...} />를 추가하는 것뿐입니다. 통합이 어떻게 구성되는지에 대한 자세한 내용은 React → AG-UI 연결 가이드를 참조하세요.
작업 3: 던전 스타일로 재디자인하기
섹션 제목: “작업 3: 던전 스타일로 재디자인하기”packages/game-ui/src/styles.css를 교체합니다 — 이것이 스타일링을 위해 변경하는 유일한 파일입니다. 공유된 Shadcn 글로벌을 가져오고, 팔레트를 횃불이 켜진 던전 테마로 재정의하며, CopilotKit이 해당 색상을 상속하도록 합니다:
@import '../../common/shadcn/src/styles/globals.css';@source './**/*.{ts,tsx}';
/* Dungeon theme — torch-lit parchment on stone. Applied to `:root` for the * page and to `[data-copilotkit][data-copilotkit]` for CopilotKit's chat * surface; CopilotKit ships a same-specificity `[data-copilotkit]` rule that * resets `--background` back to white, so we bump specificity with the * doubled selector. */:root,[data-copilotkit][data-copilotkit] {  --background: oklch(0.18 0.02 60);  --foreground: oklch(0.92 0.04 85);  --card: oklch(0.22 0.03 60);  --card-foreground: oklch(0.92 0.04 85);  --popover: oklch(0.2 0.02 60);  --popover-foreground: oklch(0.92 0.04 85);  --primary: oklch(0.75 0.15 75);  --primary-foreground: oklch(0.15 0.02 60);  --secondary: oklch(0.28 0.04 60);  --secondary-foreground: oklch(0.92 0.04 85);  --muted: oklch(0.25 0.02 60);  --muted-foreground: oklch(0.7 0.04 85);  --accent: oklch(0.4 0.12 30);  --accent-foreground: oklch(0.95 0.04 85);  --destructive: oklch(0.55 0.22 25);  --border: oklch(0.35 0.03 60);  --input: oklch(0.3 0.03 60);  --ring: oklch(0.75 0.15 75);  --sidebar: oklch(0.15 0.02 60);  --sidebar-foreground: oklch(0.88 0.04 85);  --sidebar-primary: oklch(0.75 0.15 75);  --sidebar-primary-foreground: oklch(0.15 0.02 60);  --sidebar-accent: oklch(0.28 0.04 60);  --sidebar-accent-foreground: oklch(0.92 0.04 85);  --sidebar-border: oklch(0.3 0.03 60);  --sidebar-ring: oklch(0.75 0.15 75);}
body {  font-family: 'Georgia', 'Cambria', serif;  background:    radial-gradient(circle at 20% 10%, oklch(0.25 0.05 70 / 0.4), transparent 40%),    radial-gradient(circle at 80% 90%, oklch(0.25 0.1 30 / 0.3), transparent 40%),    var(--background);}
h1, h2, h3 {  letter-spacing: 0.05em;}
작업 4: 게임 라우트 생성하기
섹션 제목: “작업 4: 게임 라우트 생성하기”두 개의 라우트가 필요합니다 — 하나는 영웅을 선택하는 것이고, 다른 하나는 플레이하는 것입니다. 둘 다 shadcn 컴포넌트와 CopilotKit 채팅을 사용하며, 수작업으로 만든 채팅 UI는 없습니다.
import { useInfiniteQuery, useMutation } from '@tanstack/react-query';import { createFileRoute, useNavigate } from '@tanstack/react-router';import { useEffect, useMemo, useRef, useState } from 'react';import { Button } from '@dungeon-adventure/common-shadcn/components/ui/button';import { Input } from '@dungeon-adventure/common-shadcn/components/ui/input';import {  Card,  CardContent,} from '@dungeon-adventure/common-shadcn/components/ui/card';import { Spinner } from '@dungeon-adventure/common-shadcn/components/ui/spinner';import { useGameApi } from '../hooks/useGameApi';import type { IGame } from '@dungeon-adventure/game-api';
const GENRES = ['medieval', 'zombie', 'superhero'] as const;
export const Route = createFileRoute('/')({ component: RouteComponent });
function RouteComponent() {  const [playerName, setPlayerName] = useState('');  const [pending, setPending] = useState<IGame['genre'] | null>(null);  const navigate = useNavigate();  const gameApi = useGameApi();  const saveGame = useMutation(gameApi.games.save.mutationOptions());  const games = useInfiniteQuery(    gameApi.games.query.infiniteQueryOptions(      { limit: 10 },      { getNextPageParam: ({ cursor }) => cursor ?? undefined },    ),  );  const savedGames = useMemo(    () => games.data?.pages.flatMap((p) => p.items) ?? [],    [games.data],  );
  // Auto-fetch subsequent pages when the sentinel at the bottom of the list  // scrolls into view — keeps the homepage a simple infinite scroll without  // a "Load more" button.  const sentinel = useRef<HTMLDivElement | null>(null);  useEffect(() => {    const el = sentinel.current;    if (!el || !games.hasNextPage) return;    const io = new IntersectionObserver(      (entries) => {        if (          entries.some((e) => e.isIntersecting) &&          !games.isFetchingNextPage        ) {          void games.fetchNextPage();        }      },      { rootMargin: '120px' },    );    io.observe(el);    return () => io.disconnect();  }, [games.hasNextPage, games.isFetchingNextPage, games.fetchNextPage]);
  const startGame = async (player: string, genre: IGame['genre']) => {    if (!player.trim()) return;    setPending(genre);    try {      if (!savedGames.find((g) => g.playerName === player)) {        await saveGame.mutateAsync({ playerName: player, genre });      }      await navigate({        to: '/game/$playerName',        params: { playerName: player },        search: { genre },      });    } finally {      setPending(null);    }  };
  const busy = pending !== null;  const firstLoad = games.isLoading;
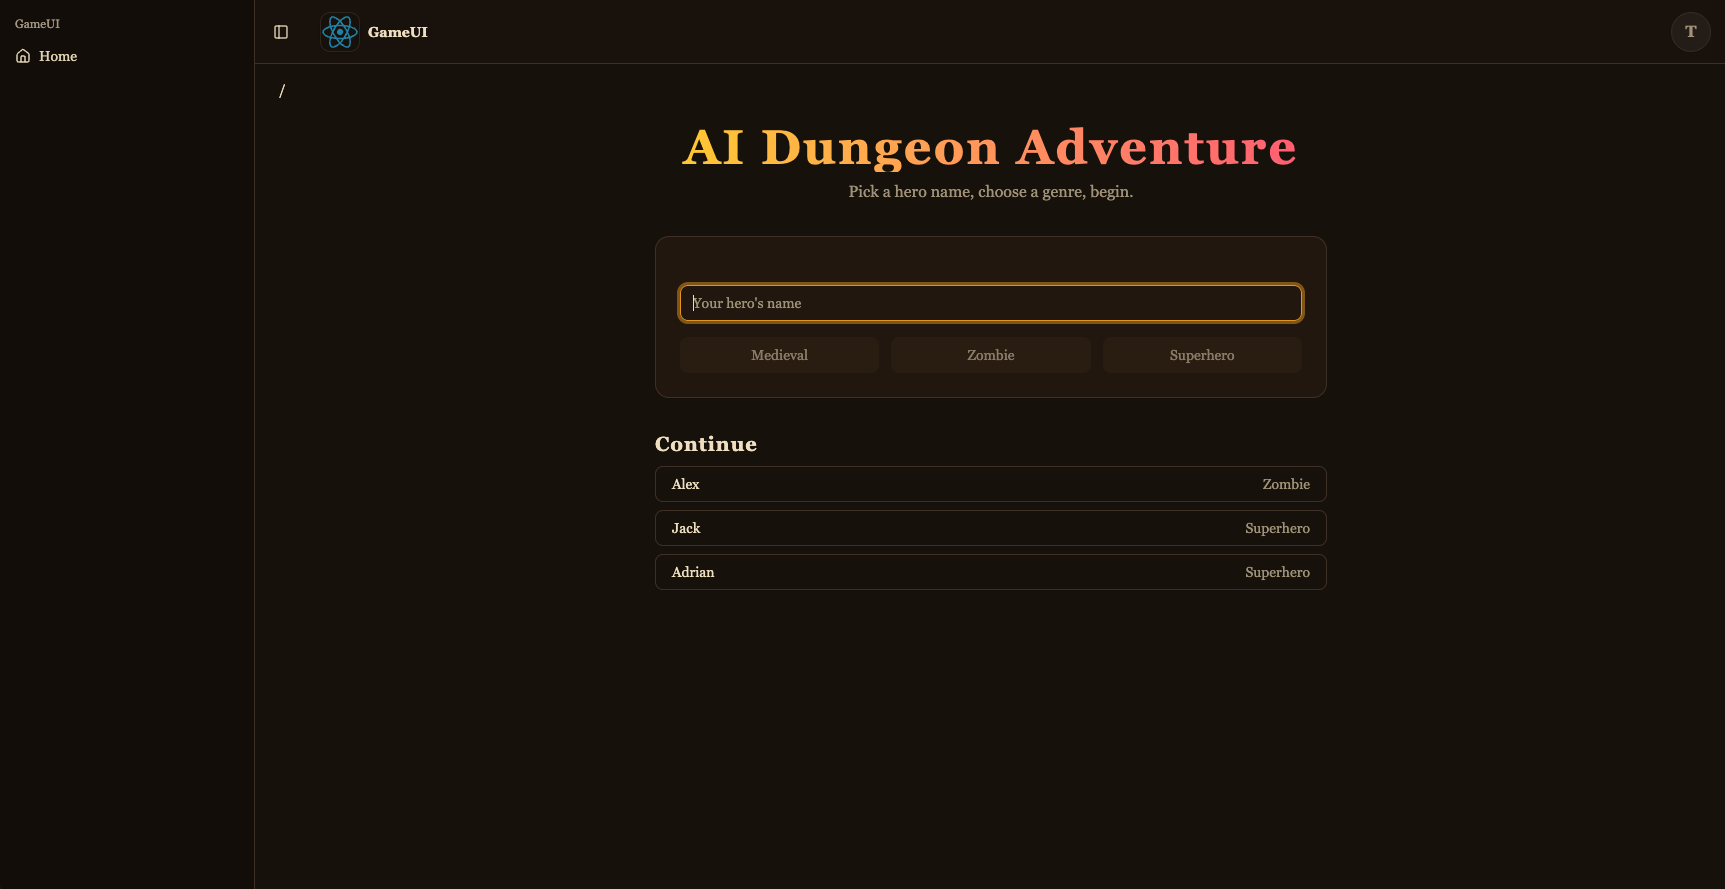
  return (    <div className="mx-auto flex w-full max-w-2xl flex-col gap-8">      <div className="text-center">        <h1 className="bg-gradient-to-r from-amber-300 to-rose-400 bg-clip-text text-5xl font-bold text-transparent">          AI Dungeon Adventure        </h1>        <p className="text-muted-foreground mt-2">          Pick a hero name, choose a genre, begin.        </p>      </div>
      <Card>        <CardContent className="flex flex-col gap-4 pt-6">          <Input            placeholder="Your hero's name"            value={playerName}            disabled={busy}            onChange={(e) => setPlayerName(e.target.value)}          />          <div className="grid grid-cols-3 gap-3">            {GENRES.map((genre) => (              <Button                key={genre}                variant="secondary"                disabled={!playerName.trim() || busy}                onClick={() => startGame(playerName, genre)}              >                {pending === genre && <Spinner />}                {genre[0].toUpperCase() + genre.slice(1)}              </Button>            ))}          </div>        </CardContent>      </Card>
      <div className="flex flex-col gap-2">        <h2 className="flex items-center gap-2 text-xl font-semibold">          Continue          {(firstLoad || games.isFetching) && <Spinner className="size-4" />}        </h2>        {!firstLoad && savedGames.length === 0 && (          <p className="text-muted-foreground text-sm">            No saved games yet — start a new adventure above.          </p>        )}        {savedGames.map((g) => (          <Button            key={g.playerName}            variant="outline"            className="justify-between"            disabled={busy}            onClick={() => startGame(g.playerName, g.genre)}          >            <span>{g.playerName}</span>            <span className="text-muted-foreground text-sm">              {g.genre[0].toUpperCase() + g.genre.slice(1)}            </span>          </Button>        ))}        <div ref={sentinel} aria-hidden className="h-1" />        {games.isFetchingNextPage && (          <div className="flex justify-center py-2">            <Spinner />          </div>        )}      </div>    </div>  );}
import { createFileRoute } from '@tanstack/react-router';import { useInfiniteQuery, useMutation } from '@tanstack/react-query';import { createFileRoute, useNavigate } from '@tanstack/react-router';import { useEffect, useMemo, useRef, useState } from 'react';import { Button } from '@dungeon-adventure/common-shadcn/components/ui/button';import { Input } from '@dungeon-adventure/common-shadcn/components/ui/input';import { Card, CardContent,} from '@dungeon-adventure/common-shadcn/components/ui/card';import { Spinner } from '@dungeon-adventure/common-shadcn/components/ui/spinner';import { useGameApi } from '../hooks/useGameApi';import type { IGame } from '@dungeon-adventure/game-api';
export const Route = createFileRoute('/')({ component: RouteComponent,});const GENRES = ['medieval', 'zombie', 'superhero'] as const;
export const Route = createFileRoute('/')({ component: RouteComponent });
function RouteComponent() { const [playerName, setPlayerName] = useState(''); const [pending, setPending] = useState<IGame['genre'] | null>(null); const navigate = useNavigate(); const gameApi = useGameApi(); const saveGame = useMutation(gameApi.games.save.mutationOptions()); const games = useInfiniteQuery( gameApi.games.query.infiniteQueryOptions( { limit: 10 }, { getNextPageParam: ({ cursor }) => cursor ?? undefined }, ), ); const savedGames = useMemo( () => games.data?.pages.flatMap((p) => p.items) ?? [], [games.data], );
// Auto-fetch subsequent pages when the sentinel at the bottom of the list // scrolls into view — keeps the homepage a simple infinite scroll without // a "Load more" button. const sentinel = useRef<HTMLDivElement | null>(null); useEffect(() => { const el = sentinel.current; if (!el || !games.hasNextPage) return; const io = new IntersectionObserver( (entries) => { if ( entries.some((e) => e.isIntersecting) && !games.isFetchingNextPage ) { void games.fetchNextPage(); } }, { rootMargin: '120px' }, ); io.observe(el); return () => io.disconnect(); }, [games.hasNextPage, games.isFetchingNextPage, games.fetchNextPage]);
const startGame = async (player: string, genre: IGame['genre']) => { if (!player.trim()) return; setPending(genre); try { if (!savedGames.find((g) => g.playerName === player)) { await saveGame.mutateAsync({ playerName: player, genre }); } await navigate({ to: '/game/$playerName', params: { playerName: player }, search: { genre }, }); } finally { setPending(null); } };
const busy = pending !== null; const firstLoad = games.isLoading;
return ( <div className="text-center"> <header> <h1>Welcome</h1> <p>Welcome to your new React website!</p> </header> <div className="mx-auto flex w-full max-w-2xl flex-col gap-8"> <div className="text-center"> <h1 className="bg-gradient-to-r from-amber-300 to-rose-400 bg-clip-text text-5xl font-bold text-transparent"> AI Dungeon Adventure </h1> <p className="text-muted-foreground mt-2"> Pick a hero name, choose a genre, begin. </p> </div>
<Card> <CardContent className="flex flex-col gap-4 pt-6"> <Input placeholder="Your hero's name" value={playerName} disabled={busy} onChange={(e) => setPlayerName(e.target.value)} /> <div className="grid grid-cols-3 gap-3"> {GENRES.map((genre) => ( <Button key={genre} variant="secondary" disabled={!playerName.trim() || busy} onClick={() => startGame(playerName, genre)} > {pending === genre && <Spinner />} {genre[0].toUpperCase() + genre.slice(1)} </Button> ))} </div> </CardContent> </Card>
<div className="flex flex-col gap-2"> <h2 className="flex items-center gap-2 text-xl font-semibold"> Continue {(firstLoad || games.isFetching) && <Spinner className="size-4" />} </h2> {!firstLoad && savedGames.length === 0 && ( <p className="text-muted-foreground text-sm"> No saved games yet — start a new adventure above. </p> )} {savedGames.map((g) => ( <Button key={g.playerName} variant="outline" className="justify-between" disabled={busy} onClick={() => startGame(g.playerName, g.genre)} > <span>{g.playerName}</span> <span className="text-muted-foreground text-sm"> {g.genre[0].toUpperCase() + g.genre.slice(1)} </span> </Button> ))} <div ref={sentinel} aria-hidden className="h-1" /> {games.isFetchingNextPage && ( <div className="flex justify-center py-2"> <Spinner /> </div> )} </div> </div> );}이것은 게임 선택기입니다: 새 게임 폼(shadcn Input + Button + Card)과 useGameApi().games.query를 useInfiniteQuery로 제공하는 “계속하기” 목록 — 하단 센티널 <div>가 IntersectionObserver에 의해 감시되어 뷰로 스크롤될 때 자동으로 fetchNextPage()를 호출하며, 제목 옆과 목록 아래의 스피너가 로딩 상태를 표시합니다. 게임을 시작하면 (playerName, genre) 쌍을 saveGame하고(다음에 표시되도록) 플레이 라우트로 이동합니다.
import { UseAgentUpdate, useAgent } from '@copilotkit/react-core/v2';import { useQuery } from '@tanstack/react-query';import { createFileRoute } from '@tanstack/react-router';import { useEffect, useMemo, useRef } from 'react';import { CopilotChat } from '../../components/copilot';import { useGameApi } from '../../hooks/useGameApi';import type { IGame } from '@dungeon-adventure/game-api';
// AgentCore session ids must be at least 33 characters. The AG-UI hook pads// the threadId to this length before sending, so the thread id is stable for// a given (player, genre) pair — revisiting the URL continues the same story.const buildThreadId = (playerName: string, genre: string) =>  `${playerName}-${genre}`.padEnd(33, '0');
export const Route = createFileRoute('/game/$playerName')({  component: RouteComponent,  validateSearch: (search: Record<string, unknown>) => ({    genre: search.genre as IGame['genre'],  }),});
function RouteComponent() {  const { playerName } = Route.useParams();  const { genre } = Route.useSearch();  const threadId = useMemo(    () => buildThreadId(playerName, genre),    [playerName, genre],  );
  const gameApi = useGameApi();  const inventory = useQuery(    gameApi.inventory.query.queryOptions({ playerName, limit: 100 }),  );  // Conversation history persisted by the agent's ``S3SessionManager``. Each  // turn is stored as ``session_<threadId>/agents/agent_default/messages/…``.  //  // `staleTime: 0` + `refetchOnMount: 'always'` together force a fresh read  // on every visit — the cached snapshot from the *first* time we loaded  // this route (before the agent had written any turns back to S3) would  // otherwise look like an empty thread on revisit and trigger re-priming.  const pastActions = useQuery({    ...gameApi.actions.query.queryOptions({ sessionId: threadId }),    staleTime: 0,    refetchOnMount: 'always',  });
  const { agent } = useAgent({    agentId: 'agent',    updates: [UseAgentUpdate.OnMessagesChanged],  });
  // Hydrate the chat once the history query resolves. For a fresh thread  // (no stored messages) the agent's system prompt expects the player's  // name and genre in the first user message, so send that priming line.  //  // We wait for `isFetching` to go false (rather than just `isLoading`) so  // that revisits with a cached empty result from the first visit aren't  // mistaken for a fresh thread — the background refetch is what sees the  // turns the agent wrote since.  const primedRef = useRef(false);  useEffect(() => {    if (!agent || primedRef.current) return;    if (pastActions.isFetching || !pastActions.isSuccess) return;    primedRef.current = true;    const items = pastActions.data.items;    if (items.length > 0) {      agent.setMessages(        items.map((a) => ({          id: `m-${a.messageId}`,          role: a.role,          content: a.content,        })),      );      return;    }    agent.addMessage({      id: crypto.randomUUID(),      role: 'user',      content: `My name is ${playerName}. Start my ${genre} adventure.`,    });    void agent.runAgent();  }, [    agent,    pastActions.data,    pastActions.isFetching,    pastActions.isSuccess,    playerName,    genre,  ]);
  // The agent's ``add-to-inventory`` tool calls mutate DynamoDB directly, so  // the inventory query needs a nudge to refetch as turns complete. The  // ``useAgent({ updates: [OnMessagesChanged] })`` subscription re-renders  // this route on each message event — refetch whenever the message count  // changes, which covers both the initial populate and every subsequent  // turn.  const seenMessages = useRef(0);  useEffect(() => {    if (!agent) return;    if (agent.messages.length !== seenMessages.current) {      seenMessages.current = agent.messages.length;      void inventory.refetch();    }  });
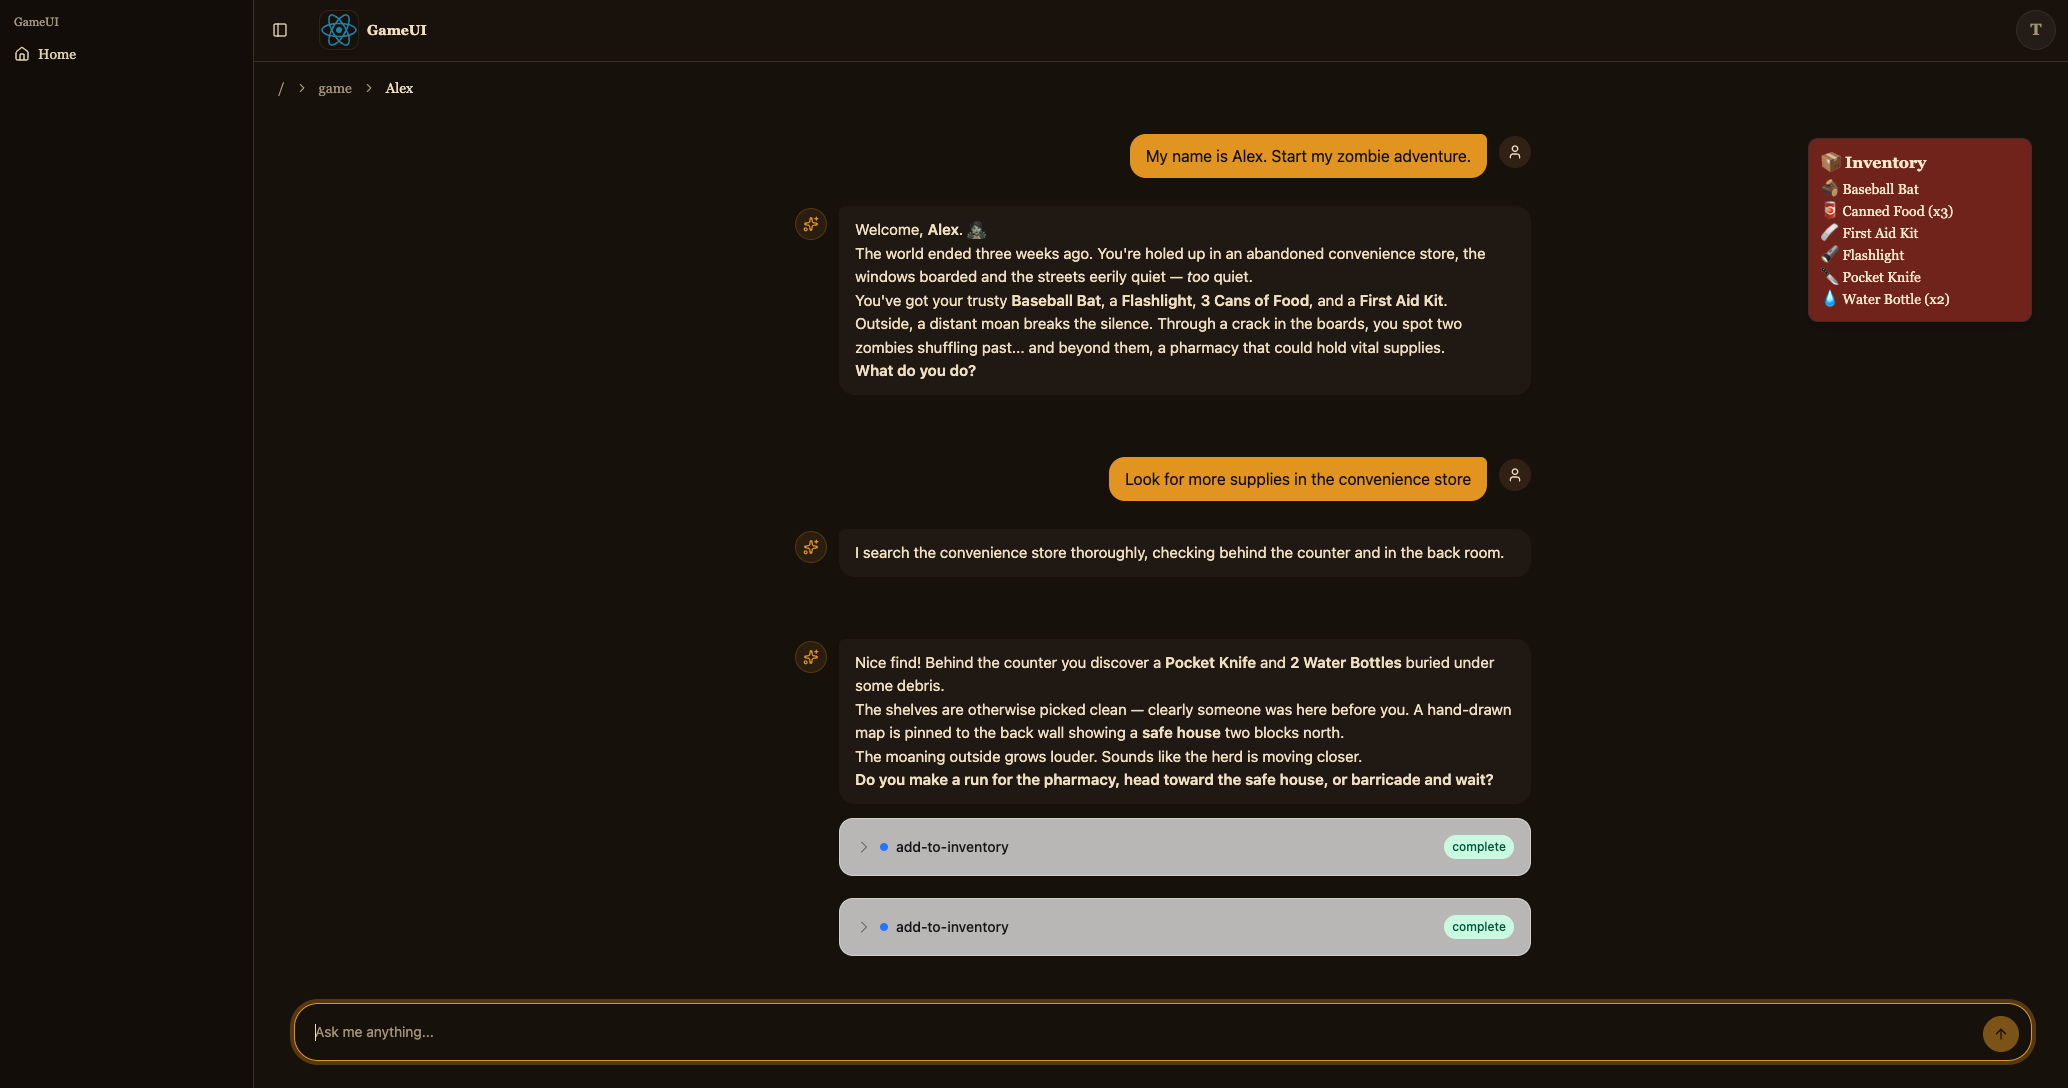
  return (    <div className="relative flex h-[calc(100vh-10rem)] min-h-0 flex-col">      {!!inventory.data?.items.length && (        <aside className="bg-accent text-accent-foreground pointer-events-none absolute right-4 top-4 z-10 w-56 rounded-lg border p-3 shadow-lg">          <div className="mb-1 font-semibold">📦 Inventory</div>          <ul className="flex flex-col gap-0.5 text-sm">            {inventory.data.items.map((item) => (              <li key={item.itemName}>                {item.emoji ?? '•'} {item.itemName}                {item.quantity > 1 ? ` (x${item.quantity})` : ''}              </li>            ))}          </ul>        </aside>      )}      <CopilotChat        agentId="agent"        threadId={threadId}        labels={{          chatInputPlaceholder: 'What do you do?',          welcomeMessageText: `${playerName}'s ${genre} adventure`,        }}      />    </div>  );}
이것은 플레이 라우트입니다. 결정론적 threadId({player}-{genre}를 33자로 패딩 — AG-UI 훅이 이를 AgentCore 세션 ID로 그대로 전송)를 빌드하고, <CopilotChat agentId="agent" threadId={threadId} />를 렌더링하며, useGameApi().inventory.query의 인벤토리를 위에 오버레이합니다. 마운트 시 useGameApi().actions.query({ sessionId: threadId })가 에이전트가 S3에 저장한 대화 기록을 읽고 — 기록이 있으면 — agent.setMessages(...)를 호출하여 채팅을 재수화합니다. 그렇지 않으면 스토리를 시작하기 위해 하나의 프라이밍 사용자 메시지를 보냅니다. agent.messages는 useAgent({ updates: [OnMessagesChanged] })를 통해 구독되므로 모든 새 턴마다 인벤토리 쿼리도 다시 가져옵니다(MCP 도구 호출이 DynamoDB를 직접 변경함).
저장하면 개발 서버에서 이제 어드벤처를 시작하고 Story Agent와 채팅할 수 있어야 합니다.
작업 5: AWS에 배포하기
섹션 제목: “작업 5: AWS에 배포하기”게임이 완성되었고 모든 부분을 로컬에서 테스트했습니다. 이제 어디서나 플레이할 수 있도록 AWS에 배포해 봅시다.
코드 빌드하기
섹션 제목: “코드 빌드하기”pnpm buildyarn buildnpm run buildbun build애플리케이션 배포하기
섹션 제목: “애플리케이션 배포하기”pnpm nx deploy-sandbox infrayarn nx deploy-sandbox infranpx nx deploy-sandbox infrabunx nx deploy-sandbox infradeploy-sandbox 타겟은 packages/infra/src/main.ts에 정의된 샌드박스 스테이지를 배포합니다.
deploy-sandbox 타겟은 CloudFormation express 모드를 사용하며, 이는 완전한 안정화를 기다리지 않고 구성이 적용되는 즉시 각 리소스 작업을 완료합니다. 첫 번째 배포는 약 4분이 걸리며, 일부 리소스(예: CloudFront 배포)는 그 후 잠시 동안 백그라운드에서 계속 프로비저닝될 수 있습니다. 후속 배포는 더 빠릅니다.
express 모드는 리소스가 완전히 안정화되기 전에 반환되므로, deploy-sandbox는 개발 전용입니다. CI/CD 및 프로덕션 배포에는 항상 완전한 안정화를 기다리는 deploy-ci 타겟을 사용하세요.
배포가 완료되면 다음과 유사한 출력이 표시됩니다:
dungeon-adventure-infra-sandbox-Applicationdungeon-adventure-infra-sandbox-Application: deploying... [2/2]
 ✅  dungeon-adventure-infra-sandbox-Application
✨  Deployment time: 220s
⚠️  Stack deployed using Express Mode. Resources still stabilizing: GameUICloudfrontDistribution, UserIdentityWebAcl, ...and more...
Outputs:dungeon-adventure-infra-sandbox-Application.GameApiEndpointXXX = https://xxx.execute-api.region.amazonaws.com/prod/dungeon-adventure-infra-sandbox-Application.GameUIDistributionDomainNameXXX = xxx.cloudfront.netdungeon-adventure-infra-sandbox-Application.InventoryMcpArn = arn:aws:bedrock-agentcore:region:xxxxxxx:runtime/dungeonadventureventoryMcpServerXXXX-YYYYdungeon-adventure-infra-sandbox-Application.RuntimeConfigApplicationId = xxxxdungeon-adventure-infra-sandbox-Application.StoryAgentArn = arn:aws:bedrock-agentcore:region:xxxxxxx:runtime/dungeonadventurecationStoryAgentXXXX-YYYYdungeon-adventure-infra-sandbox-Application.UserIdentityUserIdentityIdentityPoolIdXXX = region:xxxdungeon-adventure-infra-sandbox-Application.UserIdentityUserIdentityUserPoolClientIdXXX = xxxxxxxxxxdungeon-adventure-infra-sandbox-Application.UserIdentityUserIdentityUserPoolIdXXX = region_xxx
CloudFront URL(CDK 출력의 GameUIDistributionDomainName)로 이동하여 새 계정에 가입하고 완전히 AWS에서 실행되는 게임을 플레이하세요!
작업 6: 로컬 및 배포된 컴포넌트 혼합하기
섹션 제목: “작업 6: 로컬 및 배포된 컴포넌트 혼합하기”스펙트럼의 양 끝을 보았습니다: 모든 것이 로컬(dev)이거나 모든 것이 배포된 경우입니다. 일상적인 개발 중에는 둘을 혼합하는 것이 유용한 경우가 많습니다 — 예를 들어, 실제 배포된 API 및 에이전트에 대해 웹사이트 코드를 반복하거나, 실제 DynamoDB 테이블에 대해 API를 로컬에서 실행하는 것입니다.
핵심은 RUNTIME_CONFIG_APP_ID 환경 변수입니다. 프로젝트가 LOCAL_DEV=true 없이 실행될 때, 런타임 구성 조회는 이 애플리케이션 ID를 사용하여 AWS AppConfig에서 구성을 가져옵니다 — CDK 출력의 RuntimeConfigApplicationId 값입니다.
각 웹사이트에는 배포된 runtime-config.json(Cognito 풀, API 엔드포인트, 에이전트 ARN)을 로컬 개발 서버로 다운로드하는 load-runtime-config 타겟이 있습니다. 유용한 조합들:
-
로컬 웹사이트 → 배포된 백엔드. 배포된 구성을 한 번 가져온 다음 일반
serve타겟을 실행하여 UI가 배포된 API 및 에이전트와 통신하도록 합니다:Terminal window pnpm nx load-runtime-config game-uiTerminal window yarn nx load-runtime-config game-uiTerminal window npx nx load-runtime-config game-uiTerminal window bunx nx load-runtime-config game-uiTerminal window pnpm nx serve game-uiTerminal window yarn nx serve game-uiTerminal window npx nx serve game-uiTerminal window bunx nx serve game-ui -
로컬 API → 실제 DynamoDB 테이블. 배포된 애플리케이션 ID로
RUNTIME_CONFIG_APP_ID를 설정하여 일반serve타겟을 실행합니다:Terminal window RUNTIME_CONFIG_APP_ID=<RuntimeConfigApplicationId from CDK outputs> pnpm nx serve game-apiTerminal window RUNTIME_CONFIG_APP_ID=<RuntimeConfigApplicationId from CDK outputs> yarn nx serve game-apiTerminal window RUNTIME_CONFIG_APP_ID=<RuntimeConfigApplicationId from CDK outputs> npx nx serve game-apiTerminal window RUNTIME_CONFIG_APP_ID=<RuntimeConfigApplicationId from CDK outputs> bunx nx serve game-api
이러한 유연성을 통해 작업 중인 정확한 부분을 로컬 또는 배포된 컴포넌트 중 적합한 것에 대해 테스트할 수 있습니다.
축하합니다. 에이전트 던전 어드벤처 게임을 빌드, 테스트 및 배포했습니다! 🎉🎉🎉