Upgrading deprecated internal authentication
In the Service Workbench version 5.0.0, internal authentication has been deprecated. To upgrade to this version from your current version of Service Workbench, the administrators need to prepare the environment for an upgrade by deactivating, terminating, or disassociating internal users and the resources to which they are associated. The following tasks must be completed to prepare the Service Workbench environment for an upgrade:
- Workspaces created by internal authentication users must be terminated.
- SSH keys generated by internal authentication users must be deactivated or deleted.
- Internal authentication users cannot be associated to any projects.
- Internal authentication users cannot be associated to any organizational studies.
- Internal authentication users (including the root user) must be deactivated or deleted.
To allow administrators to revert to the Service Workbench version when internal authentication was supported, we recommend deactivating instead of deleting the resources.
If you haven’t created IdP/native Cognito users before deploying version 5.0.0, you can re-deploy the previous release to create them, and then retry deploying version 5.0.0.
Important: Follow these instructions in this order to avoid resources being removed before they should have been. Some resources depend on others being active to allow for the deactivation.
You may be required to use the Service Workbench API library to complete this process. You can either do this by using Postman (an external software that can either be used as a web version or download to your desktop), or the command line package cURL. For instructions on how to set up your Postman environment, see Setting up Postman for Service Workbench.
Terminating workspaces
- Log in to Service Workbench as an administrator using either the internal or external authentication administrator’s account.
- Terminate workspaces: Go to the Workspaces page and terminate all active workspaces owned by internal users.
Deactivating/deleting SSH keys
Using Service Workbench UI to delete SSH keys
Using the Service Workbench UI, you can only see your own SSH keys and can only delete the SSH keys. One option is to have all of your users log in before deployment and delete all of their SSH keys. Alternatively, if you attempt to deploy the latest version of Service Workbench, the output of the failed upgrade should list the SSH key IDs you need to deactivate. An administrator can deactivate another user’s SSH key using the {{baseURL}}/api/key-pairs/:keyPairId/deactivate API. Repeat whichever process you choose for each SSH key that needs to be deactivated.
Using Postman to deactivate SSH keys
When using Postman, make sure you have a valid token in your environment variable (for instructions to get this token, see Getting authentication token.
- In the Collections or APIs section, navigate to the
service-workbench-on-aws/api/key-pairs/{key Pair Id}API. - Choose PUT Deactivate key pair.
- In the Params section, paste the SSH key Id from the output of the failed deployment in the path variable for keyPairId.
- Choose Send.

Using command line to deactivate SSH keys
When using command line, make sure you have a valid token. For more information on how to get this token, see Getting authentication token. In your terminal, paste and substitute the following:
curl --location --request PUT 'http://{{baseURL}}/api/key-pairs/{{keyPairId}}/deactivate' \
--header 'Content-Type: application/json' \
--header 'Authorization: Bearer {{token}}' \
--data-raw '{
 "rev": 0
}'
Disassociating projects
- Within the Service Workbench UI, go to the Users page and choose the Users tab.
- For any user that the identity prover is internal, if the Project column has a value other than none, choose Detail.
- Choose Edit.
- Choose X next to any values in the Project field.
- Choose Save and repeat for all internal authentication users.
Disassociating organization studies
Using Service Workbench UI to disassociate organization studies
If you attempt to deploy the newest version of Service Workbench, the output of the failed upgrade should list the organization studies and their administrators you need to disassociate with internal authentication users. A Service Workbench administrator user can change permissions on any organization study using the {{baseURL}}/api/studies/:studyId/permissions API. Repeat whichever process you choose for each organization study that needs to have permissions edited. You can combine removing multiple users from the same organization study but can only edit one study per request.
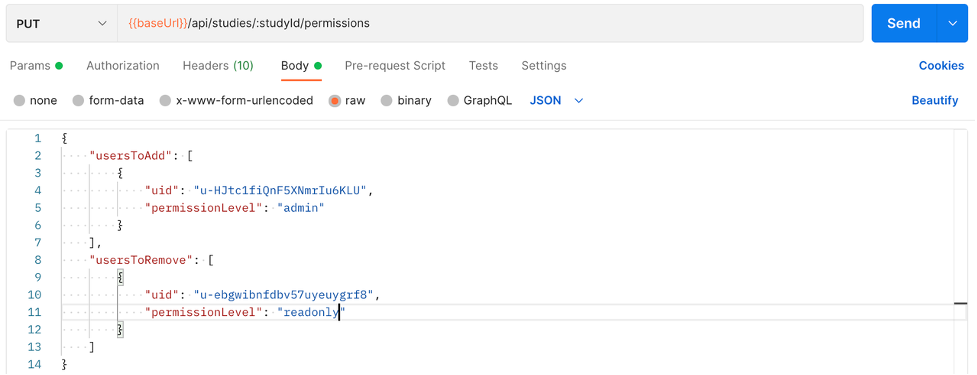
Using Postman to disassociate organization study
When using Postman, make sure you have a valid token in your environment variable. For more information on how to get this token, see Getting authentication token.
- In the Collections or APIs section, navigate to the
service-workbench-on-aws/api/studies/{study Id}/permissionsAPI. - Choose PUT update study permissions.
- In the Params section, paste an organization studyId from the output of the failed deployment in the path variable for studyId.
- In the Body section, add the user Ids of the users you want to add and to remove and their respective permission levels.
- Choose Send.


Using command line to disassociate organization study
When using command line, make sure you have a valid token. For more information on how to get this token, see Getting authentication token. In your terminal, paste and substitute the following:
curl --location --request PUT 'http://{{baseURL}}/api/studies/{{study-id}}/permissions' \
--header 'Content-Type: application/json' \
--header 'Authorization: Bearer {{token}}' \
--data-raw '{
 "usersToAdd": [
 {
 "uid": "u-HJtc1fiQnF5XNmrIu6KLU",
 "permissionLevel": "admin"
 }
 ],
 "usersToRemove": [
 {
 "uid": "u-ebgwibnfdbv57uyeuygrf8",
 "permissionLevel": "readonly"
 }
 ]
}'
Before you proceed to the last step, try to deploy to upgrade to the newest version of Service Workbench. If any checks besides the check for internal authentication users do not pass, remedy that by repeating the respective step above before proceeding in this document.
Deactivating internal authentication users
This is the last step. To deactivate internal authentication users:
- On the Service Workbench UI, go to the Users page.
- For each internal user, choose Detail.
- Choose Deactivate User. Only the root user can deactivate itself. You must have Service Workbench version 4.2.0 or later deployed to deactivate the root user as itself. Deactivate the root user after at least one external authentication user has been created.
- To deactivate the root user, log in to the Service Workbench UI as the internal authentication root user.
- Choose Detail.
- Choose Deactivate user. You immediately lose access to the UI if you are logged into the user account you just deactivated.
After completing all of those steps, you are now ready to deploy and see if you pass all of the checks. If a check does not pass, check the output on the command line and repeat the step to deactivate/terminate/disassociate the listed resource. Check the CloudWatch log for predeployment in the main account for more information. There should be additional logging there to help debug.
Important: After the upgrade to Service Workbench 5.0.0, My Studies owned by internal users would need to be transferred over to external IdP/Cognito native users. Service Workbench administrator must migrate these My Studies to the respective external authentication users after deployment. Administrators are responsible for completing this migration. This can be done by utilizing an API tool of choice. For instructions on how to complete this migration, see Migrating My Study resources.
Setting up Postman for Service Workbench
- Download Postman.
- After opening Postman, either sign in, create a free account, or continue to app without signing in (there should be an option for this at the bottom).
- On the navigation pane, choose Import.
- Import
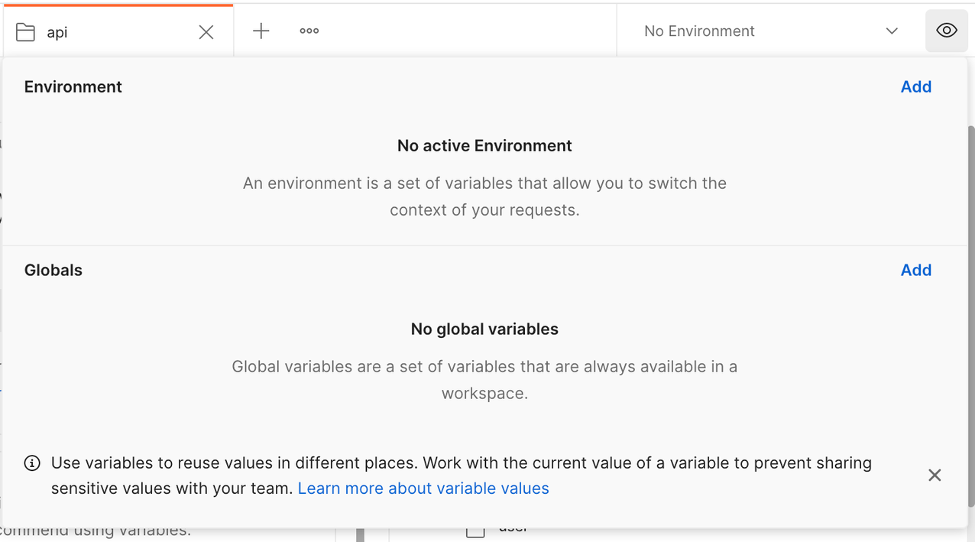
openapi.ymlfrom the Service Workbench repository. This imports the APIs as a collection if you are not logged in. - Choose the Environment quick look icon.

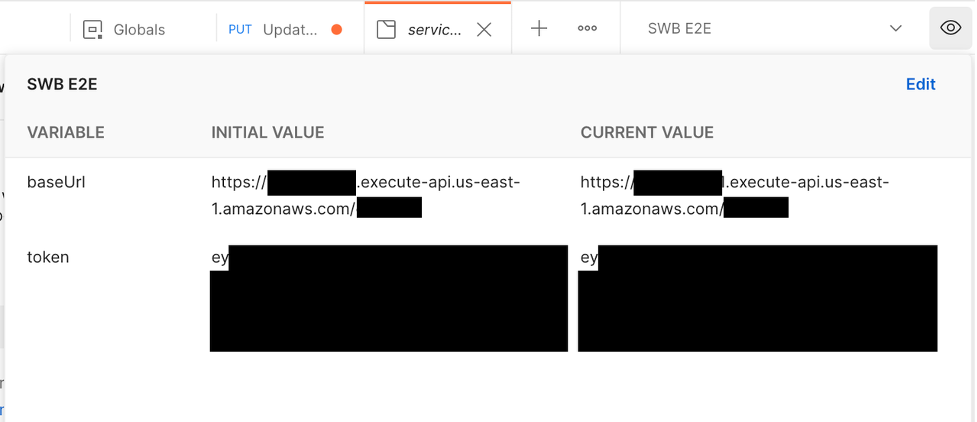
- In the Environment section, either choose Add (if you do not have an environment yet set for the Service Workbench environment you need to edit) or select the environment that corresponds to the Service Workbench environment you are preparing for upgrade. It will appear as:


- If you are adding a new environment, you will need to add two new variables.
- Create a
baseUrlvariable. The value should be the API endpoint for the Service Workbench environment. This can be found in the information displayed after deployed the environment or after runningscripts/get-info.sh <stage>in yourservice-workbench-on-awsrepository folder::::service-workbench-on-aws % scripts/get-info.sh stage
STAGE supplied as command line argument: stage
-------------------------------------------------------------------------
Summary:
-------------------------------------------------------------------------
Env Name :stage
Solution : sw
Website URL : https://------------.cloudfront.net
API Endpoint : https://----------.execute-api.us-east-1.amazonaws.com/ stage
...
------------------------------------------------------------------------- - Create a token variable. For more information on how to set this value, see Getting authentication token. Save these values and set this environment as active by choosing the three dots at the top of the panel and then choosing Set as active environment. Now, when you choose the Environment quick look icon, you should see the information you just added. If you are using an existing environment, navigate to that environment from the dropdown that displays your current active environment.
- Choose the desired environment.
- Set this environment as active by choosing the three dots at the top of the panel and then choosing Set as active environment.
- Create a
- Now, when you choose the Environment quick look icon, you should be able to view the environment’s information.
- If you have not set it up yet (only in the case of existing environments) navigate to the Authorization tab for the
service-workbench-on-awscollection or API. - For Type drop-down, choose Bearer Token.
- For Token, enter
{{token}}. - Save this configuration.
Getting authentication token
Using Service Workbench UI
- Log in to Service Workbench on your web browser.
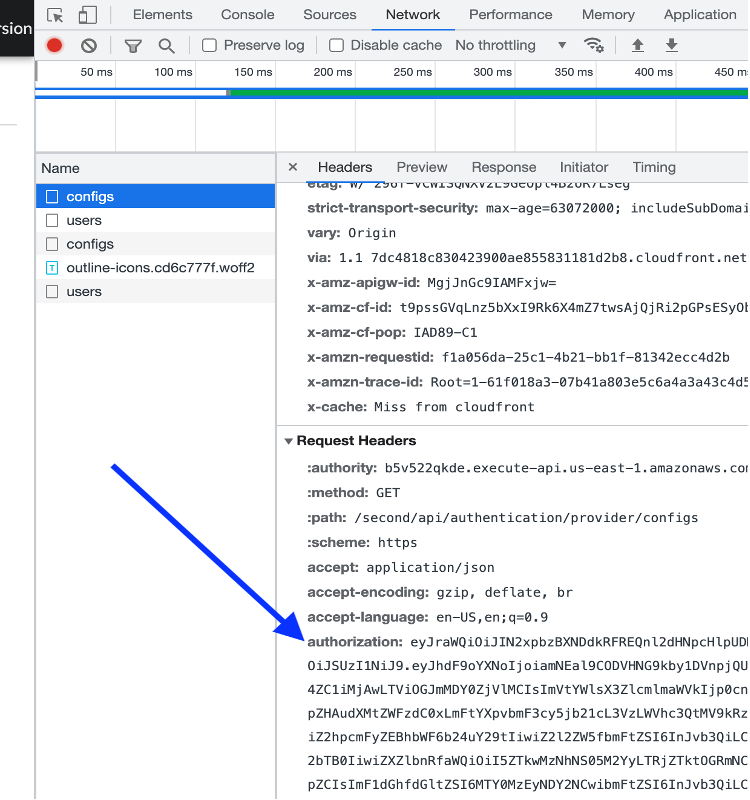
- Right click and inspect the page to display the developer console.
- Navigate to the Network tab.
- Choose another page within the Service Workbench UI.
- You should see items populate in the Name column.
- Choose one of them and then choose the Headers tab.
- In the Request Headers section, there should be an authorization property
- Copy that value. This is your authentication token.

Migrating My Study resources
We will be using API calls to migrate My Study resources.
- If you do not know which My Study resources you need to migrate, first use the
{{baseUrl}}/api/migrate/my-studies GETAPI. When using Postman, make sure you have a valid token in your environment variable. For more information on how to get this token, see Getting authentication token.- In the Collections or APIs section, navigate to the
service-workbench-on-aws/api/migrate/my-studiesAPI. - Choose GET list My Study(s) in environment.
- Choose Send. The response will either be an empty list or a list of My Study Ids and current owner user IDs. In the former case, nothing more is needed to be done in this section as no migration of My Study resources is needed.
- For command line, make sure you have a valid token. For more information on how to get this token, see Getting authentication token. In your terminal paste and substitute the following:
  ```
  curl --location --request GET 'https://{{baseUrl}}/api/migrate/my-studies' \
  --header 'Authorization: Bearer {{token}}'
  ```
- In the Collections or APIs section, navigate to the
- If you have My Study resources to migrate, you can make one API call to the
{{baseUrl}}/api/migrate/my-studies PUTAPI. You need to have the list of study IDs you wish to migrate and the non-internal authentication user IDs to whom you wish to migrate the ownership.
- For Postman, make sure you have a valid token in your environment variable For more information on how to get this token, see Getting authentication token.
- In the Collections or APIs section, navigate to the
service-workbench-on-aws/api/migrate/my-studiesAPI. - Choose PUT migrate My Study(s) to new user(s).
- In the body section, create objects with studyId and uid values.
- Choose Send.

For command line, make sure you have a valid token. For more information on how to get this token, see Getting authentication token. In your terminal paste and substitute the following:
curl --location --request PUT 'https://{{baseUrl}}/api/migrate/my-studies' \
--header 'Content-Type: application/json' \
--header 'Authorization: Bearer {{token}}' \
--data-raw '[
 {
 "studyId": "test_study_id",
 "uid": "u-C-l14OuIfNk7vL7AqmjvC"
 },
 {
 "studyId": "test_study_id",
 "uid": "u-C-l14OuIfNk7vL7AqmjvC"
 }
]'
You can verify that all My Study resources are migrated by repeating step 1.