EKS에서 ML 모델을 배포하려면 GPU 또는 Neuron 인스턴스에 대한 접근이 필요합니다. 배포가 작동하지 않는 경우, 이러한 리소스에 대한 접근 권한이 없기 때문인 경우가 많습니다. 또한 일부 배포 패턴은 Karpenter 자동 스케일링과 정적 노드 그룹에 의존합니다. 노드가 초기화되지 않으면 Karpenter 또는 노드 그룹의 로그를 확인하여 문제를 해결하세요.
참고: NVIDIA NIM을 구현하기 전에, 이것이 NVIDIA AI Enterprise의 일부이며, 프로덕션 사용 시 잠재적인 비용과 라이선스가 발생할 수 있음을 알아두세요.
평가를 위해 NVIDIA는 NVIDIA AI Enterprise를 90일 동안 사용해 볼 수 있는 무료 평가 라이선스도 제공하며, 회사 이메일로 등록할 수 있습니다.
관측성, 로깅 및 확장성 측면의 개선 사항을 통합하기 위해 이 블루프린트를 적극적으로 개선하고 있습니다.
Amazon EKS에서의 NVIDIA NIM LLM 배포
NVIDIA NIM이란?
NVIDIA NIM은 IT 및 DevOps 팀이 자체 관리 환경에서 대규모 언어 모델(LLM)을 쉽게 자체 호스팅할 수 있게 하면서, 개발자에게는 비즈니스를 혁신할 수 있는 강력한 코파일럿, 챗봇 및 AI 어시스턴트를 구축할 수 있는 업계 표준 API를 제공합니다. NVIDIA의 최첨단 GPU 가속과 확장 가능한 배포를 활용하여 NIM은 비교할 수 없는 성능으로 추론에 대한 가장 빠른 경로를 제공합니다.
왜 NIM인가?
NIM은 실행 엔진 및 런타임 운영과 같은 모델 추론 내부를 추상화합니다. 또한 TRT-LLM, vLLM 또는 기타 옵션 중 가장 성능이 좋은 옵션입니다.
NIM은 모델/모델 패밀리별로 컨테이너 이미지로 패키징됩니다. 각 NIM 컨테이너는 meta/llama3-8b-instruct와 같은 모델과 함께 제공됩니다. 이러한 컨테이너에는 충분한 GPU 메모리가 있는 모든 NVIDIA GPU에서 실행되는 런타임이 포함되어 있지만, 일부 모델/GPU 조합은 최적화되어 있습니다. NIM은 사용 가능한 경우 로컬 파일 시스템 캐시를 활용하여 NVIDIA NGC Catalog에서 모델을 자동으로 다운로드합니다.
Amazon EKS에서의 이 배포 패턴 개요
이 패턴은 NVIDIA NIM, Amazon Elastic Kubernetes Service(EKS) 및 다양한 AWS 서비스의 기능을 결합하여 고성능 및 비용 최적화된 모델 서빙 인프라를 제공합니다.
-
NVIDIA NIM 컨테이너 이미지: NVIDIA NIM은 컨테이너화된 환경에서 Llama3와 같은 LLM 모델을 호스팅하는 간소화된 접근 방식을 제공합니다. 이를 통해 고객은 기존 인프라와의 원활한 통합을 보장하면서 프라이빗 모델을 활용할 수 있습니다. NIM 배포에 대한 자세한 설정 단계를 안내합니다.
-
인스턴스 수준 스케일링을 위한 Karpenter: 오픈소스 노드 프로비저닝 프로젝트인 Karpenter는 Amazon EKS 클러스터의 인스턴스 수준에서 빠르고 효율적인 스케일링을 가능하게 합니다. 이를 통해 모델 서빙 인프라가 동적 워크로드 요구에 적응하여 리소스 활용 및 비용 효율성을 최적화할 수 있습니다.
-
스팟 인스턴스: LLM이 상태 비저장이라는 점을 고려하여 고객은 스팟 인스턴스를 활용하여 비용을 크게 절감할 수 있습니다.
-
Amazon Elastic File System(EFS): Amazon EFS는 Amazon EKS와 함께 사용할 수 있는 확장 가능하고 탄력적인 파일 스토리지를 제공합니다. 여러 파드가 동시에 동일한 파일 시스템에 접근할 수 있어 클러스터 전체에서 모델 아티팩트, 데이터셋 및 기타 영구 데이터를 저장하고 공유하는 데 이상적입니다. EFS는 파일을 추가하고 제거함에 따라 자동으로 증가하고 축소되어 용량 계획 및 관리가 필요 없습니다.
-
EKS Blueprints를 사용한 Terraform: 이 솔루션의 배포 및 관리를 간소화하기 위해 Terraform과 EKS Blueprints를 활용합니다. 이 Infrastructure-as-Code 접근 방식은 전체 스택의 자동화된 프로비저닝을 가능하게 하여 일관성, 재현성 및 효율적인 리소스 관리를 보장합니다.
이러한 구성 요소를 결합하여 제안된 솔루션은 대규모 언어 모델에 맞춤화된 강력하고 비용 효율적인 모델 서빙 인프라를 제공��합니다. NVIDIA NIM의 원활한 통합과 Karpenter를 통한 Amazon EKS의 확장성으로 고객은 인프라 비용을 최소화하면서 높은 성능을 달성할 수 있습니다.

솔루션 배포
사전 요구 사항
NVIDIA NIM을 시작하기 전에 다음 사항이 준비되어 있는지 확인하세요:
NVIDIA NIM 계정 설정 세부 정보를 보려면 클릭하세요
NVIDIA AI Enterprise 계정
- NVIDIA AI Enterprise 계정에 등록하세요. 계정이 없다면 이 링크를 사용하여 평가판 계정에 가입할 수 있습니다.
NGC API 키
-
NVIDIA AI Enterprise 계정에 로그인합니다
-
NGC(NVIDIA GPU Cloud) 포털로 이동합니다
-
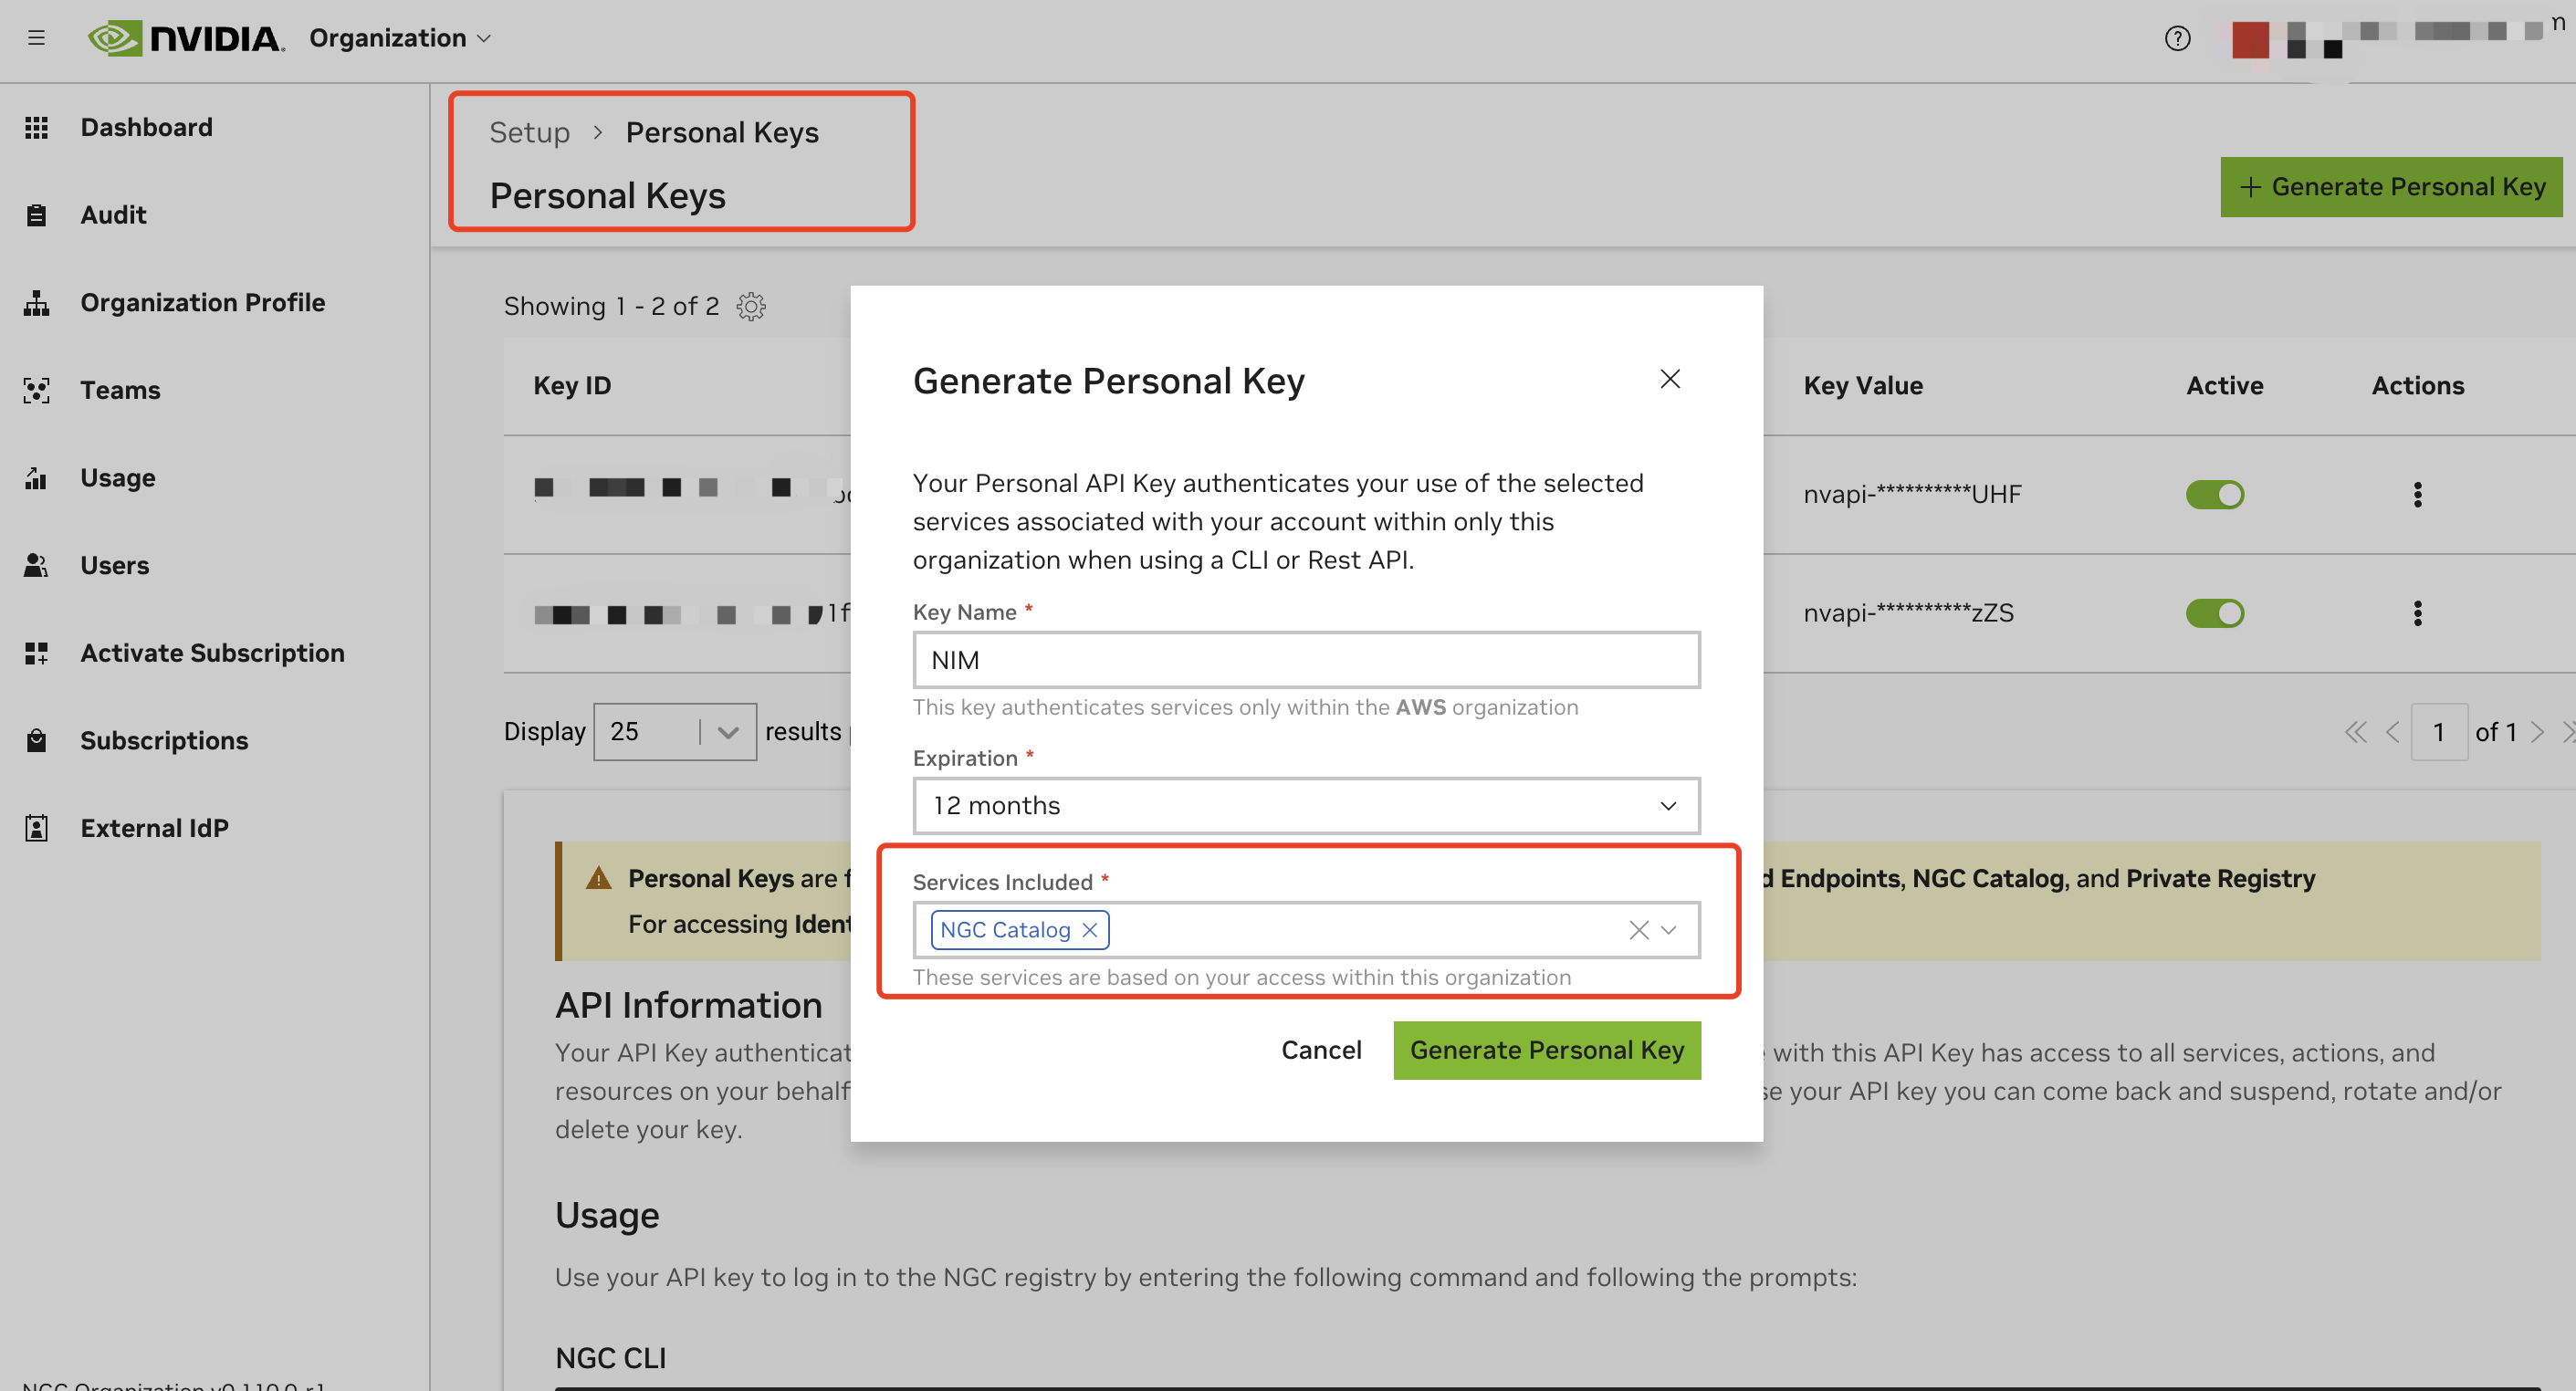
개인 API 키를 생성합니다:
- 계정 설정으로 이동하거나 직접 https://org.ngc.nvidia.com/setup/personal-keys 로 이동합니다
- "Generate Personal Key"를 클릭합니다
- "Services Included" 드롭다운에서 최소한 "NGC Catalog"가 선택되어 있는지 확인합니다
- API 키를 복사하고 안전하게 저장합니다. 키는
nvapi-접두사가 있어야 합니다
NGC API 키 검증 및 이미지 풀 테스트
API 키가 유효하고 올바르게 작동하는지 확인하려면:
- NGC API 키를 환경 변수로 설정합니다:
export NGC_API_KEY=<your_api_key_here>
- NVIDIA Container Registry로 Docker 인증을 수행합니다:
echo "$NGC_API_KEY" | docker login nvcr.io --username '$oauthtoken' --password-stdin
- NGC에서 이미지 풀을 테스트합니다:
docker pull nvcr.io/nim/meta/llama3-8b-instruct:latest
완료될 때까지 기다릴 필요 없이, API 키가 이미지를 풀할 수 있는지 확인만 하면 됩니다.
이 튜토리얼을 실행하려면 다음이 필요합니다
배포
저장소 복제
git clone https://github.com/awslabs/ai-on-eks.git
1. NGC API 키 구성
NVIDIA에서 NGC API 키를 검색하고 환경 변수로 설정합니다:
export TF_VAR_ngc_api_key=<replace-with-your-NGC-API-KEY>
2. 설치
중요 참고 사항: 블루프린트를 배포하기 전에 blueprint.tfvars 파일에서 리전을 업데이트해야 합니다. 또한 불일치를 방지하기 위해 로컬 리전 설정이 지정된 리전과 일치하는지 확인하세요. 예를 들어, export AWS_DEFAULT_REGION="<REGION>"을 원하는 리전으로 설정하세요:
설치 스크립트를 실행합니다:
이 패턴은 nvcr.io/nim/meta/llama3-8b-instruct라는 모델을 배포합니다. blueprint.tfvars 파일에서 nim_models 변수를 수정하여 더 많은 모델을 추가할 수 있습니다. 이 패턴을 사용하여 여러 모델을 동시에 배포할 수 있습니다.
이러한 변수를 통해 추가 모델을 활성화하기 전에 각 모델에 충분한 GPU를 지정했는지 확인하세요. 또한 AWS 계정이 충분한 GPU에 접근할 수 있는지 확인하세요. 이 패턴은 Karpenter를 사용하여 GPU 노드를 스케일링하며, 기본적으로 G5 인스턴스로 제한됩니다. 필요한 경우 Karpenter 노드 풀을 수정하여 p4 및 p5와 같은 다른 인스턴스를 포함할 수 있습니다.
cd ai-on-eks/infra/nvidia-triton-server
export TF_VAR_enable_nvidia_nim=true
export TF_VAR_enable_nvidia_triton_server=false
./install.sh
이 프로세스는 완료하는 데 약 20분이 소요됩니다.
3. 설치 확인
설치가 완료되면 출력에서 configure_kubectl 명령을 찾을 수 있습니다. 다음을 실행하여 EKS 클러스터 접근을 구성합니다
# EKS로 인증하기 위한 k8s 설정 파일 생성
aws eks --region us-west-2 update-kubeconfig --name nvidia-triton-server
배포된 파드의 상태를 확인합니다
kubectl get all -n nim
다음과 유사한 출력이 표시됩니다:
배포 세부 정보를 보려면 클릭하세요
NAME                               READY   STATUS    RESTARTS   AGE
pod/nim-llm-llama3-8b-instruct-0   1/1     Running   0          4h2m

NAME                                     TYPE        CLUSTER-IP     EXTERNAL-IP   PORT(S)    AGE
service/nim-llm-llama3-8b-instruct       ClusterIP   172.20.5.230   <none>        8000/TCP   4h2m
service/nim-llm-llama3-8b-instruct-sts   ClusterIP   None           <none>        8000/TCP   4h2m

NAME                                          READY   AGE
statefulset.apps/nim-llm-llama3-8b-instruct   1/1     4h2m

NAME                                                             REFERENCE                                TARGETS   MINPODS   MAXPODS   REPLICAS   AGE
horizontalpodautoscaler.autoscaling/nim-llm-llama3-8b-instruct   StatefulSet/nim-llm-llama3-8b-instruct   2/5       1         5         1          4h2m
llama3-8b-instruct 모델은 nim 네임스페이스에 StatefulSet으로 배포됩니다. 실행 중에 Karpenter가 GPU를 프로비저닝합니다.
Karpenter가 프로비저닝한 노드를 확인합니다.
kubectl get node -l type=karpenter -L node.kubernetes.io/instance-type
NAME                                         STATUS   ROLES    AGE     VERSION               INSTANCE-TYPE
ip-100-64-77-39.us-west-2.compute.internal   Ready    <none>   4m46s   v1.30.0-eks-036c24b   g5.2xlarge
4. 배포된 모델 확인
nim 네임��스페이스의 모든 파드가 1/1 상태로 준비되면 아래 명령을 사용하여 트래픽을 처리할 준비가 되었는지 확인합니다. 확인하려면 kubectl을 사용하여 port-forward로 모델 서빙 서비스를 노출합니다.
kubectl port-forward -n nim service/nim-llm-llama3-8b-instruct 8000
그런 다음 curl 명령으로 간단한 HTTP 요청을 통해 배포된 모델을 호출할 수 있습니다.
curl -X 'POST' \
  "http://localhost:8000/v1/completions" \
  -H 'accept: application/json' \
  -H 'Content-Type: application/json' \
  -d '{
      "model": "meta/llama3-8b-instruct",
      "prompt": "Once upon a time",
      "max_tokens": 64
      }'
다음과 유사한 출력이 표시됩니다
{
  "id": "cmpl-63a0b66aeda1440c8b6ca1ce3583b173",
  "object": "text_completion",
  "created": 1719742336,
  "model": "meta/llama3-8b-instruct",
  "choices": [
    {
      "index": 0,
      "text": ", there was a young man named Jack who lived in a small village at the foot of a vast and ancient forest. Jack was a curious and adventurous soul, always eager to explore the world beyond his village. One day, he decided to venture into the forest, hoping to discover its secrets.\nAs he wandered deeper into",
      "logprobs": null,
      "finish_reason": "length",
      "stop_reason": null
    }
  ],
  "usage": {
    "prompt_tokens": 5,
    "total_tokens": 69,
    "completion_tokens": 64
  }
}
NIM으로 배포된 Llama3 모델 테스트
방금 배포한 Llama3를 테스트할 시간입니다. 먼저 테스트를 위한 간단한 환경을 설정합니다.
cd ai-on-eks/blueprints/inference/nvidia-nim/nim-client
python3 -m venv .venv
source .venv/bin/activate
pip install openai
prompts.txt에 프롬프트를 준비해 두었으며, 20개의 프롬프트가 포함되어 있습니다. 다음 명령을 프롬프트와 함께 실행하여 생성된 출력을 확인할 수 있습니다.
python3 client.py --input-prompts prompts.txt --results-file results.txt
아래와 같은 출력이 표시됩니다:
Loading inputs from `prompts.txt`...
Model meta/llama3-8b-instruct - Request 14: 4.68s (4678.46ms)
Model meta/llama3-8b-instruct - Request 10: 6.43s (6434.32ms)
Model meta/llama3-8b-instruct - Request 3: 7.82s (7824.33ms)
Model meta/llama3-8b-instruct - Request 1: 8.54s (8540.69ms)
Model meta/llama3-8b-instruct - Request 5: 8.81s (8807.52ms)
Model meta/llama3-8b-instruct - Request 12: 8.95s (8945.85ms)
Model meta/llama3-8b-instruct - Request 18: 9.77s (9774.75ms)
Model meta/llama3-8b-instruct - Request 16: 9.99s (9994.51ms)
Model meta/llama3-8b-instruct - Request 6: 10.26s (10263.60ms)
Model meta/llama3-8b-instruct - Request 0: 10.27s (10274.35ms)
Model meta/llama3-8b-instruct - Request 4: 10.65s (10654.39ms)
Model meta/llama3-8b-instruct - Request 17: 10.75s (10746.08ms)
Model meta/llama3-8b-instruct - Request 11: 10.86s (10859.91ms)
Model meta/llama3-8b-instruct - Request 15: 10.86s (10857.15ms)
Model meta/llama3-8b-instruct - Request 8: 11.07s (11068.78ms)
Model meta/llama3-8b-instruct - Request 2: 12.11s (12105.07ms)
Model meta/llama3-8b-instruct - Request 19: 12.64s (12636.42ms)
Model meta/llama3-8b-instruct - Request 9: 13.37s (13370.75ms)
Model meta/llama3-8b-instruct - Request 13: 13.57s (13571.28ms)
Model meta/llama3-8b-instruct - Request 7: 14.90s (14901.51ms)
Storing results into `results.txt`...
Accumulated time for all requests: 206.31 seconds (206309.73 milliseconds)
PASS: NVIDIA NIM example
Actual execution time used with concurrency 20 is: 14.92 seconds (14.92 milliseconds)
results.txt의 출력은 다음과 같이 표시됩니다
부분 출력을 보려면 클릭하세요
The key differences between traditional machine learning models and very large language models (vLLM) are:

1. **Scale**: vLLMs are massive, with billions of parameters, whereas traditional models typically have millions.
2. **Training data**: vLLMs are trained on vast amounts of text data, often sourced from the internet, whereas traditional models are trained on smaller, curated datasets.
3. **Architecture**: vLLMs often use transformer architectures, which are designed for sequential data like text, whereas traditional models may use feedforward networks or recurrent neural networks.
4. **Training objectives**: vLLMs are often trained using masked language modeling or next sentence prediction tasks, whereas traditional models may use classification, regression, or clustering objectives.
5. **Evaluation metrics**: vLLMs are typically evaluated using metrics like perplexity, accuracy, or fluency, whereas traditional models may use metrics like accuracy, precision, or recall.
6. **Interpretability**: vLLMs are often less interpretable due to their massive size and complex architecture, whereas traditional models may be more interpretable due to their smaller size and simpler architecture.

These differences enable vLLMs to excel in tasks like language translation, text generation, and conversational AI, whereas traditional models are better suited for tasks like image classification or regression.

=========

TensorRT (Triton Runtime) optimizes LLM (Large Language Model) inference on NVIDIA hardware by:

1. **Model Pruning**: Removing unnecessary weights and connections to reduce model size and computational requirements.
2. **Quantization**: Converting floating-point models to lower-precision integer formats (e.g., INT8) to reduce memory bandwidth and improve performance.
3. **Kernel Fusion**: Combining multiple kernel launches into a single launch to reduce overhead and improve parallelism.
4. **Optimized Tensor Cores**: Utilizing NVIDIA's Tensor Cores for matrix multiplication, which provides significant performance boosts.
5. **Batching**: Processing multiple input batches concurrently to improve throughput.
6. **Mixed Precision**: Using a combination of floating-point and integer precision to balance accuracy and performance.
7. **Graph Optimization**: Reordering and reorganizing the computation graph to minimize memory access and optimize data transfer.

By applying these optimizations, TensorRT can significantly accelerate LLM inference on NVIDIA hardware, achieving faster inference times and improved performance.

=========
Open WebUI 배포
Open WebUI는 OpenAI API 서버 및 Ollama와 호환되는 모델에서만 작동합니다.
1. WebUI 배포
다음 명령을 실행하여 Open WebUI를 배포합니다:
kubectl apply -f ai-on-eks/blueprints/inference/nvidia-nim/openai-webui-deployment.yaml
2. WebUI에 접근하기 위한 Port Forward
kubectl port-forward를 사용하여 로컬에서 WebUI에 접근합니다:
kubectl port-forward svc/open-webui 8081:80 -n openai-webui
3. WebUI 접근
��브라우저를 열고 http://localhost:8081 로 이동합니다
4. 가입
이름, 이메일 및 임의의 비밀번호로 가입합니다.
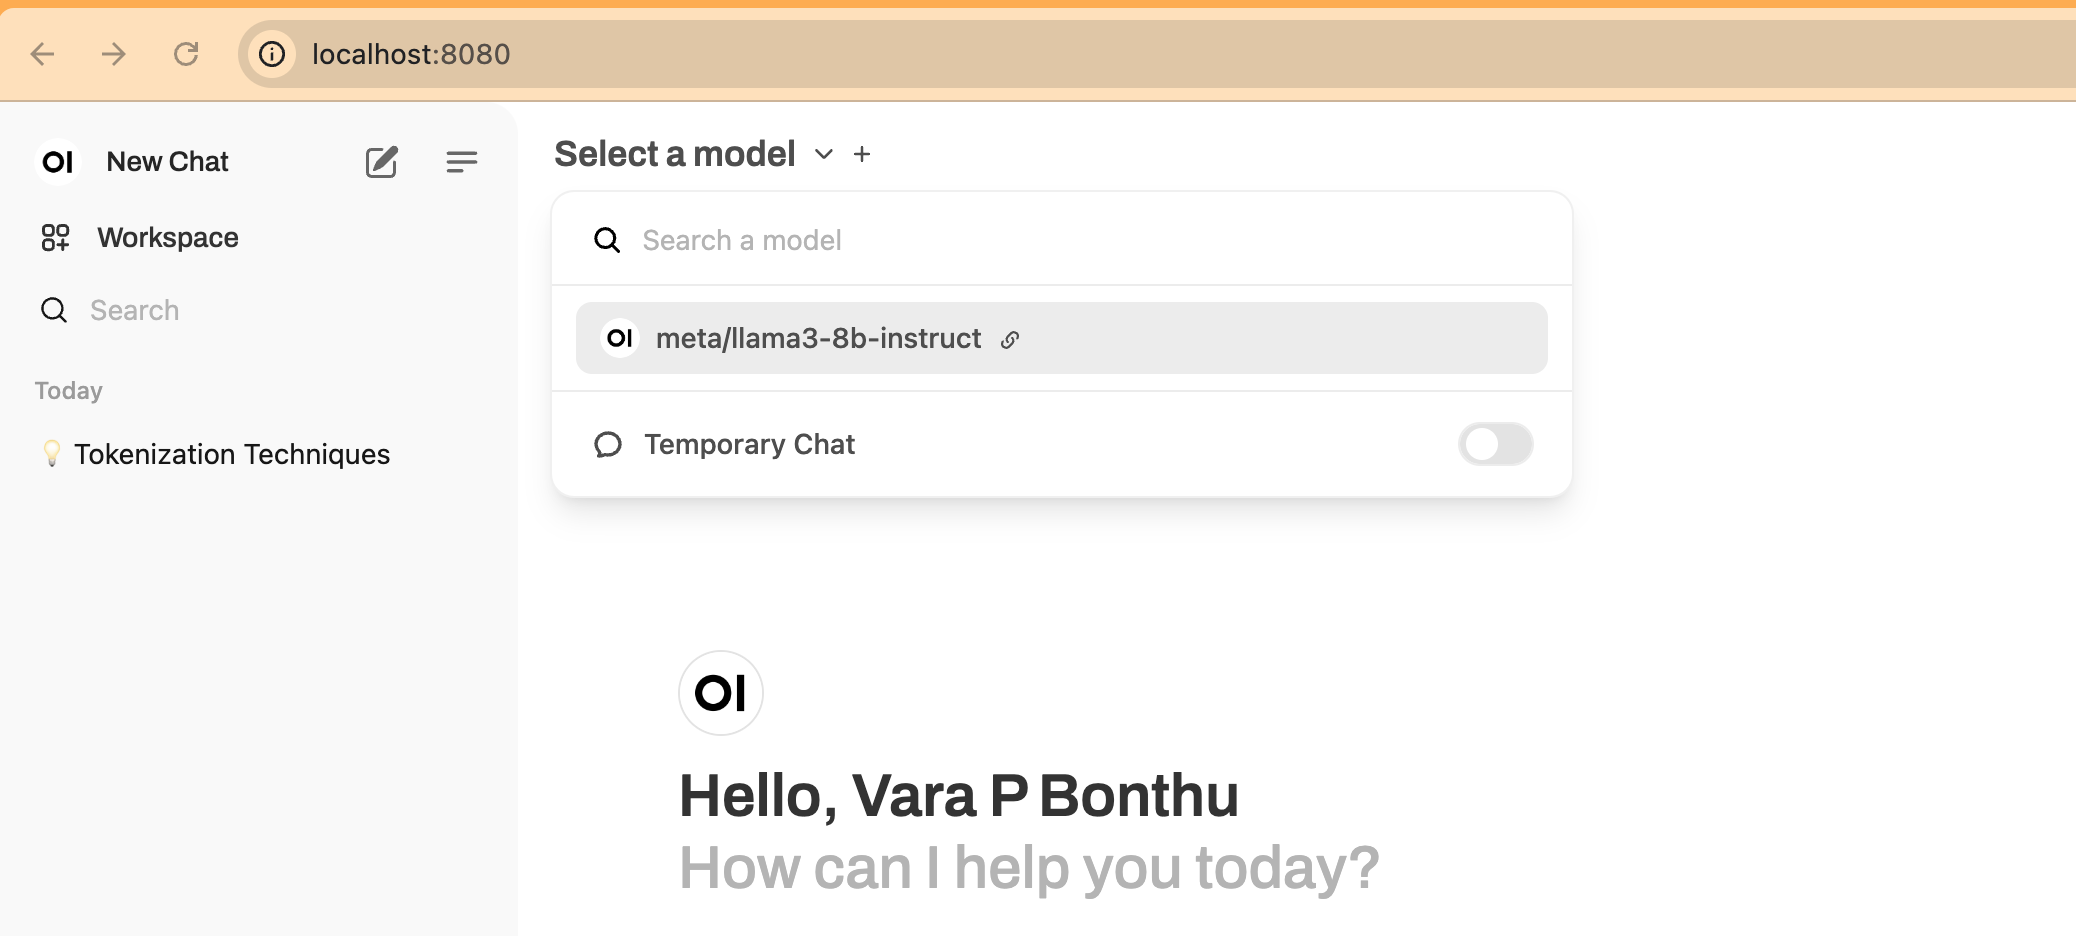
5. 새 채팅 시작
New Chat을 클릭하고 아래 스크린샷과 같이 드롭다운 메뉴에서 모델을 선택합니다:
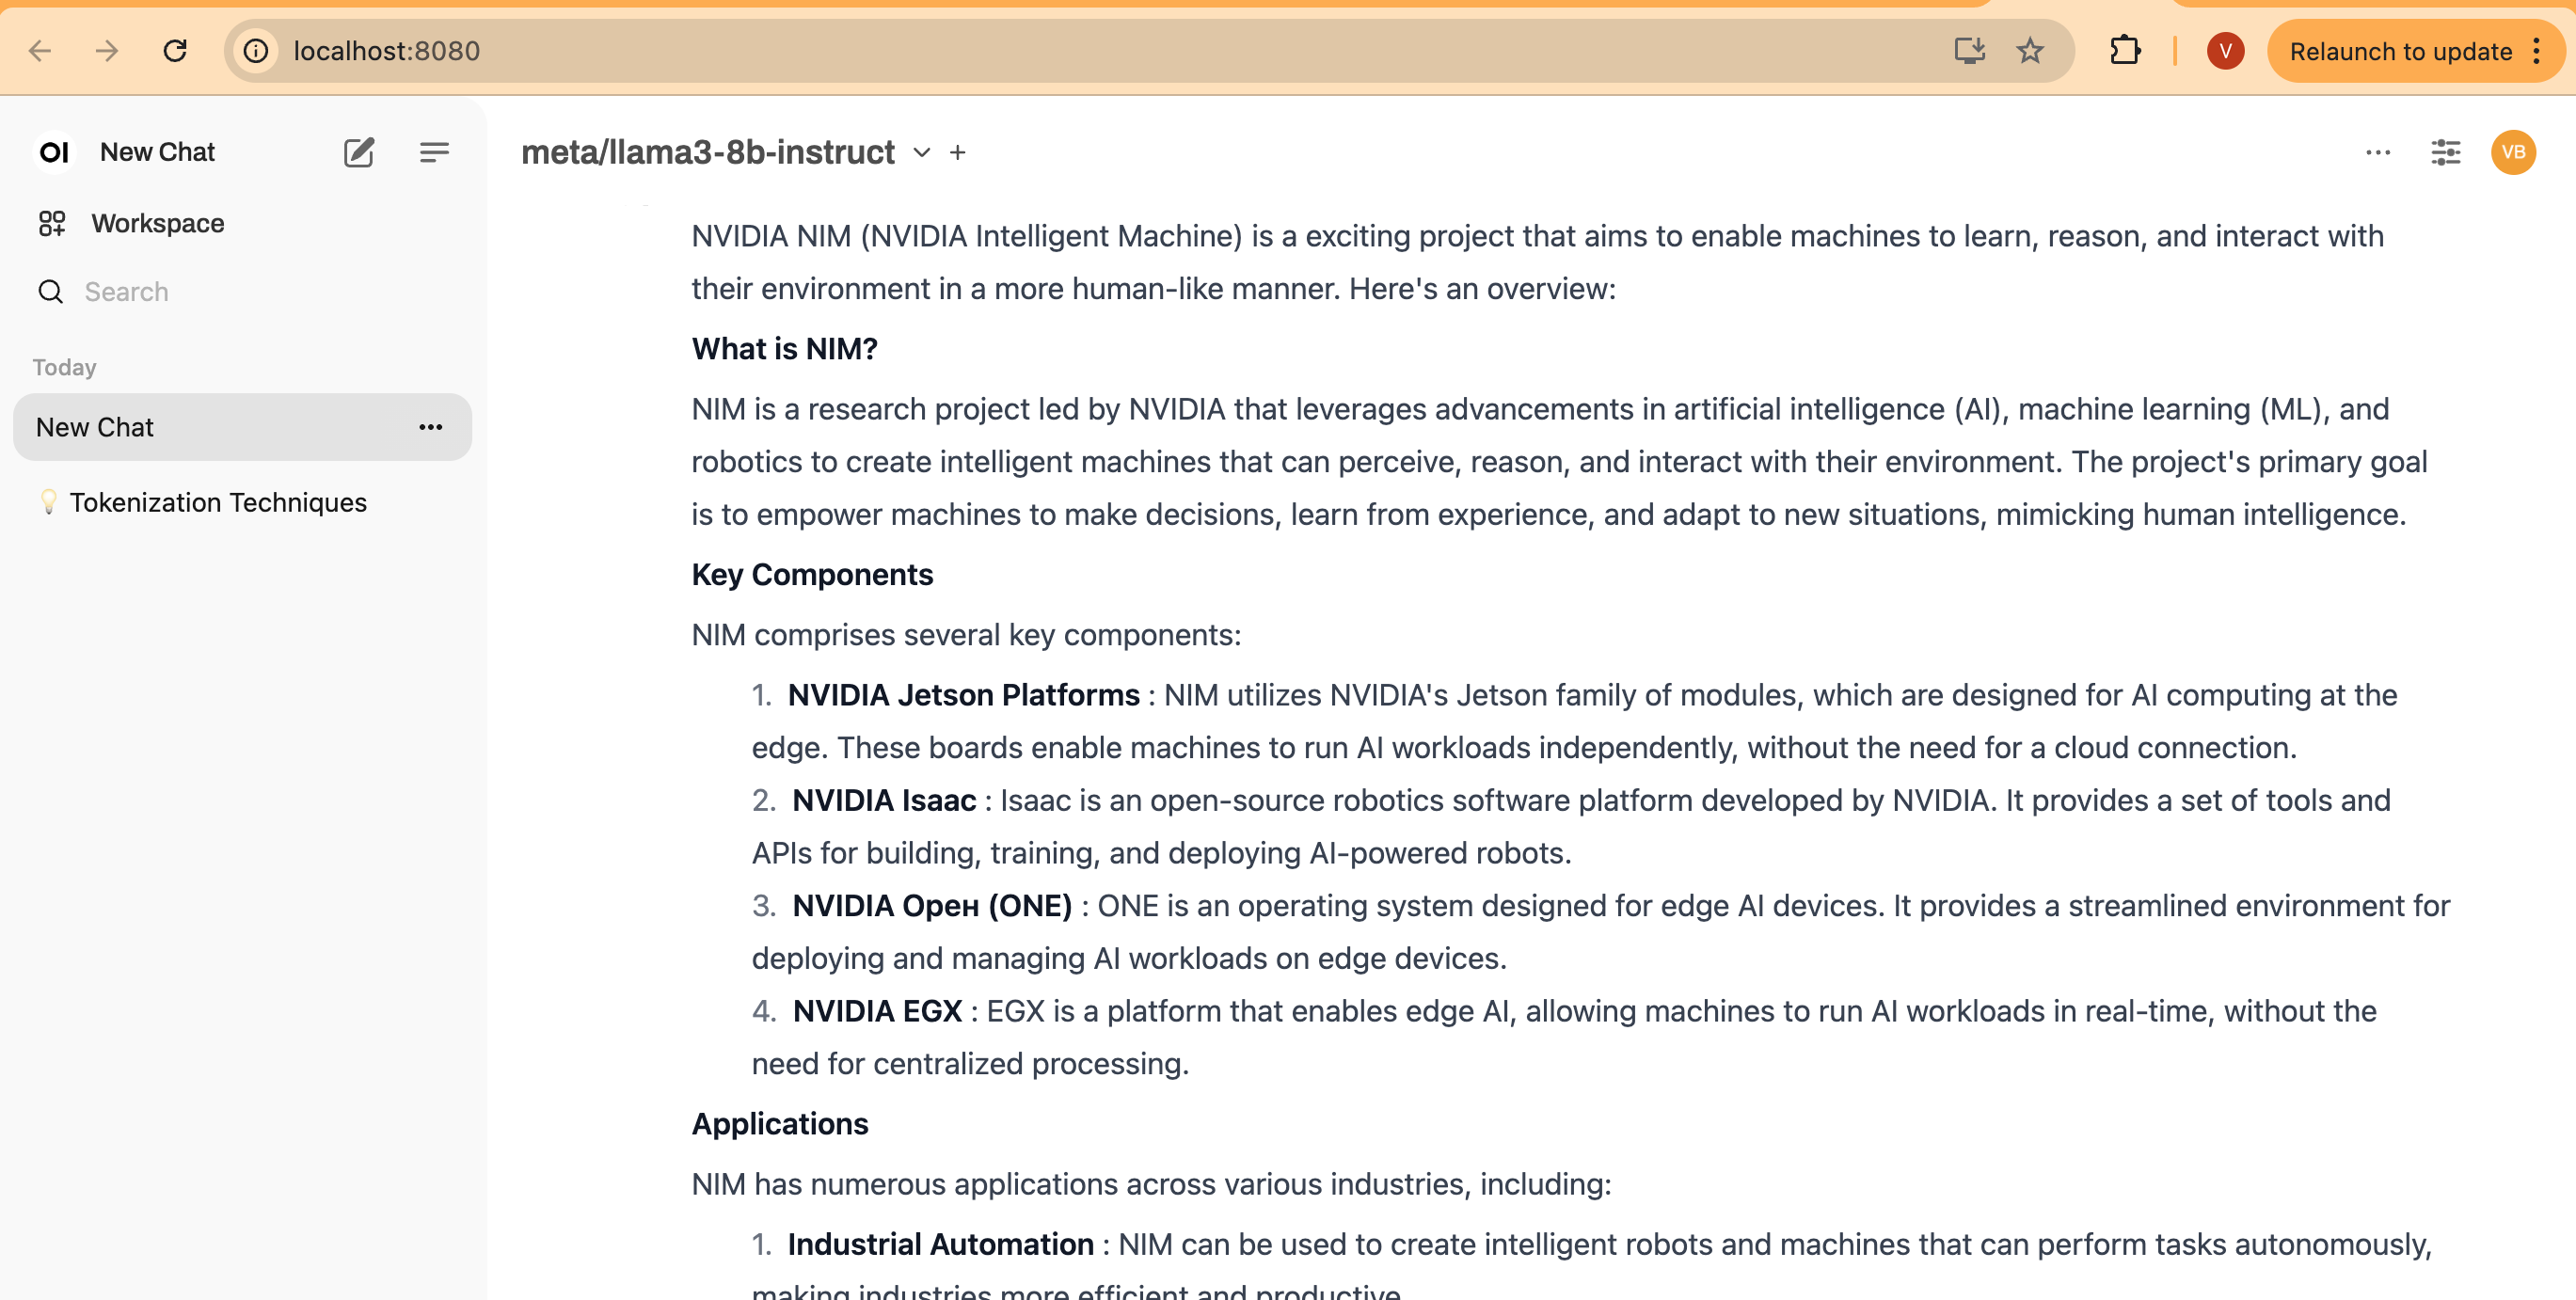
6. 테스트 프롬프트 입력
프롬프트를 입력하면 아래와 같이 스트리밍 결과가 표시됩니다:
NVIDIA GenAI-Perf 도구를 사용한 성능 테스트
GenAI-Perf는 추론 서버를 통해 제공되는 생성형 AI 모델의 처리량과 지연 시간을 측정하기 위한 명령줄 도구입니다.
GenAI-Perf는 추론 서버로 배포된 다른 모델과 벤치마크하는 표준 도구로 사용할 수 있습니다. 그러나 이 도구에는 GPU가 필요합니다. 더 쉽게 사용할 수 있도록 도구를 실행하기 위한 사전 구성된 매니페스트 genaiperf-deploy.yaml을 제공합니다.
cd ai-on-eks/blueprints/inference/nvidia-nim
kubectl apply -f genaiperf-deploy.yaml
파드가 실행 상태 1/1로 준비되면 파드에 접속할 수 있습니다.
export POD_NAME=$(kubectl get po -l app=tritonserver -ojsonpath='{.items[0].metadata.name}')
kubectl exec -it $POD_NAME -- bash
배포된 NIM Llama3 모델에 대해 테스트를 실행합니다
genai-perf \
  -m meta/llama3-8b-instruct \
  --service-kind openai \
  --endpoint v1/completions \
  --endpoint-type completions \
  --num-prompts 100 \
  --random-seed 123 \
  --synthetic-input-tokens-mean 200 \
  --synthetic-input-tokens-stddev 0 \
  --output-tokens-mean 100 \
  --output-tokens-stddev 0 \
  --tokenizer hf-internal-testing/llama-tokenizer \
  --concurrency 10 \
  --measurement-interval 4000 \
  --profile-export-file my_profile_export.json \
  --url nim-llm-llama3-8b-instruct.nim:8000
다음과 유사한 출력이 표시됩니다
2024-07-11 03:32 [INFO] genai_perf.parser:166 - Model name 'meta/llama3-8b-instruct' cannot be used to create artifact directory. Instead, 'meta_llama3-8b-instruct' will be used.
2024-07-11 03:32 [INFO] genai_perf.wrapper:137 - Running Perf Analyzer : 'perf_analyzer -m meta/llama3-8b-instruct --async --input-data artifacts/meta_llama3-8b-instruct-openai-completions-concurrency10/llm_inputs.json --endpoint v1/completions --service-kind openai -u nim-llm.nim:8000 --measurement-interval 4000 --stability-percentage 999 --profile-export-file artifacts/meta_llama3-8b-instruct-openai-completions-concurrency10/my_profile_export.json -i http --concurrency-range 10'
                                                      LLM Metrics
┏━━━━━━━━━━━━━━━━━━━━━━┳━━━━━━━━━━━━━━━┳━━━━━━━━━━━━━━━┳━━━━━━━━━━━━━━━┳━━━━━━━━━━━━━━━┳━━━━━━━━━━━━━━━┳━━━━━━━━━━━━━━━┓
┃            Statistic ┃           avg ┃           min ┃           max ┃           p99 ┃           p90 ┃           p75 ┃
┡━━━━━━━━━━━━━━━━━━━━━━╇━━━━━━━━━━━━━━━╇━━━━━━━━━━━━━━━╇━━━━━━━━━━━━━━━╇━━━━━━━━━━━━━━━╇━━━━━━━━━━━━━━━╇━━━━━━━━━━━━━━━┩
│ Request latency (ns) │ 3,934,624,446 │ 3,897,758,114 │ 3,936,987,882 │ 3,936,860,185 │ 3,936,429,317 │ 3,936,333,682 │
│     Num output token │           112 │           105 │           119 │           119 │           117 │           115 │
│      Num input token │           200 │           200 │           200 │           200 │           200 │           200 │
└──────────────────────┴───────────────┴───────────────┴───────────────┴───────────────┴───────────────┴───────────────┘
Output token throughput (per sec): 284.64
Request throughput (per sec): 2.54
Request latency, Out token throughput, Request throughput를 포함하여 genai-perf가 수집하는 메트릭을 볼 수 있습니다.
명령줄 옵션을 이해하려면 이 문서를 참조하세요.
관측성
이 블루프린트의 일부로 모니터링 및 관측성을 위한 Prometheus 서버와 Grafana 배포를 제공하는 Kube Prometheus 스택도 배포했습니다.
먼저 Kube Prometheus 스택에서 배포한 서비스를 확인합니다:
kubectl get svc -n monitoring
다음과 유사한 출력이 표시됩니다:
NAME                                             TYPE        CLUSTER-IP       EXTERNAL-IP   PORT(S)             AGE
kube-prometheus-stack-grafana                    ClusterIP   172.20.225.77    <none>        80/TCP              10m
kube-prometheus-stack-kube-state-metrics         ClusterIP   172.20.237.248   <none>        8080/TCP            10m
kube-prometheus-stack-operator                   ClusterIP   172.20.118.163   <none>        443/TCP             10m
kube-prometheus-stack-prometheus                 ClusterIP   172.20.132.214   <none>        9090/TCP,8080/TCP   10m
kube-prometheus-stack-prometheus-node-exporter   ClusterIP   172.20.213.178   <none>        9100/TCP            10m
prometheus-adapter                               ClusterIP   172.20.171.163   <none>        443/TCP             10m
prometheus-operated                              ClusterIP   None             <none>        9090/TCP            10m
NVIDIA NIM LLM 서비스는 포트 8000의 nim-llm-llama3-8b-instruct 서비스에서 /metrics 엔드포인트를 통해 메트릭을 노출합니다. 다음을 실행하여 확인합니다
kubectl get svc -n nim
kubectl port-forward -n nim svc/nim-llm-llama3-8b-instruct 8000

curl localhost:8000/metrics # 다른 터미널에서 실행
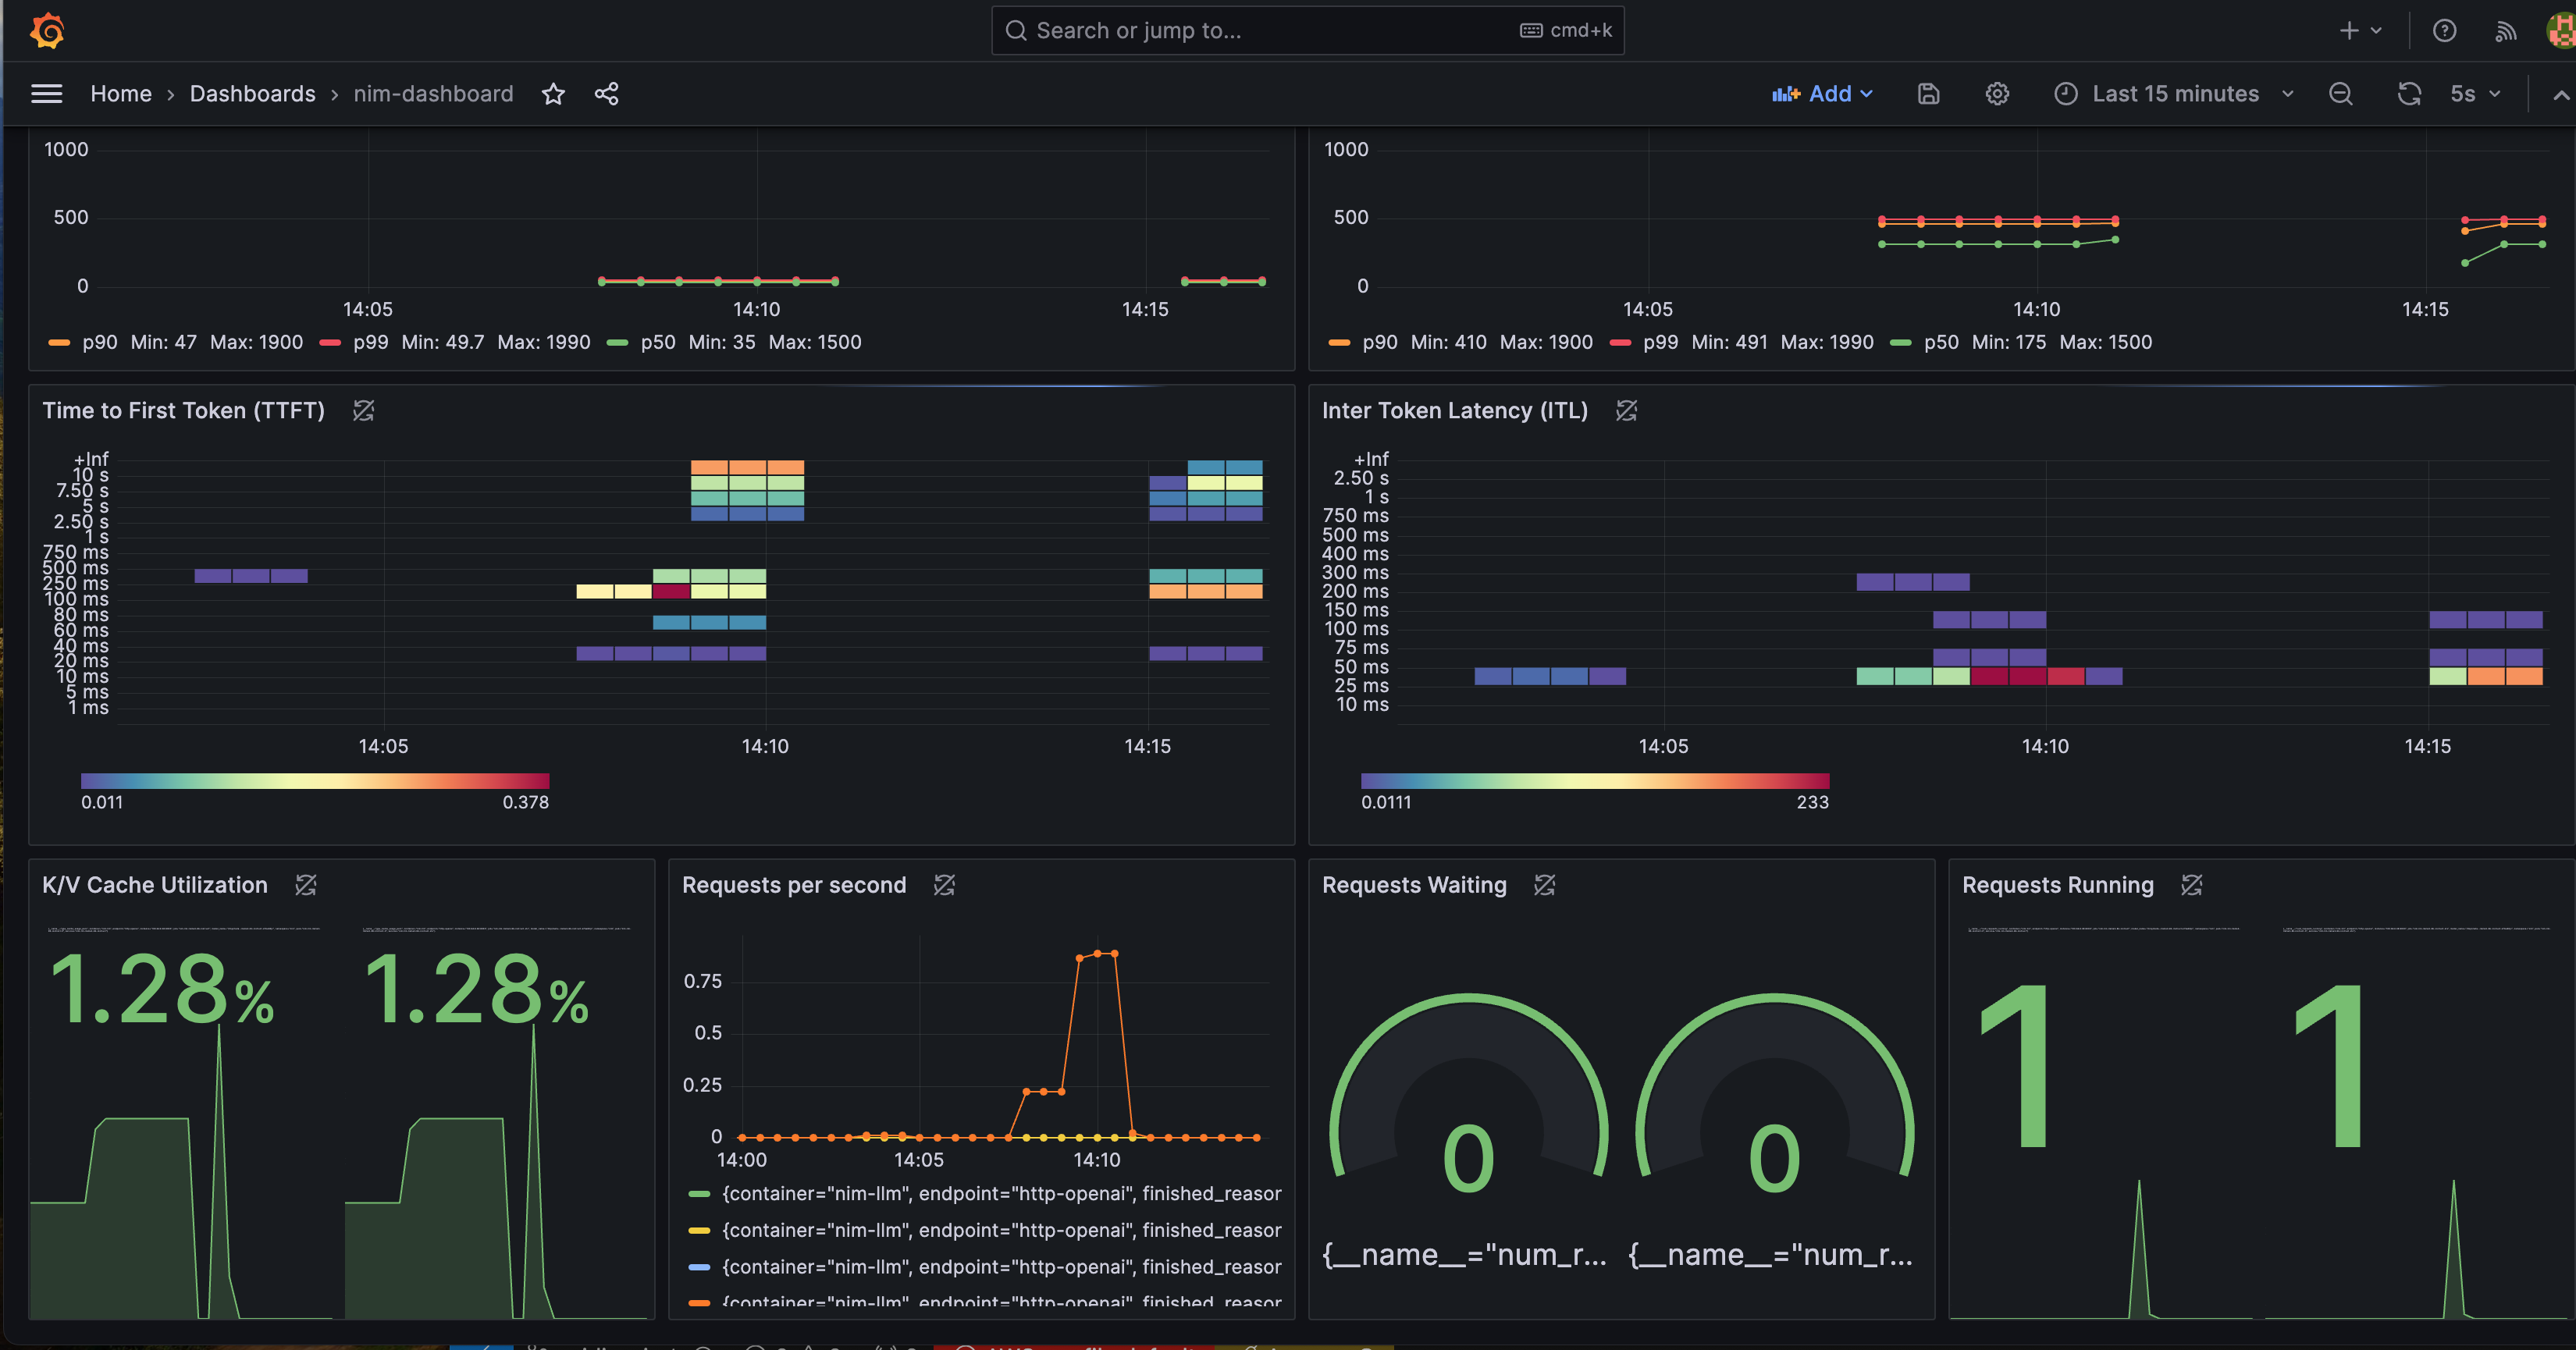
Grafana 대시보드
NIM 상태를 더 잘 시각화하기 위해 사전 구성된 Grafana 대시보드를 제공합니다. 아래 Grafana 대시보드에는 여러 중요한 메트릭이 포함되어 있습니다:
- Time to First Token(TTFT): 모델에 대한 초기 추론 요청과 첫 번째 토큰 반환 사이의 지연 시간.
- Inter-Token Latency(ITL): 첫 번째 토큰 이후 각 토큰 사이의 지연 시간.
- Total Throughput: NIM에서 초당 생성되는 총 토큰 수.
더 많은 메트릭 설명은 이 문서에서 찾을 수 있습니다.
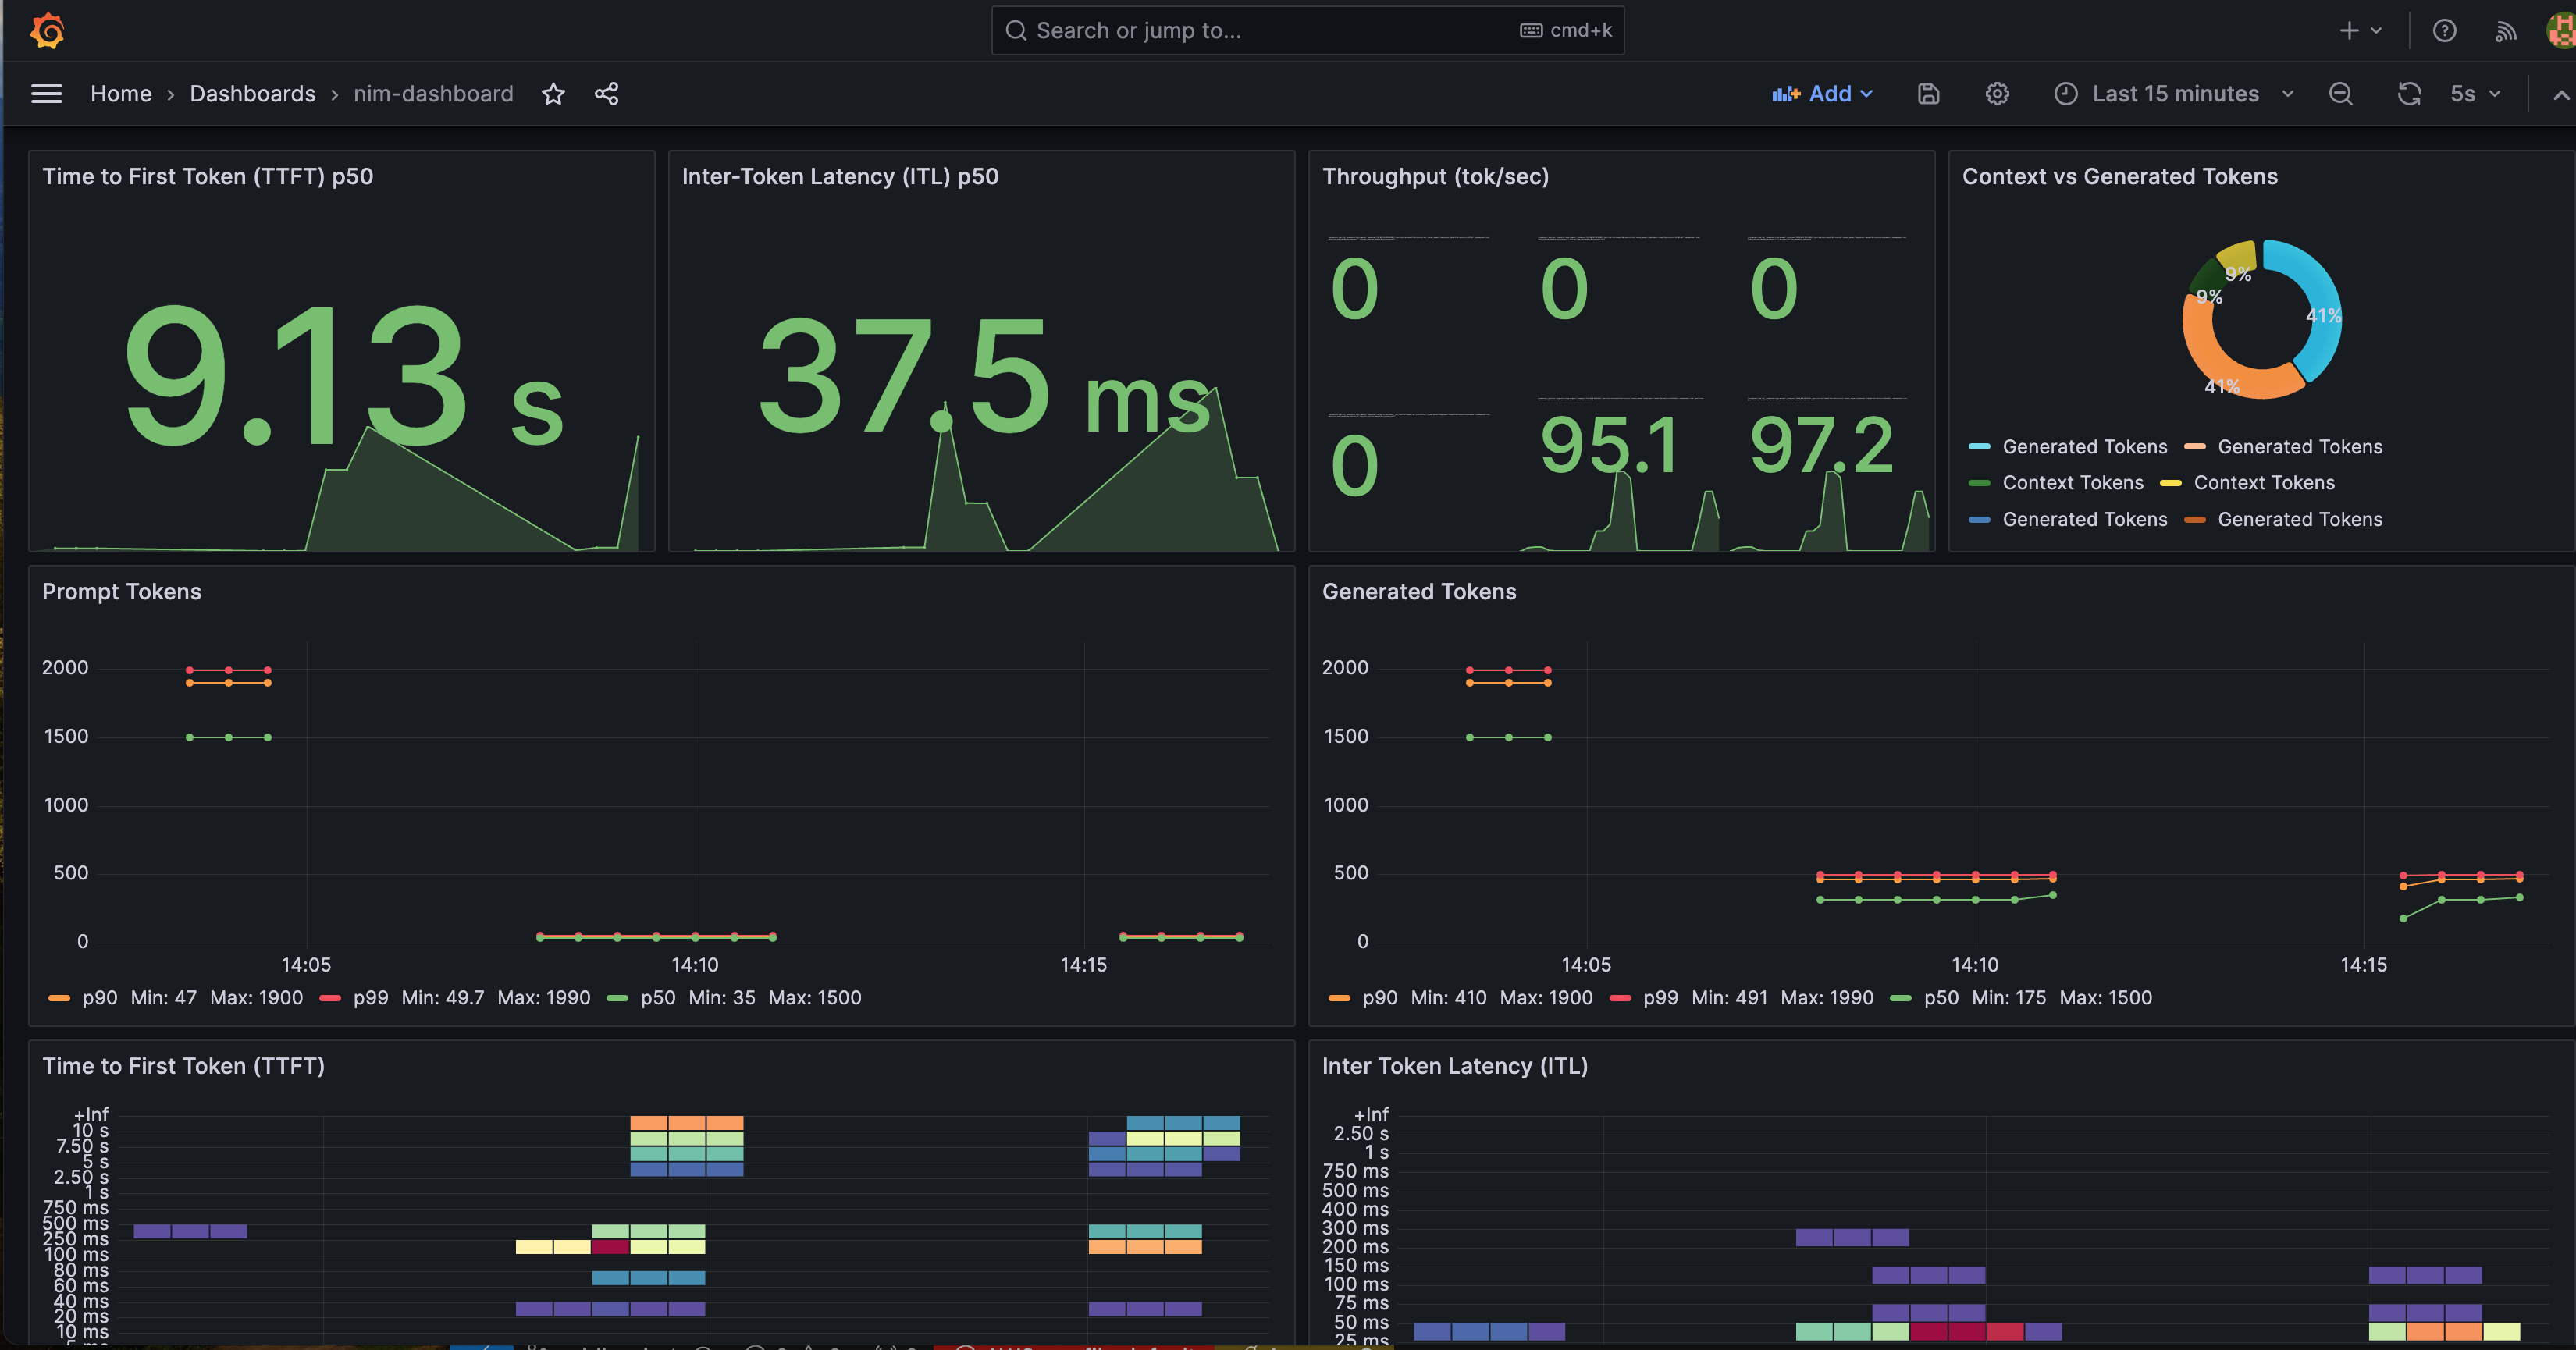
Time-to-First-Token, Inter-Token-Latency, KV Cache Utilization 메트릭 등을 모니터링할 수 있습니다.
이러한 메트릭을 모니터링하기 위해 Grafana 대시보드를 보려면 아래 단계를 따르세요:
세부 정보를 보려면 클릭하세요
1. Grafana 비밀번호 검색
비밀번호는 AWS Secret Manager에 저장되어 있습니다. 아래 Terraform 명령이 시크릿 이름을 보여줍니다.
terraform output grafana_secret_name
그런 다음 출력된 시크릿 이름을 사용하여 아래 명령을 실행합니다,
aws secretsmanager get-secret-value --secret-id <grafana_secret_name_output> --region $AWS_REGION --query "SecretString" --output text
2. Grafana 서비스 노출
port-forward를 사용하여 Grafana 서비스를 노출합니다.
kubectl port-forward svc/kube-prometheus-stack-grafana 3000:80 -n monitoring
3. Grafana에 로그인:
- 웹 브라우저를 열고 http://localhost:3000으로 이동합니다.
- 사용자 이름
admin과 AWS Secrets Manager에서 검색한 비밀번호로 로그인합니다.
4. NIM 모니터링 대시보드 열기:
- 로그인한 후 왼쪽 사이드바에서 "Dashboards"를 클릭하고 "nim"을 검색합니다
- 목록에서
NVIDIA NIM Monitoring대시보드를 찾을 수 있습니다 - 클릭하여 대시보드로 진입합니다.
이제 Grafana 대시보드에 표시된 메트릭을 볼 수 있으며, NVIDIA NIM 서비스 배포의 성능을 모니터링할 수 있습니다.
이 가이드 작성 시점에서 NVIDIA도 예제 Grafana 대시보드를 제공합니다. 여기에서 확인할 수 있습니다.
정리
이 배포에서 생성된 모든 리소스를 제거하려면 다음을 실행합니다:
./cleanup.sh