EKS에서 ML 모델을 배포하려면 GPU 또는 Neuron 인스턴스에 대한 접근이 필요합니다. 배포가 작동하지 않는 경우, 이러한 리소스에 대한 접근 권한이 없기 때문인 경우가 많습니다. 또한 일부 배포 패턴은 Karpenter 자동 스케일링과 정적 노드 그룹에 의존합니다. 노드가 초기화되지 않으면 Karpenter 또는 노드 그룹의 로그를 확인하여 문제를 해결하세요.
Mistralai/Mistral-7B-Instruct-v0.2 모델을 사용하려면 Hugging Face 계정을 통한 접근이 필요합니다.
RayServe와 vLLM을 사용한 LLM 배포
이 가이드에서는 Amazon EKS(Elastic Kubernetes Service)에서 Ray Serve와 vLLM 백엔드를 사용하여 대규모 언어 모델(LLM)을 배포하는 방법을 살펴봅니다. mistralai/Mistral-7B-Instruct-v0.2 모델을 사용하여 패턴을 시연합니다.
LLM 추론을 위해 vLLM 백엔드와 함께 Ray Serve를 사용하면 확장성, 효율성, 배포 용이성 측면에서 여러 가지 매력적인 이점이 있습니다. Ray Serve는 동시 요청을 효율적으로 처리하도록 설계되어 여러 요청을 동시에 처리해야 하는 실시간 애플리케이션에 이상적입니다. 처리량과 리소스 활용을 최적화하기 위해 여러 요청을 그룹화하는 동적 배칭을 지원하며, 이는 LLM 추론의 높은 요구사항을 처리하는 데 중요합니다. 또한 Ray Serve의 수신 요청 부하에 따른 자동 스케일링 기능은 수동 개입 없이 변동하는 트래픽에 적응하여 리소스를 최적으로 사용할 수 있도록 합니다. vLLM과의 통합은 효율적인 온라인 추론에 필수적인 vLLM의 실시간 배칭 기능을 활용하여 성능을 �더욱 향상시킵니다. 더불어 Ray Serve의 프레임워크 독립적 특성으로 모든 Python 프레임워크와 함께 사용할 수 있어 모델 배포 및 기존 시스템과의 통합에 유연성을 제공합니다. 이러한 기능의 조합으로 Ray Serve와 vLLM 백엔드는 프로덕션 환경에서 대규모 언어 모델을 배포하기 위한 강력한 솔루션이 되어 높은 성능, 확장성, 사용 용이성을 보장합니다.
RayServe와 vLLM 백엔드 통합
vLLM: 대규모 언어 모델(LLM)을 위해 특별히 설계된 고처리량 및 메모리 효율적인 추론 및 서빙 엔진입니다. 배포 및 추론 성능을 최적화하도록 설계되었습니다. 주목할 만한 기능은 운영 체제의 가상 메모리 페이징에서 영감을 받은 혁신적인 어텐션 알고리즘인 PagedAttention입니다. PagedAttention은 어텐션 키와 값 텐서(KV 캐시)를 비연속적인 메모리 공간에 저장하여 효율적으로 관리하며, 이를 통해 메모리 단편화와 낭비를 크게 줄입니다. 자세한 내용은 vLLM을 HuggingFace Transformers(HF) 및 HuggingFace Text Generation Inference(TGI)와 비교한 블로그를 참조하세요.
vLLM은 수신 요청의 연속 배칭을 사용하여 계산 리소스 사용을 최적화하고 여러 요청을 그룹화하여 추론 속도를 향상시킵니다. 이 동적 배칭은 처리량을 극대화하고 지연 시간을 줄입니다. 또한 GPU에서 가속화된 모델 실행을 위해 최적화된 CUDA 커널을 제공합니다. 또 다른 주요 장점은 단일 프롬프트에서 여러 출력 시퀀스가 생성되는 병렬 샘플링 중 vLLM의 효율적인 메모리 공유입니다. 이를 통해 메모리 사용량이 최대 55% 감소하고 처리량이 최대 2.2배 향상됩니다.
Mistralai/Mistral-7B-Instruct-v0.2
이 가이드에서는 RayServe와 vLLM을 사용하여 Mistral-7B-Instruct-v0.2 모델을 배포합니다. 이 지침을 Llama2와 같은 다른 대규모 언어 모델을 배포하는 데 쉽게 적용할 수 있습니다. Mistral-7B-Instruct-v0.2는 고품질의 교육적 응답을 제공하도록 설계된 최첨단 대규모 언어 모델입니다. 다양한 데이터셋으로 훈련되어 다양한 주제에 대해 인간과 같은 텍스트를 이해하고 생성하는 데 뛰어나며, 자세한 설명, 복잡한 쿼리, 자연어 이해가 필요한 애플리케이션에 적합합니다.
솔루션 배포
👈RayServe와 vLLM을 사용한 Mistral-7B-Instruct-v0.2 배포
필요한 모든 구성 요소와 함께 EKS 클러스터를 배포한 후, RayServe와 vLLM을 사용�하여 Mistral-7B-Instruct-v0.2를 배포하는 단계를 진행할 수 있습니다.
1단계: 이 배포의 사전 요구 사항으로 Hugging Face 계정을 통해 모델에 접근할 수 있는지 확인해야 합니다:

2단계: Hugginface Hub 토큰 내보내기
RayServe와 vLLM 백엔드로 Mistral-7B-Instruct-v0.2 모델을 배포하려면 Hugging Face Hub 토큰을 환경 변수로 구성해야 합니다. 이 토큰은 인증 및 모델 접근에 필요합니다. Hugging Face 토큰을 생성하고 관리하는 방법에 대한 안내는 Hugging Face 토큰 관리를 방문하세요.
Your-Hugging-Face-Hub-Token-Value를 실제 Hugging Face Hub 토큰으로 교체하세요. 이 단계는 배포가 Mistral-7B-Instruct-v0.2 모델에 접근하는 데 필요한 인증을 갖추도록 합니다.
export HUGGING_FACE_HUB_TOKEN=$(echo -n "Your-Hugging-Face-Hub-Token-Value" | base64)
3단계: RayService 클러스터를 배포하려면 ray-service-vllm.yaml 파일이 있는 디렉토리로 이동하여 배포 명령을 실행합니다. RayService YAML 구성에 대한 자세한 정보는 ai-on-eks/blueprints/inference/vllm-rayserve-gpu/ray-service-vllm.yaml 위치의 파일을 참조하세요.
터미널에서 다음 명령을 실행하세요. 이렇게 하면 RayService 구성이 적용되고 EKS 설정에 클러스터가 배포됩니다.
cd ai-on-eks/blueprints/inference/vllm-rayserve-gpu

envsubst < ray-service-vllm.yaml| kubectl apply -f -
4단계: 다음 명령을 실행하여 배포를 확인합니다
배포가 성공적으로 완료되었는지 확인하려면 다음 명령을 실행하세요:
배포 과정은 최대 10분이 걸릴 수 있습니다. Head Pod는 5~6분 내에 준비될 것으로 예상되며, Ray Serve 워커 파드는 Huggingface에서 이미지 검색 및 모델 배포에 최대 10분이 걸릴 수 있습니다.
RayServe 구성에 따르면 하나의 Ray head 파드가 x86 인스턴스에서 실행되고 하나의 워커 파드가 g5 GPU 인스턴스에서 실행됩니다. 여러 레플리카를 실행하도록 RayServe YAML 파일을 수정할 수 있지만, 각 추가 레플리카에는 별도의 GPU가 필요하여 새 인스턴스가 생성될 수 있습니다.
kubectl get pod -n rayserve-vllm
NAME                                           READY   STATUS    RESTARTS   AGE
vllm-raycluster-nvtxg-head-g2cg8               1/1     Running   0          47m
vllm-raycluster-nvtxg-worker-gpu-group-msl5p   1/1     Running   0          47m
이 배포는 여러 포트가 있는 Mistral 서비스도 구성합니다. 포트 8265는 Ray 대시보드용이고 포트 8000은 Mistral 모델 엔드포인트용입니다.
서비스를 확인하려면 다음 명령을 실행하세요:
kubectl get svc -n rayserve-vllm

NAME             TYPE        CLUSTER-IP       EXTERNAL-IP   PORT(S)                                         AGE
vllm             ClusterIP   172.20.208.16    <none>        6379/TCP,8265/TCP,10001/TCP,8000/TCP,8080/TCP   48m
vllm-head-svc    ClusterIP   172.20.239.237   <none>        6379/TCP,8265/TCP,10001/TCP,8000/TCP,8080/TCP   37m
vllm-serve-svc   ClusterIP   172.20.196.195   <none>        8000/TCP                                        37m
Ray 대시보드에 접근하려면 관련 포트를 로컬 머신으로 포트 포워딩할 수 있습니다:
kubectl -n rayserve-vllm port-forward svc/vllm 8265:8265
그런 다음 http://localhost:8265에서 웹 UI에 접근할 수 있으며, Ray 에코시스템 내의 작업 및 액터 배포가 표시됩니다.
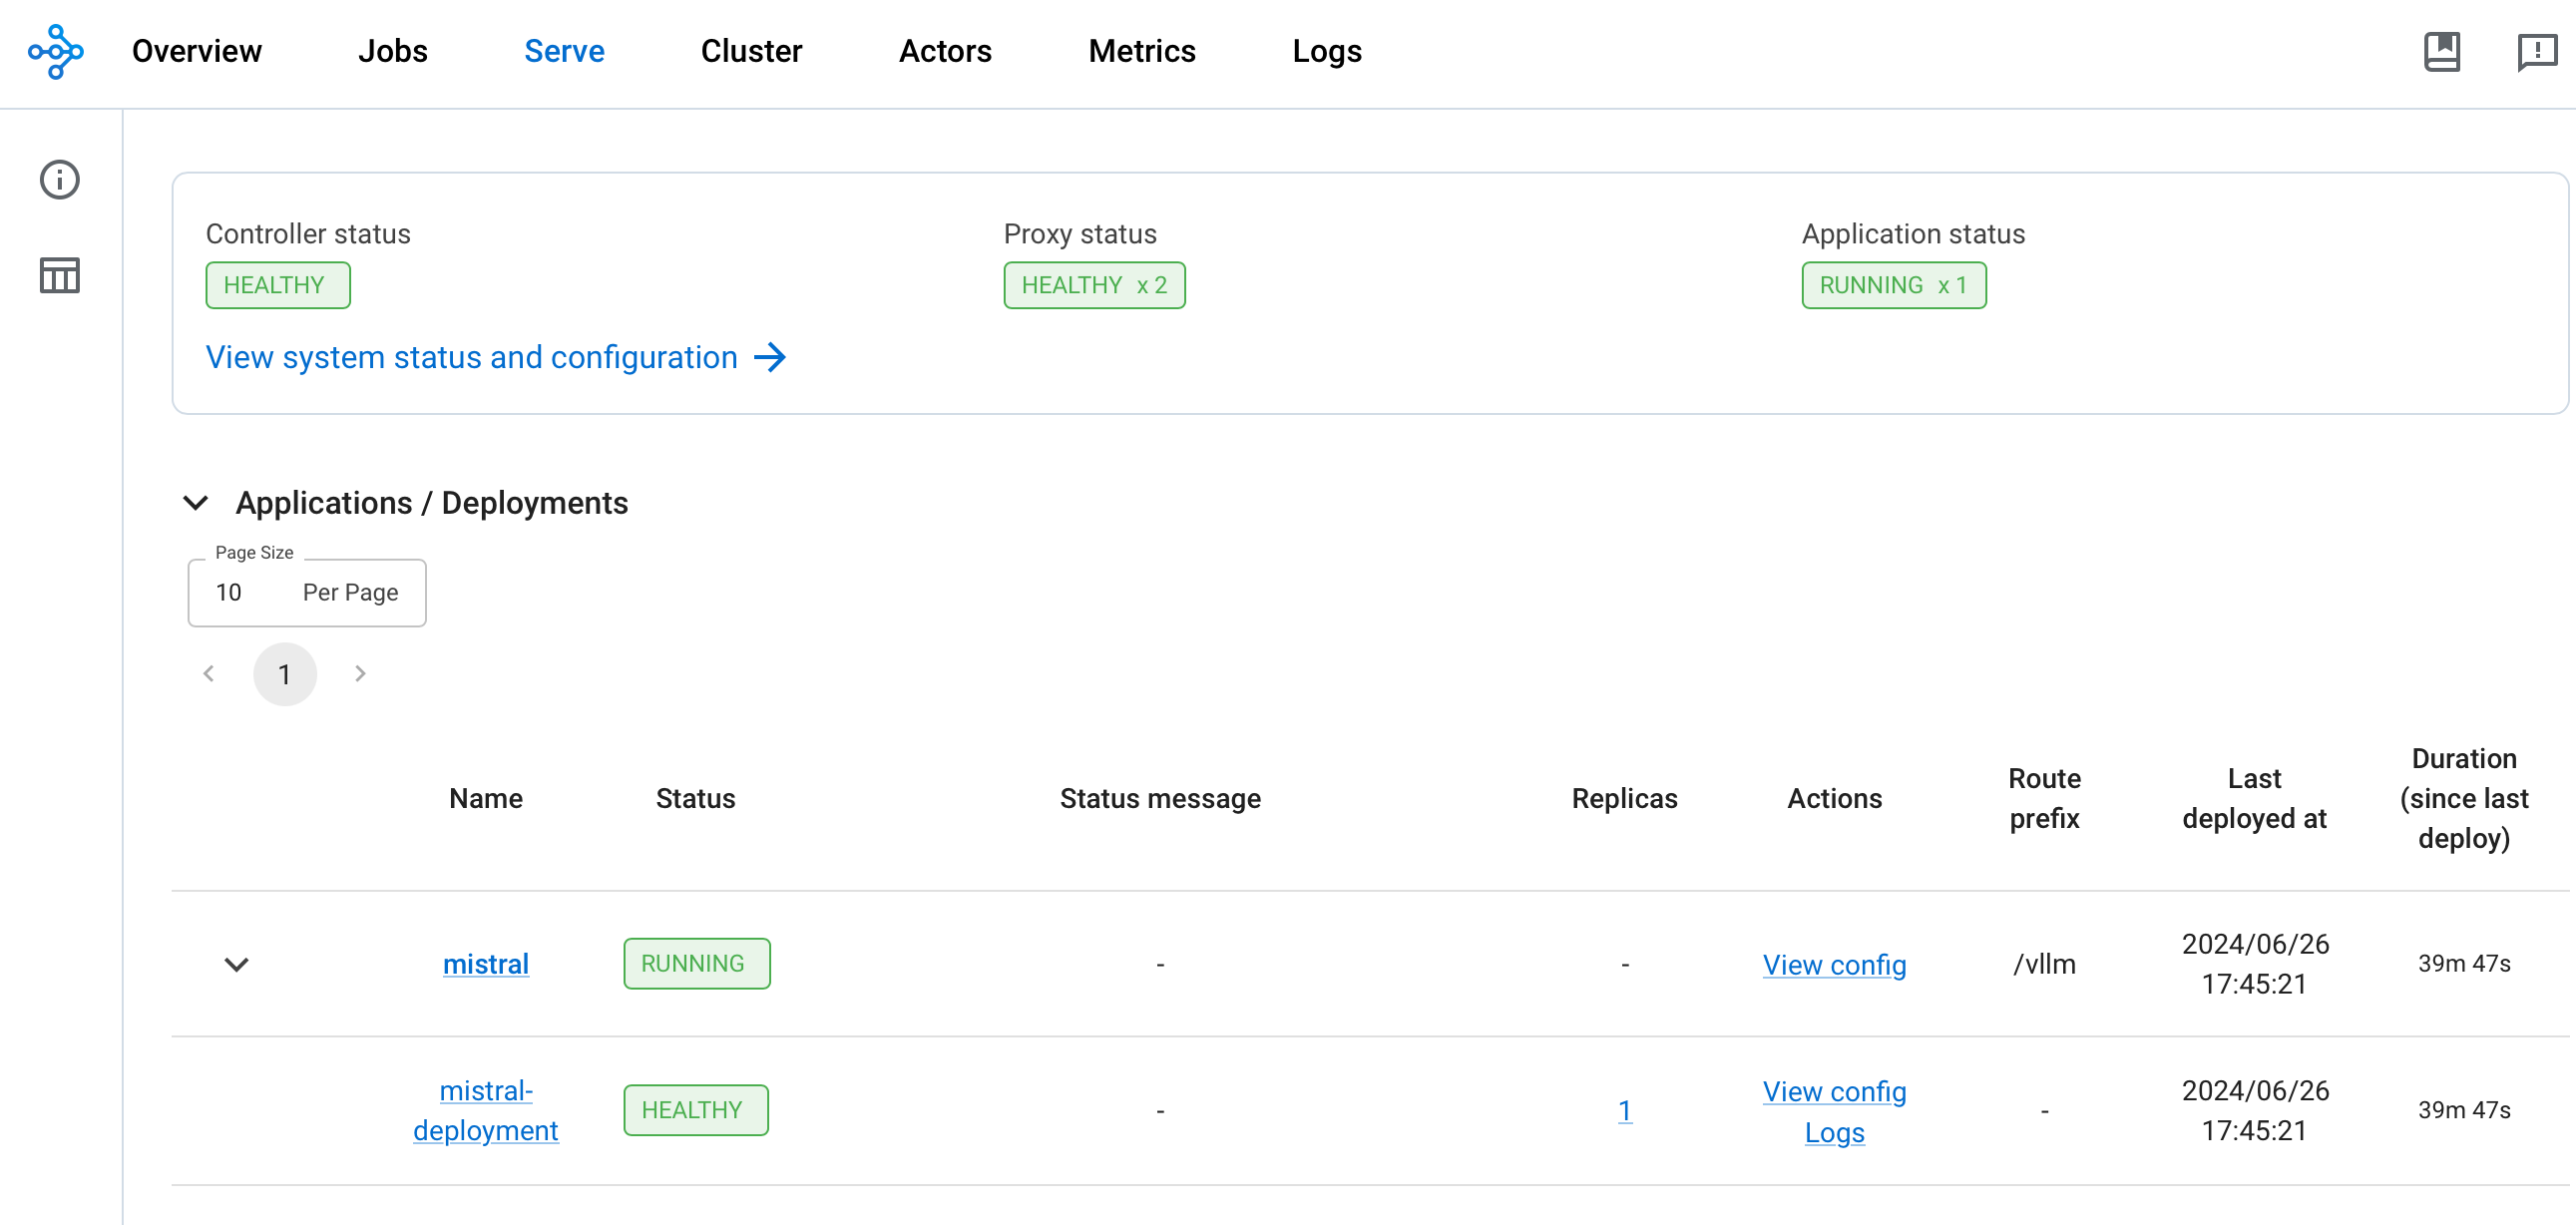
배포가 완료되면 Controller 및 Proxy 상태가 HEALTHY이고 Application 상태가 RUNNING이어야 합니다

Mistral-7b 채팅 모델 테스트
이제 Mistral-7B 채팅 모델을 테스트할 차례입니다. Python 클라이언트 스크립트를 사용하여 RayServe 추론 엔드포인트에 프롬프트를 보내고 모델이 생성한 출력을 확인합니다. 스크립트는 prompts.txt 파일에서 프롬프트를 읽고 응답을 같은 위치의 results.txt 파일에 씁니다. 또한 각 응답에 대한 응답 시간과 토큰 길이를 기록합니다.
먼저 kubectl을 사용하여 vllm-serve-svc 서비스로 포트 포워드를 실행합니다:
kubectl -n rayserve-vllm port-forward svc/vllm-serve-svc 8000:8000
client.py는 HTTP POST 메서드를 사용하여 /vllm 모델 엔드포인트를 대상으로 텍스트 완성 및 Q&A를 위한 프롬프트 목록을 추론 엔드포인트에 보냅니다.
prompts.txt 파일에 프롬프트를 추가하여 사용자 정의 프롬프트로 테스트할 수 있습니다.
가상 환경에서 Python 클라이언트 애플리케이션을 실행하려면 다음 단계를 따르세요:
cd ai-on-eks/blueprints/inference/vllm-rayserve-gpu
python3 -m venv .venv
source .venv/bin/activate
pip install requests
python3 client.py
터미널에서 다음과 같은 출력이 표시됩니다:
클릭하여 Python 클라이언트 터미널 출력 확장
python3 client.py
INFO:__main__:Warm-up successful
INFO:__main__:Response status: 200
INFO:__main__:Response status: 200
INFO:__main__:Response status: 200
INFO:__main__:Response status: 200
INFO:__main__:Response status: 200
INFO:__main__:Response status: 200
INFO:__main__:Response status: 200
INFO:__main__:Response status: 200
INFO:__main__:Response status: 200
INFO:__main__:Response status: 200
INFO:__main__:Response status: 200
INFO:__main__:Response status: 200
INFO:__main__:Response status: 200
INFO:__main__:Response status: 200
INFO:__main__:Response status: 200
INFO:__main__:Response status: 200
INFO:__main__:Response status: 200
INFO:__main__:Response status: 200
INFO:__main__:Response status: 200
INFO:__main__:Response status: 200
Prompt: [INST] Explain the concept of generative adversarial networks (GANs). [/INST]
Response Time: 20.72 seconds
Token Length: 440
================================================================================
Prompt: [INST] How does a variational autoencoder (VAE) work? [/INST]
Response Time: 18.88 seconds
Token Length: 397
================================================================================
Prompt: [INST] What are the applications of generative AI in healthcare? [/INST]
Response Time: 15.22 seconds
Token Length: 323
================================================================================
Prompt: [INST] Describe the process of training a GAN. [/INST]
Response Time: 20.82 seconds
Token Length: 437
================================================================================
Prompt: [INST] How can generative AI be used in creative arts? [/INST]
Response Time: 21.64 seconds
Token Length: 454
================================================================================
Prompt: [INST] What is the difference between supervised and unsupervised learning in the context of generative AI? [/INST]
Response Time: 13.76 seconds
Token Length: 310
================================================================================
Prompt: [INST] Explain the role of a discriminator in a GAN. [/INST]
Response Time: 11.96 seconds
Token Length: 259
================================================================================
Prompt: [INST] How can generative AI improve natural language processing (NLP)? [/INST]
Response Time: 19.92 seconds
Token Length: 393
================================================================================
Prompt: [INST] What are the ethical considerations of using generative AI? [/INST]
Response Time: 17.59 seconds
Token Length: 361
================================================================================
Prompt: [INST] How is generative AI used in drug discovery? [/INST]
Response Time: 14.31 seconds
Token Length: 311
================================================================================
Prompt: [INST] Describe the architecture of a Transformer model. [/INST]
Response Time: 26.96 seconds
Token Length: 521
================================================================================
Prompt: [INST] How can generative AI be applied in the gaming industry? [/INST]
Response Time: 16.43 seconds
Token Length: 348
================================================================================
Prompt: [INST] What is the purpose of latent space in generative models? [/INST]
Response Time: 11.55 seconds
Token Length: 253
================================================================================
Prompt: [INST] How does text generation with GPT-3 work? [/INST]
Response Time: 12.64 seconds
Token Length: 265
================================================================================
Prompt: [INST] What are the challenges of using generative AI in finance? [/INST]
Response Time: 18.21 seconds
Token Length: 331
================================================================================
Prompt: [INST] Explain the concept of zero-shot learning in generative AI. [/INST]
Response Time: 14.92 seconds
Token Length: 340
================================================================================
Prompt: [INST] How can generative AI be used for image synthesis? [/INST]
Response Time: 17.81 seconds
Token Length: 352
================================================================================
Prompt: [INST] What are some real-world applications of deepfakes? [/INST]
Response Time: 14.39 seconds
Token Length: 284
================================================================================
Prompt: [INST] How can generative AI contribute to personalized medicine? [/INST]
Response Time: 16.90 seconds
Token Length: 338
================================================================================
Prompt: [INST] Describe the use of generative AI in autonomous vehicles. [/INST]
Response Time: 13.99 seconds
Token Length: 299
================================================================================
각 프롬프트에 대한 실제 응답은 results.txt 파일에서 확인하세요.
클릭하여 Mistral 결과 부분 출력 확장
Prompt: [INST] Explain the theory of relativity.
Response: [INST] Explain the theory of relativity. [/INST] The theory of relativity, developed by Albert Einstein, is a fundamental theory in physics that describes the relationship between space and time, and how matter and energy interact within that framework. It is actually composed of two parts: the Special Theory of Relativity, published in 1905, and the General Theory of Relativity, published in 1915.

The Special Theory of Relativity is based on two postulates: the first one states that the laws of physics are the same in all inertial frames of reference (frames that are not accelerating); the second one asserts that the speed of light in a vacuum is the same for all observers, regardless of their motion or the source of the light.

From these two postulates, several counter-intuitive consequences follow. For example, the length of an object contracts when it is in motion relative to an observer, and time dilation occurs, meaning that a moving clock appears to tick slower than a stationary one. These phenomena have been confirmed by numerous experiments.

The General Theory of Relativity is a theory of gravitation, which extended the Special Theory of Relativity by incorporating gravity into the fabric of spacetime. In this theory, mass causes a distortion or curvature in spacetime, which is felt as a gravitational force. This is in contrast to the Newtonian view of gravity as a force acting at a distance between two masses.

One of the most famous predictions of General Relativity is the bending of light by gravity, which was first observed during a solar eclipse in 1919. The theory has been extremely successful in explaining various phenomena, such as the precession of Mercury's orbit, the gravitational redshift of light, and the existence of black holes and gravitational waves.

In summary, the theory of relativity is a groundbreaking theory in physics that fundamentally changed our understanding of space, time, and matter. It has been incredibly successful in making accurate predictions about the natural world and has stood the test of time through numerous experiments and observations.
--------------------------------------------------------------------------------
관측성
이 블루프린트의 일부로 모니터링 및 관측성을 위한 Prometheus 서버와 Grafana 배포를 제공하는 Kube Prometheus 스택도 배포했습니다.
먼저 Kube Prometheus 스택에서 배포한 서비스를 확인하겠습니다:
kubectl get svc -n kube-prometheus-stack
다음과 유사한 출력이 표시됩니다:
kubectl get svc -n kube-prometheus-stack
NAME                                             TYPE        CLUSTER-IP       EXTERNAL-IP   PORT(S)             AGE
kube-prometheus-stack-grafana                    ClusterIP   172.20.252.10    <none>        80/TCP              11d
kube-prometheus-stack-kube-state-metrics         ClusterIP   172.20.34.181    <none>        8080/TCP            11d
kube-prometheus-stack-operator                   ClusterIP   172.20.186.93    <none>        443/TCP             11d
kube-prometheus-stack-prometheus                 ClusterIP   172.20.147.64    <none>        9090/TCP,8080/TCP   11d
kube-prometheus-stack-prometheus-node-exporter   ClusterIP   172.20.171.165   <none>        9100/TCP            11d
prometheus-operated                              ClusterIP   None             <none>        9090/TCP            11d
Kube Prometheus 스택 서비스를 확인한 후 Ray 클러스터를 종합적으로 모니터링하도록 Prometheus를 구성해야 합니다. 이를 위해 ServiceMonitor와 PodMonitor 리소스를 모두 배포해야 합니다:
- ServiceMonitor는 메트릭 엔드포인트를 노출하는 Kubernetes 서비스가 있는 Ray head 노드에서 메트릭을 수집하는 데 사용됩니다.
- PodMonitor는 KubeRay 오퍼레이터가 Ray 워커 파드에 대한 Kubernetes 서비스를 생성하지 않기 때문에 필요합니다. 따라서 ServiceMonitor를 사용하여 워커 파드에서 메트릭을 스크랩할 수 없으므로 대신 PodMonitors CRD를 사용해야 합니다.
cd ai-on-eks/infra/jark-stack/terraform/monitoring
kubectl apply -f serviceMonitor.yaml
kubectl apply -f podMonitor.yaml
Grafana와 Prometheus 통합
Grafana와 Prometheus를 Ray 대시보드와 통합하기 위해 Ray 클러스터 구성에서 특정 환경 변수를 설정합니다:
env:
  - name: RAY_GRAFANA_HOST
    value: http://kube-prometheus-stack-grafana.kube-prometheus-stack.svc:80
  - name: RAY_PROMETHEUS_HOST
    value: http://kube-prometheus-stack-prometheus.kube-prometheus-stack.svc:9090
이러한 환경 변수는 Ray 대시보드 내에 Grafana 패널을 임베딩하고 Ray, Grafana, Prometheus 간의 올바른 통신을 가능하게 하는 데 중요합니다:
- RAY_GRAFANA_HOST는 Grafana에 대한 내부 Kubernetes 서비스 URL을 정의합니다. Ray head 파드는 클러스터 내에서 백엔드 헬스 체크 및 통신에 이를 사용��합니다.
- RAY_PROMETHEUS_HOST는 Prometheus에 대한 내부 Kubernetes 서비스 URL을 지정하여 Ray가 필요할 때 메트릭을 쿼리할 수 있도록 합니다.
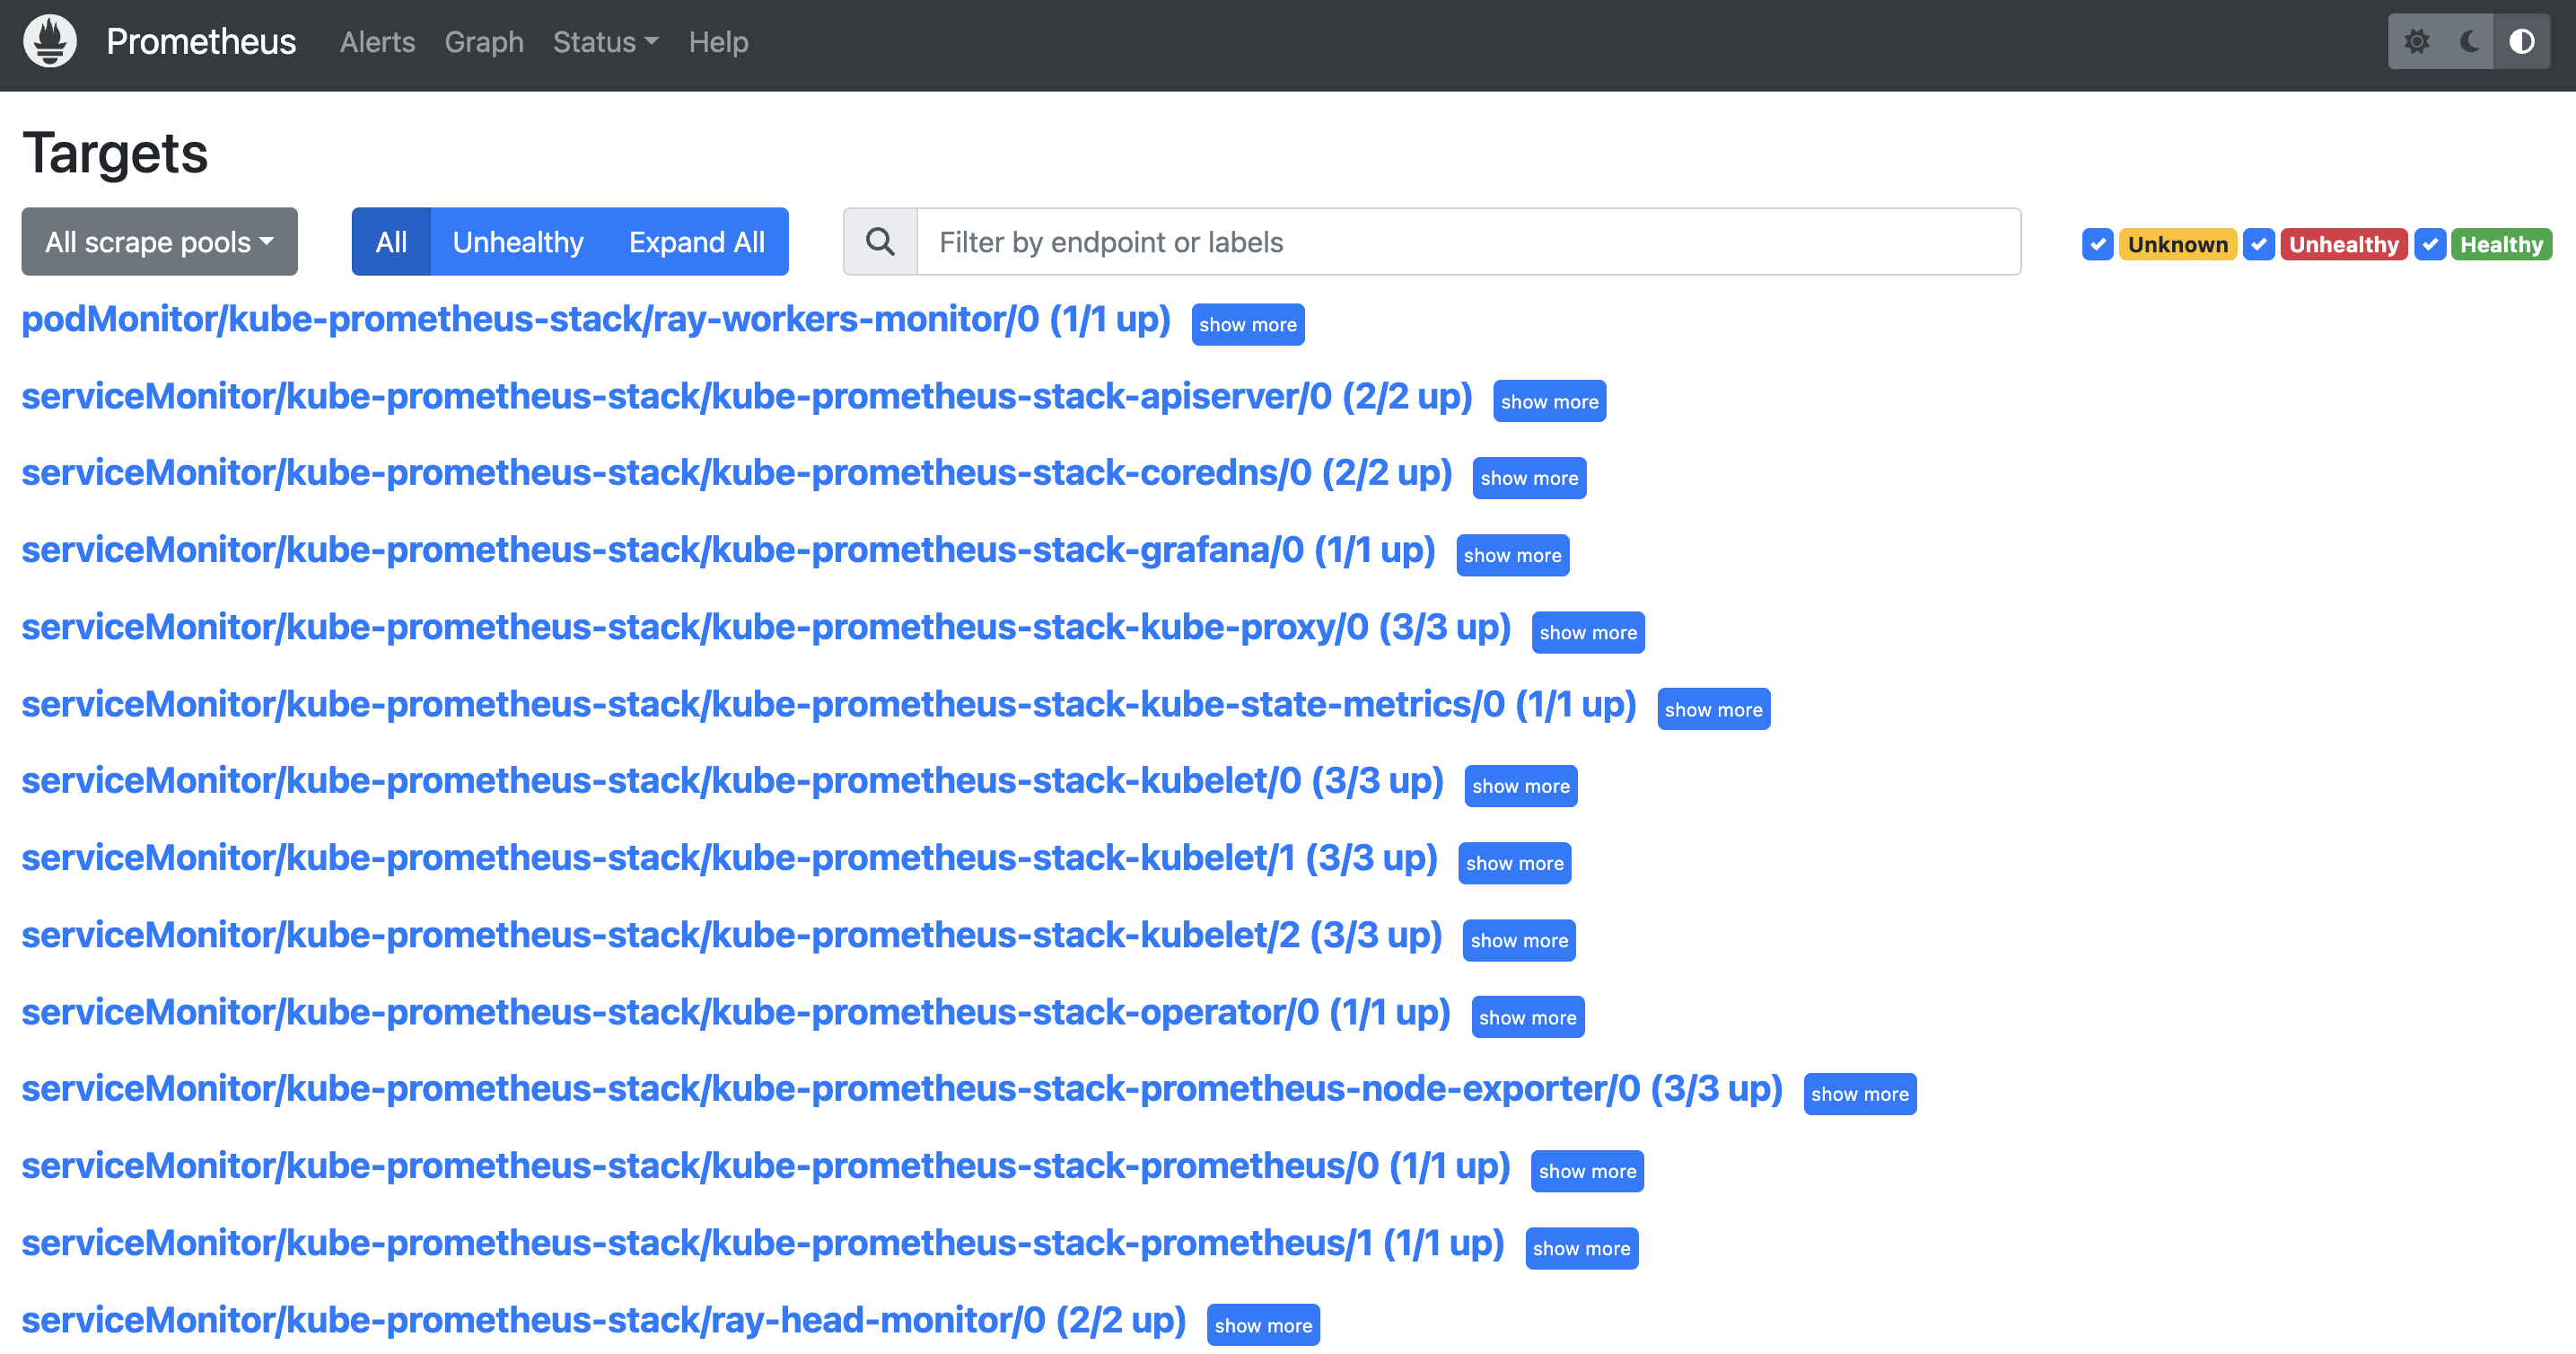
Prometheus 웹 UI 접근
# Prometheus 서버 파드에서 Prometheus 웹 UI 포트를 포워딩합니다.
kubectl port-forward prometheus-kube-prometheus-stack-prometheus-0 -n kube-prometheus-stack 9090:9090
- (YOUR_IP):9090/targets(예: 127.0.0.1:9090/targets)로 이동합니다. 다음을 확인할 수 있습니다:
- podMonitor/kube-prometheus-stack/ray-workers-monitor/0 (1/1 up)
- serviceMonitor/kube-prometheus-stack/ray-head-monitor/0 (2/2 up)
Grafana 접근
- Grafana 서비스 포트 포워딩:

kubectl port-forward deployment/kube-prometheus-stack-grafana -n kube-prometheus-stack 3000:3000

# Grafana 로그인 페이지는 (YOUR_IP):3000/login(예: 127.0.0.1:3000/login)에서 확인합니다.

- Grafana 관리자 사용자
admin

- Terraform 출력에서 시크릿 이름 가져오기
terraform output grafana_secret_name

- 관리자 사용자 비밀번호 가져오기
aws secretsmanager get-secret-value --secret-id <grafana_secret_name_output> --region $AWS_REGION --query "SecretString" --output text
참고: kubectl port-forward는 프로덕션 사용에 권장되지 않습니다. 리버스 프록시 뒤에 Grafana를 노출하는 방법은 이 Grafana 문서를 참조하세요.
오픈소스 Grafana 대시보드 가져오기
- Dashboards 메뉴를 통해 JSON 파일을 가져와 새 대시보드를 만듭니다.
- 왼쪽 패널에서 'Dashboards' 아이콘을 클릭하고 'New', 'Import'를 선택한 다음 'Upload JSON file'을 클릭합니다.
- JSON 파일을 선택합니다.
사례 1:Ray 2.24.0을 사용하는 경우 GitHub 저장소의 샘플 구성 파일을 사용할 수 있습니다. 파일 이름은 xxx_grafana_dashboard.json 패�턴을 따릅니다.사례 2:그렇지 않으면 head 파드의/tmp/ray/session_latest/metrics/grafana/dashboards/에서 JSON 파일을 가져와야 합니다.kubectl cp를 사용하여 head 파드에서 로컬 머신으로 파일을 복사할 수 있습니다.
- "Import"를 클릭합니다.
TODO: 대시보드를 수동으로 가져오는 것은 이상적이지 않습니다. 대시보드를 자동으로 가져오는 방법을 찾아야 합니다.
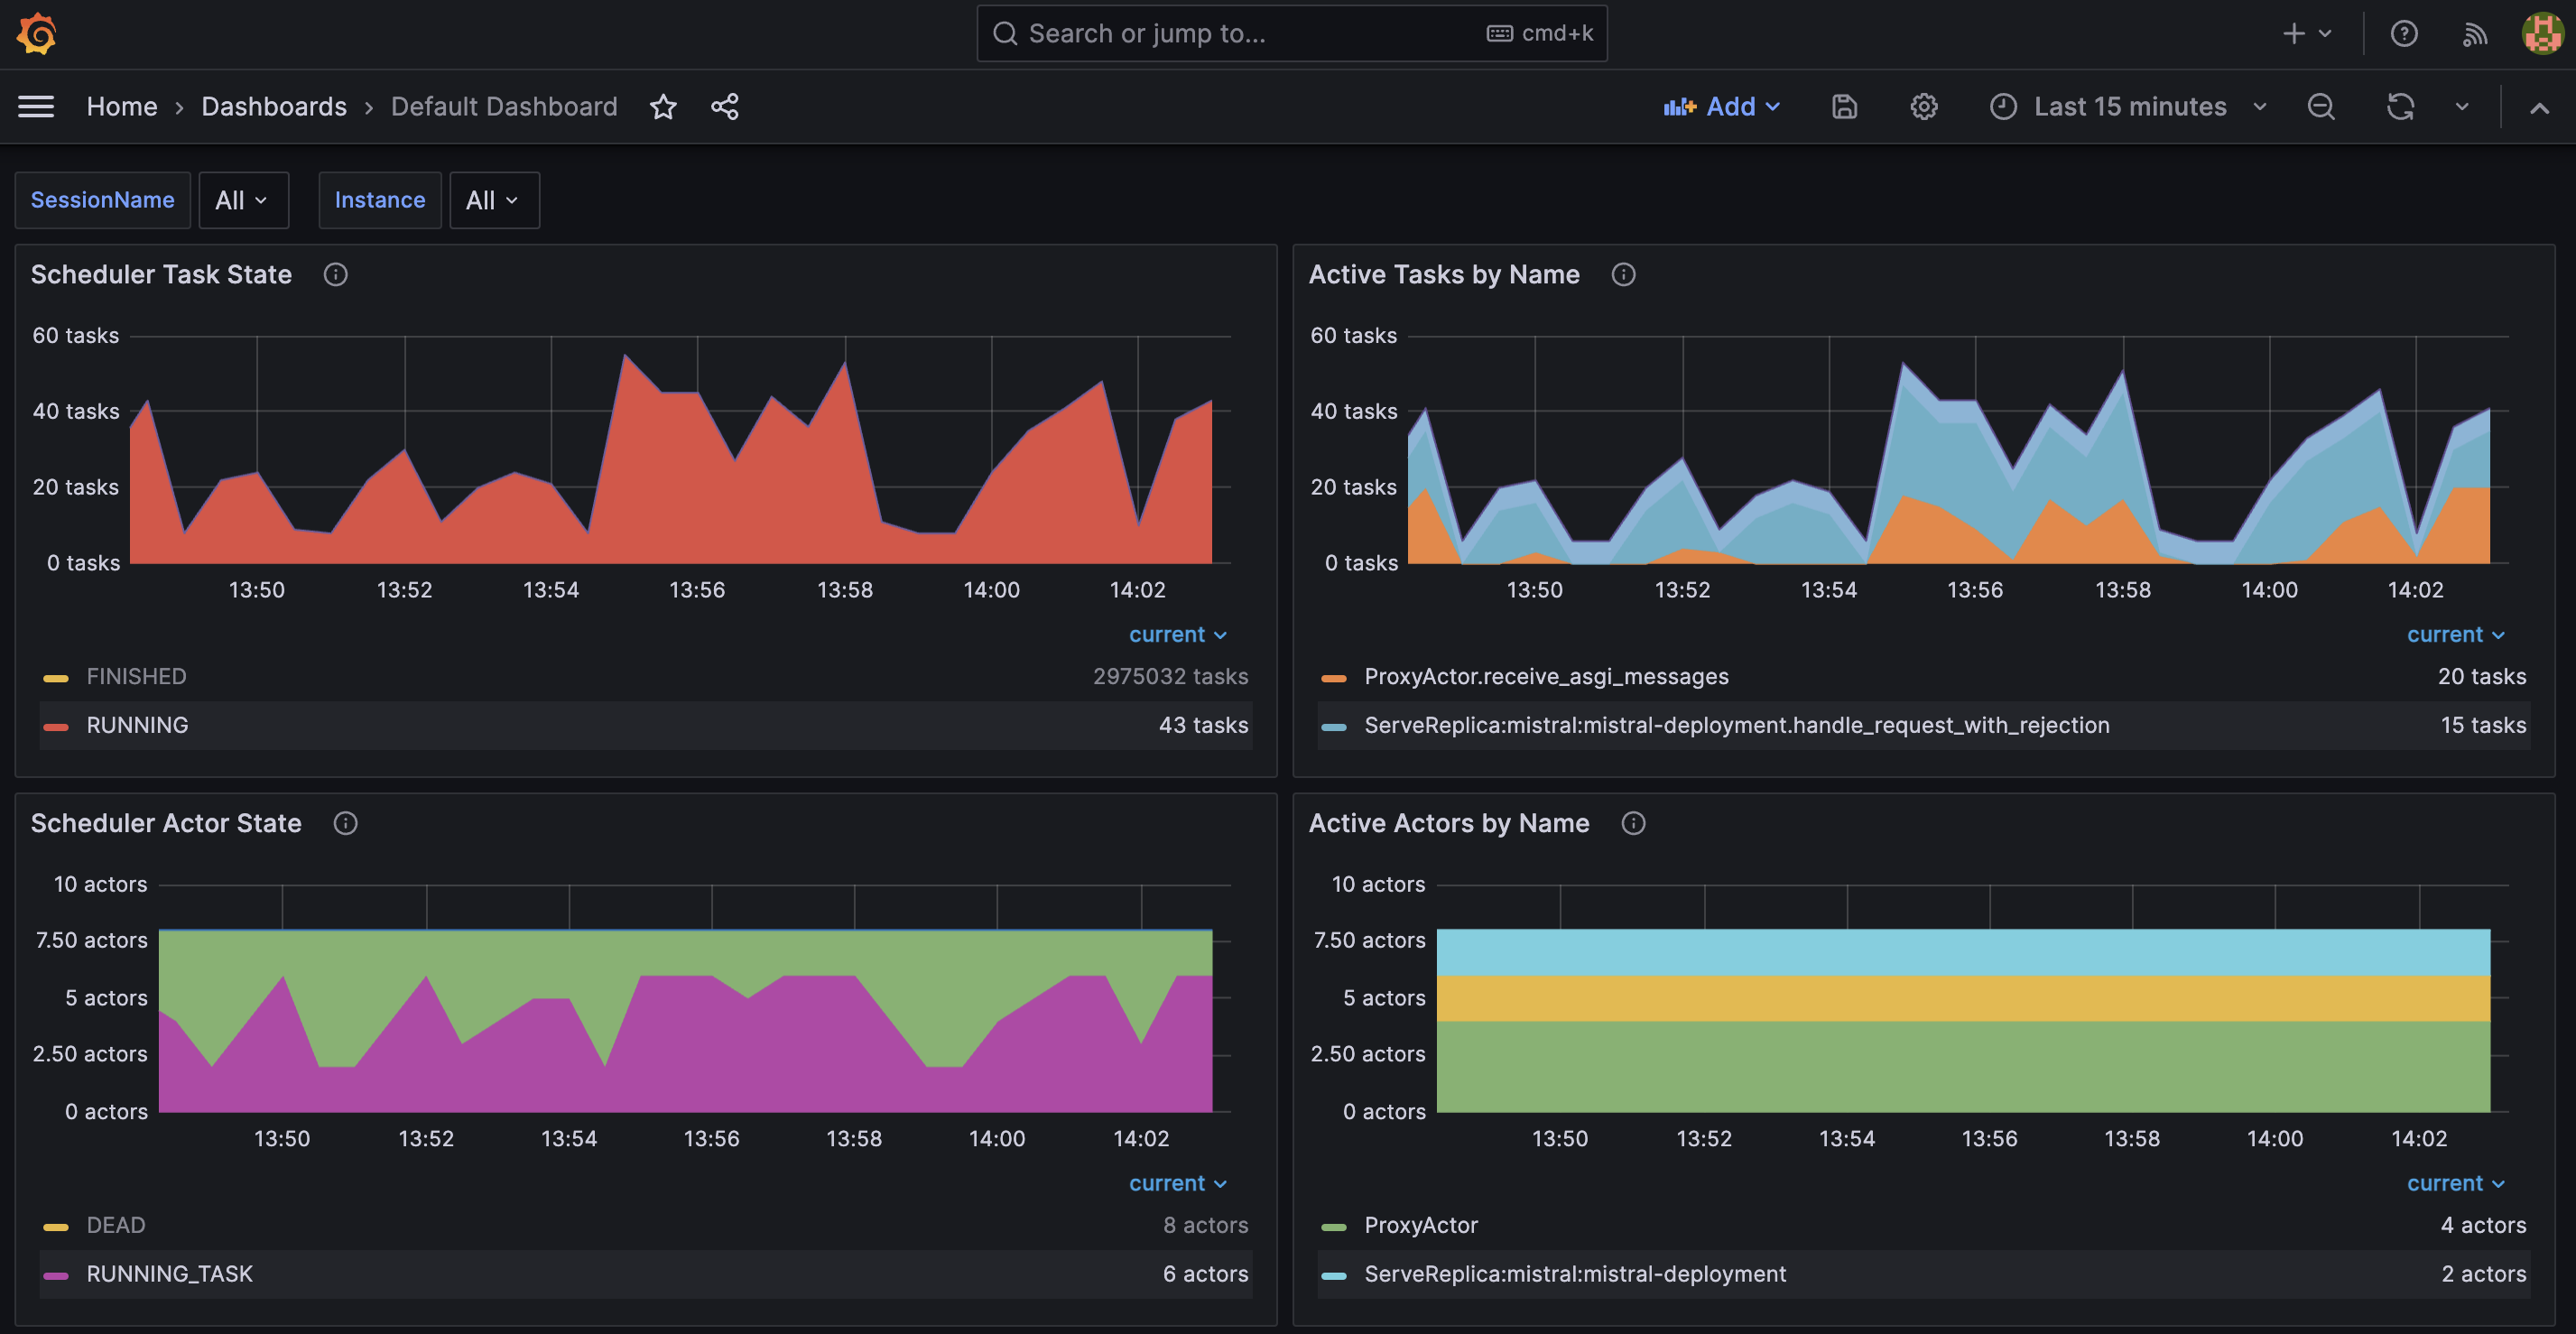
아래 Grafana 대시보드에서 여러 메트릭을 볼 수 있습니다:
- Scheduler Task State는 특정 상태에 있는 현재 작업 수를 표시합니다.
- Active Tasks by Name은 특정 이름을 가진 현재(활성) 작업 수를 보여줍니다.
- Scheduler Actor State는 특정 상태에 있는 현재 액터 수를 보여줍니다.
- Active Actors by Name은 특정 이름을 가진 현재(활성) 액터 수를 표시합니다.
결론
Ray Serve를 vLLM 백엔드와 통합하면 효율성, 확장성, 비용 효율성 측면에서 대규모 언어 모델(LLM) 추론에 많은 이점을 제공합니다. Ray Serve의 동시 요청 처리 및 동적 배칭 기능은 고처리량 LLM 애플리케이션에 중요한 최적의 GPU 활용을 보장합니다. vLLM과의 통합은 정적 배칭에 비해 처리량을 크게 향상시키고 지연 시간을 줄이는 연속 배칭을 가능하게 하여 이를 더욱 향상시킵니다. 전반적으로 Ray Serve와 vLLM의 조합은 프로덕션에서 LLM을 배포하기 위한 강력하고 확장 가능하며 비용 효율적인 솔루션을 제공합니다.
정리
마지막으로 리소스가 더 이상 필요하지 않을 때 정리하고 프로비저닝을 해제하는 방법을 안내합니다.
RayCluster 삭제
cd ai-on-eks/blueprints/inference/vllm-rayserve-gpu

kubectl delete -f ray-service-vllm.yaml
cd ai-on-eks/infra/jark-stack/terraform/monitoring

kubectl delete -f serviceMonitor.yaml
kubectl delete -f podMonitor.yaml
EKS 클러스터 및 리소스 삭제
export AWS_DEAFULT_REGION="DEPLOYED_EKS_CLUSTER_REGION>"

cd ai-on-eks/infra/jark-stack/terraform/ && chmod +x cleanup.sh
./cleanup.sh