Additional Information
Amazon SageMaker HyperPod EKS Official documentation
Amazon SageMaker HyperPod EKS Official Documentation Before implementing additional use case-specific customizations for Amazon SageMaker HyperPod orchestrated by Amazon EKS, please consult the official AWS documentation. The feature you need may already be available in the standard offering. We recommend standardizing on the official documentation whenever possible and only adding custom instructions for tasks that are difficult to implement or not covered in the official resources. This approach ensures a smooth deployment process and proper functioning of your HyperPod cluster with the latest features.
What Environment Variables are Set?
The create_config.sh script from "Verifying cluster connection to EKS" sets the following environment variables by referencing the output values of the CloudFormation stack, unless you are reusing existing resources, in which case it sources them from your entries in the helper script.
| Environment Variable | Type | Default Value | Description |
|---|---|---|---|
| EKS_CLUSTER_NAME | string | The value of the EKSClusterName output | The name of the EKS cluster |
| EKS_CLUSTER_ARN | string | The value of the EKSClusterArn output | The ARN of the EKS cluster |
| S3_BUCKET_NAME | string | The value of the S3BucketName output | The name of the S3 bucket |
| EXECUTION_ROLE | string | The value of the SageMakerIAMRoleArn output | The ARN of the SageMaker IAM execution role |
| VPC_ID | string | The value of the VpcId output | The ID of the VPC |
| PRIVATE_SUBNET_ID | string | The value of the PrivateSubnetId output | The ID of the private subnet |
| SECURITY_GROUP_ID | string | The value of the SecurityGroupId output | The ID of the security group |
The create_config.sh script checks for existing values set in your bash shell session for the following environment variables before using the default values.
| Environment Variable | Type | Default Value | Description |
|---|---|---|---|
| AWS_REGION | string | The default region configured for the AWS CLI | The region where you will deploy your HyperPod cluster |
| ACCEL_INSTANCE_TYPE | string | ml.g5.12xlarge | The accelerated compute instance type you want to use |
| ACCEL_INSTANCE_COUNT | integer | 1 | The number of accelerated compute nodes you want to deploy |
| ACCEL_VOLUME_SIZE | integer | 500 (GB) | The size of the EBS volume attached to the accelerated compute nodes |
| GEN_INSTANCE_TYPE | string | ml.m5.2xlarge | The general purpose compute instance type you want to use |
| GEN_INSTANCE_COUNT | integer | 1 | The number of general purpose compute nodes you want to deploy |
| GEN_VOLUME_SIZE | integer | 500 (GB) | The size of the EBS volume attached to the general purpose compute nodes |
| NODE_RECOVERY | string | Automatic | Enable node auto-recovery. Set to "None" to disable. |
If you don't want to use the default values, you can set the environment variables in your bash shell session first before running the create_config.sh script.
See Manual HyperPod Cluster Creation for details.
Default VPC Networking Architecture
The following diagrams illustrated the default VPC networking structure that is deployed by the CloudFormation stacks.
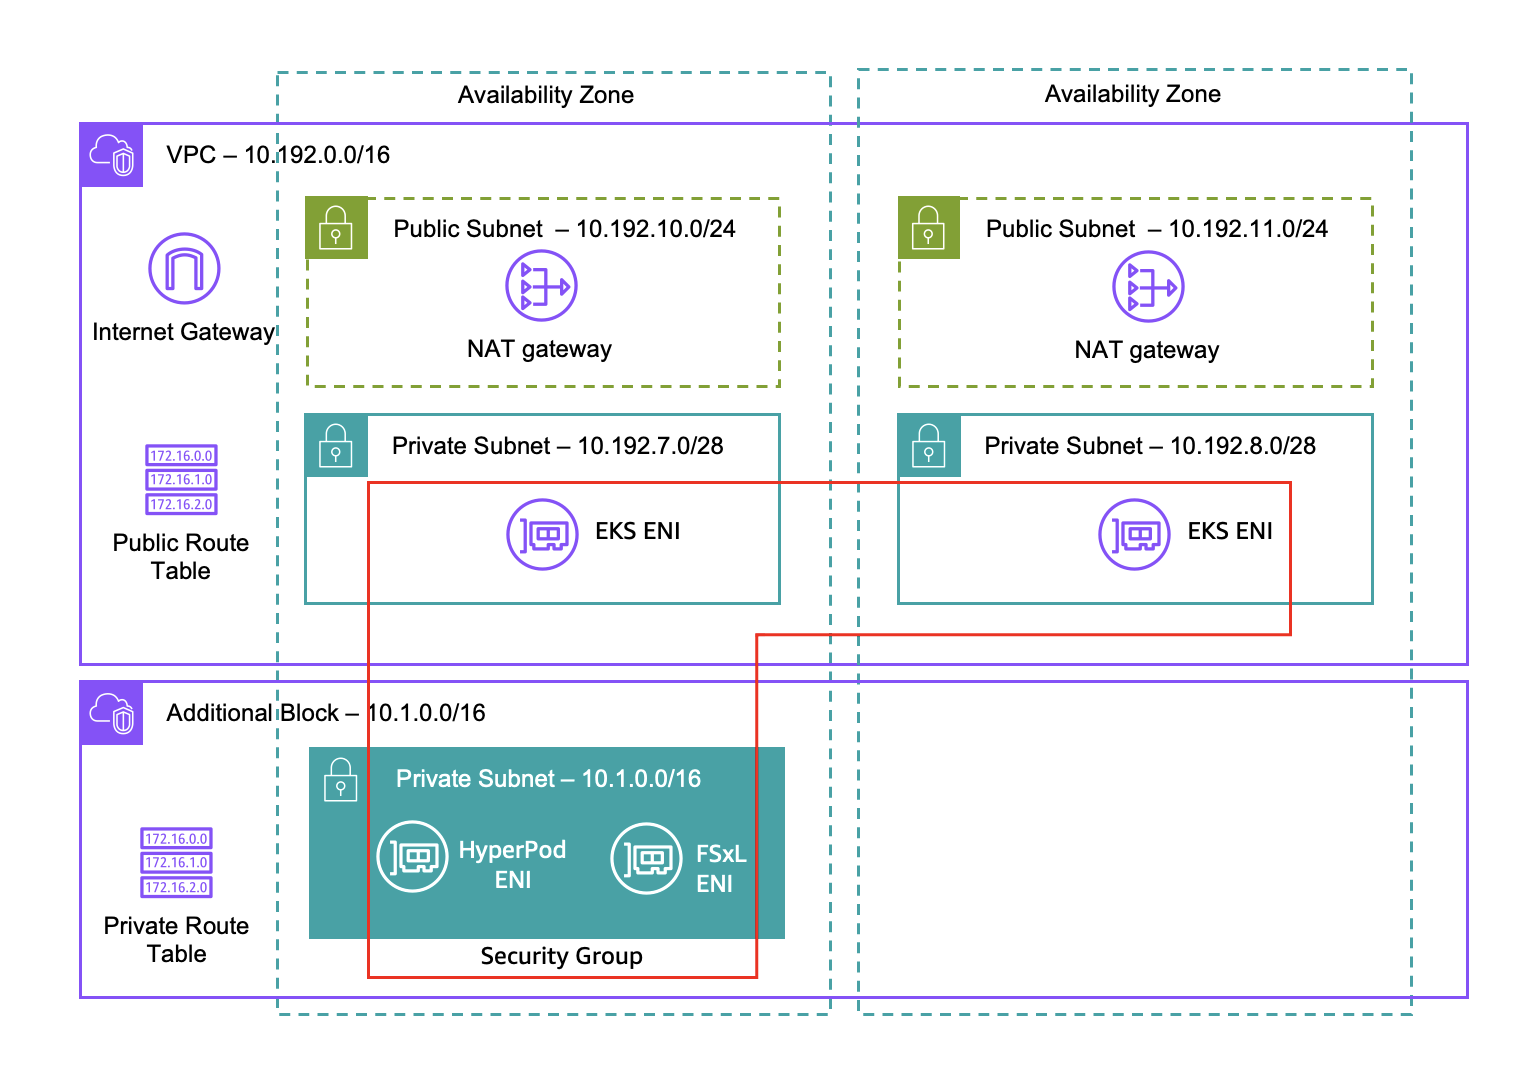
- A VPC with CIDR range 10.192.0.0/16 is created with two public and two private subnets along with an Internet Gateway, two NAT gateways, and a public route table.
- You EKS cluster will use the 10.192.7.0/28 and 10.192.8.0/28 private subnets to deploy Elastic Network Interfaces (ENIs) in. These ENIs facilitate Kubernetes control plane communication.
- An additional CIDR block of 10.1.0.0/16 is attached to the VPC and used to provision an additional private subnet for HyperPod use.
- A single security group is used to allow cross-ENI traffic from EKS to HyperPod for orchestration. This security group is also configured with rules to allow FSx for Lustre communication along with intra-security group communication for EFA.
What Dependencies are Installed on Your EKS Cluster?
The following packages are installed into your EKS cluster automatically, either by an AWS Lambda function (for CloudFormation) or by the Helm Provider (for Terraform) using these Helm charts.
Health Monitoring Agent
HyperPod health-monitoring agent continuously monitors the health status of each GPU/Trn-based node. When it detects any failures (such as GPU failure, Kernel deadlock and driver crash), the agent marks the node as unhealthy.
Verify deployment:
kubectl get ds health-monitoring-agent -n aws-hyperpod
NVIDIA device plugin for Kubernetes
The NVIDIA device plugin for Kubernetes is a Daemonset that allows you to automatically:
- Expose the number of GPUs on each nodes of your cluster
- Keep track of the health of your GPUs
- Run GPU enabled containers in your Kubernetes cluster.
Verify deployment:
kubectl get ds hyperpod-dependencies-nvidia-device-plugin -n kube-system
Neuron device plugin
The Neuron device plugin exposes Neuron cores & devices on Trainium (ml.trn1.32xlarge) instances to kubernetes as a resource.
Verify deployment:
kubectl get ds neuron-device-plugin-daemonset -n kube-system
EFA Kubernetes device plugin
Elastic Fabric Adapter (EFA) is a network interface for Amazon EC2 instances that uses a custom-built operating system bypass hardware interface to enhance the performance of inter-instance communications, allowing High Performance Computing (HPC) applications using the Message Passing Interface (MPI) and Machine Learning (ML) applications using NVIDIA Collective Communications Library (NCCL) to scale to thousands of CPUs or GPUs.
Integrating EFA with applications running on Amazon EKS clusters can reduce the time to complete large scale distributed training workloads without having to add additional instances to your cluster.
The EFA Kubernetes device plugin detects and advertises EFA interfaces as allocatable resources to Kubernetes. An application can consume the extended resource type vpc.amazonaws.com/efa in a Pod request spec just like CPU and memory. Once requested, the plugin automatically assigns and mounts an EFA interface to the Pod. Using the device plugin simplifies EFA setup and does not require a Pod to run in privileged mode.
Verify deployment:
kubectl get ds hyperpod-dependencies-aws-efa-k8s-device-plugin -n kube-system
Kubeflow Training Operator
The Kubeflow Training Operator is a tool designed for running and scaling machine learning model training on Kubernetes. It allows you to train models built with frameworks like TensorFlow and PyTorch by leveraging Kubernetes resources, simplifying the process of training complex models in a distributed way. You will use the Kubeflow training operator throughout this workshop to create various PyTorch training jobs running on SageMaker HyperPod nodes.
Verify deployment:
kubectl get deploy hyperpod-dependencies-training-operators -n kubeflow
View the custom resource definitions for each supported ML framework:
kubectl get crd | grep kubeflow
mpijobs.kubeflow.org                         2024-07-11T22:35:03Z
mxjobs.kubeflow.org                          2024-07-11T22:00:35Z
paddlejobs.kubeflow.org                      2024-07-11T22:00:36Z
pytorchjobs.kubeflow.org                     2024-07-11T22:00:37Z
tfjobs.kubeflow.org                          2024-07-11T22:00:38Z
xgboostjobs.kubeflow.org                     2024-07-11T22:00:39Z
Kubeflow MPI Operator
The Kubeflow MPI Operator makes it easy to run allreduce-style distributed training on Kubernetes.
Verify deployment:
kubectl get deploy hyperpod-dependencies-mpi-operator -n kube-system
The MPI Operator comes prepackaged with the MPIJob v2beta1 custom resource definition (CRD).
Verify the version of the MPIJob CRD:
kubectl get crd mpijobs.kubeflow.org -n kubeflow -o jsonpath='{.status.storedVersions[]}'
Kubernetes PriorityClass
Pods can have priority. Priority indicates the importance of a Pod relative to other Pods. If a Pod cannot be scheduled, the scheduler tries to preempt (evict) lower priority Pods to make scheduling of the pending Pod possible.
A PriorityClass is a non-namespaced object that defines a mapping from a priority class name to the integer value of the priority.
Verify deployment:
kubectl get priorityclass
Manual HyperPod Cluster Creation
Follow these steps if you need to manually create a HyperPod cluster using the AWS CLI.
Manually Set Environment Variables
The create_config.sh script checks for existing values set in your bash shell session before using defaults.
For example, if you want to use another accelerated compute instance type besides ml.g5.12xlarge, run one of the following commands:
- ml.trn1.32xlarge
- ml.p4d.24xlarge
- ml.p5.48xlarge
- ml.g5.8xlarge
- ml.m5.2xlarge (Workshop Studio)
export ACCEL_INSTANCE_TYPE=ml.trn1.32xlarge
export ACCEL_INSTANCE_TYPE=ml.p4d.24xlarge
export ACCEL_INSTANCE_TYPE=ml.p5.48xlarge
export ACCEL_INSTANCE_TYPE=ml.g5.8xlarge
For Workshop Studio accounts, we'll use an M5 general purpose instance for demonstration purposes.
export ACCEL_INSTANCE_TYPE=ml.m5.2xlarge
If you need to reuse some existing cloud resources (VPC, EKS cluster, etc.) that you didn't create using the provided CloudFormation stacks, be sure to set one or more of the following environment variables as needed prior to running the create_config.sh script:
export EKS_CLUSTER_ARN=<YOUR_EKS_CLUSTER_ARN_HERE>
export EKS_CLUSTER_NAME=<YOUR_EKS_CLUSTER_NAME_HERE>
export S3_BUCKET_NAME=<YOUR_S3_BUCKET_NAME_HEREs>
export EXECUTION_ROLE=<YOUR_EXECUTION_ROLE_HERE>
export VPC_ID=<YOUR_VPC_ID_HERE>
export PRIVATE_SUBNET_ID=<YOUR_PRIVATE_SUBNET_ID_HERE>
export SECURITY_GROUP_ID=<YOUR_SECURITY_GROUP_ID_HERE>
Manually run the create_config.sh Script
- First source in all the environment variables you need leveraging the output from the previously deployed CloudFormation stack:
curl -O https://raw.githubusercontent.com/aws-samples/awsome-distributed-training/refs/heads/main/1.architectures/7.sagemaker-hyperpod-eks/create_config.sh

chmod +x create_config.sh

export STACK_ID=hyperpod-eks-full-stack

./create_config.sh

source env_vars
- Confirm all the environment variables were correctly set:
cat env_vars
export AWS_REGION=us-west-2
export EKS_CLUSTER_ARN=arn:aws:eks:us-west-2:xxxxxxxxxxxx:cluster/hyperpod-eks-cluster
export EKS_CLUSTER_NAME=hyperpod-eks-cluster
export S3_BUCKET_NAME=hyperpod-eks-bucket-xxxxxxxxxxxx-us-west-2
export EXECUTION_ROLE=arn:aws:iam::xxxxxxxxxxxx:role/hyperpod-eks-ExecutionRole-us-west-2
export VPC_ID=vpc-0540e3cb2868504a8
export PRIVATE_SUBNET_ID=subnet-04a1f33d5a614cc2d
export SECURITY_GROUP_ID=sg-027f21f3e936f71bb
export ACCEL_INSTANCE_TYPE=ml.g5.12xlarge
export ACCEL_INSTANCE_COUNT=1
export ACCEL_VOLUME_SIZE=500
export GEN_INSTANCE_TYPE=ml.m5.2xlarge
export GEN_INSTANCE_COUNT=1
export GEN_VOLUME_SIZE=500
export NODE_RECOVERY=Automatic
Manually Install Helm Packages
Clone the Repo
git clone https://github.com/aws/sagemaker-hyperpod-cli.git
cd sagemaker-hyperpod-cli/helm_chart
Install the Helm Chart
Update the dependencies:
helm dependencies update HyperPodHelmChart
Locally test the helm chart:
helm lint HyperPodHelmChart
Conduct a dry run:
helm install hyperpod-dependencies HyperPodHelmChart --dry-run
Deploy the helm chart:
helm install dependencies helm_chart/HyperPodHelmChart --namespace kube-system
Verify the deployment:
helm list
Before moving on to the next step, change go to your original working directory:
cd ../..
Manually Configure The HyperPod Cluster
We'll create a HyperPod cluster configuration file (cluster-config.json) that points to the EKS cluster as the orchestrator for new instance groups that will be created. The example below creates two instance groups, one for your accelerated compute nodes (ml.g5.12xlarge by default), and an additional instance group containing a general purpose compute node (ml.m5.2xlarge by default) used to host pods that do not require accelerated compute capacity.
Before creating your HyperPod cluster, consider the types of experiments you intend to run. For example, if you want to run the Fully Sharded Data Parallel(FSDP) experiment, it has been verified on a cluster of 8 ml.g5.8xlarge nodes, whereas the Llama 3 model training using Trainium experiment has been verified on 1 to 2 node clusters of ml.trn1.32xlarge or ml.trn1n.32xlarge instances. To choose a different accelerated instance type and count, refer back to the Setup Environment Variables section.
- Full
- Simplified (Workshop Studio)
- Two instance groups
- Deep Health Checks are enabled
- Modify threadsPerCore(set it to 2 for G5/P4/P5)
cat > cluster-config.json << EOL
{
    "ClusterName": "ml-cluster",
    "Orchestrator": {
      "Eks":
      {
        "ClusterArn": "${EKS_CLUSTER_ARN}"
      }
    },
    "InstanceGroups": [
      {
        "InstanceGroupName": "worker-group-1",
        "InstanceType": "${ACCEL_INSTANCE_TYPE}",
        "InstanceCount": ${ACCEL_INSTANCE_COUNT},
        "InstanceStorageConfigs": [
          {
            "EbsVolumeConfig": {
              "VolumeSizeInGB": ${ACCEL_VOLUME_SIZE}
            }
          }
        ],
        "LifeCycleConfig": {
          "SourceS3Uri": "s3://${S3_BUCKET_NAME}",
          "OnCreate": "on_create.sh"
        },
        "ExecutionRole": "${EXECUTION_ROLE}",
        "ThreadsPerCore": 2,
        "OnStartDeepHealthChecks": ["InstanceStress", "InstanceConnectivity"]
      },
      {
        "InstanceGroupName": "worker-group-2",
        "InstanceType": "${GEN_INSTANCE_TYPE}",
        "InstanceCount": ${GEN_INSTANCE_COUNT},
        "InstanceStorageConfigs": [
          {
            "EbsVolumeConfig": {
              "VolumeSizeInGB": ${GEN_VOLUME_SIZE}
            }
          }
        ],
        "LifeCycleConfig": {
          "SourceS3Uri": "s3://${S3_BUCKET_NAME}",
          "OnCreate": "on_create.sh"
        },
        "ExecutionRole": "${EXECUTION_ROLE}",
        "ThreadsPerCore": 1
      }
    ],
    "VpcConfig": {
      "SecurityGroupIds": ["$SECURITY_GROUP_ID"],
      "Subnets":["$PRIVATE_SUBNET_ID"]
    },
    "NodeRecovery": "${NODE_RECOVERY}"
}
EOL
- Single instance group
- Deep Health Checks are disabled.
- Modify threadsPerCore(set it to 2 for G5/P4/P5)
cat > cluster-config.json << EOL
{
    "ClusterName": "ml-cluster",
    "Orchestrator": {
      "Eks":
      {
        "ClusterArn": "${EKS_CLUSTER_ARN}"
      }
    },
    "InstanceGroups": [
      {
        "InstanceGroupName": "worker-group-1",
        "InstanceType": "${ACCEL_INSTANCE_TYPE}",
        "InstanceCount": ${ACCEL_INSTANCE_COUNT},
        "InstanceStorageConfigs": [
          {
            "EbsVolumeConfig": {
              "VolumeSizeInGB": ${ACCEL_VOLUME_SIZE}
            }
          }
        ],
        "LifeCycleConfig": {
          "SourceS3Uri": "s3://${S3_BUCKET_NAME}",
          "OnCreate": "on_create.sh"
        },
        "ExecutionRole": "${EXECUTION_ROLE}",
        "ThreadsPerCore": 2
      }
    ],
    "VpcConfig": {
      "SecurityGroupIds": ["$SECURITY_GROUP_ID"],
      "Subnets":["$PRIVATE_SUBNET_ID"]
    },
    "NodeRecovery": "${NODE_RECOVERY}"
}
EOL
Cluster Configuration Parameters:
- You can configure up to 20 instance groups under the
InstanceGroupsparameter. - For
Orchestrator.Eks.ClusterArn, specify the ARN of the EKS cluster you want to use as the orchestrator. - For
OnStartDeepHealthChecks, addInstanceStressandInstanceConnectivityto enable deep health checks. - For
NodeRecovery, specifyAutomaticto enable automatic node recovery. HyperPod replaces or reboots instances (nodes) that fail the basic health or deep health checks (when enabled). - For the
VpcConfigparameter, specify the information of the VPC used in the EKS cluster. The subnets must be private
Manually Add a Training Plan
If you'd like to use training plans nodes in your cluster, you'd need to add in the following line to your cluster-config.json file
"TrainingPlanArn": "<ENTER TRAINING PLAN ARN HERE>",
To get your training plan details, you can run
export TRAINING_PLAN="<NAME OF TRAINING PLAN>"
TRAINING_PLAN_DESCRIPTION=$(aws sagemaker describe-training-plan --training-plan-name "$TRAINING_PLAN")

TRAINING_PLAN_ARN=$(echo "$TRAINING_PLAN_DESCRIPTION" | jq -r '.TrainingPlanArn')
Here's an example cluster-config.json with a training plan used
cat > cluster-config.json << EOL
{
    "ClusterName": "ml-cluster",
    "Orchestrator": {
      "Eks":
      {
        "ClusterArn": "${EKS_CLUSTER_ARN}"
      }
    },
    "InstanceGroups": [
      {
        "InstanceGroupName": "worker-group-1",
        "InstanceType": "${ACCEL_INSTANCE_TYPE}",
        "InstanceCount": ${ACCEL_COUNT},
        "InstanceStorageConfigs": [
          {
            "EbsVolumeConfig": {
              "VolumeSizeInGB": ${ACCEL_VOLUME_SIZE}
            }
          }
        ],
        "LifeCycleConfig": {
          "SourceS3Uri": "s3://${S3_BUCKET_NAME}",
          "OnCreate": "on_create.sh"
        },
        "TrainingPlanArn": "${TRAINING_PLAN_ARN}",
        "ExecutionRole": "${EXECUTION_ROLE}",
        "ThreadsPerCore": 2
      }
    ],
    "VpcConfig": {
      "SecurityGroupIds": ["$SECURITY_GROUP_ID"],
      "Subnets":["$PRIVATE_SUBNET_ID"]
    },
    "NodeRecovery": "${NODE_RECOVERY}"
}
EOL
Manually Deploy The HyperPod Cluster
- Create the cluster:
aws sagemaker create-cluster \
    --cli-input-json file://cluster-config.json \
    --region $AWS_REGION
- Describe the state of the cluster:
aws sagemaker list-clusters \
 --output table \
 --region $AWS_REGION
You'll see output similar to the following:
-------------------------------------------------------------------------------------------------------------------------------------------------
|                                                                 ListClusters                                                                  |
+-----------------------------------------------------------------------------------------------------------------------------------------------+
||                                                              ClusterSummaries                                                               ||
|+----------------------------------------------------------------+----------------------+----------------+------------------------------------+|
||                           ClusterArn                           |     ClusterName      | ClusterStatus  |           CreationTime             ||
|+----------------------------------------------------------------+----------------------+----------------+------------------------------------+|
||  arn:aws:sagemaker:us-west-2:xxxxxxxxxxxx:cluster/uwme6r18mhic |  ml-cluster          |  Creating     |  2024-07-11T16:30:42.219000-04:00   ||
|+----------------------------------------------------------------+----------------------+----------------+------------------------------------+|