SageMaker Studio + Hyperpod Integration Guide
This guide provides step-by-step instructions for setting up Amazon SageMaker Studio with Hyperpod on Amazon EKS, including FSx Lustre storage configuration.
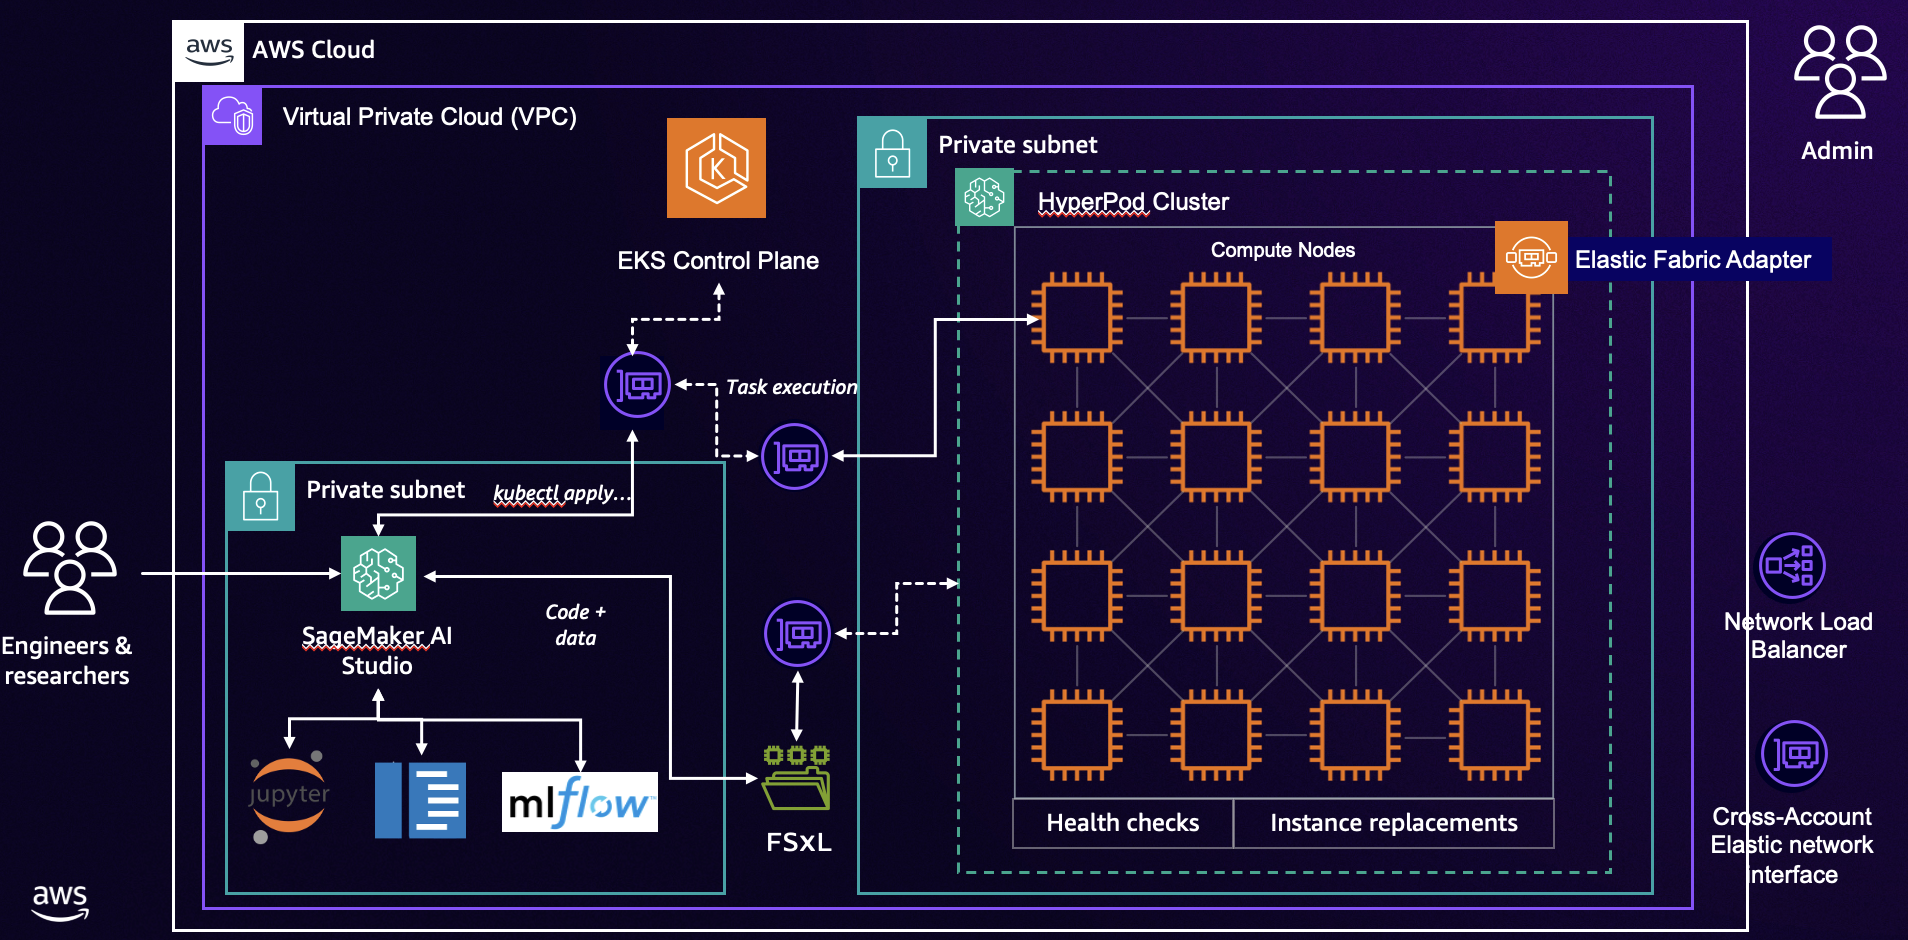
Table of Contents
- Prerequisites
- EKS Cluster Setup
- FSx for Lustre Configuration
- SageMaker Studio Domain Setup
- SageMaker Studio IDE Configuration
- Setup EKS Access Entry
- Setup EKS Cluster connection
- Optional: Setup Hyperpod Task Governance and CloudWatch Observability
- Optional: MLFlow Setup
Prerequisites
Before starting, ensure you have:
- AWS CLI configured with appropriate permissions
- Access to AWS Management Console
- Familiarity with Amazon EKS, SageMaker, and FSx Lustre
EKS Cluster Setup
To create an Amazon EKS cluster, and setup a SageMaker Hyperpod one, you can follow one of these steps:
- Option 1: Initial Cluster Setup
- Option 2: Using CloudFormation (see Infrastructure as Code section)
FSx for Lustre Configuration
To create an Amazon FSx for Lustre volume, for being used by both EKS pods and SageMaker Studio, you can follow the steps Set up your shared file system. The choice of Dynamic vs Static provisioning is yours!
SageMaker Studio Domain Setup
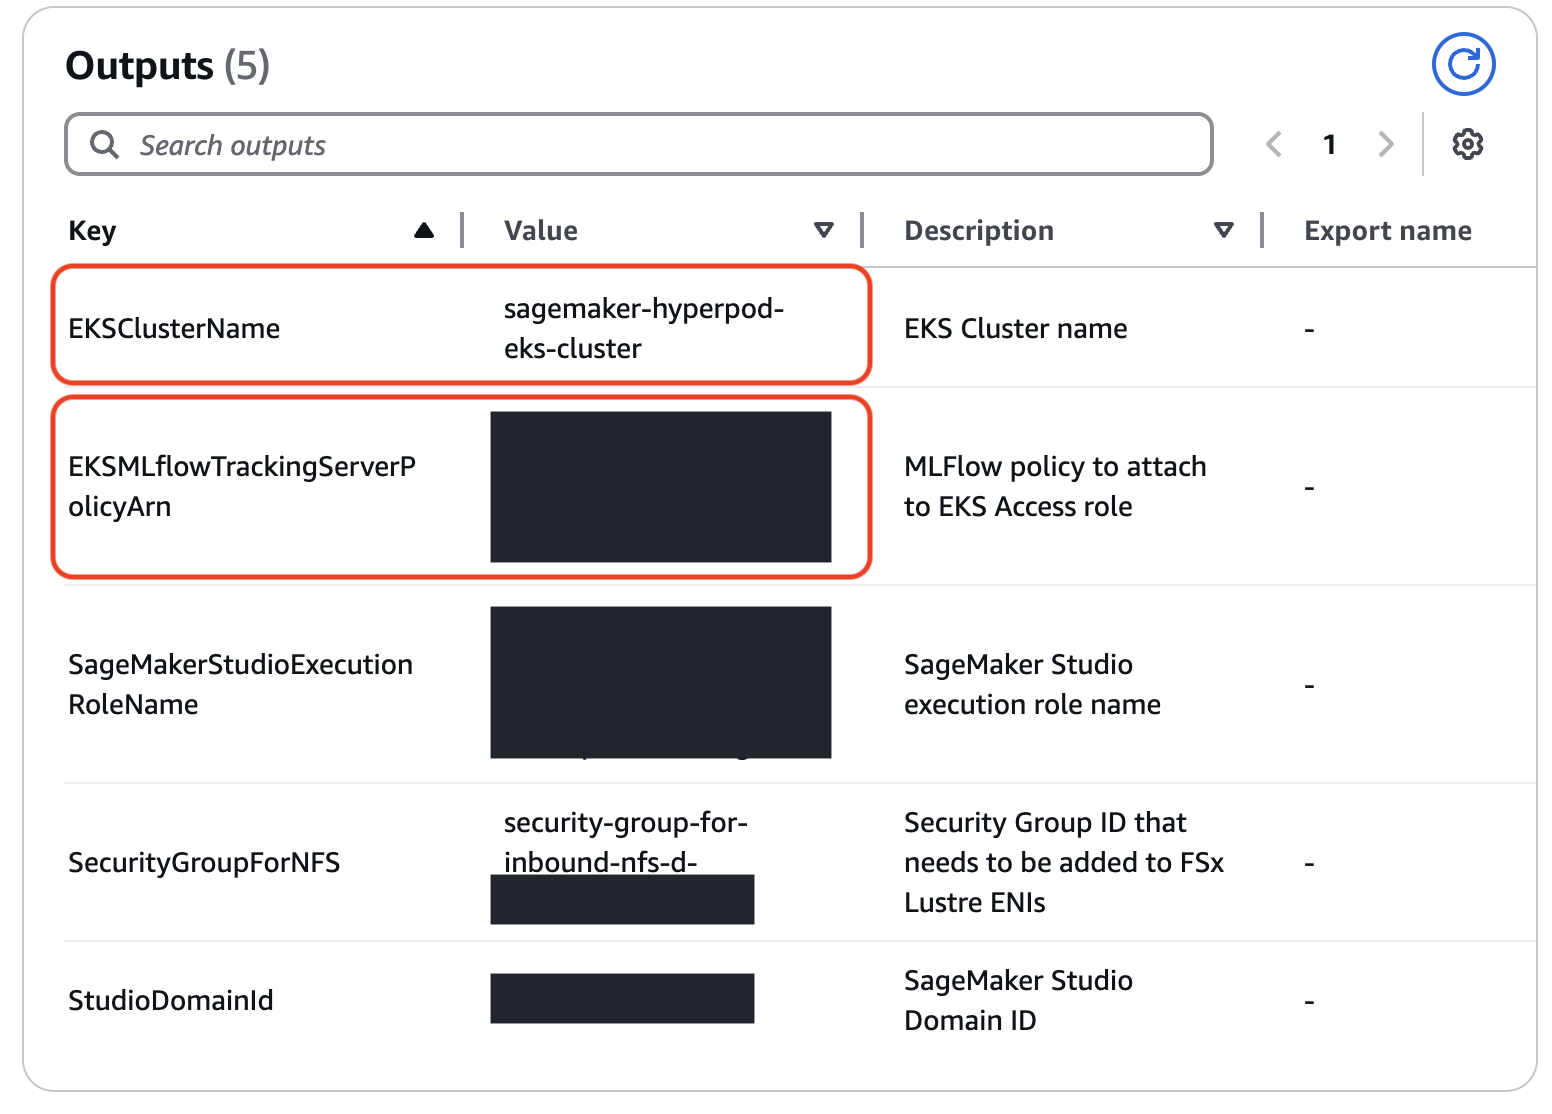
You can deploy the CloudFormation template from the awsome-distributed-training repository, which creates the following resources:
- SageMaker Studio domain
- Lifecycle configurations for installing necessary packages for Studio IDE, such as kubectl and jq. Lifecycle configurations will be created for both JupyterLab and Code Editor
- A Lambda function that:
- Associates the created
security-group-for-inbound-nfssecurity group to the Studio domain - Associates the
security-group-for-inbound-nfssecurity group to the FSx for Lustre ENIs - Optional: If SharedFSx is set to True, creates the partition shared in the FSx for Lustre volume, and associates it to the Studio domain
- Associates the created
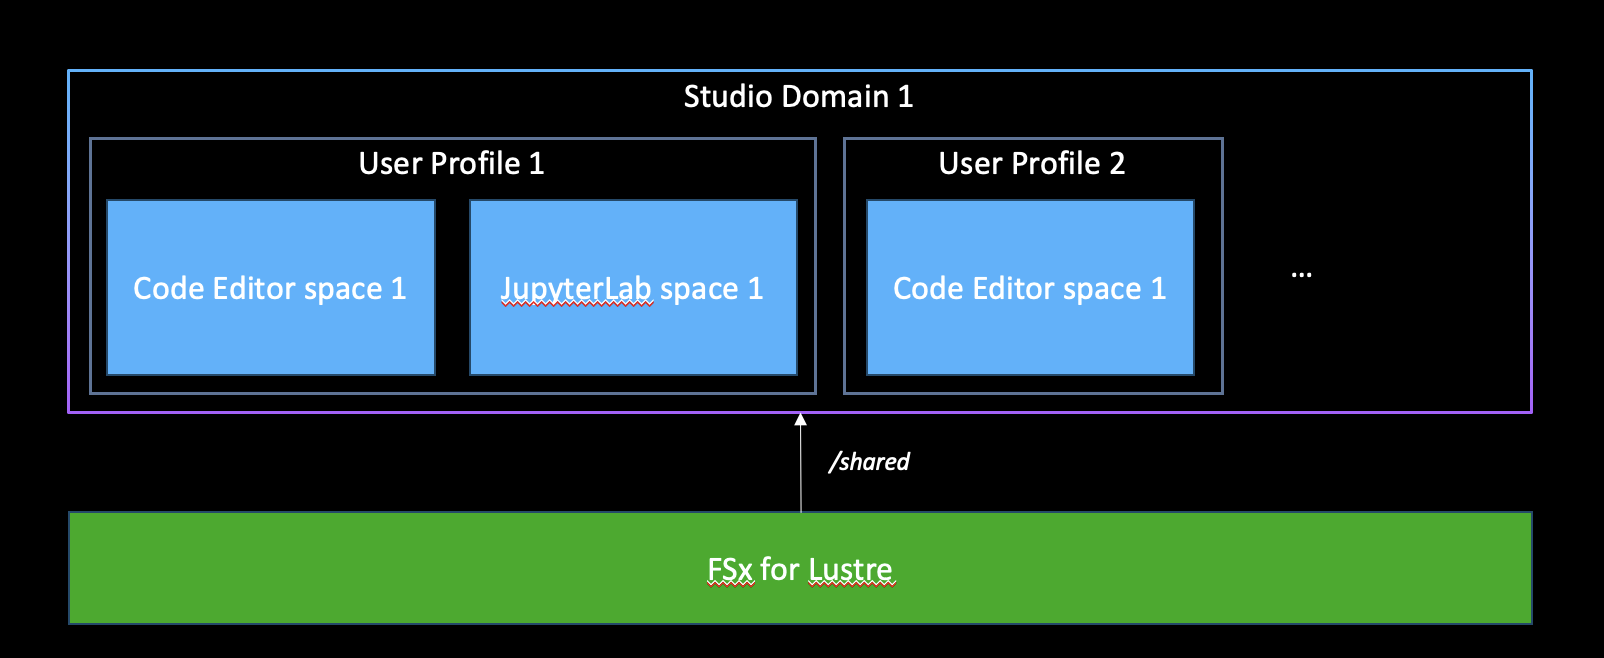
- If SharedFSx is set to False, a Lambda function that:
- Creates the partition /{user_profile_name}, and associates it to the Studio user profile
- Creates an Event bridge rule that invokes the previously defined Lambda function each time a new user is created.

The CloudFormation template requires the following parameters:
- EKSClusterName: Name of the EKS Cluster
- ExistingFSxLustreId: Id of the created FSx for Lustre volume
- FSxClaimName: Name of the claim created for the FSx for Lustre volume
- ExistingVpcId: Dropdown menu for selecting the EKS cluster VPC
- ExistingSubnetIds: Dropdown menu for selecting the EKS cluster Private Subnet IDs.
While specifying the ExistingSubnetIds, please pass in only the subnet IDs associated with your HyperPod cluster, and not your EKS cluster. You can find this in your environment variables (env_vars) that you used to create the cluster, as PRIVATE_SUBNET_ID. Alternatively, you can check your console for private subnets with names <PREFIX> Private Subnet 1 (correct) vs. <PREFIX> EKS Cluster Private Subnet 1.
Do not attempt to delete the CloudFormation stack before all EFA network interfaces have been removed, as they are dependencies of your private subnet and will preclude it from being deleted as a stack resource. This may take several minutes as the HyperPod nodes are shut down.
SageMaker Studio IDE Configuration
As an admin user, once your SageMaker Studio Domain is provisioned, you may go in and create users as you see fit.
This step DOES NOT assume that you already have a Studio Domain. To create one, check out the next section titled "SageMaker Studio Domain Setup".

You can now select your preferred IDE from SageMaker Studio.
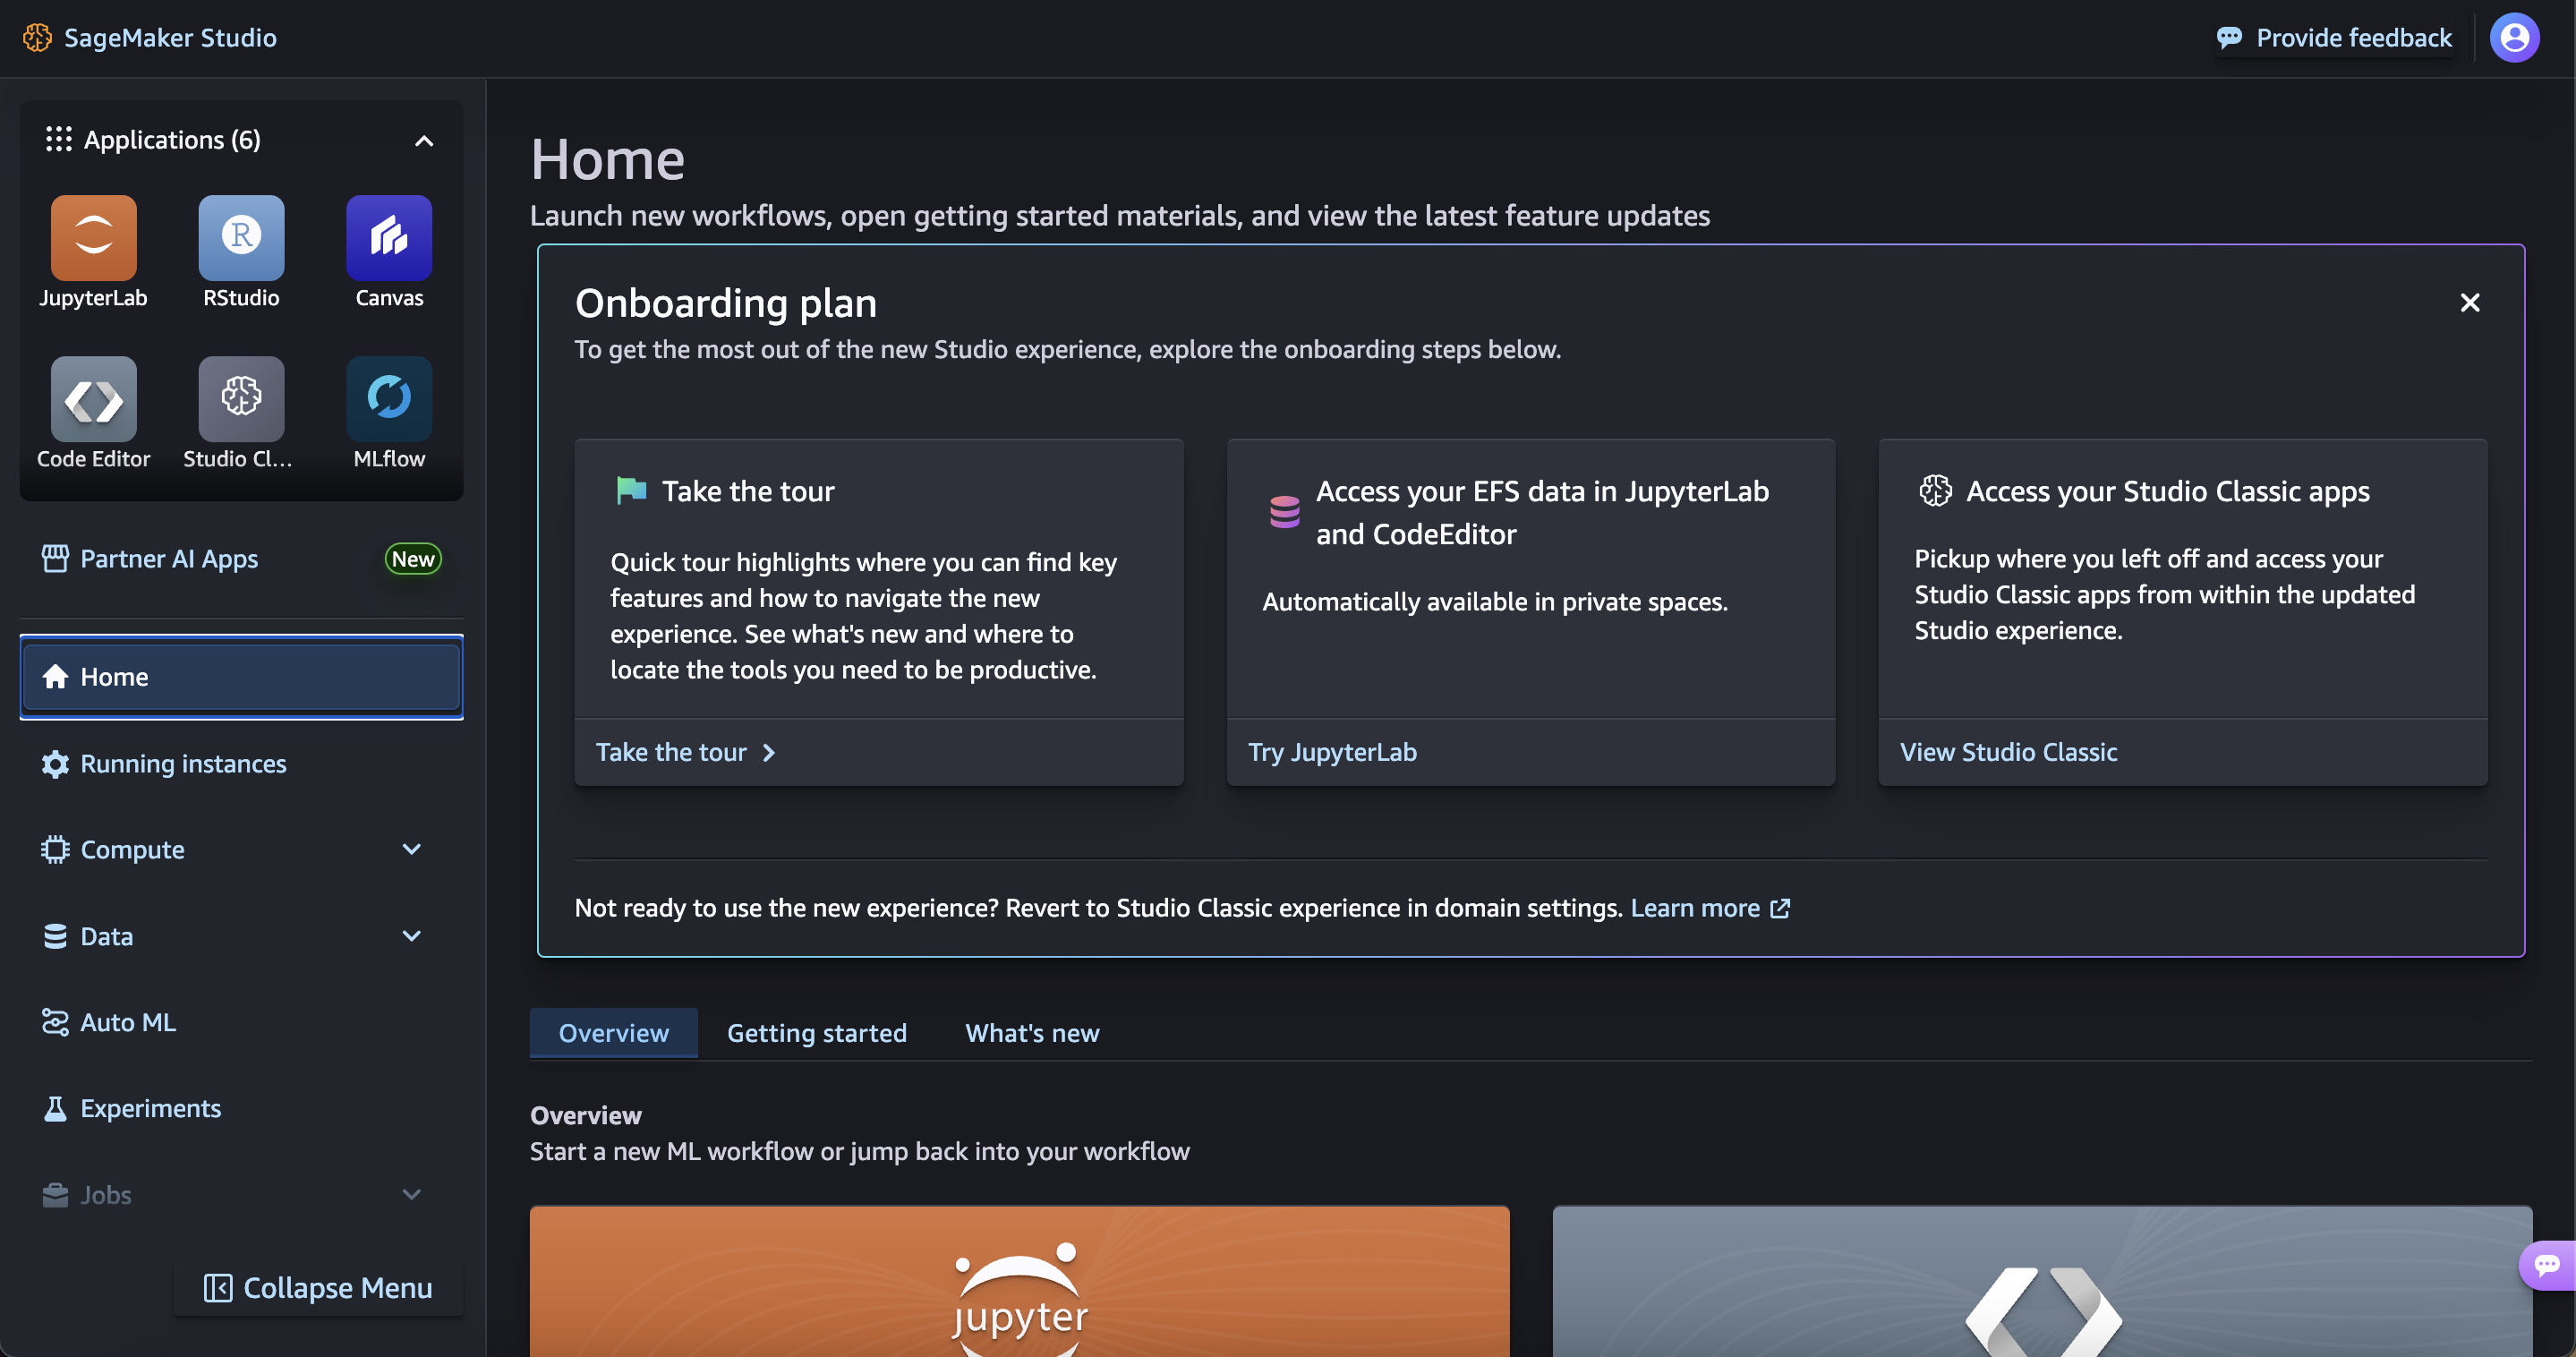
For the purpose of this workshop, we are going to create a Code Editor environment.
From the top-left menu:
- Click on Code Editor
- Click on Create Code Editor Space
- Enter a name
- Click on Create Space
- From the Attach custom filesystem - optional dropdown menu, select the FSx for Lustre volume
- From the Lifecycle configuration dropdown menu, select the available lifecycle configuration
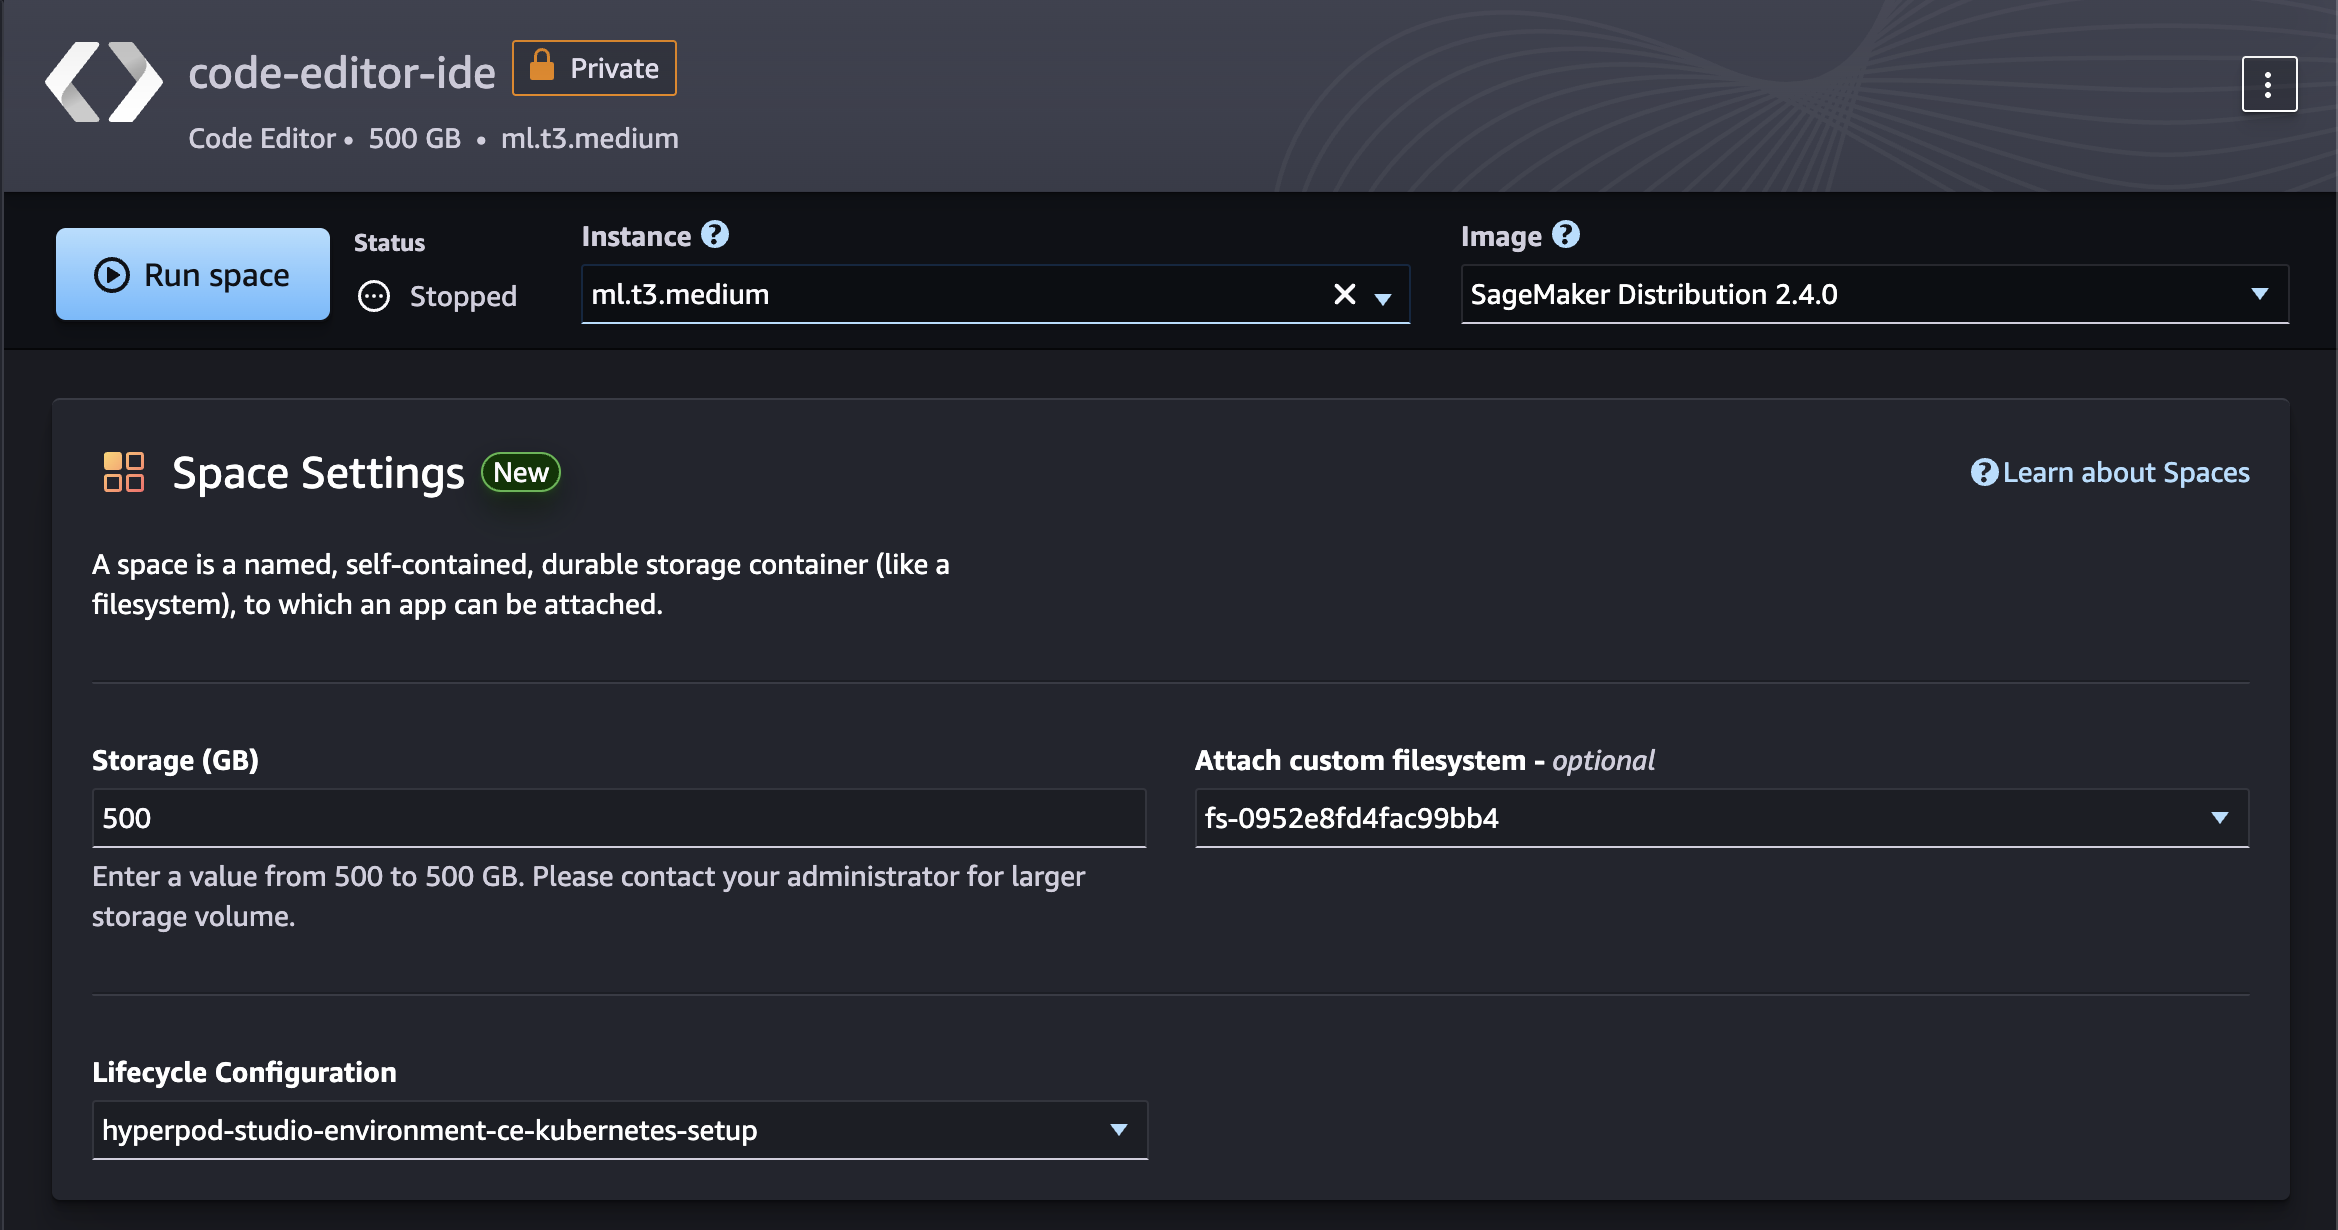
Click on Run Space. Wait until the space is created, then click Open Code Editor
To verify that your file system was mounted, you can check if you have a path mounted in the Code Editor space custom-file-system/fsx_lustre/<FSX_ID>:
You can also run:
df -h
If you set SharedFSx to False, you can verify separate partitions for two users.
Example output from user1:
Filesystem                      Size  Used Avail Use% Mounted on
overlay                          37G  494M   37G   2% /
tmpfs                            64M     0   64M   0% /dev
tmpfs                           1.9G     0  1.9G   0% /sys/fs/cgroup
shm                             392M     0  392M   0% /dev/shm
/dev/nvme1n1                    5.0G  529M  4.5G  11% /home/sagemaker-user
/dev/nvme0n1p1                  180G   31G  150G  18% /opt/.sagemakerinternal
10.1.53.46@tcp:/ylacfb4v/aman1  1.2T  7.5M  1.2T   1% /mnt/custom-file-systems/fsx_lustre/fs-0104f3de83efe0f33
127.0.0.1:/                     8.0E     0  8.0E   0% /mnt/custom-file-systems/efs/fs-052756a07c3a5ba97_fsap-0b5e6e7c68f22fee3
tmpfs                           1.9G     0  1.9G   0% /proc/acpi
tmpfs                           1.9G     0  1.9G   0% /sys/firmware
Example output from user2:
Filesystem                      Size  Used Avail Use% Mounted on
overlay                          37G  478M   37G   2% /
tmpfs                            64M     0   64M   0% /dev
tmpfs                           1.9G     0  1.9G   0% /sys/fs/cgroup
shm                             392M     0  392M   0% /dev/shm
/dev/nvme0n1p1                  180G   31G  150G  18% /opt/.sagemakerinternal
/dev/nvme1n1                    5.0G  529M  4.5G  11% /home/sagemaker-user
127.0.0.1:/                     8.0E     0  8.0E   0% /mnt/custom-file-systems/efs/fs-052756a07c3a5ba97_fsap-0a323a3e5a27e1bdc
10.1.53.46@tcp:/ylacfb4v/aman2  1.2T  7.5M  1.2T   1% /mnt/custom-file-systems/fsx_lustre/fs-0104f3de83efe0f33
tmpfs                           1.9G     0  1.9G   0% /proc/acpi
tmpfs                           1.9G     0  1.9G   0% /sys/firmware
The difference here is the mountpoint for FSxl (ylacfb4v) has separate partitions set up. You can then cd /mnt/custom-file-systems/fsx_lustre/fs-0104f3de83efe0f33 and write from each user and verify that the other user isn't able to see those files!
Alternatively, if you set SharedFSx to True, you can check the the mount using df -h, and it will show something like:
Filesystem                       Size  Used Avail Use% Mounted on
overlay                           37G  478M   37G   2% /
tmpfs                             64M     0   64M   0% /dev
tmpfs                            1.9G     0  1.9G   0% /sys/fs/cgroup
shm                              392M     0  392M   0% /dev/shm
/dev/nvme0n1p1                   180G   31G  150G  18% /opt/.sagemakerinternal
/dev/nvme1n1                     5.0G  529M  4.5G  11% /home/sagemaker-user
10.1.53.46@tcp:/ylacfb4v/shared  1.2T  7.5M  1.2T   1% /mnt/custom-file-systems/fsx_lustre/fs-0104f3de83efe0f33
127.0.0.1:/                      8.0E     0  8.0E   0% /mnt/custom-file-systems/efs/fs-0e16e272aba907ad3_fsap-08ae9b9f68be028d7
tmpfs                            1.9G     0  1.9G   0% /proc/acpi
tmpfs                            1.9G     0  1.9G   0% /sys/firmware
with the /shared partition.
Setup EKS Access Entry
To allow users to deploy training workloads on Hyperpod, you should setup EKS Access Entry for the SageMaker Studio IAM Role.
Run the following commands:
export EKS_CLUSTER_NAME=<YOUR_CLUSTER_NAME>
Replace YOUR_CLUSTER_NAME With the name of the EKS cluster.
CALLER_IDENTITY=$(aws sts get-caller-identity --output json)
ACCOUNT_ID=$(echo "$CALLER_IDENTITY" | jq -r .Account)
USER_ARN=$(echo "$CALLER_IDENTITY" | jq -r .Arn)
PRINCIPAL_TYPE=$(echo "$USER_ARN" | cut -d':' -f6 | cut -d'/' -f1)
USER_NAME=$(echo "$USER_ARN" | cut -d'/' -f2)
ROLE_NAME=$(echo "$USER_ARN" | cut -d'/' -f2)
USER_ARN="arn:aws:iam::${ACCOUNT_ID}:role/${ROLE_NAME}"
Create an EKS Access Entry:
aws eks create-access-entry \
  --cluster-name "$EKS_CLUSTER_NAME" \
  --principal-arn "$USER_ARN" \
  --type "STANDARD"
Associate an IAM policy to the access entry:
aws eks associate-access-policy \
  --cluster-name "$EKS_CLUSTER_NAME" \
  --principal-arn "$USER_ARN" \
  --policy-arn "arn:aws:eks::aws:cluster-access-policy/AmazonEKSClusterAdminPolicy" \
  --access-scope '{"type": "cluster"}'
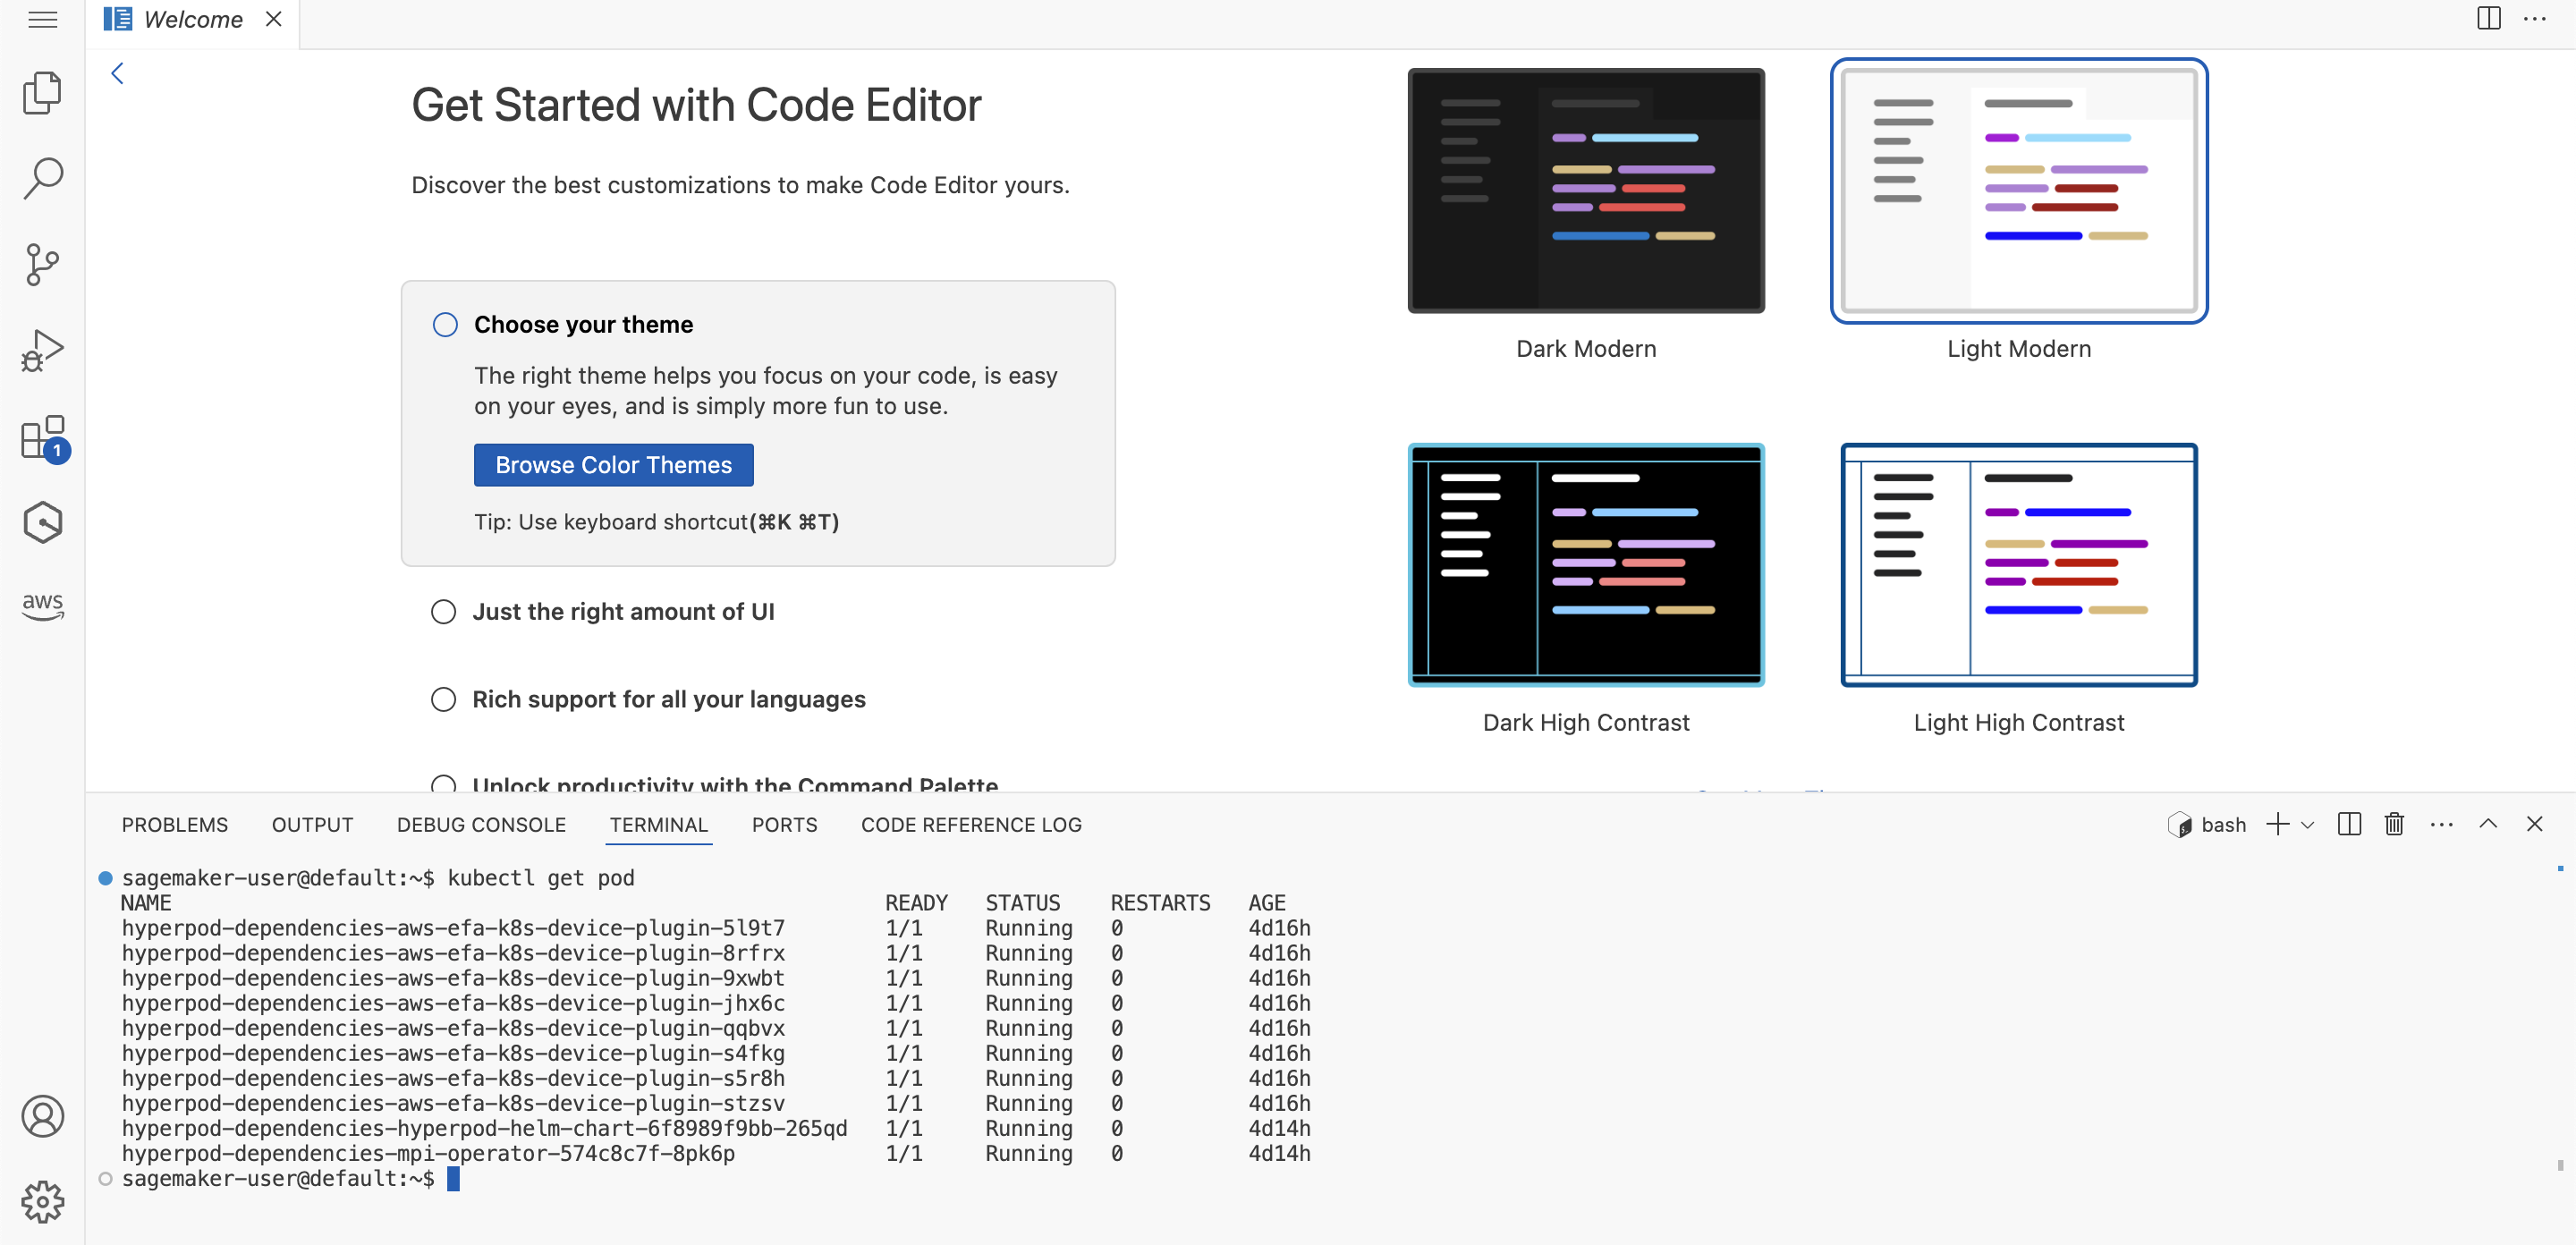
You are now ready to setup the cluster connection.
If you run
kubectl get svc
you should see an output similar to:
NAME             TYPE        CLUSTER-IP   EXTERNAL-IP PORT(S)   AGE
svc/kubernetes   ClusterIP   10.100.0.1   <none>      443/TCP   1m
Setup EKS Cluster connection
Important: Follow the steps in Verifying cluster connection to EKS until "Verify helm Chart Installation".
You should now be able to operate with the EKS cluster.
Optional: Setup Hyperpod Task Governance and CloudWatch Observability
- For Hyperpod Task Governance, If not previously done, follow the steps in Task Governance
- For CloudWatch Observability insights, if not done previously, follow the steps in Container Insights
Run the following command:
export EKS_CLUSTER_NAME=<EKS_CLUSTER_NAME>
export EKS_CLUSTER_EXECUTION_ROLE_NAME=<EKS_CLUSTER_EXECUTION_ROLE_NAME>
Replace:
- EKS_CLUSTER_NAME: EKS Cluster name
- EKS_CLUSTER_EXECUTION_ROLE_NAME: IAM Role name used by the EKS Cluster
aws iam attach-role-policy \
  --role-name $EKS_CLUSTER_EXECUTION_ROLE_NAME \
  --policy-arn arn:aws:iam::aws:policy/CloudWatchAgentServerPolicy
Optional: You can install the CloudWatch adds-on through AWS SDK:
aws eks create-addon \
--addon-name amazon-cloudwatch-observability \
--cluster-name $EKS_CLUSTER_NAME
For additional information, please refer to Upgrading to Container Insights with enhanced observability for Amazon EKS in CloudWatch
Optional: MLFlow Setup
Follow the AWS documentation: Assign IAM roles to Kubernetes service accounts
Note: You can perform these steps from SageMaker Studio. The Studio Domain execution role is configured with the necessary IAM Policy. If you need to edit the role, ensure these steps are performed by an Admin user.
Run the following commands:
export EKS_CLUSTER_NAME=<EKS_CLUSTER_NAME>
export EKS_MLFLOW_POLICY_ARN=<EKS_MLFLOW_POLICY_ARN>
Replace:
- EKS_CLUSTER_NAME: EKS Cluster name
- EKS_MLFLOW_POLICY_ARN: MLflow policy ARN from the output of the Cloudformation template
eksctl create iamserviceaccount \
  --name eks-hyperpod-sa \
  --namespace default \
  --cluster $EKS_CLUSTER_NAME \
  --role-name eks-hyperpod-mlflow-role \
  --attach-policy-arn $EKS_MLFLOW_POLICY_ARN \
  --approve
kubectl apply -f - <<EOF
apiVersion: v1
kind: ServiceAccount
metadata:
  name: eks-hyperpod-sa
  namespace: default
EOF