EMR on EKS with Karpenter
Introduction
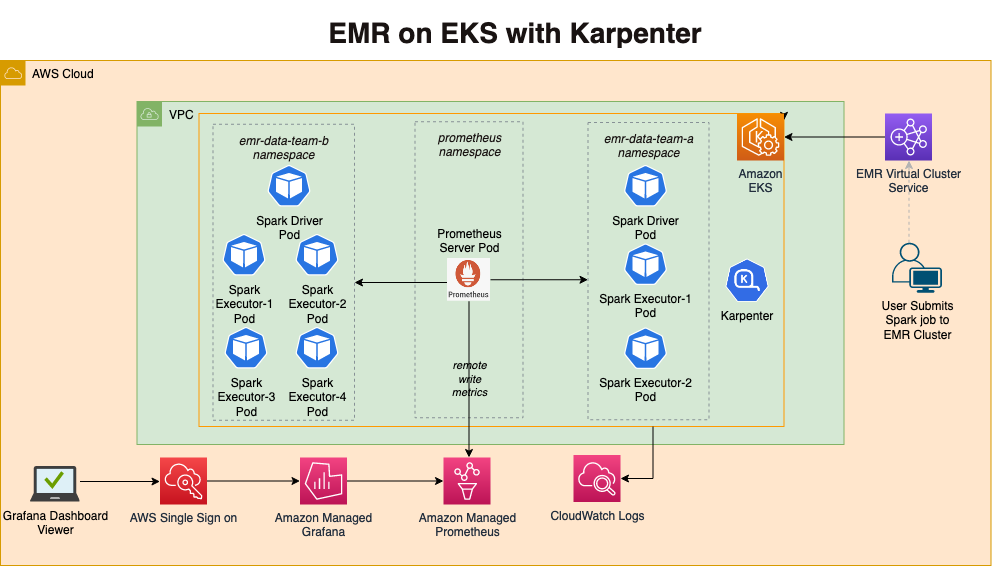
In this pattern, you will deploy an EMR on EKS cluster and use Karpenter Nodepools for scaling Spark jobs.
Architecture
This pattern uses opinionated defaults to keep the deployment experience simple but also keeps it flexible so that you can pick and choose necessary add-ons during deployment. We recommend keeping the defaults if you are new to EMR on EKS and only customize if you have viable alternative option available for replacement.
In terms of infrastructure, here are the resources that are created by this pattern
- Creates an EKS Cluster Control plane with public endpoint (recommended for demo/poc environment)
- One managed node group
- Core Node group with 3 instances spanning multi-AZs for running system critical pods. e.g., Cluster Autoscaler, CoreDNS, Observability, Logging etc.
- Enables EMR on EKS
- Creates two namespaces (
emr-data-team-a,emr-data-team-b) for data teams - Creates Kubernetes role and role binding(
emr-containersuser) for both namespaces - IAM roles for both teams needed for job execution
- Update
AWS_AUTHconfig map withemr-containersuser andAWSServiceRoleForAmazonEMRContainersrole - Create a trust relationship between the job execution role and the identity of the EMR managed service account
- Create EMR Virtual Cluster for
emr-data-team-a&emr-data-team-band IAM policies for both
- Creates two namespaces (
You can see the list of add-ons available below.
We recommend running all the default system add-ons on a dedicated EKS managed nodegroup such as core-node-group as provided by this pattern.
We don't recommend removing critical add-ons (Amazon VPC CNI, CoreDNS, Kube-proxy).
| Add-on | Enabled by default? | Benefits | Link |
|---|---|---|---|
| Amazon VPC CNI | Yes | VPC CNI is available as an EKS add-on and is responsible for creating ENI's and IPv4 or IPv6 addresses for your spark application pods | VPC CNI Documentation |
| CoreDNS | Yes | CoreDNS is available as an EKS add-on and is responsible for resolving DNS queries for spark application and for Kubernetes cluster | EKS CoreDNS Documentation |
| Kube-proxy | Yes | Kube-proxy is available as an EKS add-on and it maintains network rules on your nodes and enables network communication to your spark application pods | EKS kube-proxy Documentation |
| Amazon EBS CSI driver | Yes | EBS CSI driver is available as an EKS add-on and it allows EKS clusters to manage the lifecycle of EBS volumes | EBS CSI Driver Documentation |
| Karpenter | Yes | Karpenter is nodegroup-less autoscaler that provides just-in-time compute capacity for spark applications on Kubernetes clusters | Karpenter Documentation |
| Cluster Autoscaler | Yes | Kubernetes Cluster Autoscaler automatically adjusts the size of Kubernetes cluster and is available for scaling nodegroups (such as core-node-group) in the cluster | Cluster Autoscaler Documentation |
| Cluster proportional autoscaler | Yes | This is responsible for scaling CoreDNS pods in your Kubernetes cluster | Cluster Proportional Autoscaler Documentation |
| Metrics server | Yes | Kubernetes metrics server is responsible for aggregating cpu, memory and other container resource usage within your cluster | EKS Metrics Server Documentation |
| Prometheus | Yes | Prometheus is responsible for monitoring EKS cluster including spark applications in your EKS cluster. We use Prometheus deployment for scraping and ingesting metrics into Amazon Managed Prometheus and Kubecost | Prometheus Documentation |
| Amazon Managed Prometheus | Yes | This is responsible for storing and scaling of EKS cluster and spark application metrics | Amazon Managed Prometheus Documentation |
| Kubecost | Yes | Kubecost is responsible for providing cost break down by Spark application. You can monitor costs based on per job, namespace or labels | EKS Kubecost Documentation |
| CloudWatch metrics | No | CloudWatch container insights metrics shows simple and standardized way to monitor not only AWS resources but also EKS resources on CloudWatch dashboard | CloudWatch Container Insights Documentation |
| AWS for Fluent-bit | No | This can be used to publish EKS cluster and worker node logs to CloudWatch Logs or 3rd party logging system | AWS For Fluent-bit Documentation |
| FSx for Lustre CSI driver | No | This can be used for running Spark application using FSx for Lustre | FSx for Lustre CSI Driver Documentation |
Customizing Add-ons
👈Deploying the Solution
👈Run Sample Spark job
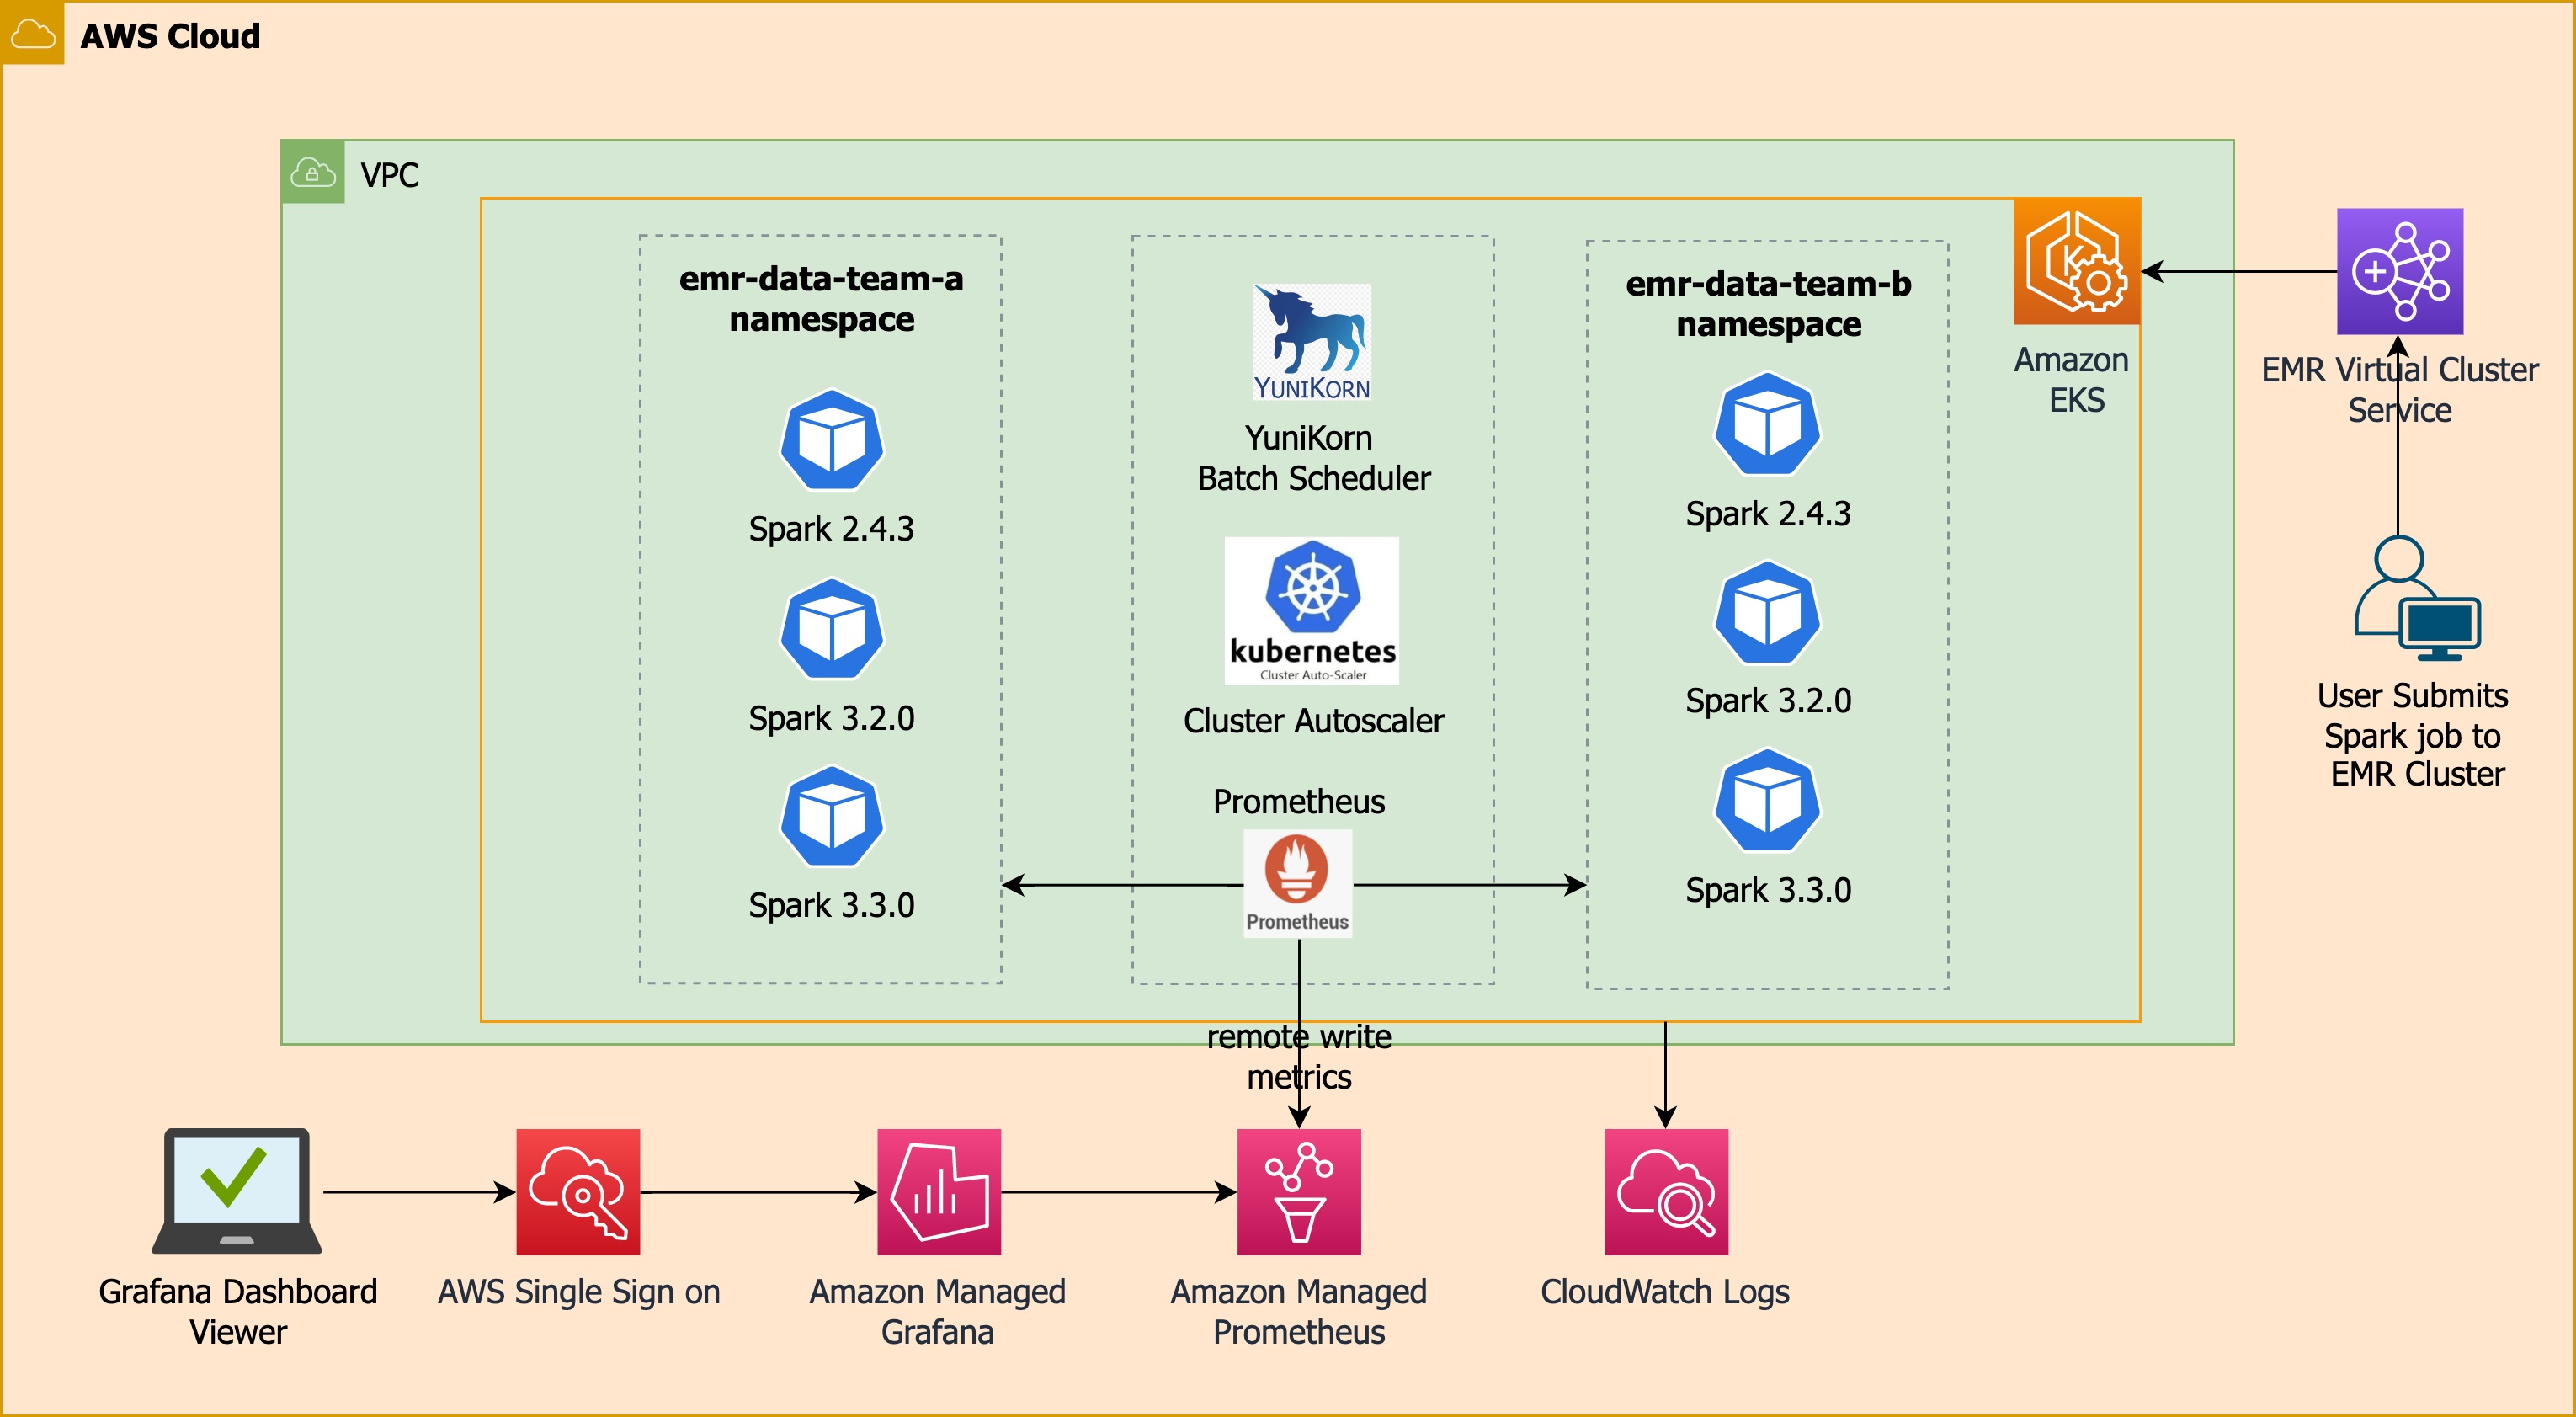
The pattern shows how to run spark jobs in a multi-tenant EKS cluster. The examples showcases two data teams using namespaces emr-data-team-a and emr-data-team-b mapped to their EMR virtual clusters. You can use different Karpenter Nodepools for each team so that they can submit jobs that are unique to their workload. Teams can also use different storage requirements to run their Spark jobs. For example, you can use compute optimized Nodepool that has taints and specify tolerations using pod templates so that you can run spark on compute optimized EC2 instances. In terms of storage, you can decide whether to use EC2 instance-store or EBS or FSx for lustre volumes for data processing. The default storage that is used in these examples is EC2 instance store because of performance benefit
spark-compute-optimizedNodepool to run spark jobs onc5dinstances.spark-memory-optimizedNodepool to run spark jobs onr5dinstances.spark-graviton-memory-optimizedNodepool to run spark jobs onr6gdGraviton instances(ARM64).
- spark-compute-optimized
- spark-memory-optimized
- spark-graviton-memory-optimized
In this tutorial, you will use Karpenter Nodepool that uses compute optimized instances. This template leverages the Karpenter AWSNodeTemplates. Verify the Karpenter NodeClass and Nodepool code here To view Karpenter Nodepool for compute optimized instances, Click to toggle content!
To run Spark Jobs that can use this Nodepool, you need to submit your jobs by adding tolerations to your pod templates
For example,
spec:
  tolerations:
    - key: "spark-compute-optimized"
      operator: "Exists"
      effect: "NoSchedule"
Execute the sample PySpark Job to trigger compute optimized Karpenter Nodepool
The following script requires four input parameters virtual_cluster_id, job_execution_role_arn, cloudwatch_log_group_name & S3_Bucket to store PySpark scripts, Pod templates and Input data. These values are auto populated by execute_emr_eks_job.sh.
This shell script downloads the test data to your local machine and uploads to S3 bucket. Verify the shell script before running the job.
cd data-on-eks/analytics/terraform/emr-eks-karpenter/examples/nvme-ssd/karpenter-compute-provisioner/

./execute_emr_eks_job.sh
Enter the EMR Virtual Cluster ID: 4ucrncg6z4nd19vh1lidna2b3
Enter the EMR Execution Role ARN: arn:aws:iam::123456789102:role/emr-eks-karpenter-emr-eks-data-team-a
Enter the CloudWatch Log Group name: /emr-on-eks-logs/emr-eks-karpenter/emr-data-team-a
Enter the S3 Bucket for storing PySpark Scripts, Pod Templates and Input data. For e.g., s3://<bucket-name>: s3://example-bucket
Karpenter may take between 1 and 2 minutes to spin up a new compute node as specified in the Nodepool templates before running the Spark Jobs. Nodes will be drained with once the job is completed
Verify the job execution
kubectl get pods --namespace=emr-data-team-a -w
In this tutorial, you will use Karpenter Nodepool that uses memory optimized instances. This template uses the AWS Node template with Userdata. Verify the Karpenter NodeClass and Nodepool code here To view Karpenter Nodepool for memory optimized instances, Click to toggle content!
To run Spark Jobs that can use this Nodepool, you need to submit your jobs by adding tolerations to your pod templates
For example,
spec:
  tolerations:
    - key: "spark-memory-optimized"
      operator: "Exists"
      effect: "NoSchedule"
Execute the sample PySpark Job to trigger memory optimized Karpenter Nodepool
The following script requires four input parameters virtual_cluster_id, job_execution_role_arn, cloudwatch_log_group_name & S3_Bucket to store PySpark scripts, Pod templates and Input data. You can get these values terraform apply output values or by running terraform output. For S3_BUCKET, Either create a new S3 bucket or use an existing S3 bucket.
This shell script downloads the test data to your local machine and uploads to S3 bucket. Verify the shell script before running the job.
cd data-on-eks/analytics/terraform/emr-eks-karpenter/examples/nvme-ssd/karpenter-memory-provisioner/
./execute_emr_eks_job.sh
Enter the EMR Virtual Cluster ID: 4ucrncg6z4nd19vh1lidna2b3
Enter the EMR Execution Role ARN: arn:aws:iam::123456789102:role/emr-eks-karpenter-emr-eks-data-team-a
Enter the CloudWatch Log Group name: /emr-on-eks-logs/emr-eks-karpenter/emr-data-team-a
Enter the S3 Bucket for storing PySpark Scripts, Pod Templates and Input data. For e.g., s3://<bucket-name>: s3://example-bucket
Karpenter may take between 1 and 2 minutes to spin up a new compute node as specified in the Nodepool templates before running the Spark Jobs. Nodes will be drained with once the job is completed
Verify the job execution
kubectl get pods --namespace=emr-data-team-a -w
In this tutorial, you will use Karpenter Nodepool that uses Graviton memory optimized instances. This template uses the AWS Node template with Userdata. Verify the Karpenter NodeClass and Nodepool code here To view Karpenter Nodepool for Graviton memory optimized instances, Click to toggle content!
To run Spark Jobs that can use this Nodepool, you need to submit your jobs by adding tolerations to your pod templates
For example,
spec:
  tolerations:
    - key: "spark-graviton-memory-optimized"
      operator: "Exists"
      effect: "NoSchedule"
Execute the sample PySpark Job to trigger Graviton memory optimized Karpenter Nodepool
The following script requires four input parameters virtual_cluster_id, job_execution_role_arn, cloudwatch_log_group_name & S3_Bucket to store PySpark scripts, Pod templates and Input data. You can get these values terraform apply output values or by running terraform output. For S3_BUCKET, Either create a new S3 bucket or use an existing S3 bucket.
This shell script downloads the test data to your local machine and uploads to S3 bucket. Verify the shell script before running the job.
cd data-on-eks/analytics/terraform/emr-eks-karpenter/examples/nvme-ssd/karpenter-graviton-memory-provisioner/
./execute_emr_eks_job.sh
Enter the EMR Virtual Cluster ID: 4ucrncg6z4nd19vh1lidna2b3
Enter the EMR Execution Role ARN: arn:aws:iam::123456789102:role/emr-eks-karpenter-emr-eks-data-team-a
Enter the CloudWatch Log Group name: /emr-on-eks-logs/emr-eks-karpenter/emr-data-team-a
Enter the S3 Bucket for storing PySpark Scripts, Pod Templates and Input data. For e.g., s3://<bucket-name>: s3://example-bucket
Karpenter may take between 1 and 2 minutes to spin up a new compute node as specified in the Nodepool templates before running the Spark Jobs. Nodes will be drained with once the job is completed
Verify the job execution
kubectl get pods --namespace=emr-data-team-a -w
Execute the sample PySpark job that uses EBS volumes and compute optimized Karpenter Nodepool
This pattern uses EBS volumes for data processing and compute optimized Nodepool. You can modify the Nodepool by changing nodeselector in driver and executor pod templates. In order to change Nodepools, simply update your pod templates to desired Nodepool
  nodeSelector:
    NodeGroupType: "SparkComputeOptimized"
You can also update EC2 instances that doesn't include instance store volumes (for example c5.xlarge) and remove c5d's if needed for this exercise
We will create Storageclass that will be used by drivers and executors. We'll create static Persistent Volume Claim (PVC) for the driver pod but we'll use dynamically created ebs volumes for executors.
Create StorageClass and PVC using example provided
cd data-on-eks/analytics/terraform/emr-eks-karpenter/examples/ebs-pvc/karpenter-compute-provisioner-ebs/
kubectl apply -f ebs-storageclass-pvc.yaml
Let's run the job
cd data-on-eks/analytics/terraform/emr-eks-karpenter/examples/ebs-pvc/karpenter-compute-provisioner-ebs/
./execute_emr_eks_job.sh
Enter the EMR Virtual Cluster ID: 4ucrncg6z4nd19vh1lidna2b3
Enter the EMR Execution Role ARN: arn:aws:iam::123456789102:role/emr-eks-karpenter-emr-eks-data-team-a
Enter the CloudWatch Log Group name: /emr-on-eks-logs/emr-eks-karpenter/emr-data-team-a
Enter the S3 Bucket for storing PySpark Scripts, Pod Templates and Input data. For e.g., s3://<bucket-name>: s3://example-bucket
You'll notice the PVC spark-driver-pvc will be used by driver pod but Spark will create multiple ebs volumes for executors mapped to Storageclass emr-eks-karpenter-ebs-sc. All dynamically created ebs volumes will be deleted once the job completes
Running Sample Spark job using FSx for Lustre
Amazon FSx for Lustre is a fully managed shared storage option built on the world’s most popular high-performance file system. You can use FSx to store shuffle files and also to store intermediate data processing tasks in a data pipeline. You can read more about FSX for Lustre in documentation and learn how to use this storage with EMR on EKS in our best practices guide
In this example, you will learn how to deploy, configure and use FSx for Lustre as a shuffle storage. There are two ways to use FSx for Lustre
- using static FSx for Lustre volumes
- using dynamically created FSx for Lustre volumes
- fsx-static
- fsx-dynamic
Execute Spark Job by using FSx for Lustre with statically provisioned volume and compute optimized Karpenter Nodepool.
Fsx for Lustre Terraform module is disabled by default. Follow the customizing add-ons steps before running Spark jobs.
Execute the Spark job using the below shell script.
This script requires input parameters which can be extracted from terraform apply output values.
This shell script downloads the test data to your local machine and uploads to S3 bucket. Verify the shell script before running the job.
cd analytics/terraform/emr-eks-karpenter/examples/fsx-for-lustre/fsx-static-pvc-shuffle-storage

./fsx-static-spark.sh
Karpetner may take between 1 and 2 minutes to spin up a new compute node as specified in the Nodepool templates before running the Spark Jobs. Nodes will be drained with once the job is completed
Verify the job execution events
kubectl get pods --namespace=emr-data-team-a -w
This will show the mounted /data directory with FSx DNS name
kubectl exec -ti taxidata-exec-1 -c spark-kubernetes-executor -n emr-data-team-a -- df -h

kubectl exec -ti taxidata-exec-1 -c spark-kubernetes-executor -n emr-data-team-a -- ls -lah /static
Execute Spark Job by using FSx for Lustre with dynamically provisioned volume and compute optimized Karpenter Nodepool.
Fsx for Lustre Terraform module is disabled by default. Follow the customizing add-ons steps before running Spark jobs.
Execute Spark Job by using FSx for Lustre as a Shuffle storage for Driver and Executor pods with dynamically provisioned FSx filesystem and Persistent volume.
Execute the Spark job using the below shell script.
This script requires input parameters which can be extracted from terraform apply output values.
This shell script downloads the test data to your local machine and uploads to S3 bucket. Verify the shell script before running the job.
cd analytics/terraform/emr-eks-karpenter/examples/fsx-for-lustre/fsx-dynamic-pvc-shuffle-storage

./fsx-dynamic-spark.sh
Karpetner may take between 1 and 2 minutes to spin up a new compute node as specified in the Nodepool templates before running the Spark Jobs. Nodes will be drained with once the job is completed
Verify the job execution events
kubectl get pods --namespace=emr-data-team-a -w
kubectl exec -ti taxidata-exec-1 -c spark-kubernetes-executor -n emr-data-team-a -- df -h

kubectl exec -ti taxidata-exec-1 -c spark-kubernetes-executor -n emr-data-team-a -- ls -lah /dynamic
Running Sample Spark job using Apache YuniKorn Batch Scheduler
Apache YuniKorn is an open-source, universal resource scheduler for managing distributed big data processing workloads such as Spark, Flink, and Storm. It is designed to efficiently manage resources across multiple tenants in a shared, multi-tenant cluster environment. Some of the key features of Apache YuniKorn include:
- Flexibility: YuniKorn provides a flexible and scalable architecture that can handle a wide variety of workloads, from long-running services to batch jobs.
- Dynamic Resource Allocation: YuniKorn uses a dynamic resource allocation mechanism to allocate resources to workloads on an as-needed basis, which helps to minimize resource wastage and improve overall cluster utilization.
- Priority-based Scheduling: YuniKorn supports priority-based scheduling, which allows users to assign different levels of priority to their workloads based on business requirements.
- Multi-tenancy: YuniKorn supports multi-tenancy, which enables multiple users to share the same cluster while ensuring resource isolation and fairness.
- Pluggable Architecture: YuniKorn has a pluggable architecture that allows users to extend its functionality with custom scheduling policies and pluggable components.
Apache YuniKorn is a powerful and versatile resource scheduler that can help organizations efficiently manage their big data workloads while ensuring high resource utilization and workload performance.
Apache YuniKorn Architecture
Apache YuniKorn Gang Scheduling with Karpenter
Apache YuniKorn Scheduler add-on is disabled by default. Follow the steps to deploy the Apache YuniKorn add-on and execute the Spark job.
- Update the
analytics/terraform/emr-eks-karpenter/variables.tffile with the following
variable "enable_yunikorn" {
  default     = true
  description = "Enable Apache YuniKorn Scheduler"
  type        = bool
}
- Execute
terrafrom applyagain. This will deploy FSx for Lustre add-on and all the necessary resources.
terraform apply -auto-approve
This example demonstrates the Apache YuniKorn Gang Scheduling with Karpenter Autoscaler.
cd analytics/terraform/emr-eks-karpenter/examples/nvme-ssd/karpenter-yunikorn-gangscheduling

./execute_emr_eks_job.sh
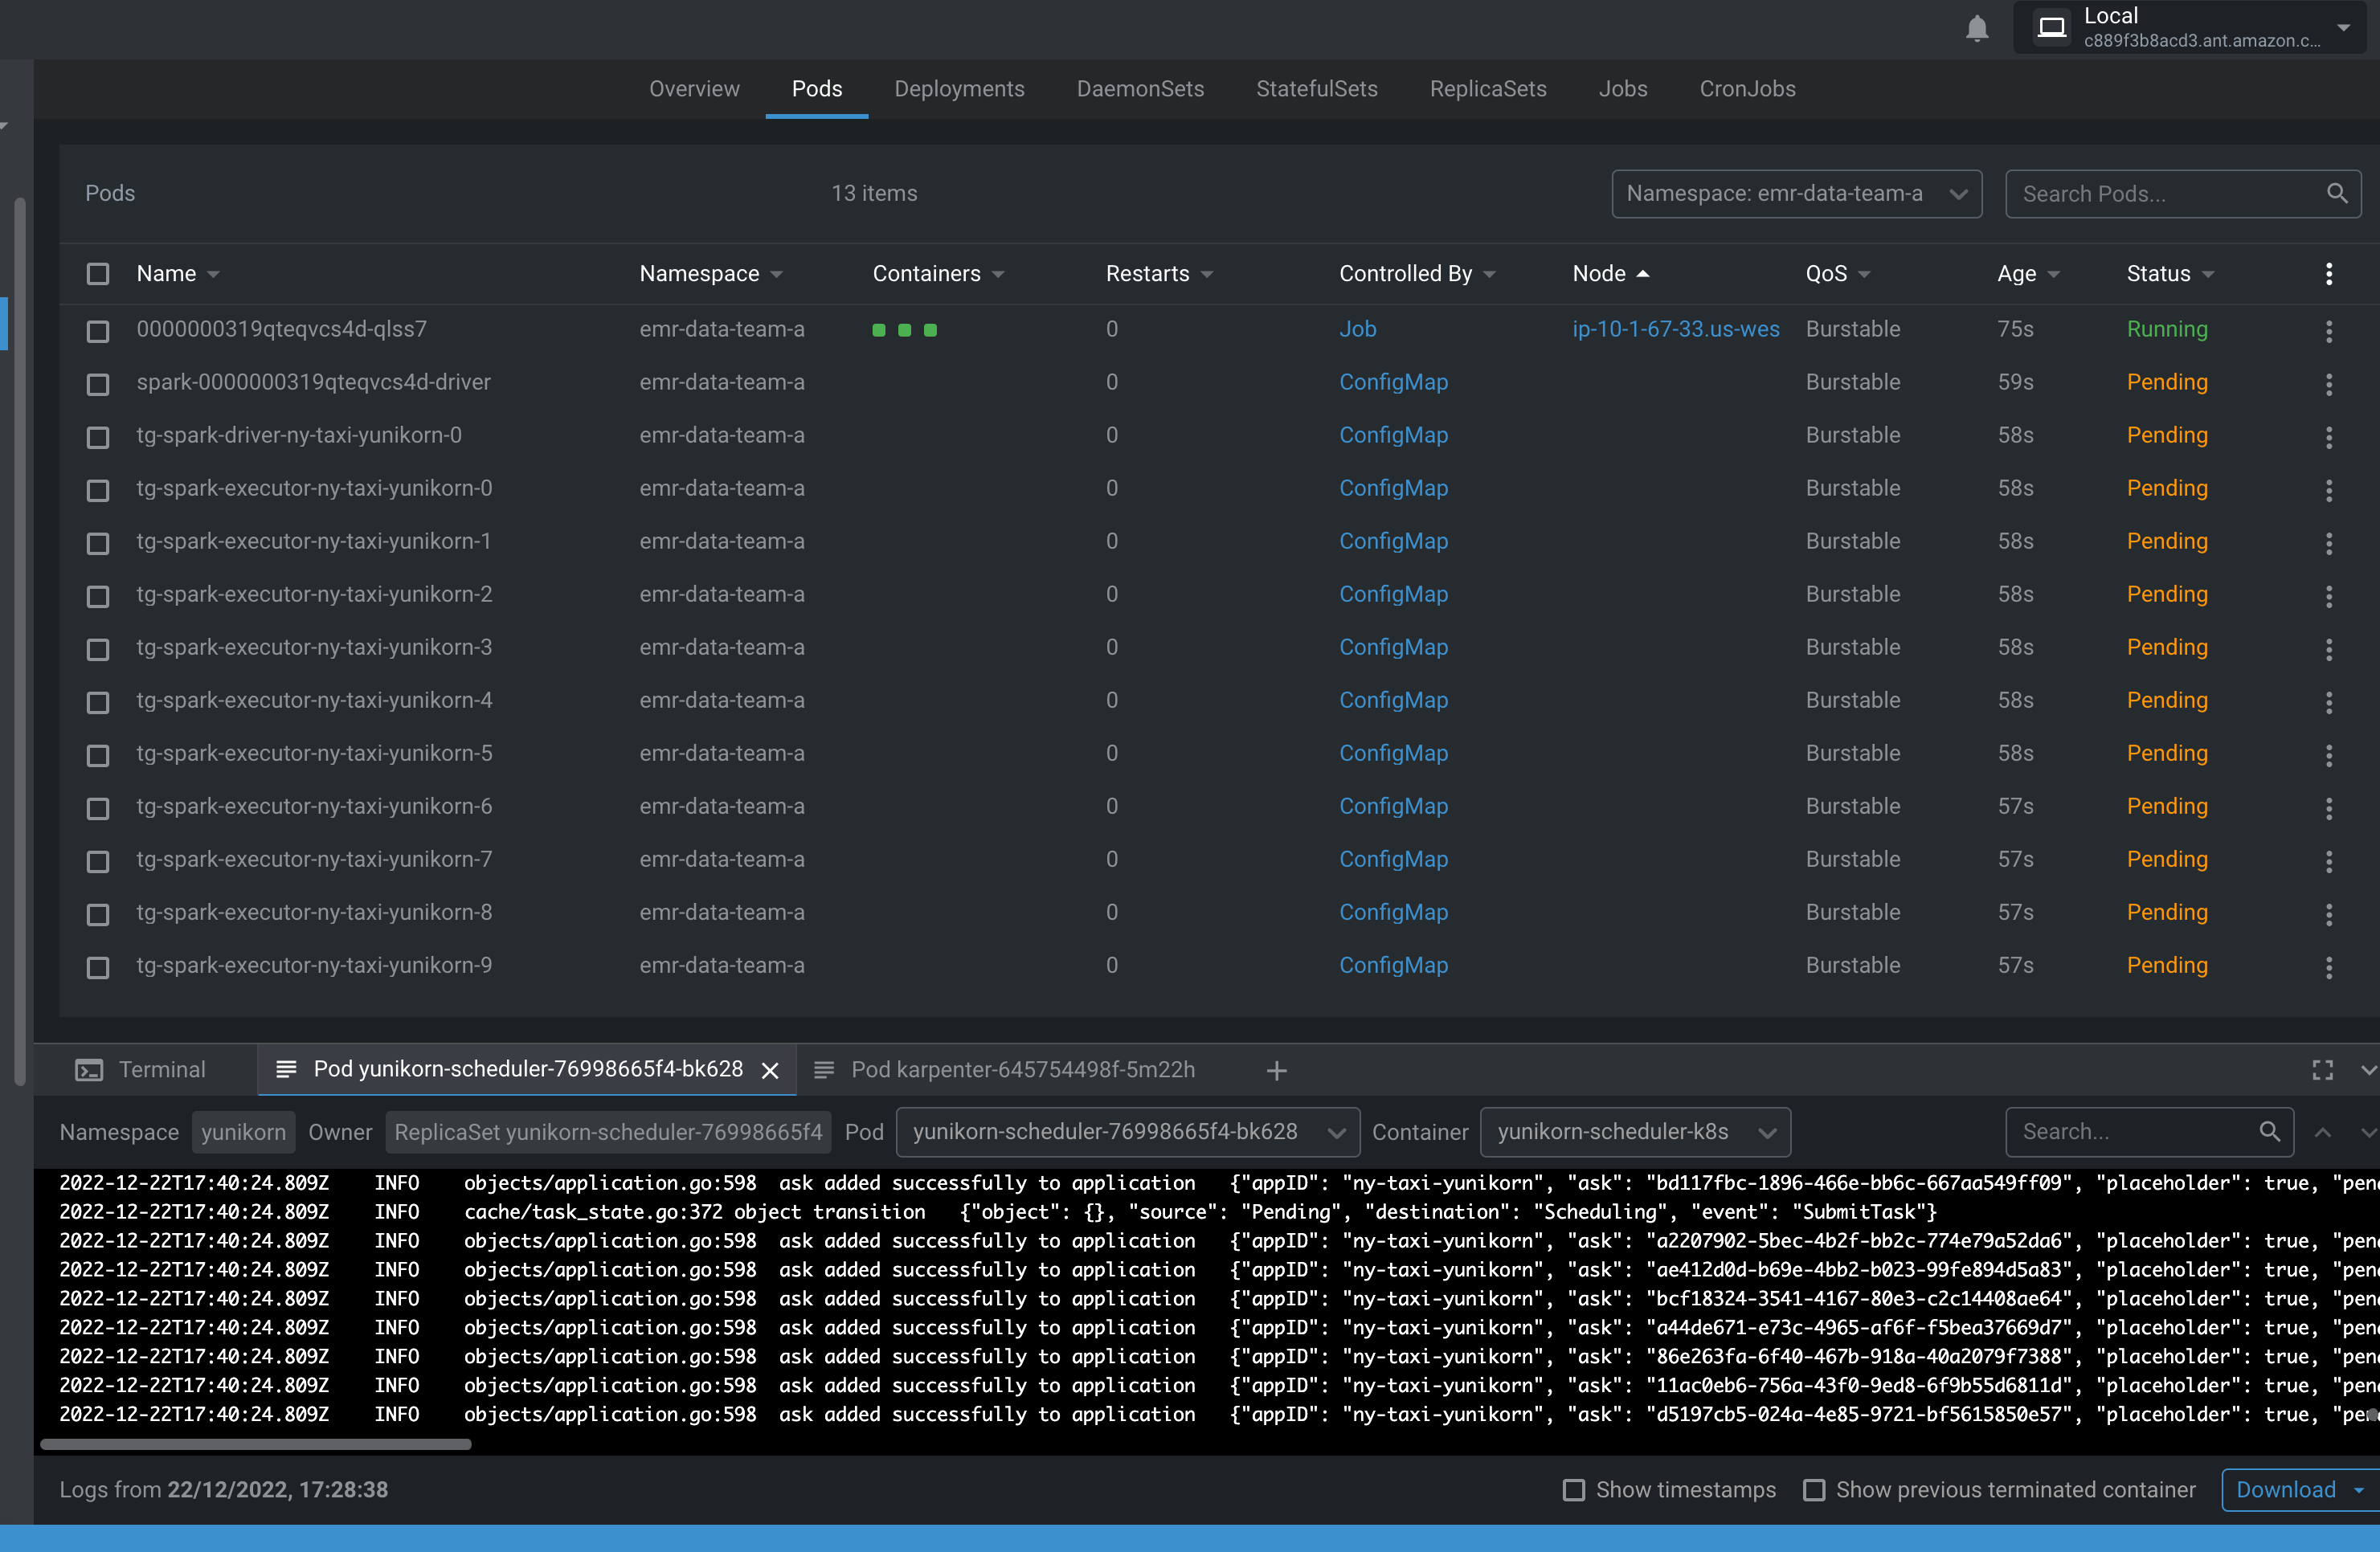
Verify the job execution Apache YuniKorn Gang Scheduling will create pause pods for total number of executors requested.
kubectl get pods --namespace=emr-data-team-a -w
Verify the driver and executor pods prefix with tg- indicates the pause pods.
These pods will be replaced with the actual Spark Driver and Executor pods once the Nodes are scaled and ready by the Karpenter.
Delta Lake Table Format
👈Run Interactive Workload with Managed Endpoint
Managed endpoint is a gateway that provides connectivity from EMR Studio to EMR on EKS so that you can run interactive workloads. You can find out more information about it here.
Creating a managed endpoint
In this example, we will create a managed endpoint under one of the data teams.
Navigate to folder and execute script:

cd analytics/terraform/emr-eks-karpenter/examples/managed-endpoints
./create-managed-endpoint.sh
Enter the EMR Virtual Cluster Id: 4ucrncg6z4nd19vh1lidna2b3
Provide your EMR on EKS team (emr-data-team-a or emr-data-team-b): emr-eks-data-team-a
Enter your AWS Region: us-west-2
Enter a name for your endpoint: emr-eks-team-a-endpoint
Provide an S3 bucket location for logging (i.e. s3://my-bucket/logging/): s3://<bucket-name>/logs
Enter the EMR Execution Role ARN (i.e. arn:aws:00000000000000000:role/EMR-Execution-Role): arn:aws:iam::181460066119:role/emr-eks-karpenter-emr-data-team-a
The script will provide the following:
- JSON configuration file for the Managed Endpoint
- Configuration settings:
- Default 8G Spark Driver
- CloudWatch monitoring, with logs stored in the S3 bucket provided
- Proper endpoint creation with appropriate security group to allow using Karpenter
- Outputs: Managed Endpoint ID and Load Balancer ARN.
Once you have created a managed endpoint, you can follow the instructions here to configure EMR Studio and associate the Managed endpoint to a workspace.
Cleanup of Endpoint resources
To delete the managed endpoint, simply run the following command:
aws emr-containers delete-managed-endpoint --id <Managed Endpoint ID> --virtual-cluster-id <Virtual Cluster ID>
Cleanup
Cleanup
👈To avoid unwanted charges to your AWS account, delete all the AWS resources created during this deployment