DEPRECATION NOTICE
This blueprint will be deprecated and eventually removed from this GitHub repository on October 27, 2024. No bugs will be fixed, and no new features will be added. The decision to deprecate is based on the lack of demand and interest in this blueprint, as well as the difficulty in allocating resources to maintain a blueprint that is not actively used by any users or customers.
If you are using this blueprint in production, please add yourself to the adopters.md page and raise an issue in the repository. This will help us reconsider and possibly retain and continue to maintain the blueprint. Otherwise, you can make a local copy or use existing tags to access it.
EMR on EKS Data Platform with AWS CDK
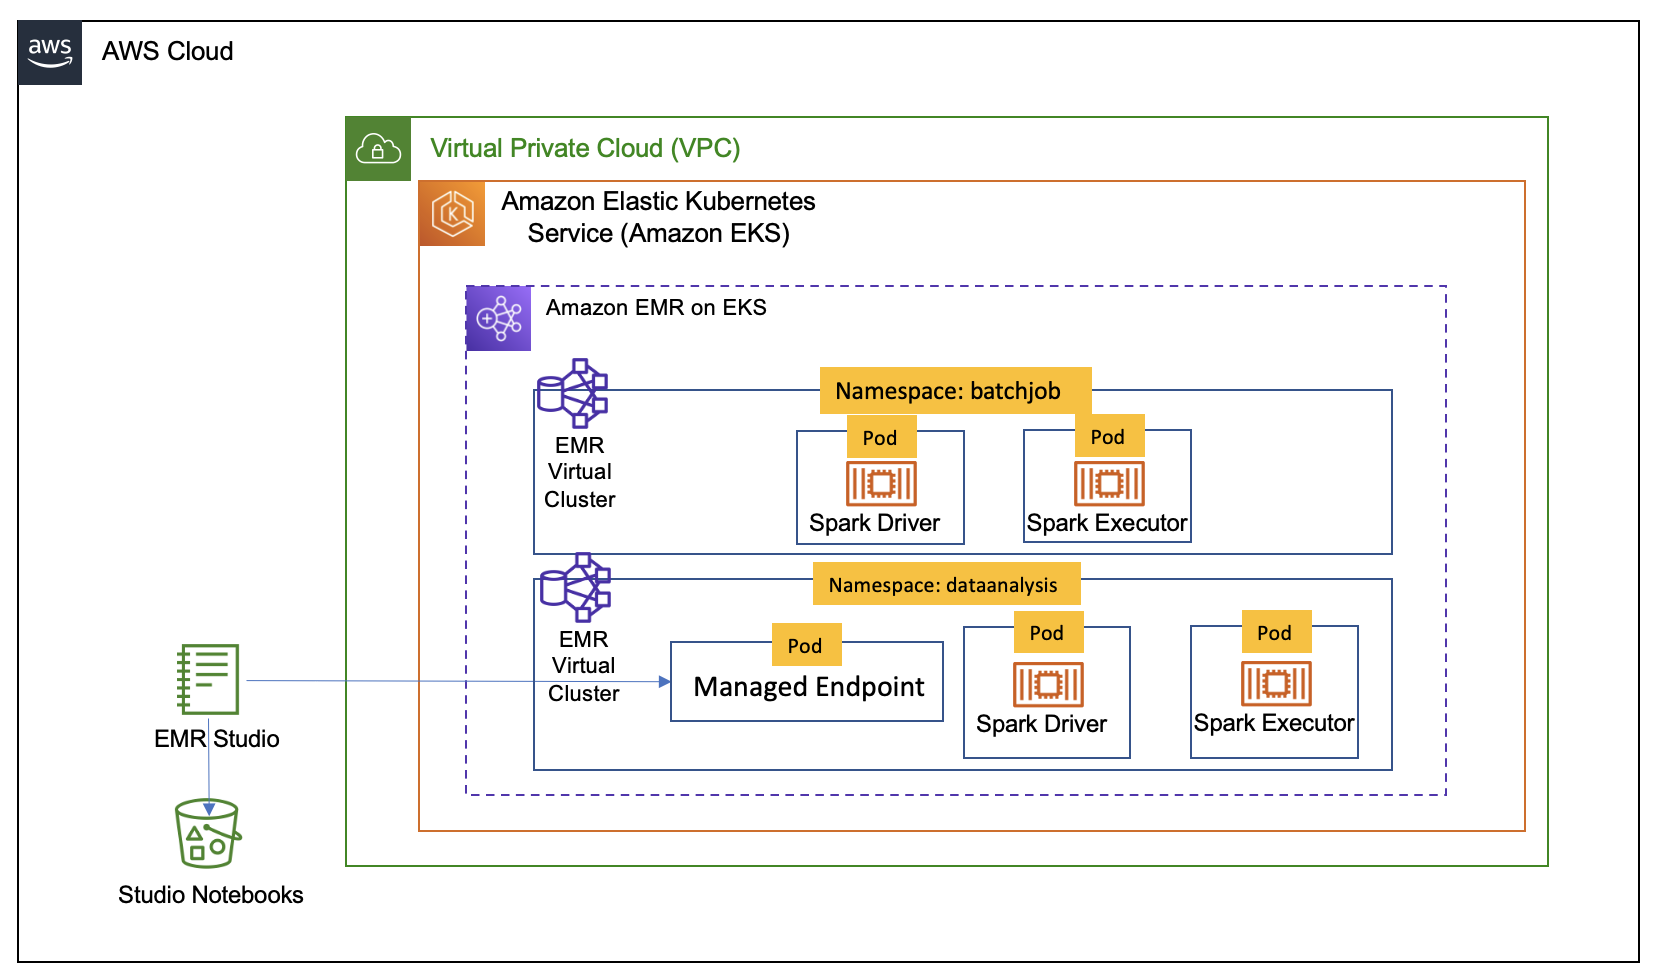
In this document we will show you how you can use AWS CDK and the Analytics Reference Architecture (ARA) library to deploy an end to end data analytics platform. This platform will allow you to run Spark interactive Session in Jupyter notebook with EMR Studio supported by EMR on EKS and run Spark jobs with EMR on EKS. The architecture below shows the infrasturcture you will deploy using the CDK and ARA library.
Analytics Reference Architecture
AWS Analytics Reference Architecture (ARA) exposes set of reusable core components in an AWS CDK library, currently available in Typescript and Python. This library contains AWS CDK constructs (L3) that can be used to quickly provision analytics solutions in demos, prototypes, proofs of concept, and end-to-end reference architectures. The API of ARA Library is defined here.
In our case the library help you deploy an infrastructure optimised for Apache Spark running on EKS leveraging EMR on EKS. The infrastructure will out of the box provide you with pod collocation to reduce network traffic, deploy nodegroup in a single AZ to reduce cross AZ traffic during shuffle, use dedicated instances for EMR on EKS, use optimized instances for memory intensive jobs, use spot and on-demand instances for non-critical job and for critical jobs.
Prerequisites
Ensure that you have installed the following tools on your machine.
Solution
To deploy the data platform we will use an example in the Analytics Reference Architecture. The example is in the directory examples/emr-eks-app that you will find in the repository you will clone below.
Clone the repository
git clone https://github.com/aws-samples/aws-analytics-reference-architecture.git
This solution will deploy the following:
-
EKS cluster and a set of Nodegroups:
-
Managed Nodegroup called tooling for running system critical pods. e.g., Cluster Autoscaler, CoreDNS, EBS CSI Driver..
-
Three Managed Nodegroup called critical for critical jobs, each in one AZ, this nodegroup use on-demand instances
-
Three Managed Nodegroup called non-critical for non-critical jobs, each in one AZ, this nodegroup use spot instances
-
Three Managed Nodegroup called notebook-driver for non-critical jobs, each in one AZ, this nodegroup use on-demand instances to have a stable driver.
-
Three Managed Nodegroup called notebook-executor for non-critical jobs, each in one AZ, this nodegroup use spot instances instances for executors.
-
Enable EKS Cluster to be with with EMR on EKS service
-
EMR Virtual Cluster called
batchjob, used to submitted jobs -
EMR Virtual Cluster called
emrvcplatform, used to submitted jobs -
EMR Studio called
platform -
A
managed endpoint, calledplatform-myendpoint, to use with Jupyter notebooks you will create in the EMR Studio -
Execution role to use when submitting jobs with EMR on EKS
start-job-run -
Execution role to use with managed endpoint.
-
pod templates stored in an S3 bucket called "EKS-CLUSTER-NAME-emr-eks-assets-ACCOUNT-ID-REGION"
Customize
The infrastructure described above is defined in emr-eks-app/lib/emr-eks-app-stack.ts. If you want to customize it you can change the values in it. For example, you can chose not to create the default nodegroup to use for jobs, in this case you can set the defaultNodeGroups parameter to false in the EmrEksCluster. You can also call the addEmrEksNodegroup method to define your own nodegroups with specific labels, instances or taints. The addEmrEksNodegroup method is defined here.
You can also create your own execution role through the createExecutionRole method or create a managed endpoint to attach it to an EMR Studio you deployed outside of the ARA library.
In order to simplify this example we use IAM authentication with IAM user for EMR Studio. If you would like to use a user in the AWS IAM Identity Center you can change studioAuthMode in the NotebookPlatform construct. Below you will can see the code snippet that you need to change.
const notebookPlatform = new ara.NotebookPlatform(this, 'platform-notebook', {
emrEks: emrEks,
eksNamespace: 'dataanalysis',
studioName: 'platform',
studioAuthMode: ara.StudioAuthMode.IAM,
});
Deploy
Before you run the solution, you MUST change the eksAdminRoleArn of the props object of EmrEksCluster in lib/emr-eks-app-stack.ts. This role allows you to interact manage EKS cluster and should have be allowed at least the IAM action eks:AccessKubernetesApi. You need to also change the identityName in the addUser method of the NotebookPlatform construct. The identityName MUST BE a valid IAM username that you use. Below you will can see the code snippet that you need to change.
notebookPlatform.addUser([{
identityName:'',
notebookManagedEndpoints: [{
emrOnEksVersion: 'emr-6.8.0-latest',
executionPolicy: emrEksPolicy,
managedEndpointName: 'myendpoint'
}],
}]);
Last you should also update the IAM policies passed to the createExecutionRole, if you want to process data that is in S3 buckets that you own.
Navigate into one of the example directories and run cdk synth --profile YOUR-AWS-PROFILE
cd examples/emr-eks-app
npm install
cdk synth --profile YOUR-AWS-PROFILE
Once the synth is completed you can deploy the infrastructrue with the following command:
cdk deploy
At the end of the deployment you will see output like follow:

In the output you will find job sample configurations with the best practices for Spark on Kubernetes like dynamicAllocation and pod collocation.
Job submission
In this example we will use the crittical-job job configuration to submit a job using that will compute pi using that is part of Spark distribution.
To submit a job we will use Below you use start-job-run command with AWS CLI.
Before you run the command below, make sure to change update the following parameters with the on created by your own deployment.
- <CLUSTER-ID> – The EMR virtual cluster ID, which you get from the AWS CDK output
- <SPARK-JOB-NAME> – The name of your Spark job
- <ROLE-ARN> – The execution role you created, which you get from the AWS CDK output
- <S3URI-CRITICAL-DRIVER> – The Amazon S3 URI of the driver pod template, which you get from the AWS CDK output
- <S3URI-CRITICAL-EXECUTOR> – The Amazon S3 URI of the executor pod template, which you get from the AWS CDK output
- <Log_Group_Name> – Your CloudWatch log group name
- <Log_Stream_Prefix> – Your CloudWatch log stream prefix
AWS CLI for start-job-run command
aws emr-containers start-job-run \
    --virtual-cluster-id CLUSTER-ID\
    --name=SPARK-JOB-NAME\
    --execution-role-arn ROLE-ARN \
    --release-label emr-6.8.0-latest \
    --job-driver '{
    "sparkSubmitJobDriver":{
        "entryPoint": "local:///usr/lib/spark/examples/src/main/python/pi.py"
    }
}' \
--configuration-overrides '{
    "applicationConfiguration": [
    {
        "classification": "spark-defaults",
        "properties": {
            "spark.hadoop.hive.metastore.client.factory.class": "com.amazonaws.glue.catalog.metastore.AWSGlueDataCatalogHiveClientFactory",
            "spark.sql.catalogImplementation": "hive",
            "spark.dynamicAllocation.enabled":"true",
            "spark.dynamicAllocation.minExecutors": "8",
            "spark.dynamicAllocation.maxExecutors": "40",
            "spark.kubernetes.allocation.batch.size": "8",
            "spark.executor.cores": "8",
            "spark.kubernetes.executor.request.cores": "7",
            "spark.executor.memory": "28G",
            "spark.driver.cores": "2",
            "spark.kubernetes.driver.request.cores": "2",
            "spark.driver.memory": "6G",
            "spark.dynamicAllocation.executorAllocationRatio": "1",
            "spark.dynamicAllocation.shuffleTracking.enabled": "true",
            "spark.dynamicAllocation.shuffleTracking.timeout": "300s",
            "spark.kubernetes.driver.podTemplateFile": "s3://EKS-CLUSTER-NAME-emr-eks-assets-ACCOUNT-ID-REGION/EKS-CLUSTER-NAME/pod-template/critical-driver.yaml",
            "spark.kubernetes.executor.podTemplateFile": "s3://EKS-CLUSTER-NAME-emr-eks-assets-ACCOUNT-ID-REGION/EKS-CLUSTER-NAME/pod-template/critical-executor.yaml"
        }
    }
    ],
    "monitoringConfiguration": {
        "cloudWatchMonitoringConfiguration": {
            "logGroupName": "Log_Group_Name",
            "logStreamNamePrefix": "Log_Stream_Prefix"
        }
    }
}'
Verify the job execution
kubectl get pods --namespace=batchjob -w
Interactive session
To use an interactive session, you should log in to the EMR Studio instance with the URL provided to you at the end of cdk deploy.
This link will be in the form of https://es-xxxxx/emrstudio-prod-REGION.amazonaws.com.
Once you click on the link you will be see a log in page where you MUST sign-in with the username provided to the addUser method. When you sign in you should follow these steps.
- Create workspace, this will start for a Jupyter notebook
- Connect to the Jupter notebook
- Attach to a Virtual cluster, this would be have the following name "emrvcplatform" and chose an endpoint called "platform-myendpoint"
- Open a notebook and select the PySpark kernel
- You are now ready to perform analyse your data with Spark running on EMR on EKS.
Cleanup
To clean up your environment, you call the command below. This will destroy the EKS cluster with Node groups and VPC
cdk destroy
To avoid unwanted charges to your AWS account, delete all the AWS resources created during this deployment