Deployment
Step 1. (Option 1) Launch the stack in AWS Regions
Important
The following deployment instructions apply to AWS Regions only. For deployment in AWS China Regions, refer to Option 2.
Deploy the AWS CloudFormation template for Option 1 – AWS Regions
Note
You are responsible for the cost of the AWS services used while running this solution. For more details, visit the Cost section in this guide, and refer to the pricing webpage for each AWS service used in this solution.
-
Sign in to the AWS Management Console and select the button to launch the
DataTransferHub-cognito.templateAWS CloudFormation template. Alternatively, you can download the template as a starting point for your own implementation.
-
The template launches in the US East (N. Virginia) Region by default. To launch the solution in a different AWS Region, use the Region selector in the console navigation bar.
-
On the Create stack page, verify that the correct template URL is in the Amazon S3 URL text box and choose Next.
-
On the Specify stack details page, assign a name to your solution stack. For information about naming character limitations, refer to IAM and and AWS STS quotas in the AWS Identity and Access Management User Guide.
-
Under Parameters, review the parameters for this solution template and modify them as necessary. This solution uses the following default values.
Parameter Default Description AdminEmail <Requires input> The email of the Admin user. -
Choose Next.
-
On the Configure Stack Options page, keep the default values and choose Next.
-
On the Review page, review and confirm the settings. Check the box acknowledging that the template will create AWS Identity and Access Management (IAM) resources.
-
Choose Create stack to deploy the stack.
You can view the status of the stack in the AWS CloudFormation console in the Status column. You should receive a CREATE_COMPLETE status in approximately 15 minutes.
Step 1. (Option 2) Launch the stack in AWS China Regions
Important
The following deployment instructions apply to AWS China Regions only. For deployment in AWS Regions, refer to Option 1.
Prerequisites
- Create an OIDC user pool.
- Configure domain name service (DNS) resolution.
- Make sure a domain registered by ICP is available.
Prerequisite 1: Create an OIDC user pool
In AWS Regions where Amazon Cognito is not yet available, you can use OIDC to provide authentication. The following procedure uses AWS Partner Authing as an example, but you can also choose any available provider.
- Go to the Authing console.
- Create a new user pool if you don't have one.
- Select the user pool.
- On the left navigation bar, select Self-built App under Applications.
- Click the Create button.
- Enter the Application Name, and Subdomain.
-
Save the
App ID(that is,client_id) andIssuerto a text file from Endpoint Information, which will be used later.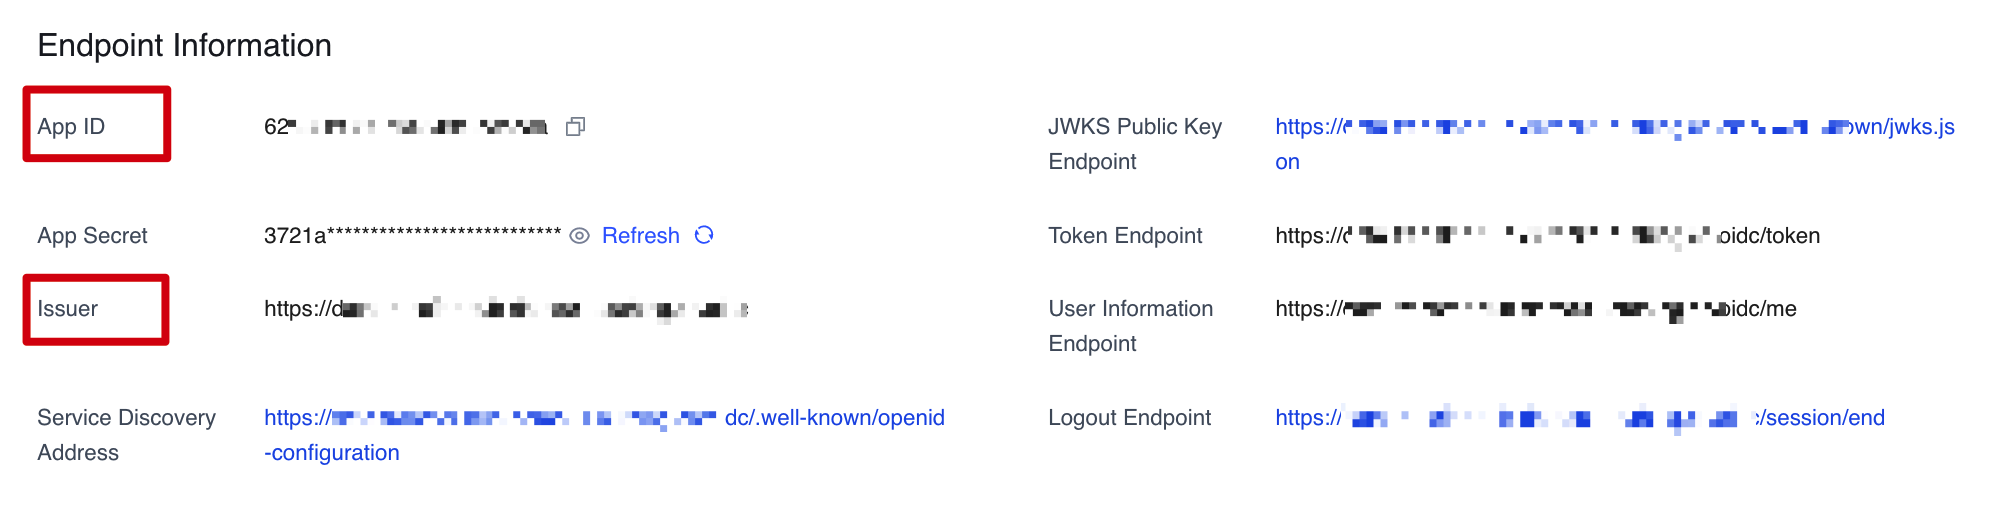
-
Update the
Login Callback URLandLogout Callback URLto your ICP recorded domain name.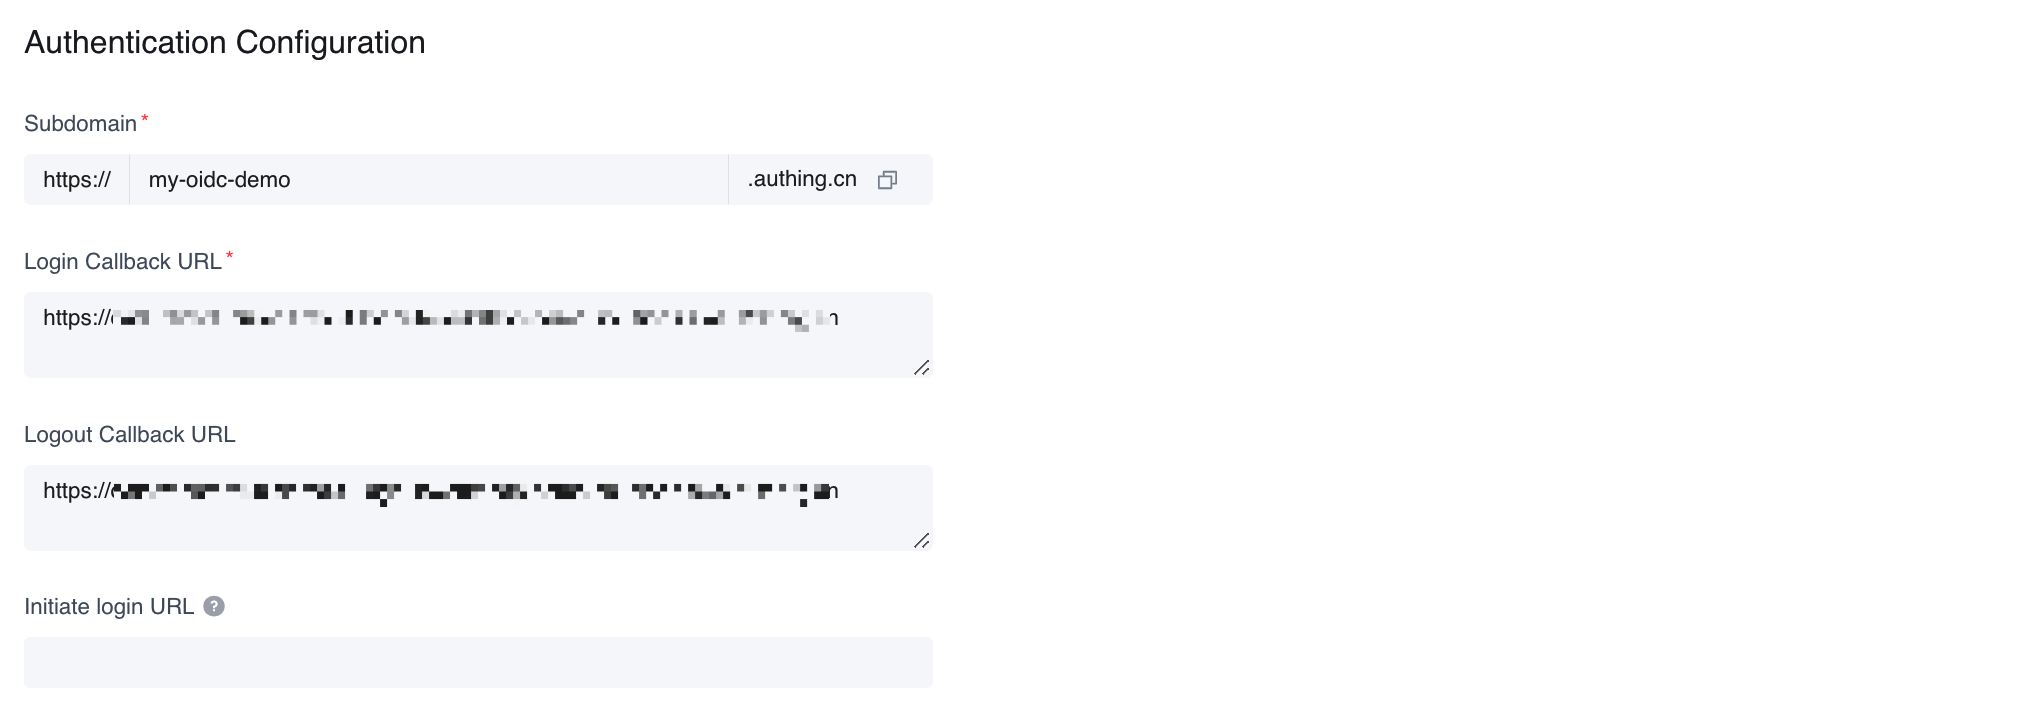
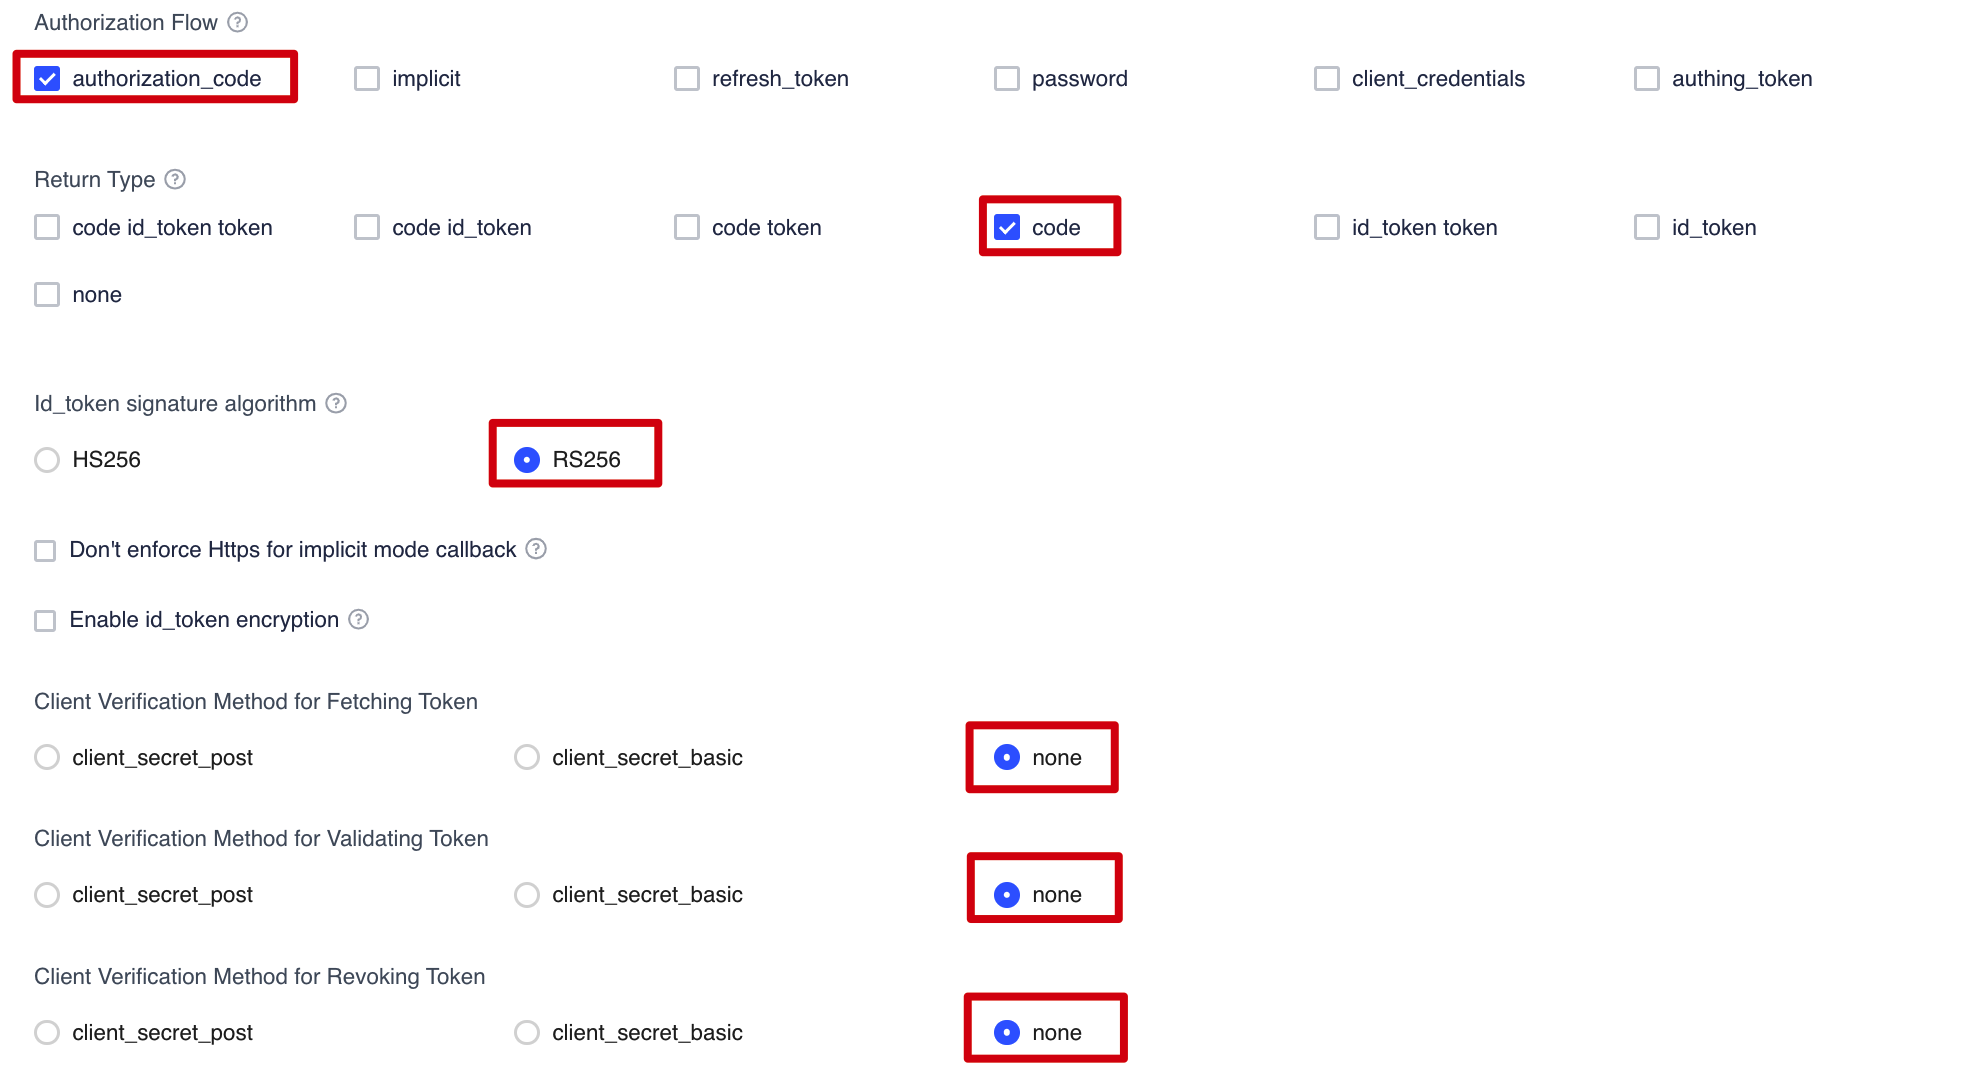
-
Set the Authorization Configuration.
-
Update login control.
- Select and enter the Application interface from the left sidebar, select Login Control, and then select Registration and Login.
- Please select only Password Login: Email for the login method.
- Please uncheck all options in the registration method.
- Select Save.
-
Create an admin user.
- From Users & Roles, select Users, then choose Create user.
- Enter the email for the user.
- Choose OK.
- Check the email for a temporary password.
- Reset the user password.
Note
Because this solution does not support application roles, all the users will receive admin rights.
Prerequisite 2: Configure domain name service resolution
Configure domain name service (DNS) resolution to point the ICP licensed domain to the CloudFront default domain name. Optionally, you can use your own DNS resolver.
The following is an example for configuring an Amazon Route 53.
-
Create a hosted zone in Amazon Route 53. For more information, refer to the Amazon Route 53 Developer Guide.
-
Create a CNAME record for the console URL.
- From the hosted zone, choose Create Record.
- In the Record name input box, enter the host name.
- From Record type select CNAME.
- In the value field, enter the CloudFormation output PortalUrl.
- Select Create records.
-
Add alternative domain names to the CloudFront distribution.
- Configure the corresponding domain name in CloudFront to open the CloudFront console by finding the distribution ID for PortalURL in the list and selecting ID (or check the check box, and then select Distribution Settings).
- Click Edit, and add the record of Route 53 in the previous step to the
Alternate Domain Name (CNAME).
Deploy the AWS CloudFormation template for Option 2 – AWS China Regions
This automated AWS CloudFormation template deploys Data Transfer Hub in the AWS Cloud. You must Create an ODIC User Pool and Configure DNS resolution before launching the stack.
Note
You are responsible for the cost of the AWS services used while running this solution. For more details, visit the Cost section in this guide, and refer to the pricing webpage for each AWS service used in this solution.
-
Sign in to the AWS Management Console and select the button to launch the
DataTransferHub-openid.templateAWS CloudFormation template. Alternatively, you can download the template as a starting point for your own implementation. -
The template launches in your console’s default Region. To launch the solution in a different AWS Region, use the Region selector in the console navigation bar.
-
On the Create stack page, verify that the correct template URL is in the Amazon S3 URL text box and choose Next.
-
On the Specify stack details page, assign a name to your solution stack. For information about naming character limitations, refer to IAM and AWS STS quotas in the AWS Identity and Access Management User Guide.
-
Under Parameters, review the parameters for this solution template and modify them as necessary. This solution uses the following default values.
Parameter Default Description OidcProvider <Requires input> Refers to the Issuer shown in the OIDC application configuration. OidcClientId <Requires input> Refers to the App ID shown in the OIDC application configuration. OidcCustomerDomain <Requires input> Refers to the customer domain that has completed ICP registration in China, not the subdomain provided by Authing.
It must start withhttps://.AdminEmail <Requires input> Refers to the email for receiving task status alarm. -
Choose Next.
-
On the Configure Stack Options page, keep the default values and choose Next.
-
On the Review page, review and confirm the settings. Check the box acknowledging that the template will create AWS Identity and Access Management (IAM) resources.
-
Choose Create Stack to deploy the stack.
You can view the status of your stack in the AWS CloudFormation console in the Status column. You should receive a CREATE_COMPLETE status in approximately 15 minutes.
Step 2. Launch the web console
After the stack is successfully created, navigate to the CloudFormation Outputs tab and select the PortalUrl value to access the Data Transfer Hub web console.
After successful deployment, an email containing the temporary login password will be sent to the email address provided.
Depending on the region where you start the stack, you can choose to access the web console from the AWS China Regions or the AWS Regions.
- Log in with Amazon Cognito User Pool (for AWS Regions)
- Log in with OpenID using Authing.cn (for AWS China Regions)
(Option 1) Log in using Amazon Cognito user pool for AWS Regions
-
Using a web browser, enter the PortalURL from the CloudFormation Output tab, then navigate to the Amazon Cognito console.
-
Sign in with the AdminEmail and the temporary password.
- Set a new account password.
- (Optional) Verify your email address for account recovery.
- After the verification is complete, the system opens the Data Transfer Hub web console.
(Option 2) OpenID authentication for AWS China Regions
- Using a web browser, enter the Data Transfer Hub domain name.
- If you are logging in for the first time, the system will open the Authing.cn login interface.
- Enter the username and password you registered when you deployed the solution, then choose Login. The system opens the Data Transfer Hub web console.
- Change your password and then sign in again.
Step 3. Create a transfer task
Use the web console to create a transfer task for Amazon S3 or Amazon ECR. For more information, refer to Create Amazon S3 Transfer Task and Create Amazon ECR Transfer Task.
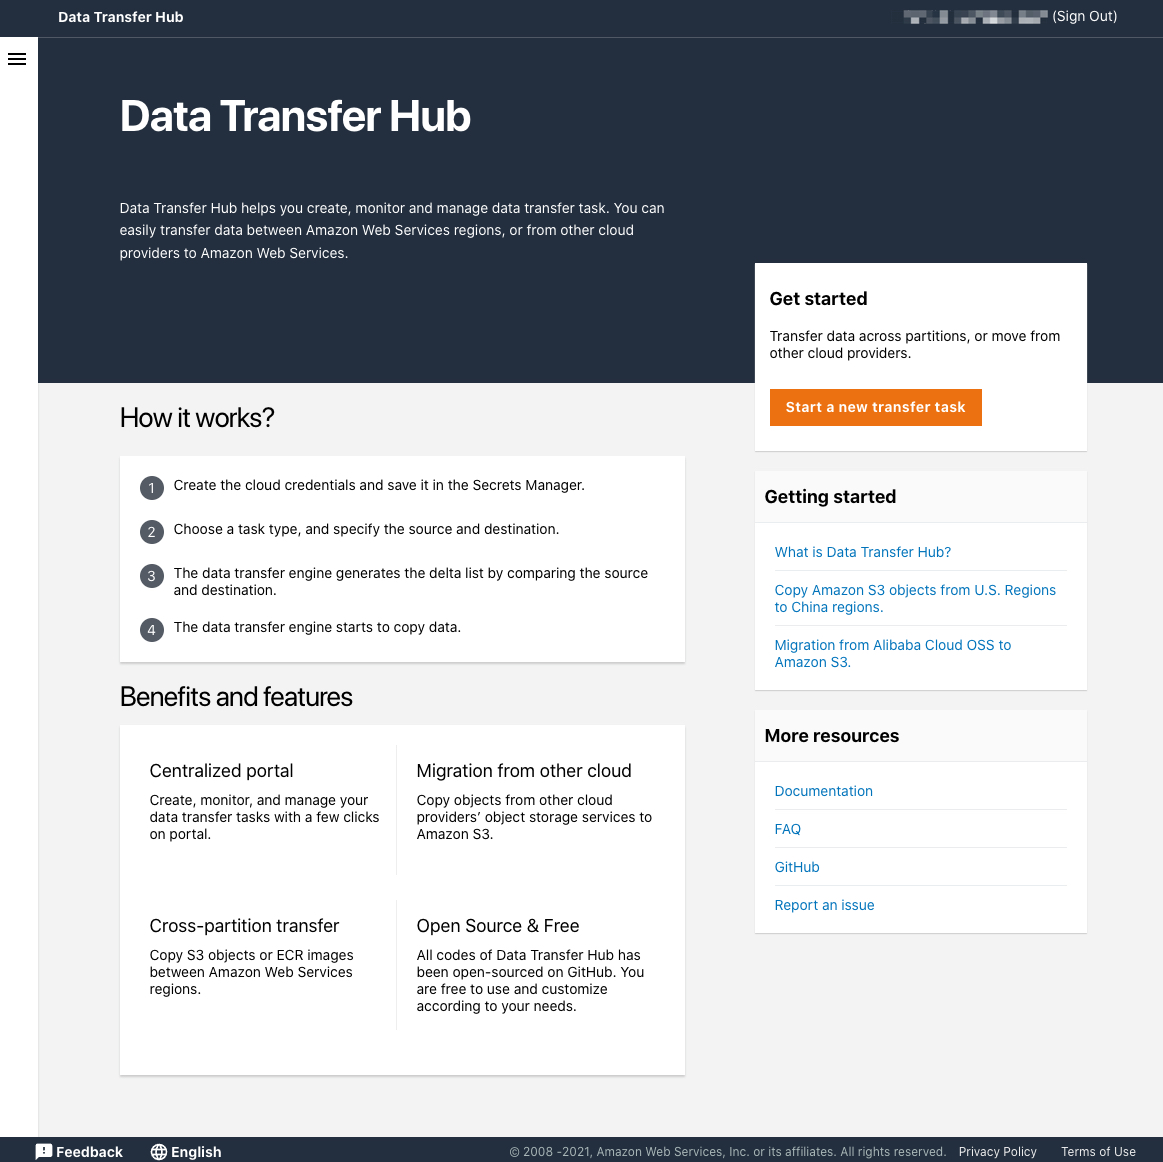
Data Transfer Hub web console