Create Amazon S3 transfer task
The solution allows you to create an Amazon S3 transfer task in the following ways:
You can make your choice according to your needs.
-
The web console provides an intuitive user interface where you can start, clone or stop a data transfer task with a simple click. The frontend also provides metric monitoring and logging view, so you do not need to switch between different pages.
-
The S3 plugin is a standalone CloudFormation template, and you can easily integrate it into your workflows. Because this option allows deployment without the frontend, it is useful if you want to deploy in AWS China Regions but do not have an ICP licensed domain.
-
AWS CLI can quickly initiate data transfer tasks. Select this option if you want to leverage Data Transfer Hub in your automation scripts.
Using the web console
You can use the web console to create an Amazon S3 transfer task. For more information about how to launch the web console, see deployment.
-
From the Create Transfer Task page, select Start a New Task, and then select Next.
-
From the Engine options page, under engine, select Amazon S3, and then choose Next Step.
-
Specify the transfer task details.
- Under Source Type, select the data source, for example, Amazon S3.
-
Enter bucket name and choose to sync Full Bucket or Objects with a specific prefix or Objects with different prefixes.
- If the data source bucket is also in the account deployed by the solution, please select Yes.
- If you need to achieve real-time incremental data synchronization, please configure whether to enable S3 event notification. Note that this option can only be configured when the program and your data source are deployed in the same area of the same account.
- If you do not enable S3 event notification, the program will periodically synchronize incremental data according to the scheduling frequency you configure in the future.
- If the source bucket is not in the same account where Data Transfer Hub was deployed, select No, then specify the credentials for the source bucket.
- If you choose to synchronize objects with multiple prefixes, please transfer the prefix list file separated by rows to the root directory of the Data Transfer Hub central bucket, and then fill in the name of the file. For details, please refer to Multi-Prefix List Configuration Tutorial。
- If the data source bucket is also in the account deployed by the solution, please select Yes.
-
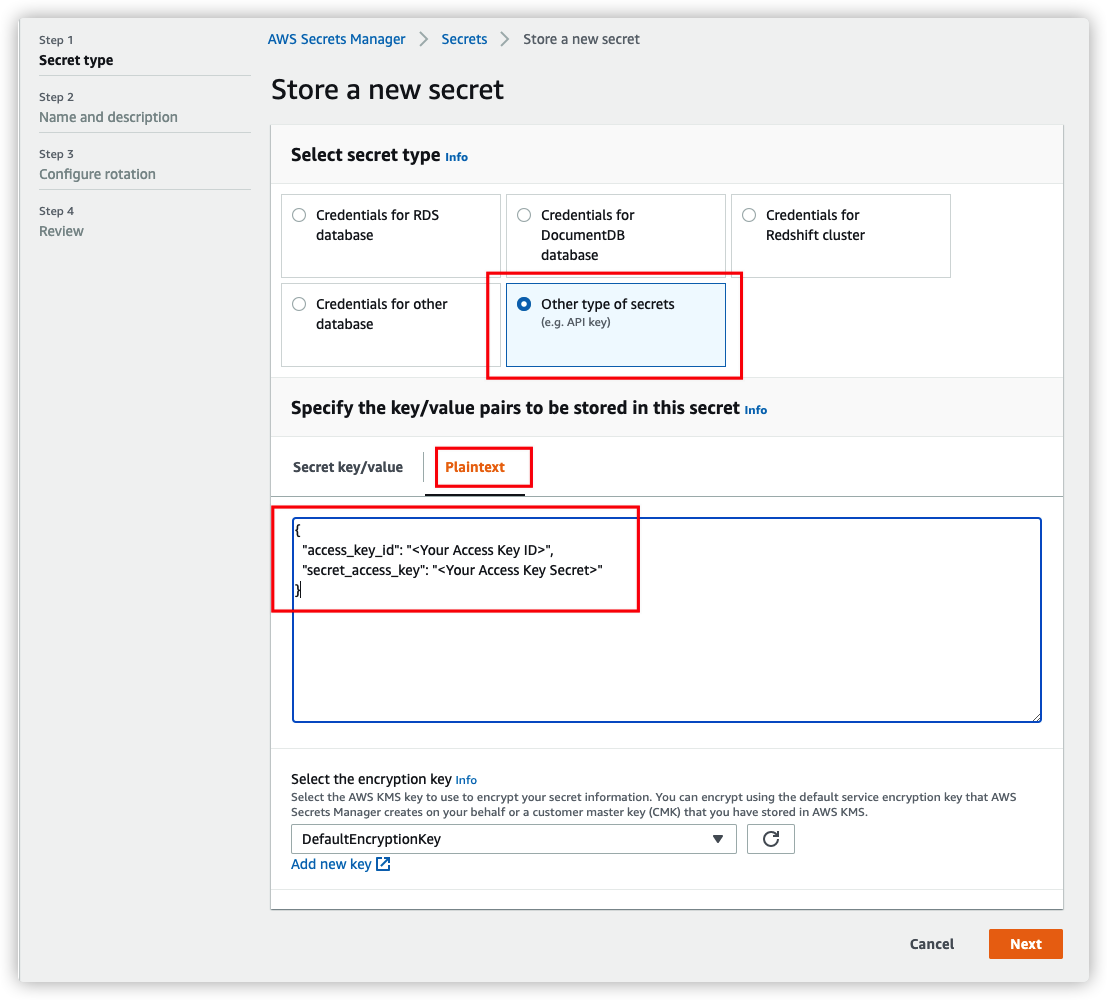
To create credential information, select Secrets Manager to jump to the AWS Secrets Manager console in the current region.
- From the left menu, select Secrets, then choose Store a new secret and select the other type of secrets key type.
- Fill in the
access_key_idandsecret_access_keyinformation in the Plaintext input box according to the following format. For more information, refer to IAM features in the IAM User Guide. Choose Next.{ "access_key_id": "<Your Access Key ID>", "secret_access_key": "<Your Access Key Secret>" } - (Optional) Enter the key name and description. Choose Next.
- In the configuration of automatic rotation, select Disable automatic rotation. Choose Next.
- Keep the default value and choose Save to complete the creation of the key.
- Navigate back to the Data Transfer Hub task creation interface and refresh the interface. Your new secret is displayed in the drop-down list.
- Select the certificate (Secret).
-
Provide destination settings for the S3 buckets.
Note
If the source S3 bucket is in the same account where Data Transfer Hub was deployed, then in destination settings, you must create or provide credential information for the S3 destination bucket. Otherwise, no credential information is needed. Use the following steps to update the destination settings.
-
From Engine settings, verify the values and modify them if necessary. We recommend to have the minimum capacity set to at least 1 if for incremental data transfer.
-
At Task Scheduling Settings, select your task scheduling configuration.
- If you want to configure the timed task at a fixed frequency to compare the data difference on both sides of the time, select Fixed Rate.
- If you want to configure a scheduled task through Cron Expression to achieve a scheduled comparison of data differences on both sides, select Cron Expression.
- If you only want to perform the data synchronization task once, select One Time Transfer.
-
From Advanced Options, keep the default values.
-
At Need Data Comparison before Transfer, select your task configuration.
- If you want to skip the data comparison process and transfer all files, please select No.
- If you only want to synchronize files with differences, please select Yes.
-
Enter an email address in Alarm Email.
-
Choose Next and review your task parameter details.
-
Choose Create Task.
After the task is created successfully, it will appear on the Tasks page.
Note
If your destination bucket in Amazon S3 is set to require all data uploads to be encrypted with Amazon S3 managed keys. You can check the tutorial below.
Destination bucket encrypted with Amazon S3 managed keys
Select "SSE-S3 AES256" from the dropdown menu under 'Destination bucket policy check' in the destination's configuration. For more information, refer to this documentation.
If your destination bucket is set to require that objects be encrypted using only SSE-KMS (Server-Side Encryption with AWS Key Management Service), which is detailed in this documentation, and your policy looks something like the example provided:
{
"Version": "2012-10-17",
"Id": "PutObjectPolicy",
"Statement": [
{
"Sid": "DenyIncorrectEncryptionHeader",
"Effect": "Deny",
"Principal": "*",
"Action": "s3:PutObject",
"Resource": "arn:aws-cn:s3:::dth-sse-debug-cn-north-1/*",
"Condition": {
"StringNotEquals": {
"s3:x-amz-server-side-encryption": "aws:kms"
}
}
},
{
"Sid": "DenyUnencryptedObjectUploads",
"Effect": "Deny",
"Principal": "*",
"Action": "s3:PutObject",
"Resource": "arn:aws-cn:s3:::dth-sse-debug-cn-north-1/*",
"Condition": {
"StringNotEquals": {
"s3:x-amz-server-side-encryption-aws-kms-key-id": "arn:aws-cn:kms:cn-north-1:123456789012:key/7c54749e-eb6a-42cc-894e-93143b32e7c0"
}
}
}
]
}
In this case, you should select "SSE-KMS" in the 'Destination bucket policy check' dropdown menu in the destination's configuration. Additionally, you need to provide the KMS Key ID, such as "7c54749e-eb6a-42cc-894e-93143b32e7c0" in the example.
Using the S3 plugin
Note
This tutorial provides guidance for the backend-only version. For more details, please refer to S3 Plugin Introduction.
Step 1. Prepare VPC
This solution can be deployed in both public and private subnets. Using public subnets is recommended.
-
If you want to use existing VPC, please make sure the VPC has at least 2 subnets, and both subnets must have public internet access (Either public subnets with internet gateway or private subnets with NAT gateway).
-
If you want to create new default VPC for this solution, please go to Step 2 and make sure you have Create a new VPC for this cluster selected when you create the cluster.
Step 2. Configure credentials
You need to provide AccessKeyID and SecretAccessKey (namely AK/SK) to read or write bucket in S3 from or to another AWS account or other cloud storage service, and the credential will be stored in AWS Secrets Manager. You DON'T need to create credential for the bucket in the current account where you are deploying the solution.
Go to AWS Management Console > Secrets Manager. From Secrets Manager home page, click Store a new secret. For secret type, please use Other type of secrets. For key/value paris, please copy and paste below JSON text into the Plaintext section, and change value to your AK/SK accordingly.
{
    "access_key_id": "<Your Access Key ID>",
    "secret_access_key": "<Your Access Key Secret>"
}
Click Next to specify a secret name, and click Create in the last step.
If the AK/SK is for source bucket, READ access to bucket is required; if it's for destination bucket, READ and WRITE access to bucket is required. For Amazon S3, you can refer to Set up credentials for Amazon S3.
Step 3. Launch AWS Cloudformation Stack
Please follow below steps to deploy this solution via AWS Cloudformation.
-
Sign in to AWS Management Console, and switch to the Region where you want to deploy the CloudFormation Stack.
-
Click the following button to launch the CloudFormation Stack.
- For AWS China Regions

- For AWS Global Regions
- For AWS GovCloud (US) Regions
-
Click Next. Specify values to parameters accordingly. Change the stack name if required.
-
Click Next. Configure additional stack options such as tags (Optional).
-
Click Next. Review and confirm acknowledgement, and then click Create Stack to start the deployment.
The deployment will take approximately 3 to 5 minutes.
Using AWS CLI
You can use the AWS CLI to create an Amazon S3 transfer task. Note that if you have deployed the DTH Portal at the same time, the tasks started through the CLI will not appear in the Task List on your Portal.
-
Create an Amazon VPC with two public subnets or two private subnets with NAT gateway.
-
Replace
<CLOUDFORMATION_URL>as shown below.https://solutions-reference.s3.amazonaws.com/data-transfer-hub/latest/DataTransferS3Stack.template -
Go to your terminal and enter the following command. For the parameter details, refer to the Parameters table.
Parametersaws cloudformation create-stack --stack-name dth-s3-task --template-url CLOUDFORMATION_URL \ --capabilities CAPABILITY_NAMED_IAM \ --parameters \ ParameterKey=alarmEmail,ParameterValue=your_email@example.com \ ParameterKey=destBucket,ParameterValue=dth-receive-cn-north-1 \ ParameterKey=destPrefix,ParameterValue=test-prefix \ ParameterKey=destCredentials,ParameterValue=drh-cn-secret-key \ ParameterKey=destInCurrentAccount,ParameterValue=false \ ParameterKey=destRegion,ParameterValue=cn-north-1 \ ParameterKey=destStorageClass,ParameterValue=STANDARD \ ParameterKey=destPutObjectSSEType,ParameterValue=None \ ParameterKey=destPutObjectSSEKmsKeyId,ParameterValue= \ ParameterKey=srcBucket,ParameterValue=dth-us-west-2 \ ParameterKey=srcInCurrentAccount,ParameterValue=true \ ParameterKey=srcCredentials,ParameterValue= \ ParameterKey=srcRegion,ParameterValue=us-west-2 \ ParameterKey=srcPrefix,ParameterValue=case1 \ ParameterKey=srcType,ParameterValue=Amazon_S3 \ ParameterKey=ec2VpcId,ParameterValue=vpc-040bbab85f0e4e088 \ ParameterKey=ec2Subnets,ParameterValue=subnet-0d1bf2725ab8e94ee\\,subnet-06d17b2b3286be40e \ ParameterKey=finderEc2Memory,ParameterValue=8 \ ParameterKey=ec2CronExpression,ParameterValue="0/60 * * * ? *" \ ParameterKey=includeMetadata,ParameterValue=false \ ParameterKey=srcEvent,ParameterValue=No \ ParameterKey=maxCapacity,ParameterValue=20 \ ParameterKey=minCapacity,ParameterValue=1 \ ParameterKey=desiredCapacity,ParameterValue=1
| Parameter Name | Allowed Value | Default Value | Description |
|---|---|---|---|
| alarmEmail | An email to which errors will be sent | ||
| desiredCapacity | 1 | Desired capacity for Auto Scaling Group | |
| destAcl | private public-read public-read-write authenticated-read aws-exec-read bucket-owner-read bucket-owner-full-control |
bucket-owner-full-control | Destination access control list |
| destBucket | Destination bucket name | ||
| destCredentials | Secret name in Secrets Manager used to keep AK/SK credentials for destination bucket. Leave it blank if the destination bucket is in the current account | ||
| destInCurrentAccount | true false |
true | Indicates whether the destination bucket is in current account. If not, you should provide a credential with read and write access |
| destPrefix | Destination prefix (Optional) | ||
| destRegion | Destination region name | ||
| destStorageClass | STANDARD STANDARD_IA ONEZONE_IA INTELLIGENT_TIERING |
INTELLIGENT_TIERING | Destination storage class, which defaults to INTELLIGENT_TIERING |
| destPutObjectSSEType | None AES256 AWS_KMS |
None | Specifies the server-side encryption algorithm used for storing objects in Amazon S3. 'AES256' applies AES256 encryption, 'AWS_KMS' uses AWS Key Management Service encryption, and 'None' indicates that no encryption is applied. |
| destPutObjectSSEKmsKeyId | Specifies the ID of the symmetric customer managed AWS KMS Customer Master Key (CMK) used for object encryption. This parameter should only be set when destPutObjectSSEType is set to 'AWS_KMS'. If destPutObjectSSEType is set to any value other than 'AWS_KMS', please leave this parameter empty. The default value is not set. | ||
| isPayerRequest | true false |
false | Indicates whether to enable payer request. If true, it will get object in payer request mode. |
| ec2CronExpression | 0/60 * * * ? * | Cron expression for EC2 Finder task "" for one time transfer. |
|
| finderEc2Memory | 8 16 32 64 128 256 |
8 GB | The amount of memory (in GB) used by the Finder task. |
| ec2Subnets | Two public subnets or two private subnets with NAT gateway | ||
| ec2VpcId | VPC ID to run EC2 task, for example, vpc-bef13dc7 | ||
| finderDepth | 0 | Depth of sub folders to compare in parallel. 0 means comparing all objects in sequence | |
| finderNumber | 1 | The number of finder threads to run in parallel | |
| includeMetadata | true false |
false | Indicates whether to add replication of object metadata. If true, there will be additional API calls. |
| maxCapacity | 20 | Maximum capacity for Auto Scaling Group | |
| minCapacity | 1 | Minimum capacity for Auto Scaling Group | |
| srcBucket | Source bucket name | ||
| srcCredentials | Secret name in Secrets Manager used to keep AK/SK credentials for Source Bucket. Leave it blank if source bucket is in the current account or source is open data | ||
| srcEndpoint | Source Endpoint URL (Optional). Leave it blank unless you want to provide a custom Endpoint URL | ||
| srcEvent | No Create CreateAndDelete |
No | Whether to enable S3 Event to trigger the replication. Note that S3Event is only applicable if source is in the current account |
| srcInCurrentAccount | true false |
false | Indicates whether the source bucket is in the current account. If not, you should provide a credential with read access |
| srcPrefix | Source prefix (Optional) | ||
| srcPrefixListBucket | Source prefix list file S3 bucket name (Optional). It used to store the Source prefix list file. The specified bucket must be located in the same AWS region and under the same account as the DTH deployment. If your PrefixList File is stored in the Source Bucket, please leave this parameter empty. | ||
| srcPrefixsListFile | Source prefix list file S3 path (Optional). It supports txt type, for example, my_prefix_list.txt, and the maximum number of lines is 10 millions | ||
| srcRegion | Source region name | ||
| srcSkipCompare | true false |
false | Indicates whether to skip the data comparison in task finding process. If yes, all data in the source will be sent to the destination |
| srcType | Amazon_S3 Aliyun_OSS Qiniu_Kodo Tencent_COS |
Amazon_S3 | If you choose to use the Endpoint mode, please select Amazon_S3. |
| workerNumber | 1 ~ 10 | 4 | The number of worker threads to run in one worker node/instance. For small files (size < 1MB), you can increase the number of workers to improve the transfer performance. |
How to transfer S3 object from KMS encrypted Amazon S3
By default, Data Transfer Hub supports data source bucket using SSE-S3 and SSE-KMS.
If your source bucket enabled SSE-CMK, you need to create an IAM Policy and attach it to DTH worker and finder node. You can go to Amazon IAM Roles Console and search for <StackName>-FinderStackFinderRole<random suffix> and <StackName>-EC2WorkerStackWorkerAsgRole<random suffix>.
Pay attention to the following:
- Change the
Resourcein KMS part to your own KMS key's Amazon Resource Name (ARN). - For S3 buckets in AWS China Regions, make sure to use
arn:aws-cn:kms:::instead ofarn:aws:kms:::.
{
    "Version": "2012-10-17",
    "Statement": [
        {
            "Sid": "VisualEditor0",
            "Effect": "Allow",
            "Action": [
                "kms:Decrypt",
                "kms:Encrypt",
                "kms:ReEncrypt*",
                "kms:GenerateDataKey*",
                "kms:DescribeKey"
            ],
            "Resource": [
                "arn:aws:kms:us-west-2:123456789012:key/f5cd8cb7-476c-4322-ac9b-0c94a687700d <Please replace this with your own KMS key arn>"
            ]
        }
    ]
}