Transfer S3 object via Direct Connect
This tutorial describes how to use Data Transfer Hub (DTH) via Direct Connect (DX).
When the DTH worker node and finder node start to work, they need to download related assets (such as CloudWatch agent, DTH CLI) from the internet by default. In an isolated network, you need to manually download and upload these files to an S3 bucket in the region where DTH is deployed.
You have two options to use DTH to transfer data via DX:
- Use DTH to transfer data via DX in a non-isolated network
- Use DTH to transfer data via DX in an isolated network
Use DTH to transfer data via DX in a non-isolated network
In this scenario, DTH is deployed in the destination side and within a VPC with public access (has Internet Gateway or NAT), and the source bucket is in the isolated network.
Note
As DTH deployment VPC has public internet access (IGW or NAT), EC2 worker/finder nodes can access other AWS services used by DTH such as secret managers and download related assets (such as CloudWatch agent, DTH CLI) from internet without any changes.
-
From the Create Transfer Task page, select Create New Task, and then select Next.
-
From the Engine options page, under engine, select Amazon S3, and then choose Next Step.
-
Specify the transfer task details.
- Under Source Type, select the data source Amazon S3 Compatible Storage.
-
Enter endpoint url, which must be the interface endpoint url, such as
https://bucket.vpce-076205013d3a9a2ca-us23z2ze.s3.ap-east-1.vpce.amazonaws.com. You can find the specific url in VPC Endpoint Console DNS names part. -
Enter bucket name and choose to sync Full Bucket or Objects with a specific prefix or Objects with different prefixes.
-
Provide destination settings for the S3 buckets.
-
From Engine settings, verify the values and modify them if necessary. For incremental data transfer, we recommend to set the minimum capacity to at least 1.
-
At Task Scheduling Settings, select your task scheduling configuration.
- If you want to configure the timed task at a fixed frequency to compare the data difference on both sides of the time, select Fixed Rate.
- If you want to configure a scheduled task through Cron Expression to achieve a scheduled comparison of data differences on both sides, select Cron Expression.
- If you only want to perform the data synchronization task once, select One Time Transfer.
-
For Advanced Options, keep the default values.
-
At Need Data Comparison before Transfer, select your task configuration.
- If you want to skip the data comparison process and transfer all files, select No.
- If you only want to synchronize files with differences, select Yes.
-
In Alarm Email, provide an email address.
-
Choose Next and review your task parameter details.
-
Choose Create Task.
Use DTH to transfer data via DX in an isolated network
In this scenario, DTH is deployed in the destination side and within a VPC without public access (isolated VPC), and the source bucket is also in an isolated network. For details, refer to the tutorial.
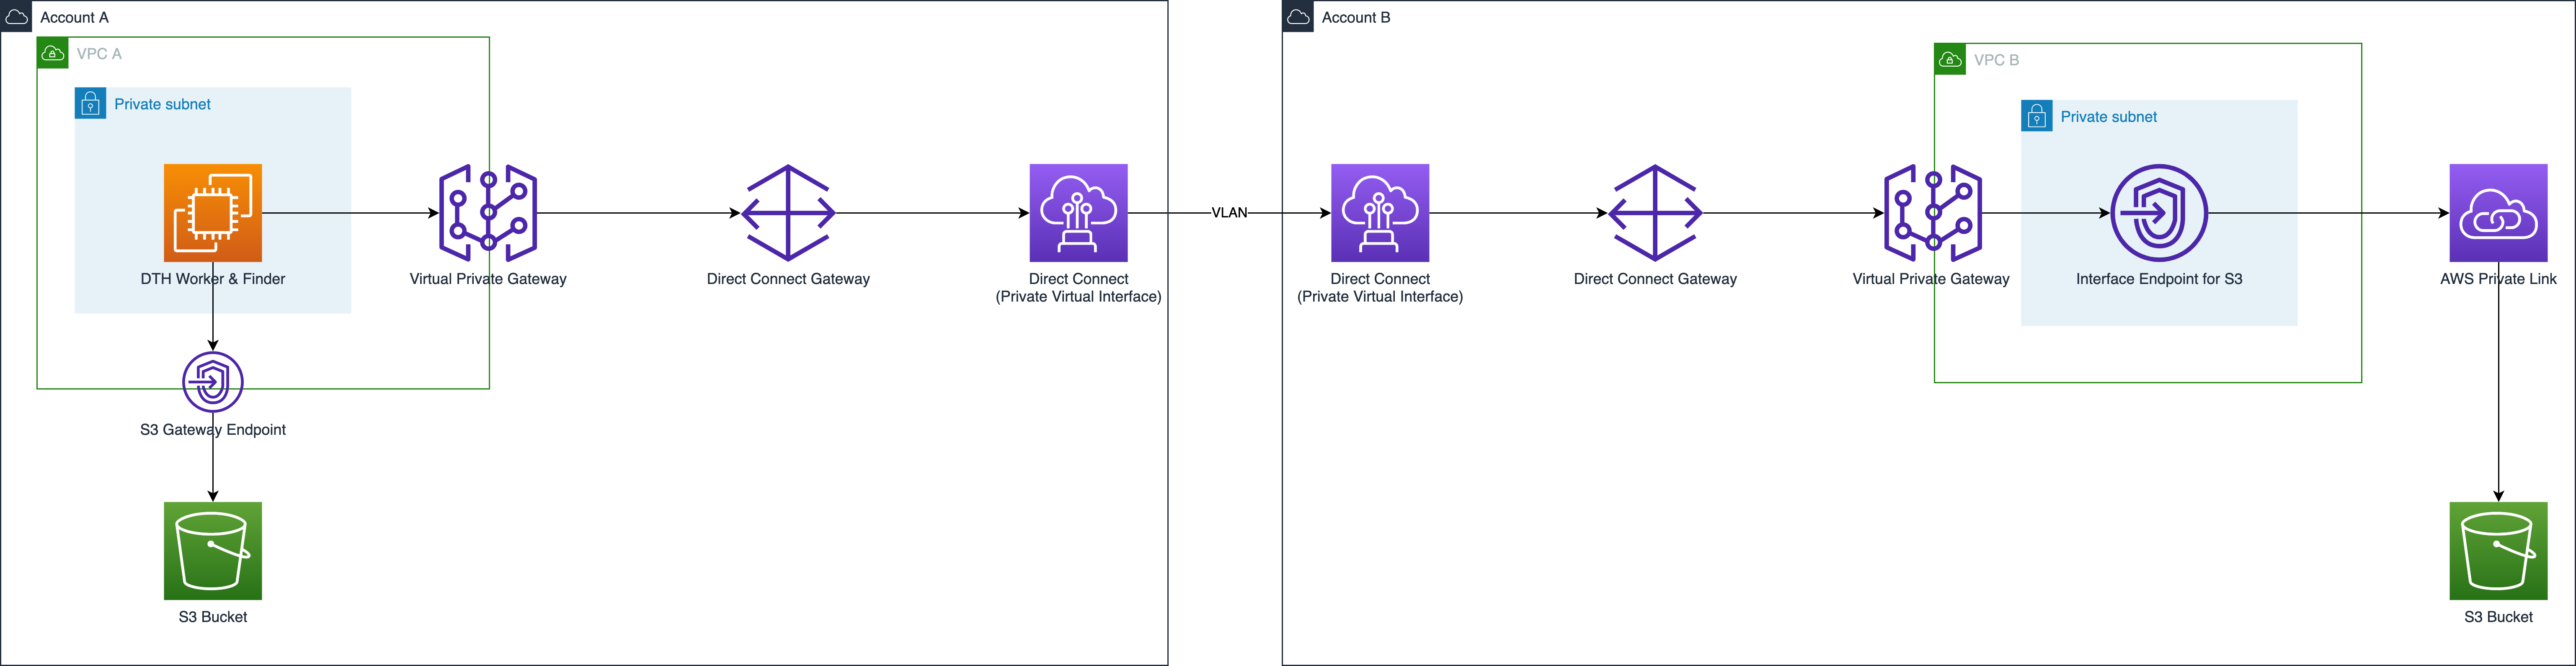
DTH worker nodes running on EC2 transfer data from bucket in one AWS account to bucket in another AWS account.
- To access bucket in the account where DTH is deployed, DTH worker nodes use S3 Gateway Endpoint
- To access bucket in another account, DTH worker nodes use S3 Private Link by S3 Interface Endpoint