

モノレポをセットアップする
タスク1: モノレポを作成する
Section titled “タスク1: モノレポを作成する”新しいモノレポを作成するには、任意のディレクトリ内で次のコマンドを実行してください:
pnpm create @aws/nx-workspace dungeon-adventure --iac=cdkyarn create @aws/nx-workspace dungeon-adventure --iac=cdknpm create @aws/nx-workspace -- dungeon-adventure --iac=cdkbun create @aws/nx-workspace dungeon-adventure --iac=cdkこれによりdungeon-adventureディレクトリ内にNXモノレポがセットアップされます。VSCodeでディレクトリを開くと、次のファイル構造が表示されます:
Directory.nx/
- …
Directory.vscode/
- …
Directorynode_modules/
- …
Directorypackages/ サブプロジェクトが配置される場所
- …
- .gitignore
- biome.json リンティングとフォーマット用のBiome設定
- nx.json Nx CLIとモノレポのデフォルト設定
- package.json すべてのNode依存関係をここで定義
- pnpm-lock.yaml または bun.lock, yarn.lock, package-lock.json(パッケージマネージャーに依存)
- pnpm-workspace.yaml pnpm使用時
- README.md
- tsconfig.base.json すべてのNodeベースサブプロジェクトがこれを継承
- tsconfig.json
- aws-nx-plugin.config.mts Nx Plugin for AWSの設定
これで@aws/nx-pluginを使用して様々なサブプロジェクトを作成できるようになりました。
タスク2: Game APIを作成する
Section titled “タスク2: Game APIを作成する”まず、Game APIを作成します。これを行うには、次の手順でGameApiというtRPC APIを作成します:
- インストール Nx Console VSCode Plugin まだインストールしていない場合
- VSCodeでNxコンソールを開く
- クリック
Generate (UI)"Common Nx Commands"セクションで - 検索
@aws/nx-plugin - ts#api - 必須パラメータを入力
- name: GameApi
- framework: trpc
- クリック
Generate
pnpm nx g @aws/nx-plugin:ts#api --name=GameApi --framework=trpc --no-interactiveyarn nx g @aws/nx-plugin:ts#api --name=GameApi --framework=trpc --no-interactivenpx nx g @aws/nx-plugin:ts#api --name=GameApi --framework=trpc --no-interactivebunx nx g @aws/nx-plugin:ts#api --name=GameApi --framework=trpc --no-interactive変更されるファイルを確認するためにドライランを実行することもできます
pnpm nx g @aws/nx-plugin:ts#api --name=GameApi --framework=trpc --no-interactive --dry-runyarn nx g @aws/nx-plugin:ts#api --name=GameApi --framework=trpc --no-interactive --dry-runnpx nx g @aws/nx-plugin:ts#api --name=GameApi --framework=trpc --no-interactive --dry-runbunx nx g @aws/nx-plugin:ts#api --name=GameApi --framework=trpc --no-interactive --dry-runファイルツリーに新しいファイルが表示されます。
ts#apiで更新されたファイル
以下はts#apiジェネレーターによって生成されたすべてのファイルのリストです。ファイルツリーで強調表示されている主要なファイルを確認します:
Directorypackages/
Directorycommon/
Directoryconstructs/
Directorysrc/
Directoryapp/ アプリ固有のCDKコンストラクト
Directoryapis/
- game-api.ts tRPC APIを作成するためのCDKコンストラクト
- index.ts
- …
- index.ts
Directorycore/ 汎用CDKコンストラクト
Directoryapi/
- rest-api.ts API Gateway Rest API用のベースCDKコンストラクト
- trpc-utils.ts tRPC API CDKコンストラクト用のユーティリティ
- utils.ts APIコンストラクト用のユーティリティ
- index.ts
- runtime-config.ts
- index.ts
- project.json
- …
Directorygame-api/ tRPC API
Directorysrc/
Directoryclient/ マシン間のTS呼び出しに通常使用されるバニラクライアント
- index.ts
Directorymiddleware/ Powertools計装
- error.ts
- index.ts
- logger.ts
- metrics.ts
- tracer.ts
Directoryschema/ APIの入力と出力の定義
- index.ts
- echo.ts サンプルの入力と出力スキーマ
- z-async-iterable.ts tRPCサブスクリプション出力用のラッパーZodスキーマ
Directoryprocedures/ APIプロシージャ/ルートの具体的な実装
- echo.ts サンプルプロシージャ実装
- index.ts
- init.ts コンテキストとミドルウェアをセットアップ
- handler.ts Lambdaハンドラーエントリーポイント(REST API用のレスポンスストリーミングを使用)
- local-server.ts tRPCサーバーをローカルで実行する際に使用
- router.ts tRPCルーターとすべてのプロシージャを定義
- project.json
- …
- vitest.workspace.ts
これらの主要ファイルを見てみましょう:
import { echo } from './procedures/echo.js';import { t } from './init.js';
export const router = t.router;
export const appRouter = router({  echo,});
export type AppRouter = typeof appRouter;ルーターはAPIのtRPCルーターを定義し、すべてのAPIメソッドを宣言する場所です。上記のように、./procedures/echo.tsファイルに実装があるechoというメソッドがあります。Lambdaハンドラーエントリーポイントはhandler.tsにあり、ジェネレーターによって自動的に設定されます。
import { publicProcedure } from '../init.js';import {  EchoInputSchema,  EchoOutputSchema,} from '../schema/echo.js';
export const echo = publicProcedure .input(EchoInputSchema) .output(EchoOutputSchema) .query((opts) => ({ result: opts.input.message }));このファイルはechoメソッドの実装であり、入力および出力データ構造を宣言することで厳密に型付けされています。
import { z } from 'zod';
export const EchoInputSchema = z.object({  message: z.string().max(1024),});
export type IEchoInput = z.TypeOf<typeof EchoInputSchema>;
export const EchoOutputSchema = z.object({  message: z.string().max(1024),});
export type IEchoOutput = z.TypeOf<typeof EchoOutputSchema>;すべてのtRPCスキーマ定義はZodを使用して定義され、z.TypeOf構文を介してTypeScript型としてエクスポートされます。
import { Construct } from 'constructs';import * as url from 'url';import { Distribution } from 'aws-cdk-lib/aws-cloudfront';import {  Code,  Runtime,  Function,  FunctionProps,  Tracing,} from 'aws-cdk-lib/aws-lambda';import {  AuthorizationType,  LambdaIntegration,  ResponseTransferMode,} from 'aws-cdk-lib/aws-apigateway';import { Aspects, Duration } from 'aws-cdk-lib';import {  PolicyDocument,  PolicyStatement,  Effect,  AnyPrincipal,  IGrantable,  Grant,} from 'aws-cdk-lib/aws-iam';import {  IntegrationBuilder,  RestApiIntegration,} from '../../core/api/utils.js';import { AddCorsPreflightAspect, RestApi } from '../../core/api/rest-api.js';import { Procedures, routerToOperations } from '../../core/api/trpc-utils.js';import { AppRouter, appRouter } from ':dungeon-adventure/game-api';
// すべてのAPI操作名の文字列ユニオン型type Operations = Procedures<AppRouter>;
/** * GameApiコンストラクトを作成するためのプロパティ * * @template TIntegrations - 操作名からそれらの統合へのマップ */export interface GameApiProps<  TIntegrations extends Record<Operations, RestApiIntegration>,> {  /**   * 操作名からそれらのAPI Gateway統合へのマップ   */  integrations: TIntegrations;}
/** * GameApi専用のAWS API Gateway REST APIを作成および設定するCDKコンストラクト * @template TIntegrations - 操作名からそれらの統合へのマップ */export class GameApi<  TIntegrations extends Record<Operations, RestApiIntegration>,> extends RestApi<Operations, TIntegrations> {  private allowedOrigins: readonly string[] = ['*'];
  /**   * すべての操作のデフォルト統合を作成します。各操作を   * 独自の個別のLambda関数として実装します。   *   * @param scope - CDKコンストラクトスコープ   * @returns デフォルトのLambda統合を持つIntegrationBuilder   */  public static defaultIntegrations = (scope: Construct) => {    return IntegrationBuilder.rest({      operations: routerToOperations(appRouter),      defaultIntegrationOptions: <FunctionProps>{        runtime: Runtime.NODEJS_LATEST,        handler: 'index.handler',        code: Code.fromAsset(          url.fileURLToPath(            new URL(              '../../../../../../dist/packages/game-api/bundle',              import.meta.url,            ),          ),        ),        timeout: Duration.seconds(30),        tracing: Tracing.ACTIVE,      },      buildDefaultIntegration: (op, props: FunctionProps) => {        const handler = new Function(scope, `GameApi${op}Handler`, props);        return {          handler,          integration: new LambdaIntegration(handler, {            responseTransferMode: ResponseTransferMode.STREAM,          }),        };      },    });  };
  constructor(    scope: Construct,    id: string,    props: GameApiProps<TIntegrations>,  ) {    super(scope, id, {      apiName: 'GameApi',      defaultMethodOptions: {        authorizationType: AuthorizationType.IAM,      },      deployOptions: {        tracingEnabled: true,      },      policy: new PolicyDocument({        statements: [          // ブラウザが認証されていないプリフライトリクエストを行えるようにOPTIONSを開放          new PolicyStatement({            effect: Effect.ALLOW,            principals: [new AnyPrincipal()],            actions: ['execute-api:Invoke'],            resources: ['execute-api:/*/OPTIONS/*'],          }),        ],      }),      operations: routerToOperations(appRouter),      ...props,    });    Aspects.of(this).add(new AddCorsPreflightAspect(() => this.allowedOrigins));  }
  /**   * CORSを指定されたオリジンに制限します   *   * CloudFrontディストリビューションドメインまたはオリジン文字列を、   * API Gatewayプリフライトレスポンスおよび   * AWS Lambda統合で許可される唯一のCORSオリジンとして設定します。   *   * @param origins - CORSを許可するオリジン文字列、CloudFrontディストリビューション、またはCloudFrontディストリビューションを含むオブジェクト   */  public restrictCorsTo(    ...origins: (string | Distribution | { cloudFrontDistribution: Distribution })[]  ) {    const allowedOrigins = origins.map((origin) =>      typeof origin === 'string'        ? origin        : 'cloudFrontDistribution' in origin          ? `https://${origin.cloudFrontDistribution.distributionDomainName}`          : `https://${origin.distributionDomainName}`,    );
    this.allowedOrigins = allowedOrigins;
    // すべてのLambda統合にALLOWED_ORIGINS環境変数を設定    Object.values(this.integrations).forEach((integration) => {      if ('handler' in integration && integration.handler instanceof Function) {        integration.handler.addEnvironment(          'ALLOWED_ORIGINS',          allowedOrigins.join(','),        );      }    });  }
  /**   * このAPI上の任意のメソッドを呼び出すためのIAM権限を付与します。   *   * @param grantee - 権限を付与するIAMプリンシパル   */  public grantInvokeAccess(grantee: IGrantable) {    // ここでは、granteeにAPIを呼び出す権限を付与します。    // 必要に応じて、より具体的なプリンシパル(ロールやユーザーなど)とリソース    // (どのプリンシパルがどのAPIパスを呼び出せるかなど)を使用して、    // マシン間のきめ細かいアクセスをここで定義できます。    this.api.addToResourcePolicy(      new PolicyStatement({        effect: Effect.ALLOW,        principals: [grantee.grantPrincipal],        actions: ['execute-api:Invoke'],        resources: ['execute-api:/*'],      }),    );
Grant.addToPrincipal({ grantee, actions: ['execute-api:Invoke'], resourceArns: [this.api.arnForExecuteApi('*', '/*', '*')], }); }}これはGameApiを定義するCDKコンストラクトです。defaultIntegrationsメソッドを提供し、tRPC APIの各プロシージャに対してLambda関数を自動的に作成し、バンドルされたAPI実装を指します。これは、cdk synth時にバンドリングが発生しないことを意味します(NodeJsFunctionの使用とは対照的)。バックエンドプロジェクトのビルドターゲットの一部として既にバンドルしているためです。
タスク3: ストーリーエージェントを作成する
Section titled “タスク3: ストーリーエージェントを作成する”次にストーリーエージェントを作成しましょう。
ストーリーエージェント: Pythonプロジェクト
Section titled “ストーリーエージェント: Pythonプロジェクト”Pythonプロジェクトを作成するには:
- インストール Nx Console VSCode Plugin まだインストールしていない場合
- VSCodeでNxコンソールを開く
- クリック
Generate (UI)"Common Nx Commands"セクションで - 検索
@aws/nx-plugin - py#project - 必須パラメータを入力
- name: story
- クリック
Generate
pnpm nx g @aws/nx-plugin:py#project --name=story --no-interactiveyarn nx g @aws/nx-plugin:py#project --name=story --no-interactivenpx nx g @aws/nx-plugin:py#project --name=story --no-interactivebunx nx g @aws/nx-plugin:py#project --name=story --no-interactive変更されるファイルを確認するためにドライランを実行することもできます
pnpm nx g @aws/nx-plugin:py#project --name=story --no-interactive --dry-runyarn nx g @aws/nx-plugin:py#project --name=story --no-interactive --dry-runnpx nx g @aws/nx-plugin:py#project --name=story --no-interactive --dry-runbunx nx g @aws/nx-plugin:py#project --name=story --no-interactive --dry-runファイルツリーに新しいファイルが表示されます。
py#projectで更新されたファイル
py#projectは次のファイルを生成します:
Directory.venv/ モノレポ用の単一仮想環境
- …
Directorypackages/
Directorystory/
Directorydungeon_adventure_story/ Pythonモジュール
- …
Directorytests/
- …
- .python-version
- pyproject.toml
- project.json
- .python-version 固定されたUV Pythonバージョン
- pyproject.toml
- uv.lock
これにより、共有仮想環境を持つPythonプロジェクトとUV Workspaceが設定されました。
ストーリーエージェント
Section titled “ストーリーエージェント”py#agentジェネレーターを使用してプロジェクトにStrandsエージェントを追加するには:
- インストール Nx Console VSCode Plugin まだインストールしていない場合
- VSCodeでNxコンソールを開く
- クリック
Generate (UI)"Common Nx Commands"セクションで - 検索
@aws/nx-plugin - py#agent - 必須パラメータを入力
- project: story
- auth: cognito
- protocol: ag-ui
- クリック
Generate
pnpm nx g @aws/nx-plugin:py#agent --project=story --auth=cognito --protocol=ag-ui --no-interactiveyarn nx g @aws/nx-plugin:py#agent --project=story --auth=cognito --protocol=ag-ui --no-interactivenpx nx g @aws/nx-plugin:py#agent --project=story --auth=cognito --protocol=ag-ui --no-interactivebunx nx g @aws/nx-plugin:py#agent --project=story --auth=cognito --protocol=ag-ui --no-interactive変更されるファイルを確認するためにドライランを実行することもできます
pnpm nx g @aws/nx-plugin:py#agent --project=story --auth=cognito --protocol=ag-ui --no-interactive --dry-runyarn nx g @aws/nx-plugin:py#agent --project=story --auth=cognito --protocol=ag-ui --no-interactive --dry-runnpx nx g @aws/nx-plugin:py#agent --project=story --auth=cognito --protocol=ag-ui --no-interactive --dry-runbunx nx g @aws/nx-plugin:py#agent --project=story --auth=cognito --protocol=ag-ui --no-interactive --dry-runファイルツリーに新しいファイルが表示されます。
py#agentで更新されたファイル
py#agentは次のファイルを生成します:
Directorypackages/
Directorystory/
Directorydungeon_adventure_story/ Pythonモジュール
Directoryagent/
- init.py FastAPIアプリとミドルウェアをセットアップ
- main.py Bedrock AgentCore Runtimeでのエージェントのエントリーポイント
- agent.py サンプルエージェントとツールを定義
- Dockerfile AgentCore Runtimeへのデプロイ用のDockerイメージを定義
Directorycommon/constructs/
Directorysrc
Directoryapp/agents/story-agent/
- story-agent.ts ストーリーエージェントをAgentCore Runtimeにデプロイするためのコンストラクト
いくつかのファイルを詳しく見てみましょう:
from contextlib import contextmanager
from strands import Agent, toolfrom strands_tools import current_time

@tooldef subtract(a: int, b: int) -> int:    return a - b

@contextmanagerdef get_agent(): yield Agent( name="StoryAgent", description="StoryAgent Agent", system_prompt="""You are a mathematical wizard.Use your tools for mathematical tasks.Refer to tools as your 'spellbook'.""", tools=[subtract, current_time], )これは、サンプルStrandsエージェントを作成し、減算ツールを定義します。
import loggingimport uuid
from ag_ui_strands import StrandsAgent, create_strands_appfrom dungeon_adventure_agent_connection import session_id_contextfrom fastapi import Requestfrom starlette.middleware.base import BaseHTTPMiddleware
from .agent import get_agent
logging.basicConfig(level=logging.INFO)
SESSION_ID_HEADER = "x-amzn-bedrock-agentcore-runtime-session-id"
# Create AG-UI agent wrapper_agent_ctx = get_agent()_agent = _agent_ctx.__enter__()
agui_agent = StrandsAgent(    agent=_agent,    name="StoryAgent",    description="A Agent exposed via the AG-UI protocol.",)

class _SessionIdMiddleware(BaseHTTPMiddleware):    """Bind the session ID for this request so downstream MCP / A2A clients forward it on outbound calls."""
    async def dispatch(self, request: Request, call_next):        session_id = request.headers.get(SESSION_ID_HEADER) or str(uuid.uuid4())        with session_id_context(session_id):            return await call_next(request)

# Create FastAPI app with AG-UI endpoint and health checkapp = create_strands_app(agui_agent, path="/invocations")app.add_middleware(_SessionIdMiddleware)これはエージェントのエントリーポイントです。--protocol=AG-UIを選択したため、ジェネレーターはStrandsのAgentをag_ui_strandsのStrandsAgentでラップし、AG-UIプロトコルを話すFastAPIアプリにマウントします。これがReactウェブサイトからCopilotKitが通信する相手です。_SessionIdMiddlewareは、インバウンドのAgentCoreランタイムセッションIDをContextVarにバインドするため、後で配線する下流のMCP/A2Aクライアント(例えばモジュール2のInventory MCPサーバー)が、アウトバウンド呼び出しで自動的にそれを転送します。モジュール3では、各スレッドIDが独自のS3SessionManagerを取得し、会話履歴がターン間で永続化されるようにsession_manager_providerも追加します。
import { Lazy, Names } from 'aws-cdk-lib';import { Platform } from 'aws-cdk-lib/aws-ecr-assets';import { Construct } from 'constructs';import { execSync } from 'child_process';import * as path from 'path';import * as url from 'url';import {  AgentRuntimeArtifact,  ProtocolType,  Runtime,  RuntimeProps,} from 'aws-cdk-lib/aws-bedrockagentcore';import { IGrantable, IPrincipal } from 'aws-cdk-lib/aws-iam';
export type StoryAgentProps = Omit<  RuntimeProps,  'runtimeName' | 'protocolConfiguration' | 'agentRuntimeArtifact'>;
export class StoryAgent extends Construct implements IGrantable {  public readonly dockerImage: AgentRuntimeArtifact;  public readonly agentCoreRuntime: Runtime;
  constructor(scope: Construct, id: string, props?: StoryAgentProps) {    super(scope, id);
    this.dockerImage = AgentRuntimeArtifact.fromAsset(      path.dirname(url.fileURLToPath(new URL(import.meta.url))),      {        platform: Platform.LINUX_ARM64,        extraHash: execSync(          `docker inspect dungeon-adventure-story-agent:latest --format '{{.Id}}'`,          { encoding: 'utf-8' },        ).trim(),      },    );
    this.agentCoreRuntime = new Runtime(this, 'StoryAgent', {      runtimeName: Lazy.string({        produce: () =>          Names.uniqueResourceName(this.agentCoreRuntime, { maxLength: 40 }),      }),      protocolConfiguration: ProtocolType.HTTP,      agentRuntimeArtifact: this.dockerImage,      ...props,    });  }
public get grantPrincipal(): IPrincipal { return this.agentCoreRuntime.grantPrincipal; }}これは、エージェントDockerイメージをECRにアップロードし、AgentCore Runtimeを使用してホストするCDK AgentRuntimeArtifactを設定します。
追加のDockerfileに気付くかもしれませんが、これはstoryプロジェクトからDockerイメージを参照し、Dockerfileとエージェントソースコードを同じ場所に配置できるようにします。
タスク4: インベントリツールをセットアップする
Section titled “タスク4: インベントリツールをセットアップする”Inventory: TypeScriptプロジェクト
Section titled “Inventory: TypeScriptプロジェクト”ストーリーエージェントがプレイヤーのインベントリを管理するためのツールを提供するMCPサーバーを作成しましょう。
まず、TypeScriptプロジェクトを作成します:
- インストール Nx Console VSCode Plugin まだインストールしていない場合
- VSCodeでNxコンソールを開く
- クリック
Generate (UI)"Common Nx Commands"セクションで - 検索
@aws/nx-plugin - ts#project - 必須パラメータを入力
- name: inventory
- クリック
Generate
pnpm nx g @aws/nx-plugin:ts#project --name=inventory --no-interactiveyarn nx g @aws/nx-plugin:ts#project --name=inventory --no-interactivenpx nx g @aws/nx-plugin:ts#project --name=inventory --no-interactivebunx nx g @aws/nx-plugin:ts#project --name=inventory --no-interactive変更されるファイルを確認するためにドライランを実行することもできます
pnpm nx g @aws/nx-plugin:ts#project --name=inventory --no-interactive --dry-runyarn nx g @aws/nx-plugin:ts#project --name=inventory --no-interactive --dry-runnpx nx g @aws/nx-plugin:ts#project --name=inventory --no-interactive --dry-runbunx nx g @aws/nx-plugin:ts#project --name=inventory --no-interactive --dry-runこれにより、空のTypeScriptプロジェクトが作成されます。
ts#projectで更新されたファイル
ts#projectジェネレーターは次のファイルを生成します。
Directorypackages/
Directoryinventory/
Directorysrc/
- index.ts サンプル関数を含むエントリーポイント
- project.json プロジェクト設定
- vitest.config.mts テスト設定
- tsconfig.json プロジェクトのベースTypeScript設定
- tsconfig.lib.json コンパイルとバンドル用のプロジェクトのTypeScript設定
- tsconfig.spec.json テスト用のTypeScript設定
- tsconfig.base.json 他のプロジェクトがこれを参照するためのエイリアスを設定するように更新
Inventory: MCPサーバー
Section titled “Inventory: MCPサーバー”次に、TypeScriptプロジェクトにMCPサーバーを追加します:
- インストール Nx Console VSCode Plugin まだインストールしていない場合
- VSCodeでNxコンソールを開く
- クリック
Generate (UI)"Common Nx Commands"セクションで - 検索
@aws/nx-plugin - ts#mcp-server - 必須パラメータを入力
- project: inventory
- クリック
Generate
pnpm nx g @aws/nx-plugin:ts#mcp-server --project=inventory --no-interactiveyarn nx g @aws/nx-plugin:ts#mcp-server --project=inventory --no-interactivenpx nx g @aws/nx-plugin:ts#mcp-server --project=inventory --no-interactivebunx nx g @aws/nx-plugin:ts#mcp-server --project=inventory --no-interactive変更されるファイルを確認するためにドライランを実行することもできます
pnpm nx g @aws/nx-plugin:ts#mcp-server --project=inventory --no-interactive --dry-runyarn nx g @aws/nx-plugin:ts#mcp-server --project=inventory --no-interactive --dry-runnpx nx g @aws/nx-plugin:ts#mcp-server --project=inventory --no-interactive --dry-runbunx nx g @aws/nx-plugin:ts#mcp-server --project=inventory --no-interactive --dry-runこれによりMCPサーバーが追加されます。
ts#mcp-serverで更新されたファイル
ts#mcp-serverジェネレーターは次のファイルを生成します。
Directorypackages/
Directoryinventory/
Directorysrc/mcp-server/
- index.ts バレルエクスポート
- server.ts MCPサーバーを作成
Directorytools/
- divide.ts サンプルツール
Directoryresources/
- sample-guidance.ts サンプルリソース
- stdio.ts STDIOトランスポート用MCPのエントリーポイント
- http.ts ストリーミングHTTPトランスポート用MCPのエントリーポイント
- Dockerfile AgentCore Runtime用のイメージをビルド
- rolldown.config.ts AgentCoreへのデプロイ用にMCPサーバーをバンドルするための設定
Directorycommon/constructs/
Directorysrc
Directoryapp/mcp-servers/inventory-mcp-server/
- inventory-mcp-server.ts インベントリMCPサーバーをAgentCore Runtimeにデプロイするためのコンストラクト
タスク5: ゲームデータベースを作成する
Section titled “タスク5: ゲームデータベースを作成する”ゲームの状態(保存されたゲームと各プレイヤーのインベントリ)はAmazon DynamoDBに保存されます。ts#dynamodbジェネレーターを使用してDungeonDbというDynamoDBプロジェクトを作成します:
- インストール Nx Console VSCode Plugin まだインストールしていない場合
- VSCodeでNxコンソールを開く
- クリック
Generate (UI)"Common Nx Commands"セクションで - 検索
@aws/nx-plugin - ts#dynamodb - 必須パラメータを入力
- name: DungeonDb
- クリック
Generate
pnpm nx g @aws/nx-plugin:ts#dynamodb --name=DungeonDb --no-interactiveyarn nx g @aws/nx-plugin:ts#dynamodb --name=DungeonDb --no-interactivenpx nx g @aws/nx-plugin:ts#dynamodb --name=DungeonDb --no-interactivebunx nx g @aws/nx-plugin:ts#dynamodb --name=DungeonDb --no-interactive変更されるファイルを確認するためにドライランを実行することもできます
pnpm nx g @aws/nx-plugin:ts#dynamodb --name=DungeonDb --no-interactive --dry-runyarn nx g @aws/nx-plugin:ts#dynamodb --name=DungeonDb --no-interactive --dry-runnpx nx g @aws/nx-plugin:ts#dynamodb --name=DungeonDb --no-interactive --dry-runbunx nx g @aws/nx-plugin:ts#dynamodb --name=DungeonDb --no-interactive --dry-runファイルツリーに新しいファイルが表示されます。
ts#dynamodbで更新されたファイル
ts#dynamodbジェネレーターはこれらのファイルを生成します。
Directorypackages/
Directorydungeon-db/
- config.json ポート、テーブル名、コンテナ設定、グローバルセカンダリインデックスを含むDynamoDB設定
Directorysrc/
- index.ts エントリーポイントとエクスポート
- client.ts DynamoDBクライアントシングルトンとテーブル名解決
Directoryentities/
- example.ts サンプルElectroDBエンティティ(これを置き換えます)
- index.ts エンティティエクスポート
- project.json
devとpull-imageターゲットを追加
Directorycommon/
Directoryscripts/
Directorysrc/
Directorydynamodb/
- create-local-table.ts DynamoDB Localにテーブルを作成
- pull-image.ts DynamoDB Localイメージをプル
- start-container.ts DynamoDB Localコンテナを起動
Directoryconstructs/
Directorysrc/
Directoryapp/dynamodb/
- dungeon-db.ts テーブルをプロビジョニングするためのコンストラクト
Directorycore/
- dynamodb.ts 汎用DynamoDBテーブルコンストラクト
生成されたsrc/client.tsはgetDynamoDBClient()とresolveTableName()をエクスポートします。LOCAL_DEV=trueの場合(devターゲットによって自動的に設定されます)、これらはDynamoDB Localに接続します。それ以外の場合はAWSに接続し、Runtime Configurationからデプロイされたテーブル名を解決します。モジュール2でこのプロジェクトにGameとInventoryエンティティをモデル化します。
詳細については、ts#dynamodbジェネレーターガイドを参照してください。
タスク6: ユーザーインターフェース(UI)を作成する
Section titled “タスク6: ユーザーインターフェース(UI)を作成する”このタスクでは、ゲームとやり取りできるUIを作成します。
ゲームUI: ウェブサイト
Section titled “ゲームUI: ウェブサイト”UIを作成するには、次の手順でGameUIというウェブサイトを作成します:
- インストール Nx Console VSCode Plugin まだインストールしていない場合
- VSCodeでNxコンソールを開く
- クリック
Generate (UI)"Common Nx Commands"セクションで - 検索
@aws/nx-plugin - ts#website - 必須パラメータを入力
- name: GameUI
- ux: shadcn
- クリック
Generate
pnpm nx g @aws/nx-plugin:ts#website --name=GameUI --ux=shadcn --no-interactiveyarn nx g @aws/nx-plugin:ts#website --name=GameUI --ux=shadcn --no-interactivenpx nx g @aws/nx-plugin:ts#website --name=GameUI --ux=shadcn --no-interactivebunx nx g @aws/nx-plugin:ts#website --name=GameUI --ux=shadcn --no-interactive変更されるファイルを確認するためにドライランを実行することもできます
pnpm nx g @aws/nx-plugin:ts#website --name=GameUI --ux=shadcn --no-interactive --dry-runyarn nx g @aws/nx-plugin:ts#website --name=GameUI --ux=shadcn --no-interactive --dry-runnpx nx g @aws/nx-plugin:ts#website --name=GameUI --ux=shadcn --no-interactive --dry-runbunx nx g @aws/nx-plugin:ts#website --name=GameUI --ux=shadcn --no-interactive --dry-runファイルツリーに新しいファイルが表示されます。
ts#websiteで更新されたファイル
ts#websiteは次のファイルを生成します。ファイルツリーで強調表示されている主要なファイルを確認しましょう:
Directorypackages/
Directorycommon/
Directoryconstructs/
Directorysrc/
Directoryapp/ アプリ固有のCDKコンストラクト
Directorystatic-websites/
- game-ui.ts Game UIを作成するためのCDKコンストラクト
Directorycore/
- static-website.ts 汎用静的ウェブサイトコンストラクト
Directorygame-ui/
Directorypublic/
- …
Directorysrc/
Directorycomponents/
DirectoryAppLayout/
- index.tsx shadcn
SidebarProvider+ ヘッダーを使用した全体的なページレイアウト
- index.tsx shadcn
- app-sidebar.tsx ナビゲーション項目を持つデフォルトのshadcnサイドバー
- alert.tsx, spinner.tsx shadcnでラップされたフィードバックプリミティブ
Directoryroutes/ @tanstack/react-routerファイルベースルート
- index.tsx ルート’/‘ページ
- __root.tsx すべてのページがこのコンポーネントをベースとして使用
- config.ts
- main.tsx Reactエントリーポイント
- routeTree.gen.ts これは@tanstack/react-routerによって自動的に更新されます
- styles.css 共有shadcnグローバル(Tailwind v4)をインポート
- index.html
- project.json
- vite.config.mts
- …
Directorycommon/
Directoryshadcn/ 共有shadcn/uiライブラリ(テーマトークン、
Button、Card、Input、Sidebarなど)、すべてのuxProvider=Shadcnウェブサイトでインポート- src/components/ui/*
- src/styles/globals.css Tailwind + shadcnデザイントークン
- …
import * as url from 'url';import { Construct } from 'constructs';import { StaticWebsite } from '../../core/index.js';
export class GameUI extends StaticWebsite { constructor(scope: Construct, id: string) { super(scope, id, { websiteName: 'GameUI', websiteFilePath: url.fileURLToPath( new URL( '../../../../../../dist/packages/game-ui/bundle', import.meta.url, ), ), }); }}これはGameUIを定義するCDKコンストラクトです。ViteベースUIの生成されたバンドルへのファイルパスが既に設定されています。これは、build時に、game-uiプロジェクトのビルドターゲット内でバンドリングが発生し、その出力がここで使用されることを意味します。
import React from 'react';import { createRoot } from 'react-dom/client';import { RouterProvider, createRouter } from '@tanstack/react-router';import { routeTree } from './routeTree.gen';import './styles.css';
export type RouterProviderContext = {};
const router = createRouter({ routeTree, context: {} });
declare module '@tanstack/react-router' {  interface Register {    router: typeof router;  }}
const App = () => <RouterProvider router={router} context={{}} />;
const root = document.getElementById('root');root && createRoot(root).render( <React.StrictMode> <App /> </React.StrictMode>, );これはReactがマウントされるエントリーポイントです。スタイリングはstyles.css経由でインポートされたTailwind v4トークンから提供されます。@tanstack/react-routerはファイルベースルーティングモードで設定されています。開発サーバーが実行されている限り、routes/の下に作成したファイルは自動的に検出され、ルートツリーが再生成されます。後のジェネレーター(auth、connection)は、このファイルをAST変換して<App />を追加のプロバイダーでラップします。
import { createFileRoute } from '@tanstack/react-router';
export const Route = createFileRoute('/')({  component: RouteComponent,});
function RouteComponent() { return ( <div className="text-center"> <header> <h1>Welcome</h1> <p>Welcome to your new React website!</p> </header> </div> );}/ルートにナビゲートすると、コンポーネントがレンダリングされます。@tanstack/react-routerは、このファイルを作成/移動するたびに(開発サーバーが実行されている限り)Routeを管理します。
ゲームUI: 認証
Section titled “ゲームUI: 認証”次の手順を使用して、Amazon Cognito経由の認証アクセスを要求するようにゲームUIを設定しましょう:
- インストール Nx Console VSCode Plugin まだインストールしていない場合
- VSCodeでNxコンソールを開く
- クリック
Generate (UI)"Common Nx Commands"セクションで - 検索
@aws/nx-plugin - ts#website#auth - 必須パラメータを入力
- cognitoDomain: game-ui
- project: @dungeon-adventure/game-ui
- allowSignup: true
- クリック
Generate
pnpm nx g @aws/nx-plugin:ts#website#auth --cognitoDomain=game-ui --project=@dungeon-adventure/game-ui --allowSignup=true --no-interactiveyarn nx g @aws/nx-plugin:ts#website#auth --cognitoDomain=game-ui --project=@dungeon-adventure/game-ui --allowSignup=true --no-interactivenpx nx g @aws/nx-plugin:ts#website#auth --cognitoDomain=game-ui --project=@dungeon-adventure/game-ui --allowSignup=true --no-interactivebunx nx g @aws/nx-plugin:ts#website#auth --cognitoDomain=game-ui --project=@dungeon-adventure/game-ui --allowSignup=true --no-interactive変更されるファイルを確認するためにドライランを実行することもできます
pnpm nx g @aws/nx-plugin:ts#website#auth --cognitoDomain=game-ui --project=@dungeon-adventure/game-ui --allowSignup=true --no-interactive --dry-runyarn nx g @aws/nx-plugin:ts#website#auth --cognitoDomain=game-ui --project=@dungeon-adventure/game-ui --allowSignup=true --no-interactive --dry-runnpx nx g @aws/nx-plugin:ts#website#auth --cognitoDomain=game-ui --project=@dungeon-adventure/game-ui --allowSignup=true --no-interactive --dry-runbunx nx g @aws/nx-plugin:ts#website#auth --cognitoDomain=game-ui --project=@dungeon-adventure/game-ui --allowSignup=true --no-interactive --dry-runファイルツリーに新しいファイルが表示/変更されます。
ts#website#authで更新されたファイル
ts#website#authジェネレーターはこれらのファイルを更新/生成します。ファイルツリーで強調表示されている主要なファイルを確認しましょう:
Directorypackages/
Directorycommon/
Directoryconstructs/
Directorysrc/
Directorycore/
- user-identity.ts ユーザー/アイデンティティプールを作成するためのCDKコンストラクト
Directorygame-ui/
Directorysrc/
Directorycomponents/
DirectoryAppLayout/
- index.tsx ログインユーザー/ログアウトをヘッダーに追加
DirectoryCognitoAuth/
- index.tsx Cognitoへのログインを管理
DirectoryRuntimeConfig/
- index.tsx
runtime-config.jsonを取得し、コンテキスト経由で子に提供
- index.tsx
Directoryhooks/
- useRuntimeConfig.tsx
- main.tsx Cognitoを追加するように更新
import { useAuth } from 'react-oidc-context';import CognitoAuth from './components/CognitoAuth';import { useRuntimeConfig } from './hooks/useRuntimeConfig';import RuntimeConfigProvider from './components/RuntimeConfig';import React from 'react';import { createRoot } from 'react-dom/client';import { RouterProvider, createRouter } from '@tanstack/react-router';import { routeTree } from './routeTree.gen';import './styles.css';export type RouterProviderContext = {};export type RouterProviderContext = { runtimeConfig?: ReturnType<typeof useRuntimeConfig>; auth?: ReturnType<typeof useAuth>;};const router = createRouter({ routeTree, context: {} });const router = createRouter({ routeTree, context: { runtimeConfig: undefined, auth: undefined },});// 型安全性のためにルーターインスタンスを登録declare module '@tanstack/react-router' { interface Register { router: typeof router; }}const App = () => <RouterProvider router={router} context={{}} />;const App = () => { const auth = useAuth(); const runtimeConfig = useRuntimeConfig(); return <RouterProvider router={router} context={{ runtimeConfig, auth }} />;};const root = document.getElementById('root');root && createRoot(root).render( <React.StrictMode> <RuntimeConfigProvider> <CognitoAuth> <App /> </CognitoAuth> </RuntimeConfigProvider> </React.StrictMode>, );RuntimeConfigProviderとCognitoAuthコンポーネントがAST変換を介してmain.tsxファイルに追加されました。これにより、CognitoAuthコンポーネントは、正しい宛先へのバックエンド呼び出しを行うために必要なCognito接続設定を含むruntime-config.jsonを取得することで、Amazon Cognitoで認証できるようになります。
ゲームUI: Game APIに接続する
Section titled “ゲームUI: Game APIに接続する”以前に作成したGame APIに接続するようにゲームUIを設定しましょう。
- インストール Nx Console VSCode Plugin まだインストールしていない場合
- VSCodeでNxコンソールを開く
- クリック
Generate (UI)"Common Nx Commands"セクションで - 検索
@aws/nx-plugin - connection - 必須パラメータを入力
- sourceProject: @dungeon-adventure/game-ui
- targetProject: @dungeon-adventure/game-api
- クリック
Generate
pnpm nx g @aws/nx-plugin:connection --sourceProject=@dungeon-adventure/game-ui --targetProject=@dungeon-adventure/game-api --no-interactiveyarn nx g @aws/nx-plugin:connection --sourceProject=@dungeon-adventure/game-ui --targetProject=@dungeon-adventure/game-api --no-interactivenpx nx g @aws/nx-plugin:connection --sourceProject=@dungeon-adventure/game-ui --targetProject=@dungeon-adventure/game-api --no-interactivebunx nx g @aws/nx-plugin:connection --sourceProject=@dungeon-adventure/game-ui --targetProject=@dungeon-adventure/game-api --no-interactive変更されるファイルを確認するためにドライランを実行することもできます
pnpm nx g @aws/nx-plugin:connection --sourceProject=@dungeon-adventure/game-ui --targetProject=@dungeon-adventure/game-api --no-interactive --dry-runyarn nx g @aws/nx-plugin:connection --sourceProject=@dungeon-adventure/game-ui --targetProject=@dungeon-adventure/game-api --no-interactive --dry-runnpx nx g @aws/nx-plugin:connection --sourceProject=@dungeon-adventure/game-ui --targetProject=@dungeon-adventure/game-api --no-interactive --dry-runbunx nx g @aws/nx-plugin:connection --sourceProject=@dungeon-adventure/game-ui --targetProject=@dungeon-adventure/game-api --no-interactive --dry-runファイルツリーに新しいファイルが表示/変更されます。
UI → tRPC connectionで更新されたファイル
connectionジェネレーターはこれらのファイルを生成/更新します。ファイルツリーで強調表示されている主要なファイルを確認しましょう:
Directorypackages/
Directorygame-ui/
Directorysrc/
Directorycomponents/
- GameApiClientProvider.tsx GameAPIクライアントをセットアップ
Directoryhooks/
- useGameApi.tsx GameApiを呼び出すためのフック
- main.tsx trpcクライアントプロバイダーを注入
- package.json
import { useContext } from 'react';import { GameApiTRPCContext } from '../components/GameApiClientProvider';
export const useGameApi = () => {  const container = useContext(GameApiTRPCContext);  if (!container) {    throw new Error('useGameApi must be used within GameApiClientProvider');  }  return container.optionsProxy;};
export const useGameApiClient = () => { const container = useContext(GameApiTRPCContext); if (!container) { throw new Error( 'useGameApiClient must be used within GameApiClientProvider', ); } return container.client;};このフックは、GameApiを呼び出すためのtRPCクライアントへのアクセスを提供します。tRPC APIを呼び出す方法の例については、tRPCフックの使用ガイドを参照してください。
import GameApiClientProvider from './components/GameApiClientProvider';import QueryClientProvider from './components/QueryClientProvider';import { useAuth } from 'react-oidc-context';import CognitoAuth from './components/CognitoAuth';import { useRuntimeConfig } from './hooks/useRuntimeConfig';import RuntimeConfigProvider from './components/RuntimeConfig';import React from 'react';import { createRoot } from 'react-dom/client';import { RouterProvider, createRouter } from '@tanstack/react-router';import { routeTree } from './routeTree.gen';import './styles.css';...const root = document.getElementById('root');root && createRoot(root).render( <React.StrictMode> <RuntimeConfigProvider> <CognitoAuth> <QueryClientProvider> <GameApiClientProvider> <App /> </GameApiClientProvider> </QueryClientProvider> </CognitoAuth> </RuntimeConfigProvider> </React.StrictMode>, );main.tsxファイルがAST変換を介して更新され、tRPCプロバイダーが注入されました。
ストーリーエージェント: Inventory MCPサーバーに接続する
Section titled “ストーリーエージェント: Inventory MCPサーバーに接続する”ストーリーエージェントをInventory MCPサーバーに接続して、エージェントがMCPサーバーのツールを検出して呼び出せるようにしましょう。
- インストール Nx Console VSCode Plugin まだインストールしていない場合
- VSCodeでNxコンソールを開く
- クリック
Generate (UI)"Common Nx Commands"セクションで - 検索
@aws/nx-plugin - connection - 必須パラメータを入力
- sourceProject: story
- targetProject: inventory
- クリック
Generate
pnpm nx g @aws/nx-plugin:connection --sourceProject=story --targetProject=inventory --no-interactiveyarn nx g @aws/nx-plugin:connection --sourceProject=story --targetProject=inventory --no-interactivenpx nx g @aws/nx-plugin:connection --sourceProject=story --targetProject=inventory --no-interactivebunx nx g @aws/nx-plugin:connection --sourceProject=story --targetProject=inventory --no-interactive変更されるファイルを確認するためにドライランを実行することもできます
pnpm nx g @aws/nx-plugin:connection --sourceProject=story --targetProject=inventory --no-interactive --dry-runyarn nx g @aws/nx-plugin:connection --sourceProject=story --targetProject=inventory --no-interactive --dry-runnpx nx g @aws/nx-plugin:connection --sourceProject=story --targetProject=inventory --no-interactive --dry-runbunx nx g @aws/nx-plugin:connection --sourceProject=story --targetProject=inventory --no-interactive --dry-runストーリーエージェント → Inventory MCP接続で更新されたファイル
connectionジェネレーターはこれらのファイルを生成/更新します:
Directorypackages/
Directorycommon/
Directoryagent_connection/
Directorydungeon_adventure_agent_connection/
Directorycore/
- agentcore_endpoints.py フレームワークに依存しないARN/URL解決
- agentcore_mcp_transport.py フレームワークに依存しないMCPトランスポート
- agentcore_mcp_client_strands.py トランスポートをラップするStrands MCPクライアント
Directoryauth/ フレームワークに依存しないSigV4 / セッション転送
httpx.Auth- …
Directoryapp/
- inventory_mcp_server_client_strands.py インベントリMCPサーバーに接続するためのStrands クライアント
- __init__.py 接続ごとのクライアントを再エクスポート
Directorystory/
Directorydungeon_adventure_story/agent/
- agent.py MCPクライアントをインポートして使用するように変更
ジェネレーターは:
- コア
AgentCoreMCPClientStrandsを持つ共有agent_connectionPythonプロジェクトを作成します(まだ存在しない場合) - ローカル(直接HTTP)とデプロイ時(IAM認証を使用したAgentCore経由)の両方でMCPサーバーへの接続を処理する
InventoryMcpServerClientStrandsクラスを生成します agent.pyを変換してクライアントをインポートし、インスタンスを作成し、MCPサーバーのツールをエージェントに接続しますagent_connectionプロジェクトをstoryプロジェクトのワークスペース依存関係として追加します- ローカル実行時にMCPサーバーを自動的に起動するように
devターゲットを更新します
詳細については、PythonエージェントからMCPへの接続ガイドを参照してください。
ゲームUI: ストーリーエージェントに接続する
Section titled “ゲームUI: ストーリーエージェントに接続する”ゲームUIをストーリーエージェントに接続しましょう。エージェントがAG-UIを話すため、connectionジェネレーターはCopilotKitを配線します。テーマ付きチャットコンポーネントと、レンダリング準備が整った@ag-ui/clientのHttpAgentが得られます。
- インストール Nx Console VSCode Plugin まだインストールしていない場合
- VSCodeでNxコンソールを開く
- クリック
Generate (UI)"Common Nx Commands"セクションで - 検索
@aws/nx-plugin - connection - 必須パラメータを入力
- sourceProject: @dungeon-adventure/game-ui
- targetProject: story
- クリック
Generate
pnpm nx g @aws/nx-plugin:connection --sourceProject=@dungeon-adventure/game-ui --targetProject=story --no-interactiveyarn nx g @aws/nx-plugin:connection --sourceProject=@dungeon-adventure/game-ui --targetProject=story --no-interactivenpx nx g @aws/nx-plugin:connection --sourceProject=@dungeon-adventure/game-ui --targetProject=story --no-interactivebunx nx g @aws/nx-plugin:connection --sourceProject=@dungeon-adventure/game-ui --targetProject=story --no-interactive変更されるファイルを確認するためにドライランを実行することもできます
pnpm nx g @aws/nx-plugin:connection --sourceProject=@dungeon-adventure/game-ui --targetProject=story --no-interactive --dry-runyarn nx g @aws/nx-plugin:connection --sourceProject=@dungeon-adventure/game-ui --targetProject=story --no-interactive --dry-runnpx nx g @aws/nx-plugin:connection --sourceProject=@dungeon-adventure/game-ui --targetProject=story --no-interactive --dry-runbunx nx g @aws/nx-plugin:connection --sourceProject=@dungeon-adventure/game-ui --targetProject=story --no-interactive --dry-runUI → ストーリーエージェント接続で更新されたファイル
connectionジェネレーターはこれらのファイルを生成/更新します:
Directorypackages/
Directorygame-ui/
Directorysrc/
Directorycomponents/
- AguiProvider.tsx 接続されたすべてのAG-UIエージェントが登録された
CopilotKitProvider Directorycopilot/
- index.tsx Shadcnテーマの
CopilotChat/CopilotSidebar/CopilotPopup - ShadcnAssistantMessage.tsx, ShadcnUserMessage.tsx, ShadcnChatInput.tsx, ShadcnCursor.tsx, copilot.css
- index.tsx Shadcnテーマの
- AguiProvider.tsx 接続されたすべてのAG-UIエージェントが登録された
Directoryhooks/
- useAguiStoryAgent.tsx
HttpAgentを構築し、Cognitoベアラートークンを注入し、threadIdをAgentCoreの33文字のセッションIDにパディング
- useAguiStoryAgent.tsx
- main.tsx
<App />を<AguiProvider>でラップ
ジェネレーターは:
- Reactウェブサイトの
uxProvider(ここではShadcn)を検出し、マッチするチャットコンポーネントを提供します。 - すべての接続されたエージェントを単一の
CopilotKitProviderに登録します。別のエージェント用に再実行すると、別のフックが追加されるだけです。 - Runtime Configurationからエージェントのランタイム ARNを読み取り、AgentCore呼び出しURLを構築し、CognitoベアラートークンとAgentCoreセッションIDヘッダーを添付します。
詳細については、ReactからAG-UIへの接続ガイドを参照してください。
Game APIとInventory MCPサーバーをデータベースに接続する
Section titled “Game APIとInventory MCPサーバーをデータベースに接続する”Game APIとInventory MCPサーバーの両方がDynamoDBテーブルを読み書きするため、DungeonDbプロジェクトに接続しましょう。connectionジェネレーターはターゲットがts#dynamodbプロジェクトであることを検出し、各ソースプロジェクトのdevターゲットがDynamoDB Localを自動的に起動するように配線します。
- インストール Nx Console VSCode Plugin まだインストールしていない場合
- VSCodeでNxコンソールを開く
- クリック
Generate (UI)"Common Nx Commands"セクションで - 検索
@aws/nx-plugin - connection - 必須パラメータを入力
- sourceProject: @dungeon-adventure/game-api
- targetProject: @dungeon-adventure/dungeon-db
- クリック
Generate
pnpm nx g @aws/nx-plugin:connection --sourceProject=@dungeon-adventure/game-api --targetProject=@dungeon-adventure/dungeon-db --no-interactiveyarn nx g @aws/nx-plugin:connection --sourceProject=@dungeon-adventure/game-api --targetProject=@dungeon-adventure/dungeon-db --no-interactivenpx nx g @aws/nx-plugin:connection --sourceProject=@dungeon-adventure/game-api --targetProject=@dungeon-adventure/dungeon-db --no-interactivebunx nx g @aws/nx-plugin:connection --sourceProject=@dungeon-adventure/game-api --targetProject=@dungeon-adventure/dungeon-db --no-interactive変更されるファイルを確認するためにドライランを実行することもできます
pnpm nx g @aws/nx-plugin:connection --sourceProject=@dungeon-adventure/game-api --targetProject=@dungeon-adventure/dungeon-db --no-interactive --dry-runyarn nx g @aws/nx-plugin:connection --sourceProject=@dungeon-adventure/game-api --targetProject=@dungeon-adventure/dungeon-db --no-interactive --dry-runnpx nx g @aws/nx-plugin:connection --sourceProject=@dungeon-adventure/game-api --targetProject=@dungeon-adventure/dungeon-db --no-interactive --dry-runbunx nx g @aws/nx-plugin:connection --sourceProject=@dungeon-adventure/game-api --targetProject=@dungeon-adventure/dungeon-db --no-interactive --dry-run- インストール Nx Console VSCode Plugin まだインストールしていない場合
- VSCodeでNxコンソールを開く
- クリック
Generate (UI)"Common Nx Commands"セクションで - 検索
@aws/nx-plugin - connection - 必須パラメータを入力
- sourceProject: @dungeon-adventure/inventory
- targetProject: @dungeon-adventure/dungeon-db
- クリック
Generate
pnpm nx g @aws/nx-plugin:connection --sourceProject=@dungeon-adventure/inventory --targetProject=@dungeon-adventure/dungeon-db --no-interactiveyarn nx g @aws/nx-plugin:connection --sourceProject=@dungeon-adventure/inventory --targetProject=@dungeon-adventure/dungeon-db --no-interactivenpx nx g @aws/nx-plugin:connection --sourceProject=@dungeon-adventure/inventory --targetProject=@dungeon-adventure/dungeon-db --no-interactivebunx nx g @aws/nx-plugin:connection --sourceProject=@dungeon-adventure/inventory --targetProject=@dungeon-adventure/dungeon-db --no-interactive変更されるファイルを確認するためにドライランを実行することもできます
pnpm nx g @aws/nx-plugin:connection --sourceProject=@dungeon-adventure/inventory --targetProject=@dungeon-adventure/dungeon-db --no-interactive --dry-runyarn nx g @aws/nx-plugin:connection --sourceProject=@dungeon-adventure/inventory --targetProject=@dungeon-adventure/dungeon-db --no-interactive --dry-runnpx nx g @aws/nx-plugin:connection --sourceProject=@dungeon-adventure/inventory --targetProject=@dungeon-adventure/dungeon-db --no-interactive --dry-runbunx nx g @aws/nx-plugin:connection --sourceProject=@dungeon-adventure/inventory --targetProject=@dungeon-adventure/dungeon-db --no-interactive --dry-runゲームUI: インフラストラクチャー
Section titled “ゲームUI: インフラストラクチャー”CDKインフラストラクチャーの最終サブプロジェクトを作成しましょう。
- インストール Nx Console VSCode Plugin まだインストールしていない場合
- VSCodeでNxコンソールを開く
- クリック
Generate (UI)"Common Nx Commands"セクションで - 検索
@aws/nx-plugin - ts#infra - 必須パラメータを入力
- name: infra
- クリック
Generate
pnpm nx g @aws/nx-plugin:ts#infra --name=infra --no-interactiveyarn nx g @aws/nx-plugin:ts#infra --name=infra --no-interactivenpx nx g @aws/nx-plugin:ts#infra --name=infra --no-interactivebunx nx g @aws/nx-plugin:ts#infra --name=infra --no-interactive変更されるファイルを確認するためにドライランを実行することもできます
pnpm nx g @aws/nx-plugin:ts#infra --name=infra --no-interactive --dry-runyarn nx g @aws/nx-plugin:ts#infra --name=infra --no-interactive --dry-runnpx nx g @aws/nx-plugin:ts#infra --name=infra --no-interactive --dry-runbunx nx g @aws/nx-plugin:ts#infra --name=infra --no-interactive --dry-runファイルツリーに新しいファイルが表示/変更されます。
ts#infraで更新されたファイル
ts#infraジェネレーターはこれらを生成/更新します。ファイルツリーで強調表示されている主要なファイルを確認しましょう:
Directorypackages/
Directorycommon/
Directoryconstructs/
Directorysrc/
Directorycore/
- checkov.ts
- index.ts
Directoryinfra
Directorysrc/
Directorystages/
- application-stage.ts CDKスタックがここで定義されます
Directorystacks/
- application-stack.ts CDKリソースがここで定義されます
- main.ts すべてのステージを定義するエントリーポイント
- cdk.json
- checkov.yml
- project.json
- …
- package.json
- tsconfig.json 参照を追加
- tsconfig.base.json エイリアスを追加
import { ApplicationStage } from './stages/application-stage.js';import { App } from ':dungeon-adventure/common-constructs';
const app = new App();
// これを使用して独自のサンドボックス環境をデプロイします(CLI認証情報を想定)new ApplicationStage(app, 'dungeon-adventure-infra-sandbox', {  env: {    account: process.env.CDK_DEFAULT_ACCOUNT,    region: process.env.CDK_DEFAULT_REGION,  },});
app.synth();これはCDKアプリケーションのエントリーポイントです。
import { Stack, StackProps } from 'aws-cdk-lib';import { Construct } from 'constructs';
export class ApplicationStack extends Stack {  constructor(scope: Construct, id: string, props?: StackProps) {    super(scope, id, props);
// スタックを定義するコードはここに記述します }}ダンジョンアドベンチャーゲームを構築するためにCDKコンストラクトをインスタンス化しましょう。
タスク7: インフラストラクチャーを更新する
Section titled “タスク7: インフラストラクチャーを更新する”生成されたコンストラクトの一部をインスタンス化するために、packages/infra/src/stacks/application-stack.tsを更新しましょう:
import {  GameApi,  GameUI,  InventoryMcpServer,  StoryAgent,  UserIdentity,} from ':dungeon-adventure/common-constructs';import { Stack, StackProps, CfnOutput } from 'aws-cdk-lib';import { Construct } from 'constructs';export class ApplicationStack extends Stack {  constructor(scope: Construct, id: string, props?: StackProps) {    super(scope, id, props);
    const userIdentity = new UserIdentity(this, 'UserIdentity');
    const gameApi = new GameApi(this, 'GameApi', {      integrations: GameApi.defaultIntegrations(this).build(),    });
    const mcpServer = new InventoryMcpServer(this, 'InventoryMcpServer');
    // Use Cognito for user authentication with the agent    const storyAgent = new StoryAgent(this, 'StoryAgent', {      identity: userIdentity,    });
    new CfnOutput(this, 'StoryAgentArn', {      value: storyAgent.agentCoreRuntime.agentRuntimeArn,    });    new CfnOutput(this, 'InventoryMcpArn', {      value: mcpServer.agentCoreRuntime.agentRuntimeArn,    });
    // Grant the agent permissions to invoke our mcp server    mcpServer.grantInvokeAccess(storyAgent);
    // Grant the authenticated role access to invoke the api    gameApi.grantInvokeAccess(userIdentity.identityPool.authenticatedRole);
    new GameUI(this, 'GameUI');  }}
import { Stack, StackProps } from 'aws-cdk-lib';import { GameApi, GameUI, InventoryMcpServer, StoryAgent, UserIdentity,} from ':dungeon-adventure/common-constructs';import { Stack, StackProps, CfnOutput } from 'aws-cdk-lib';import { Construct } from 'constructs';
export class ApplicationStack extends Stack { constructor(scope: Construct, id: string, props?: StackProps) { super(scope, id, props);
// The code that defines your stack goes here const userIdentity = new UserIdentity(this, 'UserIdentity');
const gameApi = new GameApi(this, 'GameApi', { integrations: GameApi.defaultIntegrations(this).build(), });
const mcpServer = new InventoryMcpServer(this, 'InventoryMcpServer');
// Use Cognito for user authentication with the agent const storyAgent = new StoryAgent(this, 'StoryAgent', { identity: userIdentity, });
new CfnOutput(this, 'StoryAgentArn', { value: storyAgent.agentCoreRuntime.agentRuntimeArn, }); new CfnOutput(this, 'InventoryMcpArn', { value: mcpServer.agentCoreRuntime.agentRuntimeArn, });
// Grant the agent permissions to invoke our mcp server mcpServer.grantInvokeAccess(storyAgent);
// Grant the authenticated role access to invoke the api gameApi.grantInvokeAccess(userIdentity.identityPool.authenticatedRole);
new GameUI(this, 'GameUI'); }}タスク8: コードをビルドする
Section titled “タスク8: コードをビルドする”Nxコマンド
単一 vs 複数ターゲット
Section titled “単一 vs 複数ターゲット”run-manyコマンドは、リストされた複数のサブプロジェクトでターゲットを実行します(--allはすべてをターゲットにします)。これにより、依存関係が正しい順序で実行されます。
プロジェクトで直接ターゲットを実行することで、単一のプロジェクトターゲットのビルド(または他のタスク)をトリガーすることもできます。たとえば、@dungeon-adventure/infraプロジェクトをビルドするには、次のコマンドを実行します:
pnpm nx build infrayarn nx build infranpx nx build infrabunx nx build infraスコープを省略して、Nxの省略構文を使用することもできます:
pnpm nx build infrayarn nx build infranpx nx build infrabunx nx build infra依存関係の可視化
Section titled “依存関係の可視化”依存関係を可視化するには、次を実行します:
pnpm nx graphyarn nx graphnpx nx graphbunx nx graph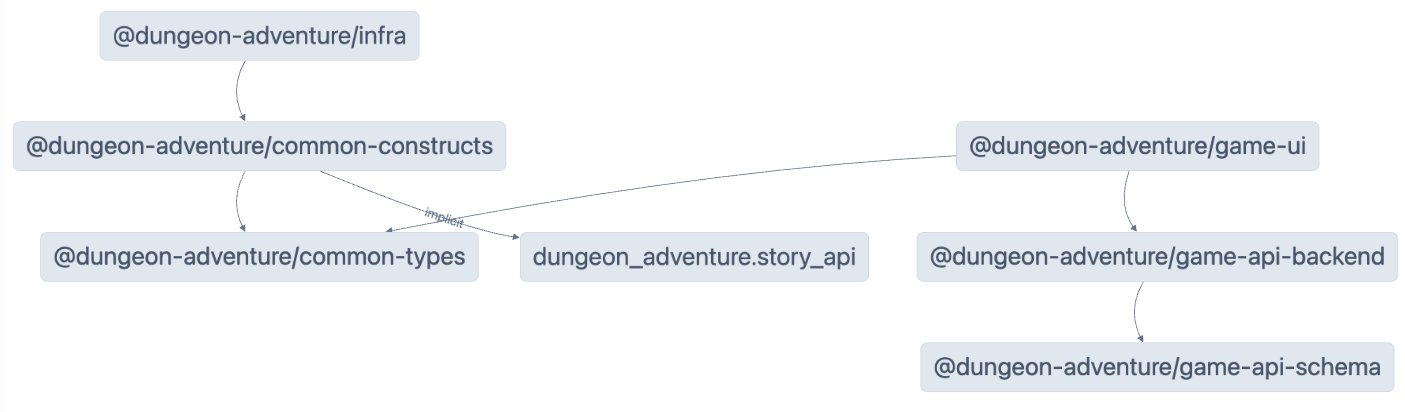
Nxはキャッシュに依存しているため、開発を高速化するために以前のビルドの成果物を再利用できます。これを正しく機能させるにはいくつかの設定が必要であり、キャッシュを使用せずにビルドを実行したい場合があります。そのためには、コマンドに--skip-nx-cache引数を追加するだけです。例:
pnpm nx build infra --skip-nx-cacheyarn nx build infra --skip-nx-cachenpx nx build infra --skip-nx-cachebunx nx build infra --skip-nx-cache何らかの理由でキャッシュ(.nxフォルダに保存)をクリアしたい場合は、次のコマンドを実行できます:
pnpm nx resetyarn nx resetnpx nx resetbunx nx resetコマンドラインを使用して、次のコマンドを実行して最初にリントの問題を修正します:
pnpm lintyarn lintnpm run lintbun lint次に、完全なビルドを実行するために次のコマンドを実行します:
pnpm buildyarn buildnpm run buildbun build次のプロンプトが表示されます:
 NX   The workspace is out of sync
[@nx/js:typescript-sync]: Some TypeScript configuration files are missing project references to the projects they depend on or contain outdated project references.
This will result in an error in CI.
? Would you like to sync the identified changes to get your workspace up to date? …Yes, sync the changes and run the tasksNo, run the tasks without syncing the changesこのメッセージは、NXが自動的に更新できるファイルを検出したことを示しています。この場合、参照プロジェクトにTypeScript参照が設定されていないtsconfig.jsonファイルを指しています。
Yes, sync the changes and run the tasksオプションを選択して続行します。同期ジェネレーターが不足しているTypeScript参照を自動的に追加するため、IDEに関連するすべてのインポートエラーが自動的に解決されることに気付くはずです!
すべてのビルド成果物は、モノレポのルートにあるdist/フォルダ内で利用できるようになりました。これは、@aws/nx-pluginによって生成されたプロジェクトを使用する場合の標準的な慣行であり、生成されたファイルでファイルツリーが汚染されることはありません。ファイルをクリーンにしたい場合は、ビルド成果物がファイルツリー全体に散らばることを心配せずにdist/フォルダを削除してください。
おめでとうございます!AIダンジョンアドベンチャーゲームのコアの実装を開始するために必要なすべてのサブプロジェクトを作成しました。🎉🎉🎉