Asset Management
This guide covers the full lifecycle of asset management in VAMS, including viewing, editing, versioning, file operations, relationships, and deletion. For initial asset creation, see Upload Your First Asset.
Viewing Assets
You can access assets through several paths in the VAMS interface:
| Method | Navigation |
|---|---|
| Search page | Select Assets and Files in the side navigation. Use text search, property filters, and view modes (table, card, map) to find assets. |
| Database listing | Select Databases, then select a database row to view all assets within that database. |
| Direct URL | Navigate directly to /#/databases/{databaseId}/assets/{assetId} to open a specific asset. |
| Relationships | From an asset's Relationships tab, select a linked asset to navigate to it. |
Asset Detail Page Layout
The asset detail page is organized into three vertically stacked sections:
Details Pane
The details pane is the top section and displays the asset's core properties alongside action buttons.
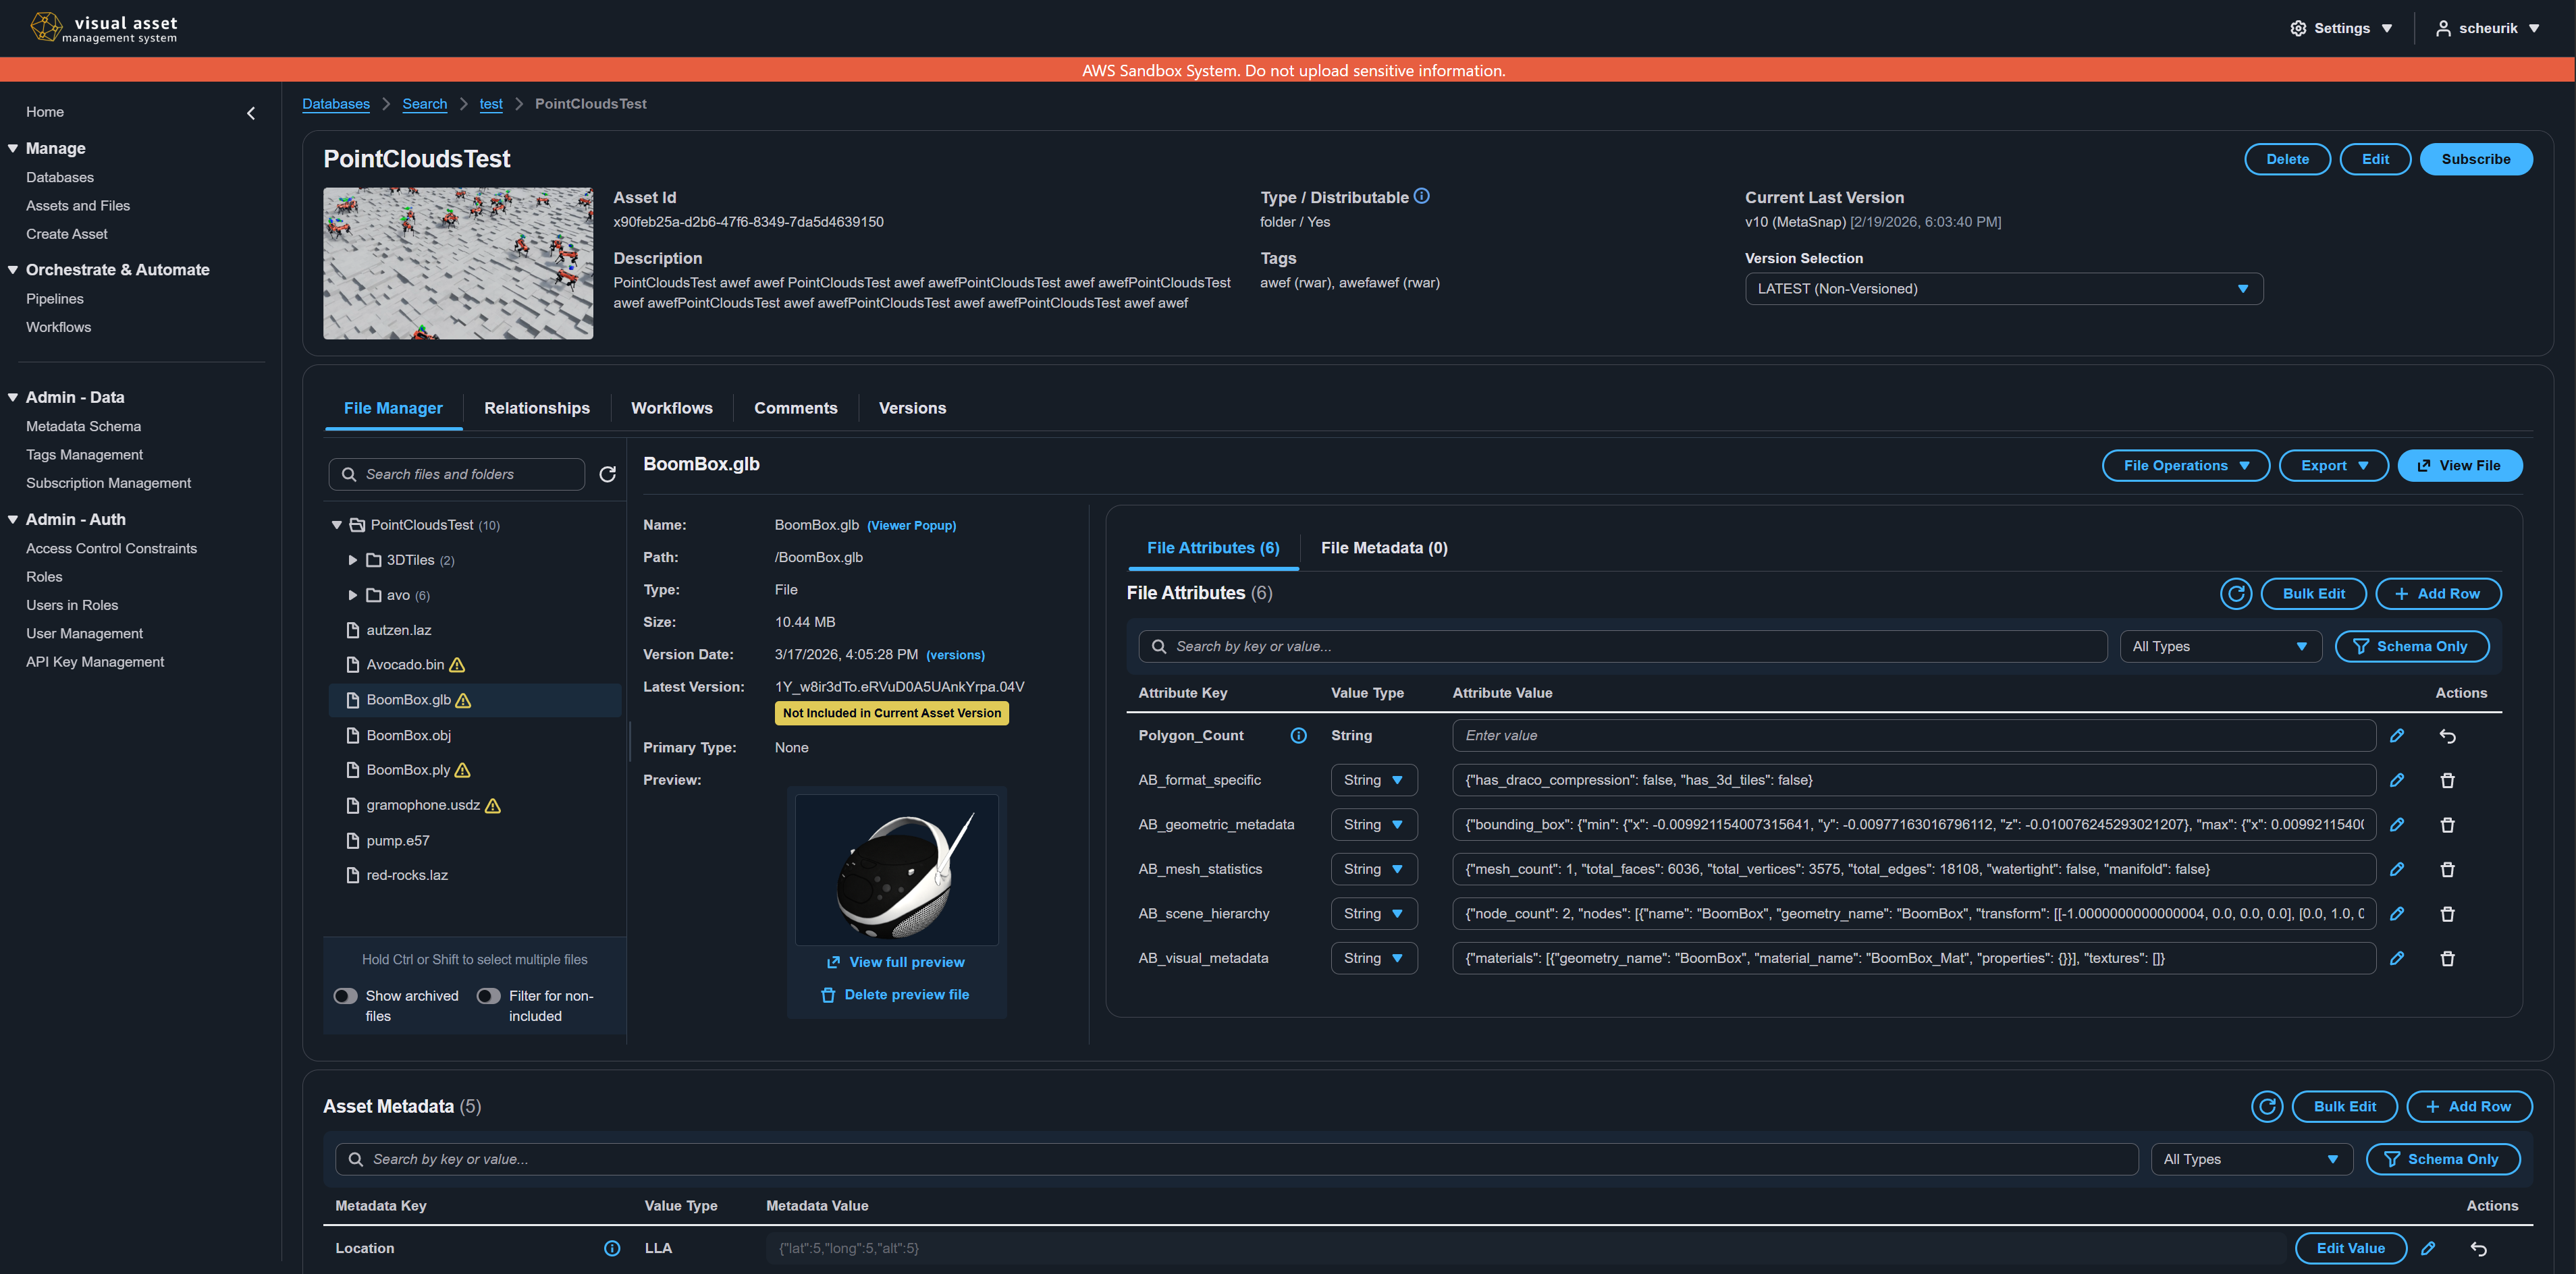
| Element | Description |
|---|---|
| Preview thumbnail | A clickable preview image (if available). Select it to open a full-size preview modal. |
| Asset Id | The unique system identifier for the asset. |
| Description | The asset's description text. |
| Type / Distributable | The asset type and download permission status. Hover over the info icon for a detailed explanation. |
| Tags | Tags assigned to the asset, displayed as a comma-separated list. |
| Version selector | A dropdown showing all versions. Select a version to view the asset at that point in time. When viewing a historical version, file operations become read-only. |
| Database | Shown in the breadcrumb trail. |
Action Buttons
The details pane header includes three action buttons:
| Button | Description |
|---|---|
| Delete | Opens the deletion modal. You can choose between archiving (soft delete) and permanent deletion. |
| Edit | Opens the update asset modal to modify the asset name, description, type, distributable status, and tags. |
| Subscribe / Subscribed | Toggles email notification subscription for asset version change events. When subscribed, you receive notifications when new versions are created. |
Tabbed Container
The tabbed container sits below the details pane and contains five tabs: File Manager, Relationships, Workflows, Comments, and Versions. Each tab is described in detail in the sections that follow.
Metadata Section
The metadata section at the bottom of the page displays and allows editing of all key-value metadata pairs. See Metadata Management for details.
Editing Asset Details
To modify an asset's properties:
- Select the Edit button in the details pane header.
- In the Update Asset modal, modify any of the following fields:
| Field | Description |
|---|---|
| Asset Name | The display name of the asset. |
| Description | A description of the asset's contents or purpose. |
| Asset Type | The file type classification. |
| Is Distributable | Whether file downloads are enabled for this asset. |
| Tags | Add or remove tags to categorize the asset. |
- Select Update to save your changes. The page refreshes to display the updated properties.
Asset Versioning
VAMS maintains a complete version history for every asset. Versions capture the state of the asset's files and metadata at a specific point in time.
Viewing Version History
- Open the asset detail page.
- Select the Versions tab in the tabbed container.
- The version list displays all versions sorted by date (newest first), including:
- Version ID -- The unique identifier for the version.
- Date Modified -- When the version was created.
- Alias -- An optional human-readable label.
- Comment -- An optional description of what changed in this version.
- Archive status -- Whether the version is archived.
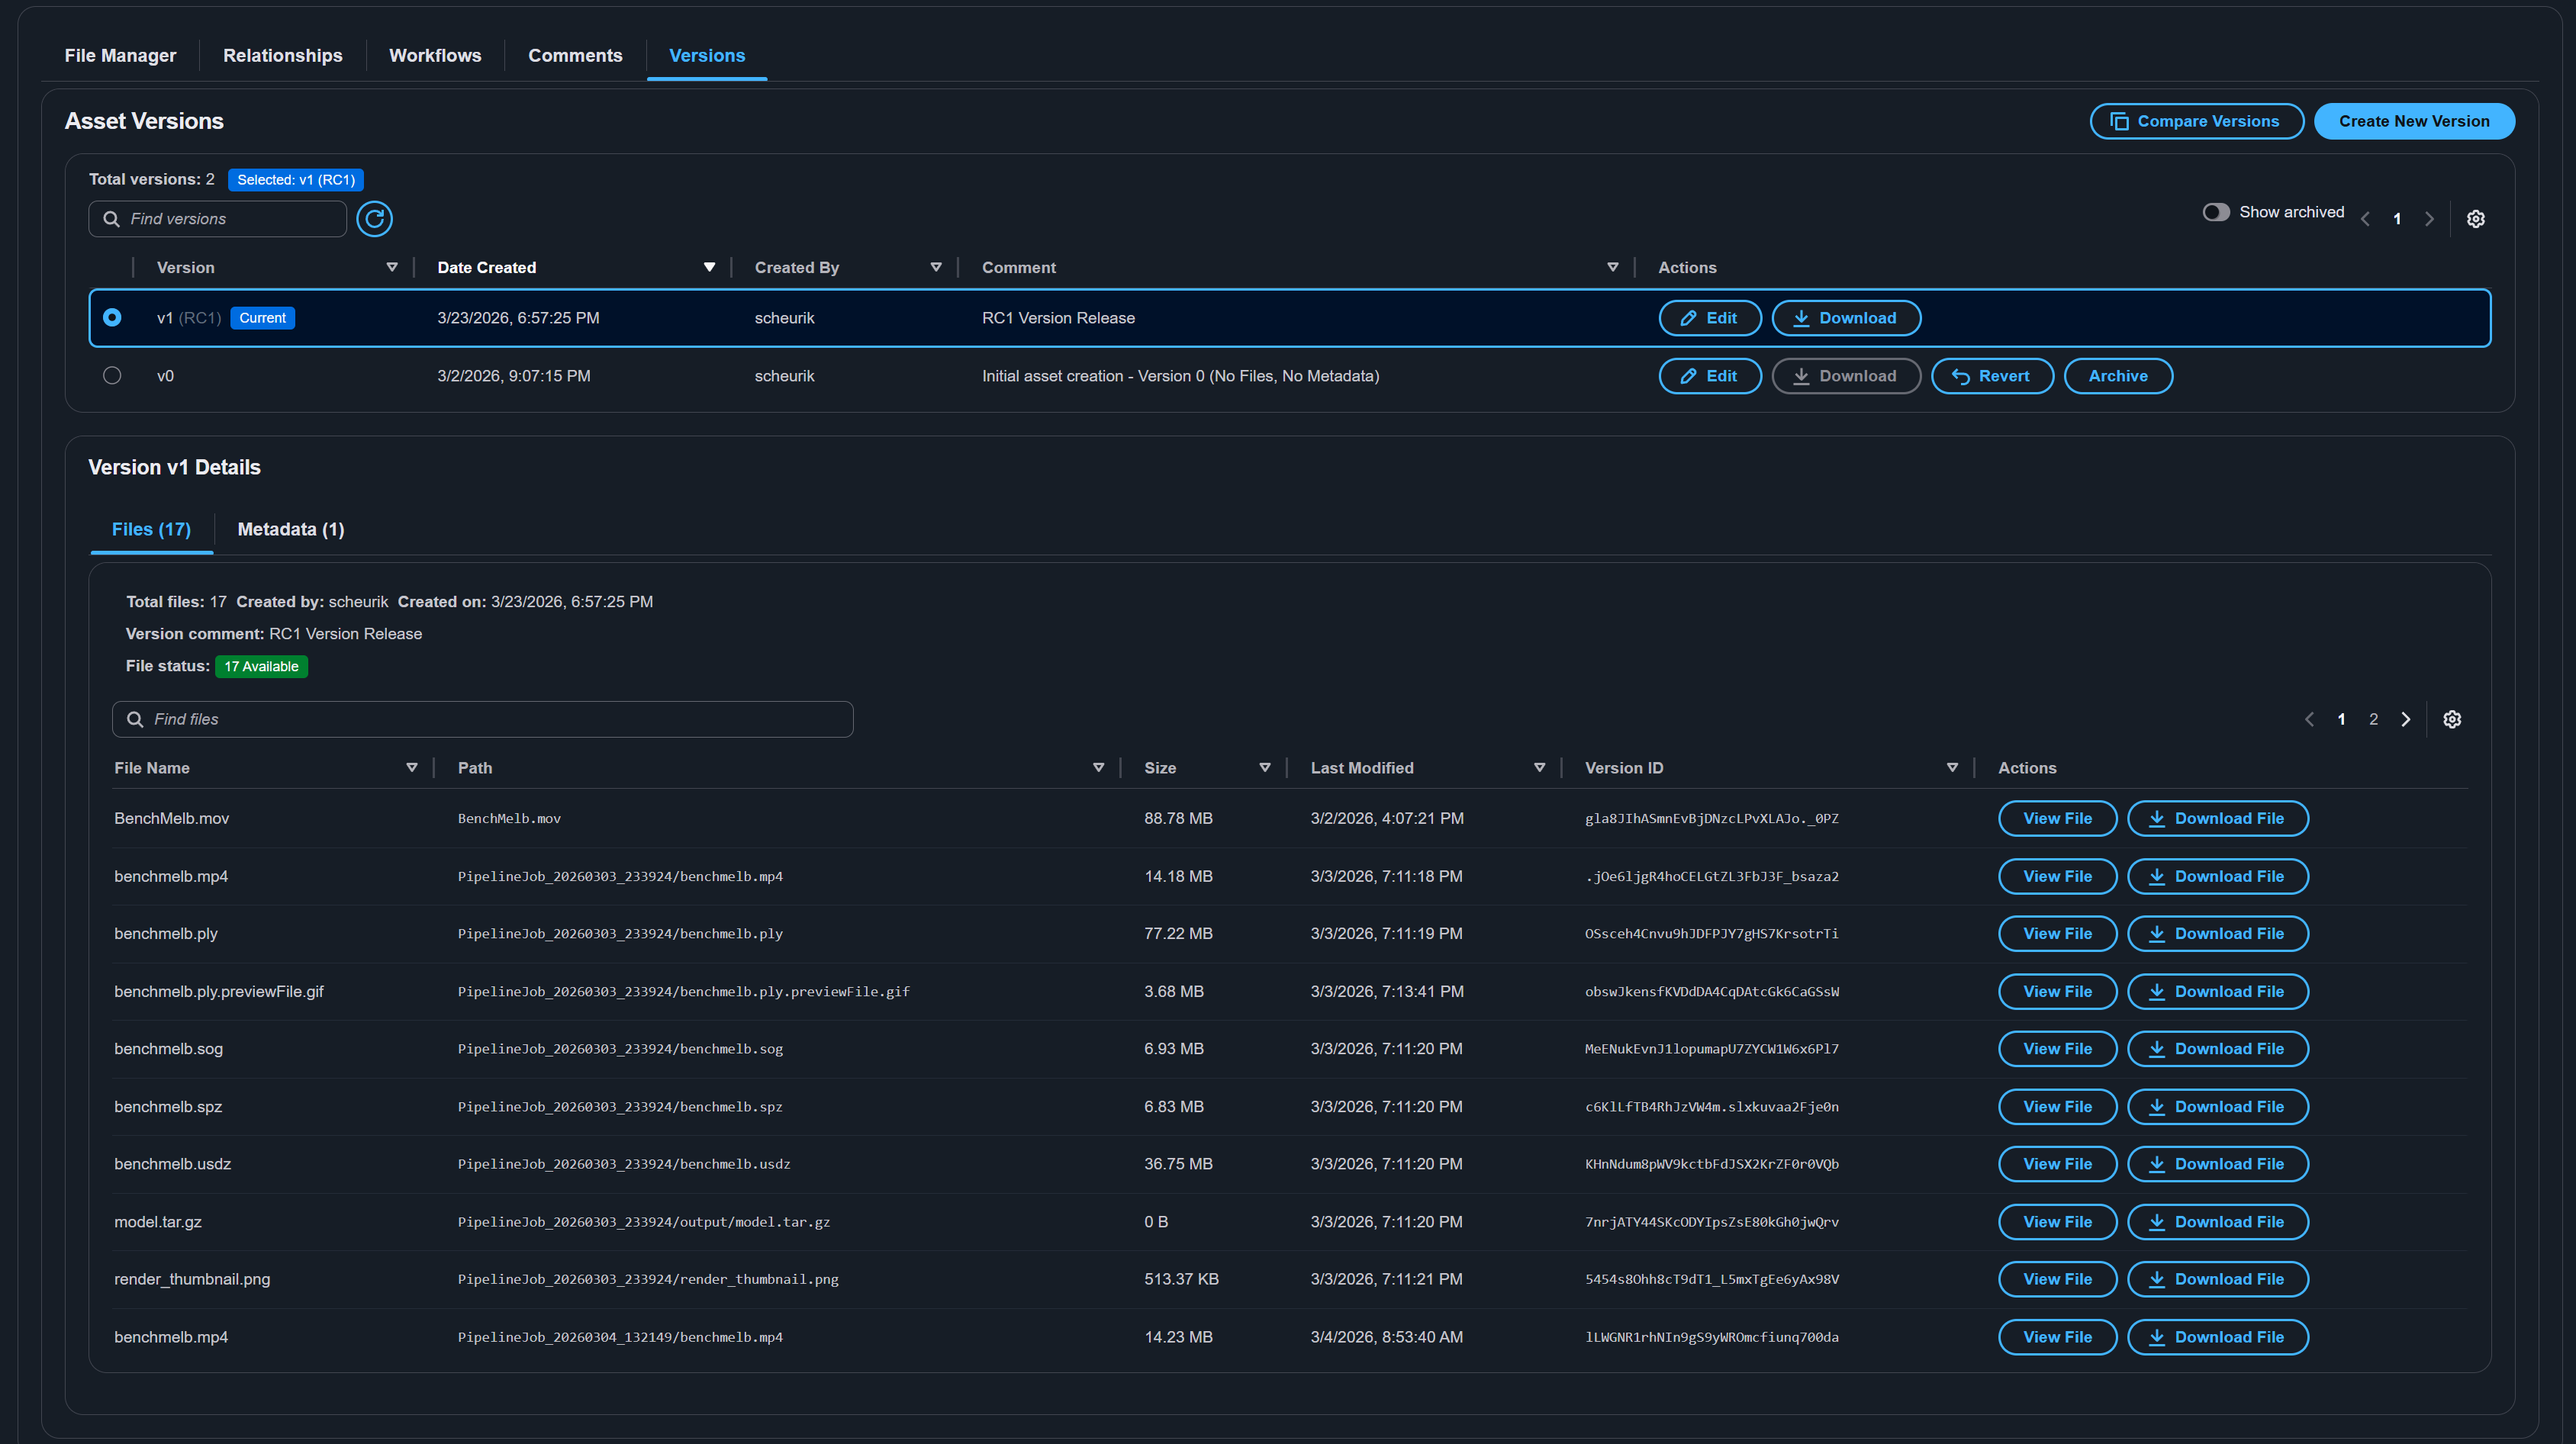
Selecting a Version
Use the version selector dropdown in the details pane to switch between versions:
-
Select the version dropdown.
-
Choose a version from the list. Each entry shows the version ID, date, and alias (if set).
-
The page updates to show the asset as it existed at that version:
- The File Manager tab displays files from the selected version (in read-only mode).
- The Metadata section shows metadata as it was at that version.
- The tab label updates to File Manager (v{versionId}).
-
To return to the current (latest) version, select the default option in the version dropdown or clear the version selection.
When viewing a historical version, all file operations (upload, move, copy, rename, delete) are disabled. The File Manager operates in read-only mode.
Creating a New Version
New versions are created automatically when changes are made to the asset's files. You can also create versions explicitly:
- Select the Versions tab.
- Use the Create Version action to create a new version snapshot of the current asset state.
- Optionally provide a version alias (a human-friendly label like "v2.0-final") and a version comment describing the changes.
Editing Version Details
To update a version's alias or comment:
- Select the Versions tab.
- Find the version in the list and select the Edit action.
- Modify the alias or comment fields.
- Select Save to apply changes.
Archiving and Unarchiving Versions
Archiving a version moves it to a lower-cost storage tier while retaining it in the version history:
- Select the Versions tab.
- Find the version and select the Archive action.
- Confirm the archive operation.
To restore an archived version:
- Find the archived version in the version list.
- Select the Unarchive action.
- Confirm the unarchive operation. The version becomes fully accessible again.
Reverting to a Previous Version
To restore the asset to the state of a previous version:
- Select the Versions tab.
- Find the target version and select the Revert action.
- Choose whether to include metadata restoration:
- With metadata -- Restores both files and metadata to the selected version's state.
- Without metadata -- Restores only files; current metadata is preserved.
- Confirm the revert operation. A new version is created that reflects the reverted state.
Reverting creates a new version rather than deleting later versions. The full version history is preserved for audit purposes.
File Management
The File Manager tab provides a split-pane interface for managing all files within an asset.
File Tree Navigation
The left panel displays a hierarchical directory tree:
- Folders are shown with folder icons and can be expanded or collapsed.
- Files are shown with file icons and display their name.
- Select any file or folder to view its details in the right panel.
- The root node shows the asset name and represents the top-level directory.
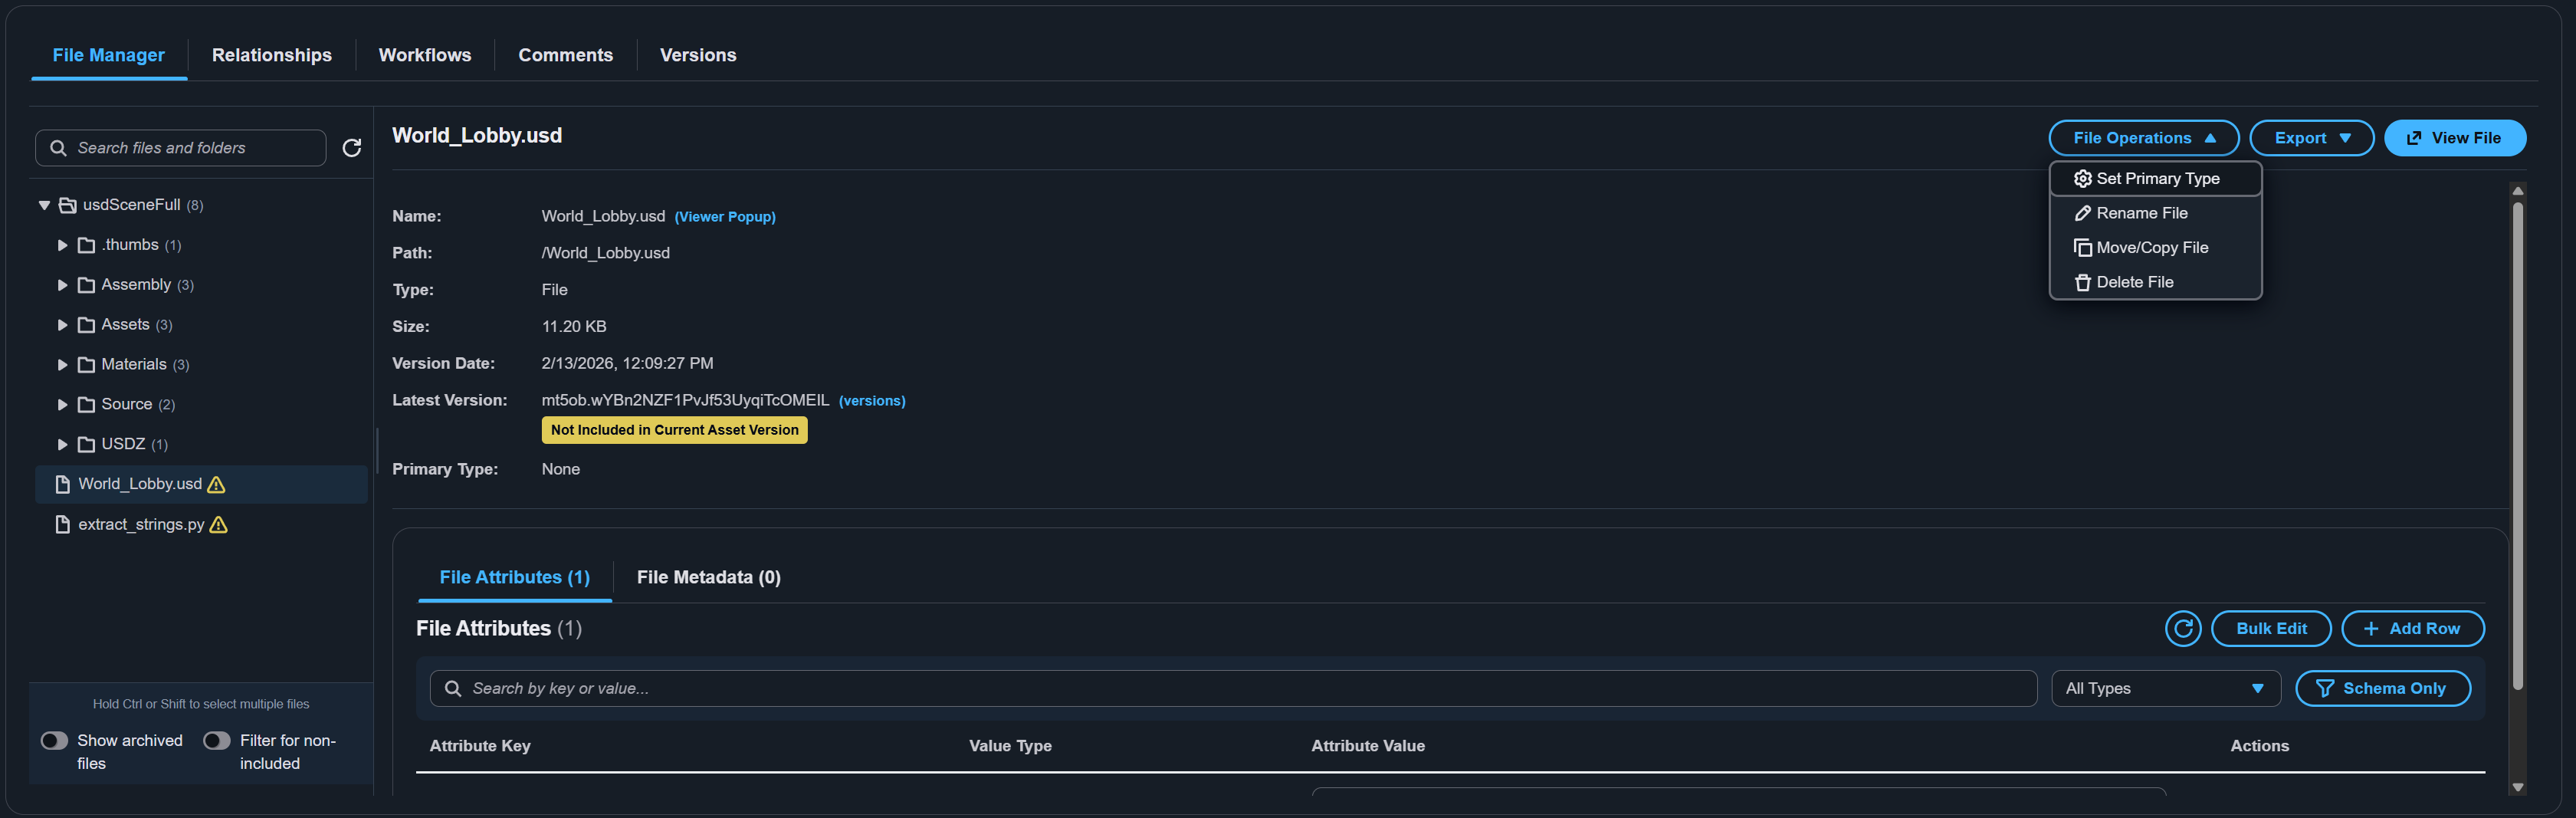
File Details Panel
When you select a file in the tree, the right panel displays:
| Property | Description |
|---|---|
| File name | The name of the selected file. |
| File path | The full relative path within the asset. |
| File size | The size of the file in human-readable format. |
| Last modified | The date and time the file was last modified. |
| Archive status | Whether the file is currently archived. |
| Preview | If the file has a preview image, it is displayed inline. |
| Actions | Contextual action buttons based on the file state. |
Uploading Additional Files
To add files to an existing asset:
- In the File Manager, use the upload controls to select files or folders.
- Files are uploaded to the current directory location in the asset's file hierarchy.
- Upload progress is displayed for each file.
You can also navigate to the dedicated upload page for the asset from the asset detail page to use the full upload wizard with metadata and relationship options.
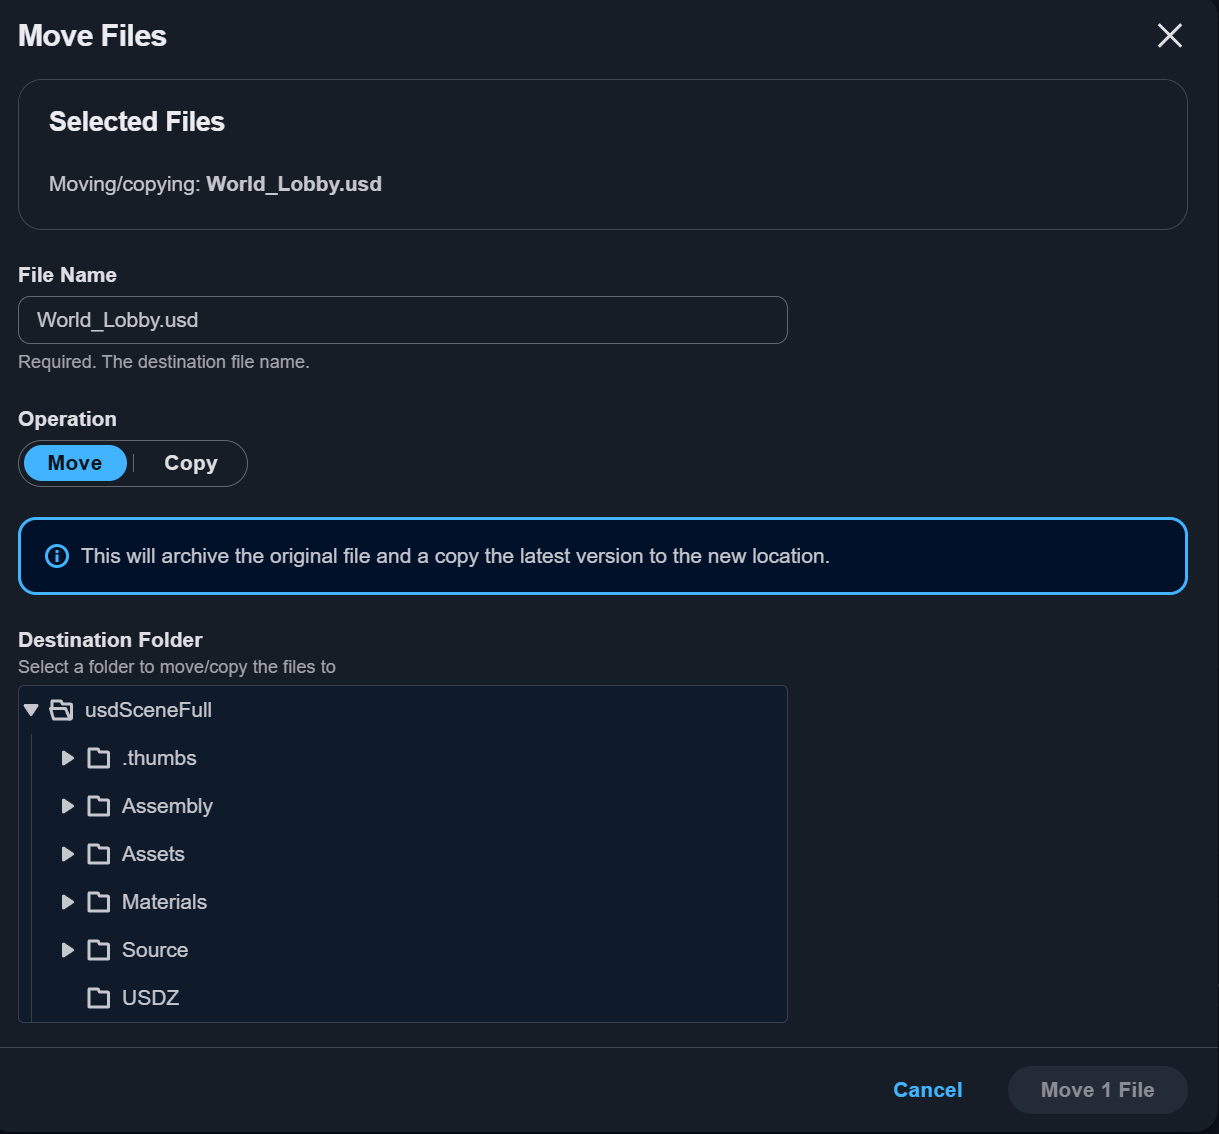
Moving and Renaming Files
To move or rename a file:
- Select the file in the directory tree.
- Select the Move/Rename action in the file details panel.
- Enter the new destination path or file name.
- Confirm the operation. The file tree updates to reflect the new location.
Moving a file changes its path within the asset but preserves its version history and metadata.
Copying Files
VAMS supports several copy operations:
| Copy Type | Description |
|---|---|
| Same asset | Copy a file to a different location within the same asset. |
| Different asset | Copy a file to another asset in the same database. |
| Cross-database | Copy a file to an asset in a different database. |
To copy a file:
- Select the file in the directory tree.
- Select the Copy action.
- Choose the destination: same asset, different asset, or cross-database.
- Specify the target path.
- Confirm the copy operation.
Creating Folders
To create a new folder in the asset's file structure:
- Navigate to the parent location in the directory tree.
- Select the Create Folder action.
- Enter the folder name.
- The new folder appears in the directory tree.
Archiving and Unarchiving Files
Archiving a file moves it to lower-cost storage while retaining it in the file listing:
- Select the file in the directory tree.
- Select the Archive action.
- Confirm the operation. The file is marked as archived and may not be downloadable until unarchived.
To unarchive:
- Enable the Show Archived toggle in the File Manager to display archived files.
- Select the archived file.
- Select the Unarchive action.
- Confirm the operation.
Permanently Deleting Files
Permanent deletion is irreversible. The file and all its versions are removed from Amazon S3.
To permanently delete a file:
- Select the file in the directory tree.
- Select the Delete action.
- In the confirmation dialog, choose Permanent Delete.
- Type the confirmation text if prompted.
- The file is permanently removed from the asset.
File Previews and Preview Management
Files can have associated preview thumbnails. These are generated by processing pipelines or uploaded manually.
- Automatic previews -- When preview-generating pipelines (such as 3D preview or point cloud preview) are configured and triggered via workflows, preview thumbnails are created automatically.
- Manual previews -- Upload a file named
{originalFile}.previewFile.{ext}(for example,model.gltf.previewFile.png) alongside the original file. Valid preview formats are.png,.jpg,.jpeg,.svg, and.gif.
Preview images appear in the file details panel and are used as thumbnails in search results.
Download and Share URLs
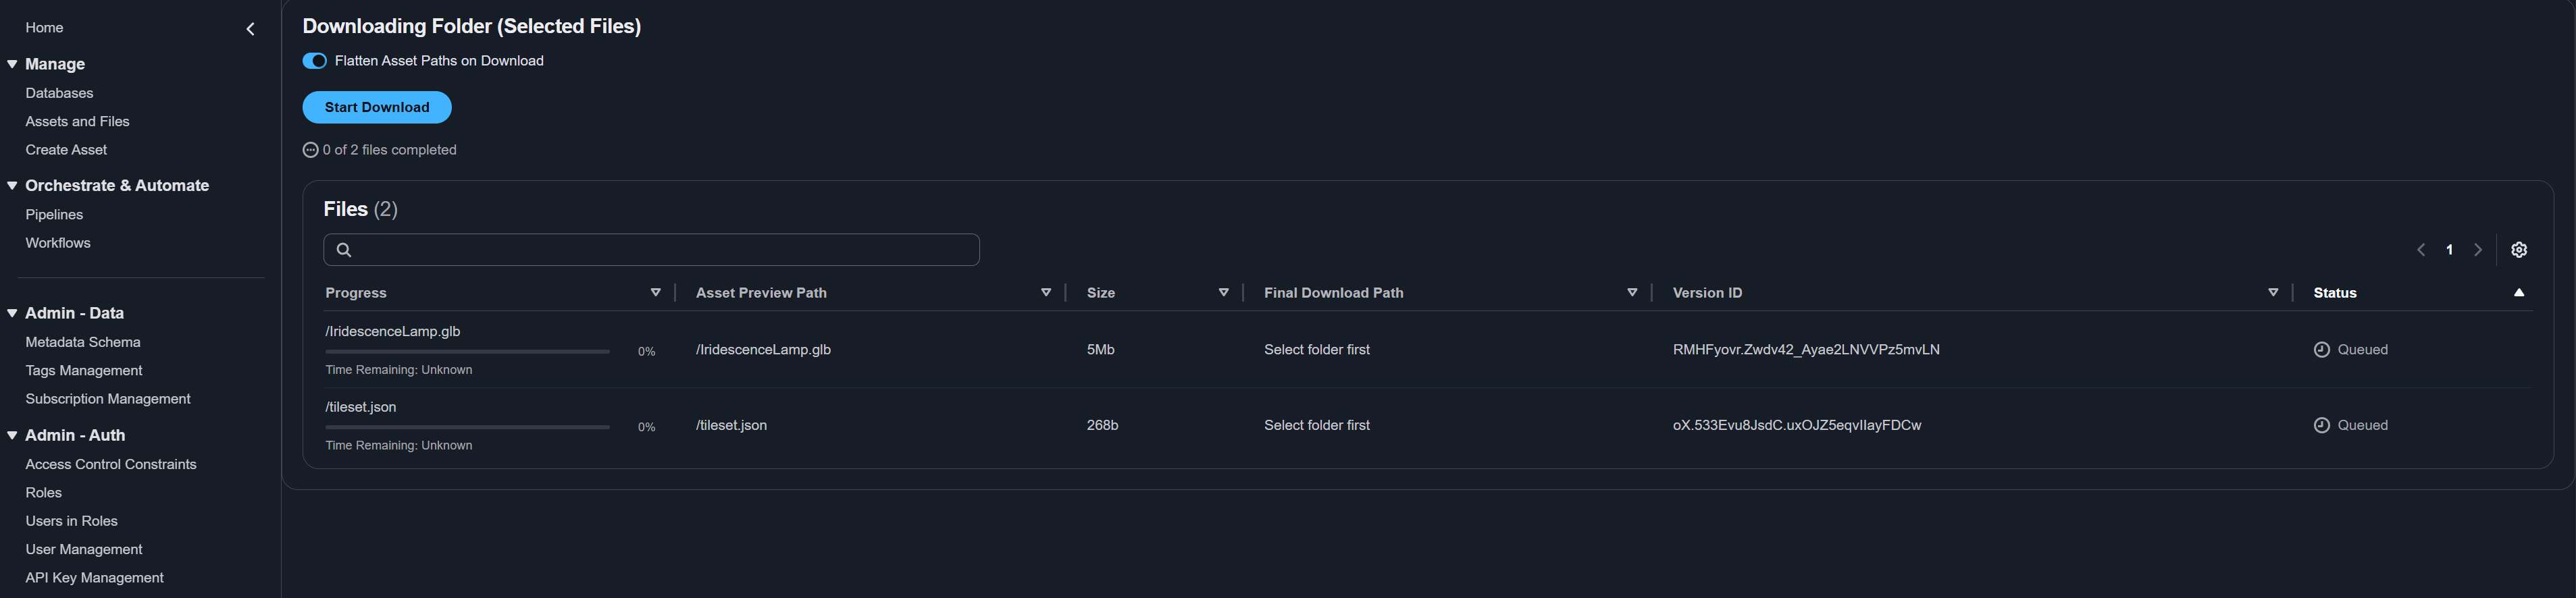
For distributable assets, you can generate shareable download URLs:
- Select a file in the directory tree.
- Select the Download action to download the file directly, or select Share to open the Share File URLs modal.
- Choose a URL type using the segmented control at the top of the modal:
- URLs (Embedded Auth) -- Generates time-limited presigned URLs with embedded authentication. These expire after the timeout configured by your administrator.
- URLs (API Stream) -- Generates long-lasting streaming URLs that require an Authorization header with a Bearer token. These do not expire as long as the caller is authenticated.

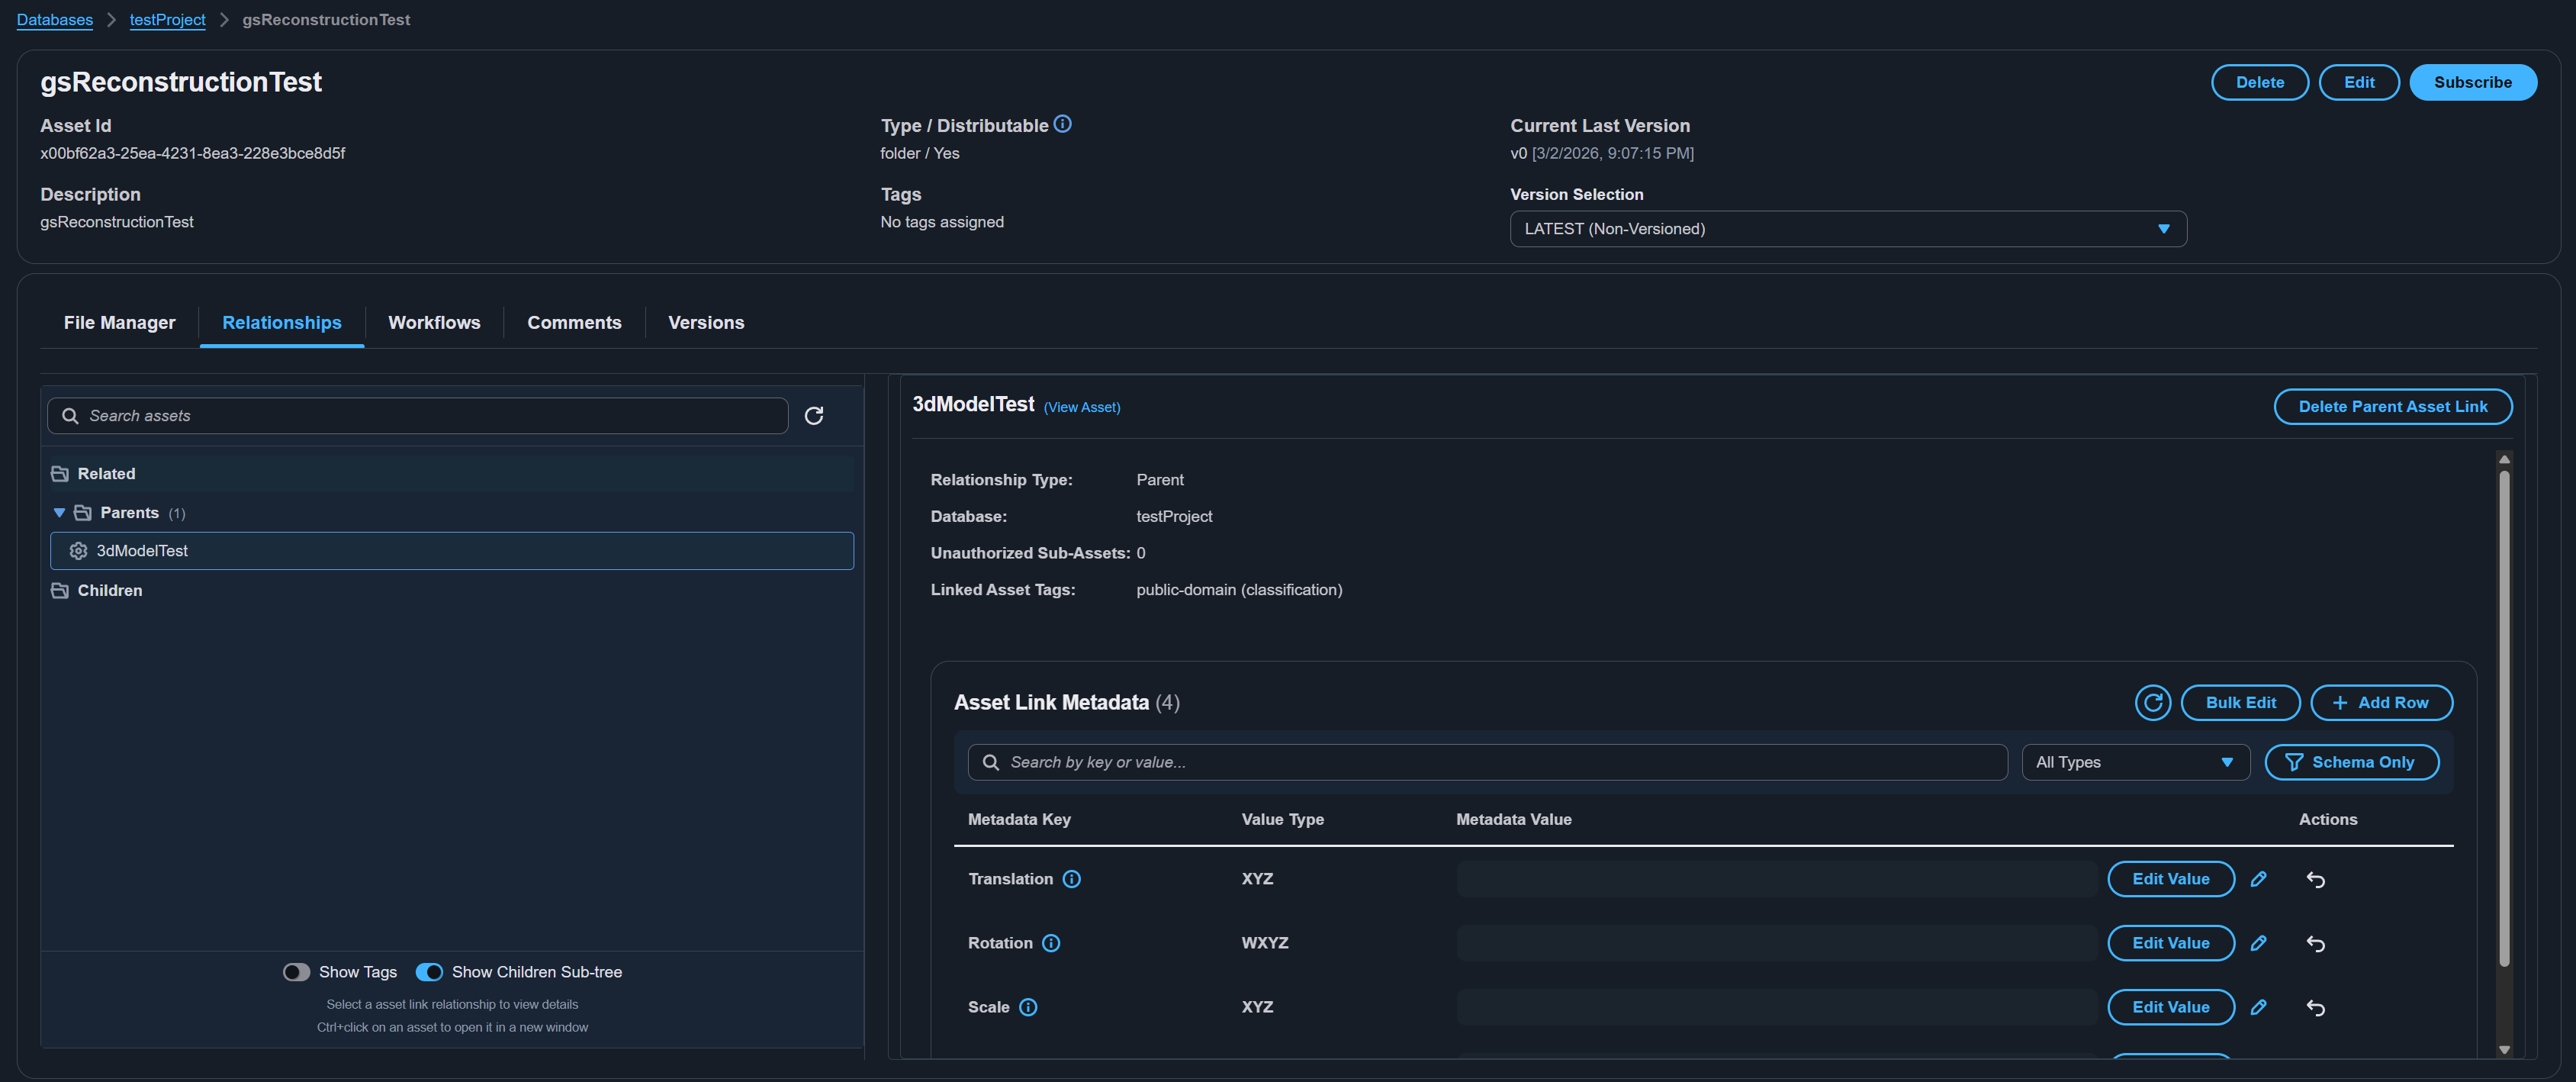
Asset Relationships
The Relationships tab allows you to view and manage links between assets. Relationships help model real-world hierarchies and associations between visual assets.
Relationship Types
| Type | Description |
|---|---|
| Parent | The current asset is a child of the parent asset. Models hierarchical "belongs to" relationships. |
| Child | The selected asset is a child of the current asset. Inverse of the parent relationship. |
| Related | A general association between two assets with no hierarchy implied. |
Viewing Relationships
- Select the Relationships tab on the asset detail page.
- Relationships are organized by type (Parent, Child, Related).
- Each linked asset shows its name, database, and any relationship metadata.
- Select a linked asset to navigate to its detail page.
Adding Relationships
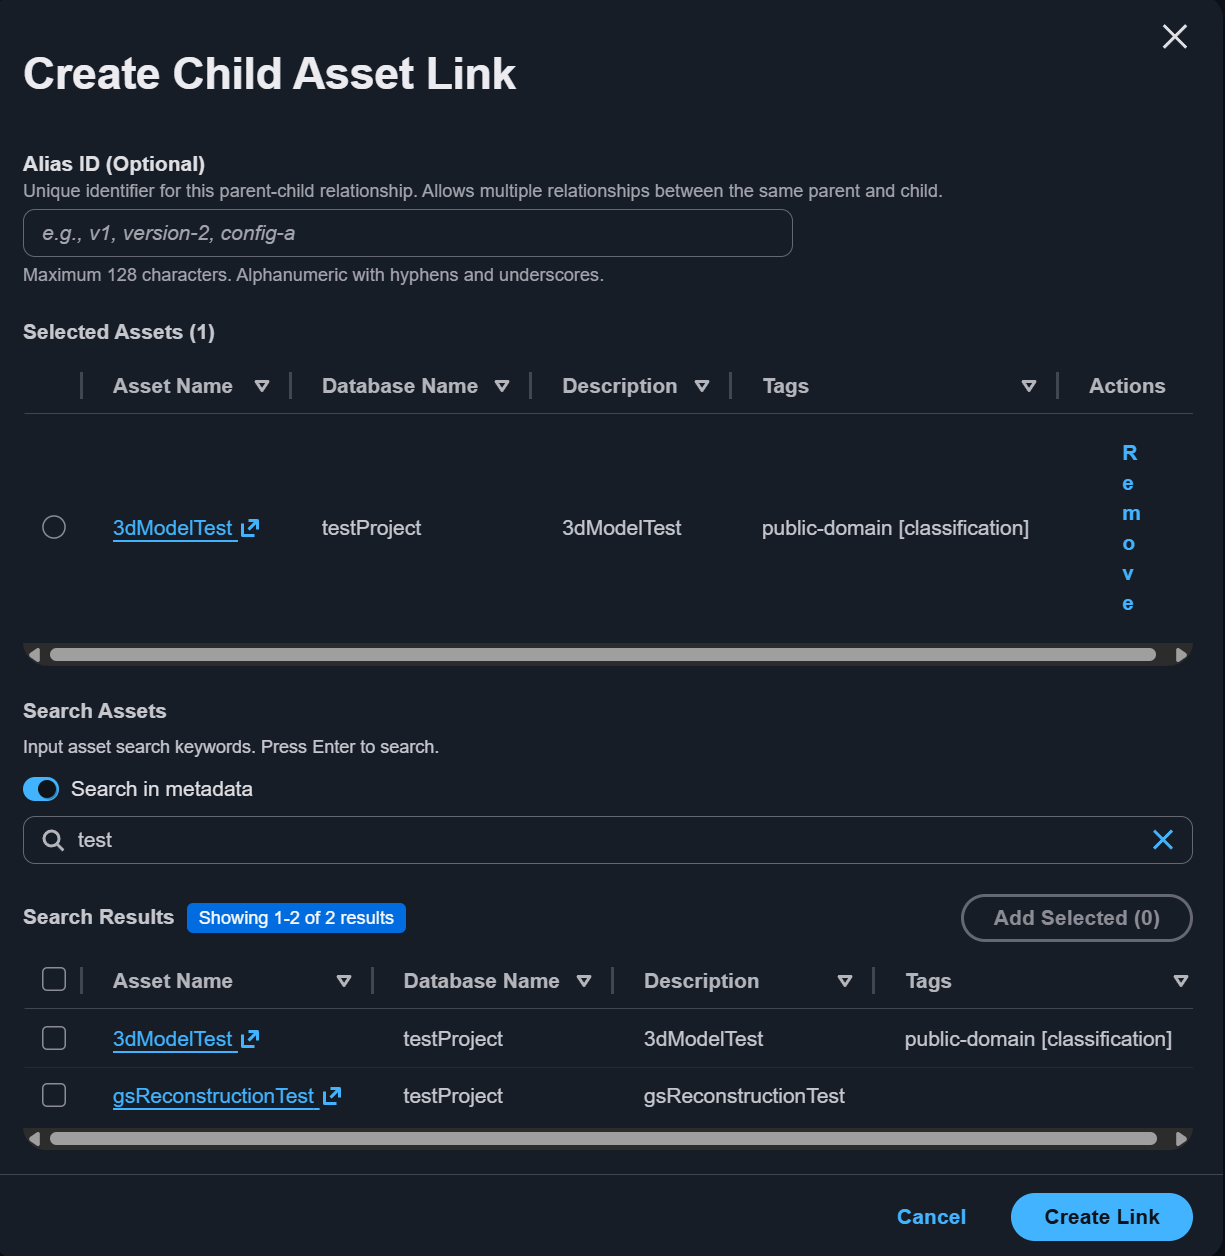
- In the Relationships tab, select the Add action for the desired relationship type.
- Use the asset selector to search for and select the target asset. You can search across databases.
- Optionally add metadata to the relationship link to describe the nature of the connection.
- Confirm the relationship. It appears immediately in the relationships list.
Removing Relationships
- Find the relationship in the list.
- Select the Remove action.
- Confirm removal. The link is deleted, but neither asset is affected.
Relationships are bidirectional in display. If Asset A is a parent of Asset B, then Asset B's relationships tab shows Asset A as a parent. Removing the relationship from either side removes it from both.
Asset Archive and Unarchive
Archiving an asset is a soft-delete operation that hides it from default search results while preserving all data.
Archiving an Asset
- On the asset detail page, select the Delete button.
- In the deletion modal, choose Archive.
- Confirm the operation.
- The asset is archived and no longer appears in standard search results.
Unarchiving an Asset
- In the search page, enable the option to show archived assets.
- Find the archived asset.
- On its detail page, use the restore action to unarchive it.
- The asset becomes visible in standard search results again.
Permanent Asset Deletion
Permanent deletion is irreversible. The asset, all its files in Amazon S3, all version history, metadata, and relationships are permanently destroyed.
To permanently delete an asset:
- On the asset detail page, select the Delete button.
- In the deletion modal, choose Permanent Delete.
- Type the confirmation text to acknowledge the irreversible nature of the operation.
- Select Confirm.
- You are redirected to the search page after successful deletion.
Comments
The Comments tab provides a collaborative discussion space for each asset. Team members can leave notes, observations, or review feedback directly on the asset without needing external communication tools.
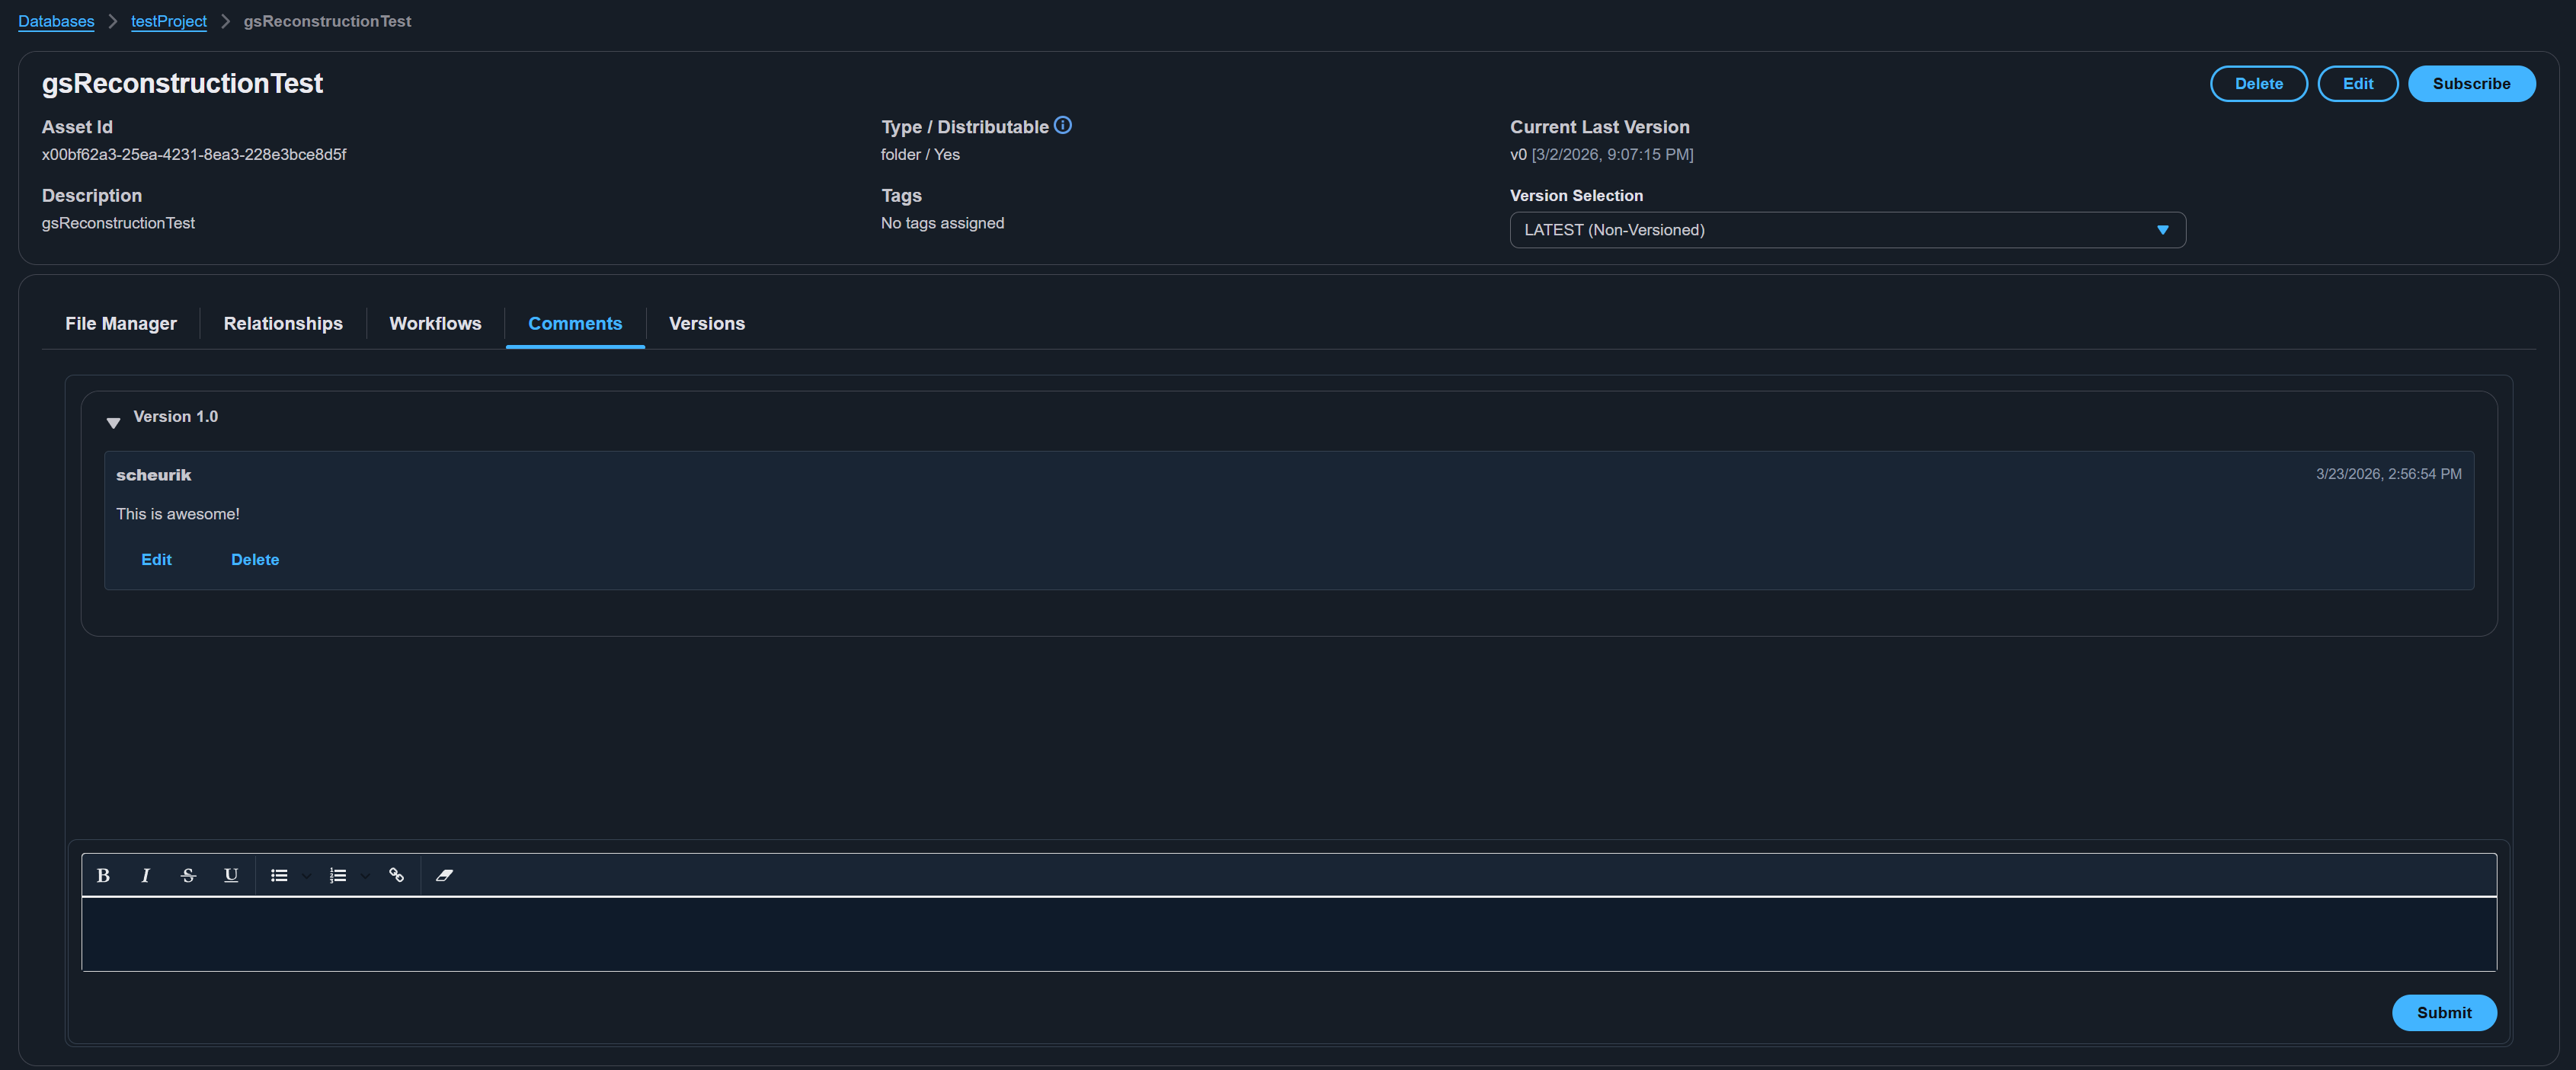
Adding a Comment
- Select the Comments tab on the asset detail page.
- Type your comment in the rich text editor at the bottom. The editor supports bold, italic,
strikethrough, underline, ordered/unordered lists, and links. - Select Add Comment to post.
Viewing Comments
Comments are displayed in chronological order with the most recent at the top. Each comment shows:
- The author's user ID
- The timestamp
- The full comment content with rich text formatting
Editing and Deleting Comments
- Comments can be deleted by selecting the delete icon next to a comment.
- Currently, comments cannot be edited after posting — delete and re-add if changes are needed.
Comments are tied to the asset, not to a specific version. All comments remain visible regardless of which version is selected in the version selector.
Workflow Executions
The Workflows tab shows the execution history of all workflows that have been run against the asset. This provides a centralized view of processing activities without needing to navigate to the workflow management pages.
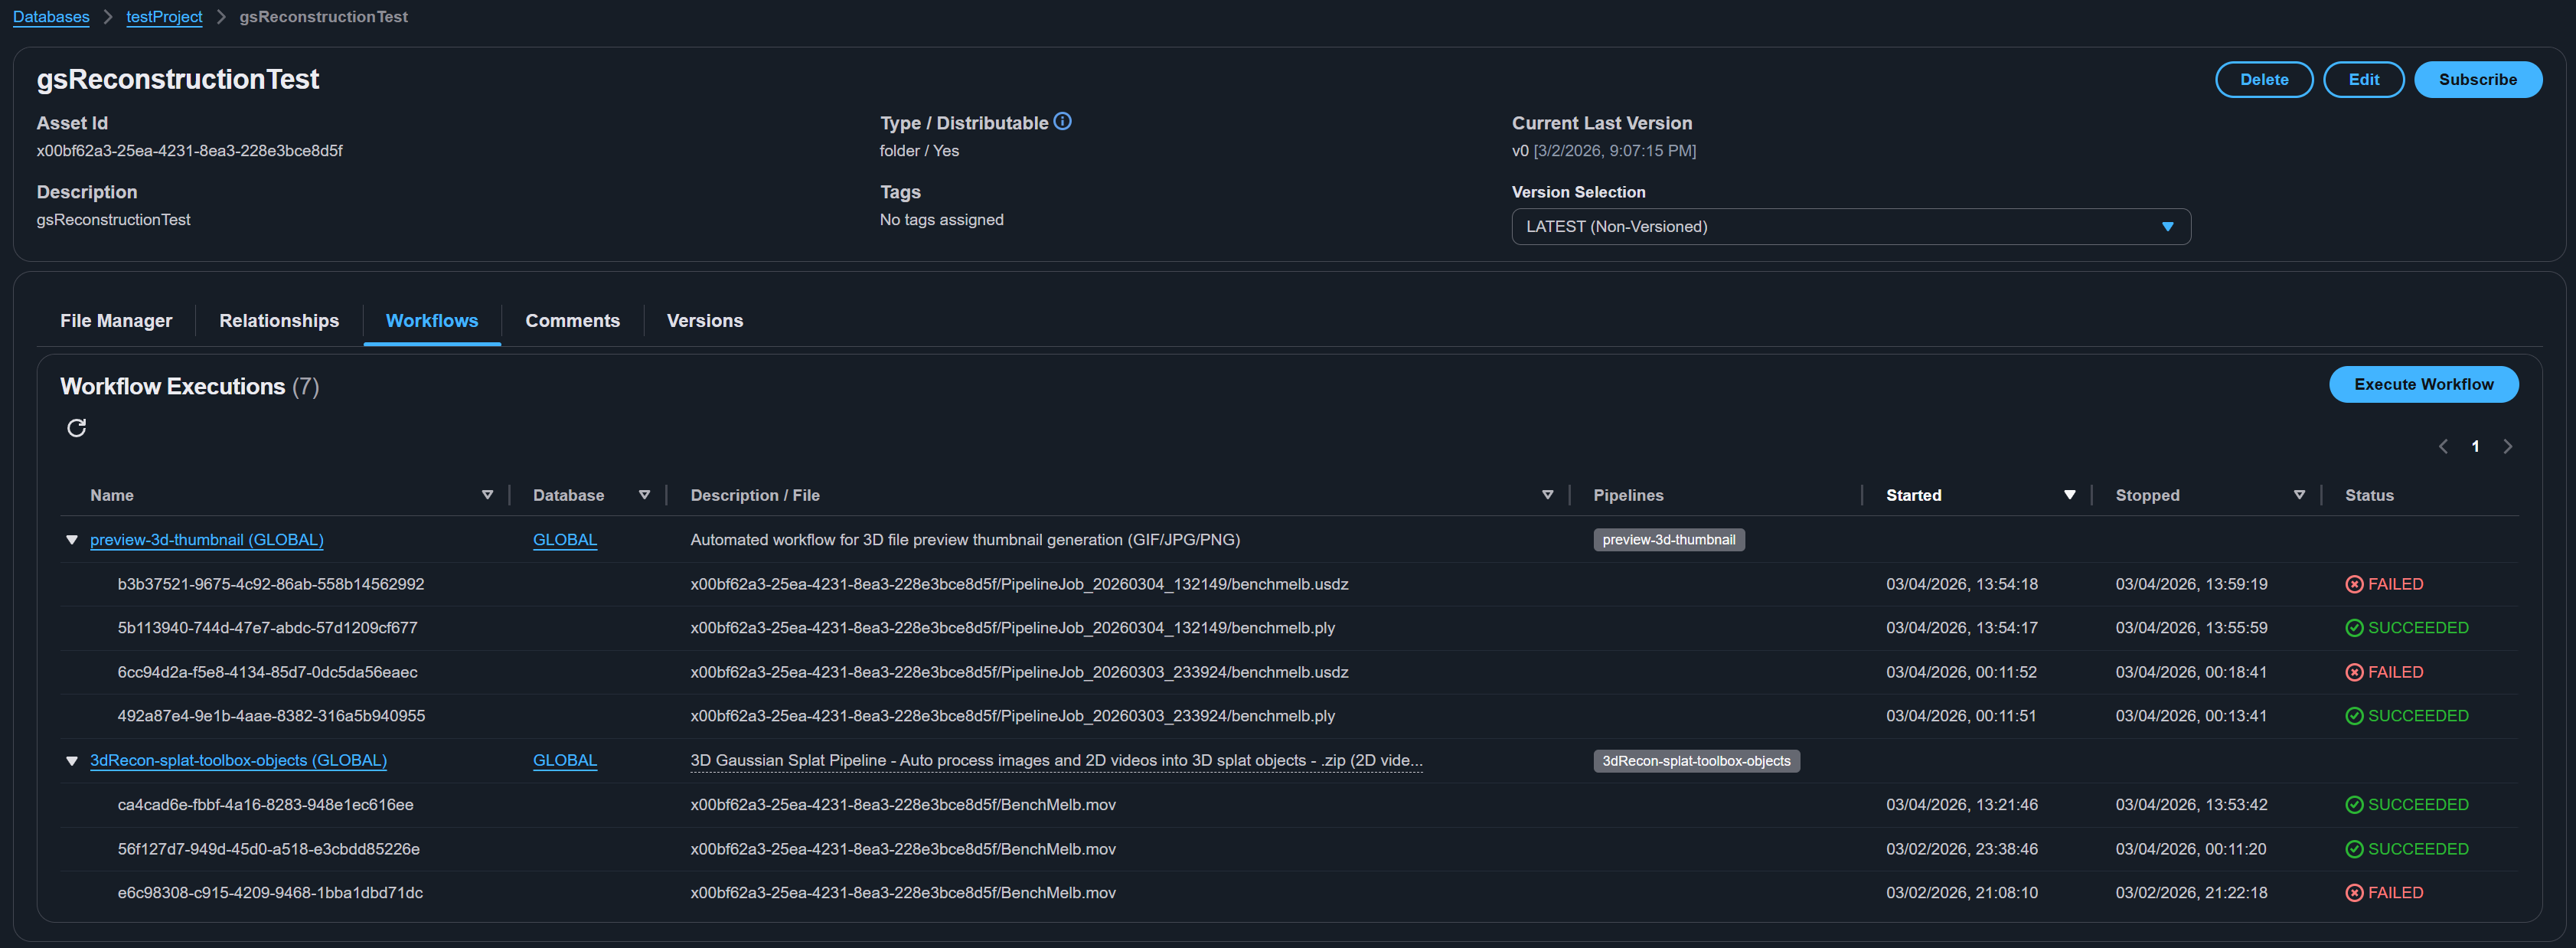
Viewing Execution History
- Select the Workflows tab on the asset detail page.
- Executions are grouped by workflow, with each workflow showing its list of individual executions.
- Each execution displays:
- The workflow name
- Execution status (Running, Succeeded, Failed, Timed Out, Aborted)
- Start time
- Input file(s) that triggered the execution
Executing a Workflow from the Asset Page
You can start a new workflow execution directly from the asset detail page:
- Select the Execute Workflow button above the workflows tab.
- Choose the workflow to run from the dropdown.
- Select the input file(s) for processing (or select the entire asset).
- Confirm the execution.
The new execution appears in the workflow tab immediately with a Running status. The tab auto-refreshes to show status updates.
Auto-Triggered Workflows
If a workflow has auto-trigger configured (based on file extension matching), executions appear automatically after uploading files that match the trigger pattern. These are displayed the same way as manually triggered executions.
For detailed workflow creation and management, see Pipelines and Workflows.
Subscription Notifications
VAMS can notify you when asset versions change. This is useful for staying informed about updates to assets you depend on.
Subscribing to an Asset
- On the asset detail page, select the Subscribe button in the details pane header.
- A confirmation message appears indicating that a subscription has been created for the Asset Version Change event.
- Check your email inbox for a subscription confirmation message and confirm the subscription.
Unsubscribing from an Asset
- On the asset detail page, the button displays Subscribed (with a bell icon) when you have an active subscription.
- Select the Subscribed button to unsubscribe.
- A confirmation message appears indicating successful unsubscription.
Manage all your subscriptions from the Subscription Management page under Admin - Data in the side navigation.
Asset operations can also be performed via the command line. See CLI Asset Commands and CLI File Commands.
Related Topics
- Upload Your First Asset -- Step-by-step asset creation tutorial
- Web Interface Overview -- Complete tour of all VAMS pages
- Metadata Management -- Working with metadata and metadata schemas
- Pipelines and Workflows -- Automating asset processing
- Tags -- Organizing assets with tags
- Subscriptions -- Receiving change notifications