Install your Engineering Development Hub cluster
Step 1 - Pre-Requisite
Installation of EDH is fully automated by Amazon Cloud Development Kit (CDK). Prior to installing EDH:
-
Make sure you have an AWS account with a Security Keypair configured.
-
You must create an Amazon S3 bucket. This bucket will be used to store the installer artifacts.
-
Some basic understanding of how Amazon Cloud Development Kit (CDK) works.
Check your account limits first
A first deployment can fail if your account runs into service quotas. Before you start, confirm you have enough headroom in the region you are deploying to, in particular for Elastic IP addresses, VPCs, and vCPU limits for the instance types you plan to use. You can request increases from the AWS Service Quotas console.
Step 2 - Minimal IAM permissions required
IAM policies required to install EDH
This step is optional if:
- You already have an IAM user/role with Admin privileges configured.
- You are planning to install EDH via AWS CloudShell, as CloudShell already has all the required permissions.
For environments where least-privilege is required, EDH provides scoped-down IAM policy files under installer/policy_permissions. You create four policies, attach them to a dedicated installer user, and then pass them to the installer.
You may not need every permission
Permissions are additive based on the features you enable. For example, if you are not using the AWS Backup integration, the backup:* actions are not required.
The installer user is temporary
The IAM user or role used to run the installer is only needed during deployment and can be safely deleted afterward. All IAM roles that EDH creates at runtime (compute nodes, login nodes, Lambda functions, and so on) are already scoped to least privilege.
The four policy files are:
| Policy file | Suggested policy name | Purpose |
|---|---|---|
EDHInstallerPolicy_01.json |
EDHInstallerPolicy_01 |
Core infrastructure provisioning |
EDHInstallerPolicy_02.json |
EDHInstallerPolicy_02 |
Core infrastructure provisioning |
EDHInstallerCDKIamPolicy.json |
EDHInstallerCDK |
CDK bootstrap permissions |
EDHUninstallPolicy.json |
EDHUninstallPolicy |
Stack teardown and cleanup |
1. Update the CDK policy placeholders
Open EDHInstallerCDKIamPolicy.json and replace the placeholders with your own values: your 12-digit AWS account ID, and the names you will give the two installer policies and the uninstall policy. You can do this in one command (replace 123456789012 with your account ID):
sed -i '' \
    -e 's/<AWS_ACCOUNT_ID_REPLACE_ME>/123456789012/g' \
    -e 's/<NAME_OF_YOUR_EDH_INSTALLER_POLICY_01>/EDHInstallerPolicy_01/g' \
    -e 's/<NAME_OF_YOUR_EDH_INSTALLER_POLICY_02>/EDHInstallerPolicy_02/g' \
    -e 's/<NAME_OF_YOUR_EDH_UNINSTALLER_POLICY>/EDHUninstallPolicy/g' \
    installer/policy_permissions/EDHInstallerCDKIamPolicy.json
On Linux, use sed -i without the empty '' argument.
2. Create the four IAM policies
In the console, go to IAM > Policies, click Create policy, select the JSON tab, and paste the contents of each file. Name each policy to match its file (for example, EDHInstallerPolicy_01), and repeat for all four files.
Or, using the AWS CLI:
aws iam create-policy --policy-name EDHInstallerPolicy_01 \
    --policy-document file://installer/policy_permissions/EDHInstallerPolicy_01.json
aws iam create-policy --policy-name EDHInstallerPolicy_02 \
    --policy-document file://installer/policy_permissions/EDHInstallerPolicy_02.json
aws iam create-policy --policy-name EDHInstallerCDK \
    --policy-document file://installer/policy_permissions/EDHInstallerCDKIamPolicy.json
aws iam create-policy --policy-name EDHUninstallPolicy \
    --policy-document file://installer/policy_permissions/EDHUninstallPolicy.json
3. Create the installer user and attach the policies
In the console, go to IAM > Users, click Create user, name it edh-installer, choose Attach policies directly, and select all four policies you just created.
Or, using the AWS CLI (replace <ACCOUNT_ID> with your 12-digit AWS account ID):
aws iam create-user --user-name edh-installer

aws iam attach-user-policy --user-name edh-installer \
    --policy-arn arn:aws:iam::<ACCOUNT_ID>:policy/EDHInstallerPolicy_01
aws iam attach-user-policy --user-name edh-installer \
    --policy-arn arn:aws:iam::<ACCOUNT_ID>:policy/EDHInstallerPolicy_02
aws iam attach-user-policy --user-name edh-installer \
    --policy-arn arn:aws:iam::<ACCOUNT_ID>:policy/EDHInstallerCDK
aws iam attach-user-policy --user-name edh-installer \
    --policy-arn arn:aws:iam::<ACCOUNT_ID>:policy/EDHUninstallPolicy
4. Create an access key and configure your shell
Create an access key for the edh-installer user (in the console: Security credentials > Create access key > Command Line Interface), then make it available in your shell. A named profile is recommended:
# Add to ~/.aws/credentials
[edh-installer]
aws_access_key_id = AKIA...
aws_secret_access_key = ...
export AWS_PROFILE=edh-installer
When you run the installer in Step 5, pass all four policy ARNs so that CDK deploys with least privilege:
./installer/edh_installer.sh \
    --cdk-cloudformation-execution-policies "arn:aws:iam::<ACCOUNT_ID>:policy/EDHInstallerCDK" \
    --cdk-cloudformation-execution-policies "arn:aws:iam::<ACCOUNT_ID>:policy/EDHInstallerPolicy_01" \
    --cdk-cloudformation-execution-policies "arn:aws:iam::<ACCOUNT_ID>:policy/EDHInstallerPolicy_02" \
    --cdk-cloudformation-execution-policies "arn:aws:iam::<ACCOUNT_ID>:policy/EDHUninstallPolicy"
Step 3 - Download EDH
You can choose to install EDH via AWS CloudShell or using your own Linux/Mac/Windows computer:
The easiest option is to install EDH via AWS CloudShell. Launch the AWS CloudShell in the region you are planning to install EDH by clicking the icon in the top right as indicated in the picture below.
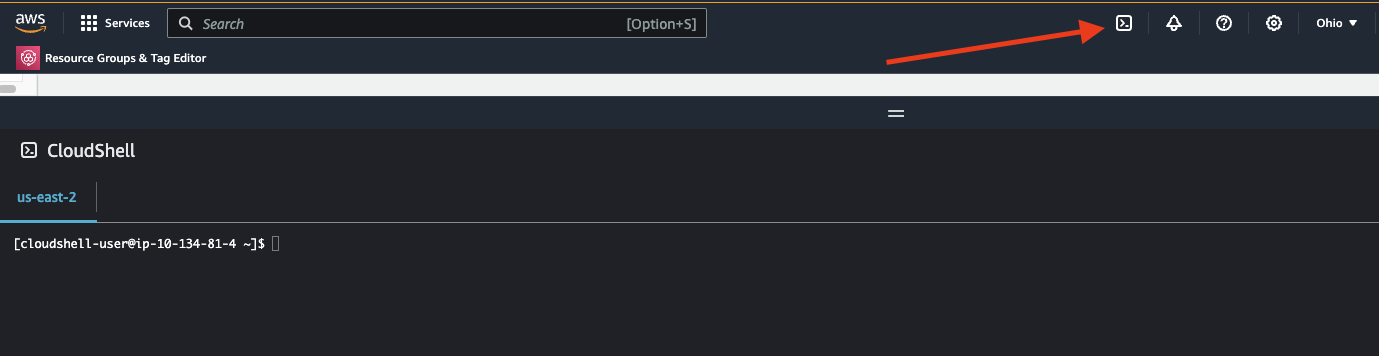
This will open a shell where you can copy/paste commands. Install the build dependencies used to compile Python if needed:
sudo dnf install -y gcc zlib zlib-devel openssl-devel ncurses-devel libffi-devel sqlite-devel readline-devel readline bzip2 bzip2-devel xz-devel
The installer detects Python automatically and, if a compatible version is not found, offers to install Python 3.13 (via PyEnv) for you, so no manual Python setup is required. If you already have Python 3.13 and prefer to use it, you can point the installer at it:
export SOCA_PYTHON=$(command -v python3.13)
AWS CloudShell's $HOME directory has a storage limitation. To avoid it, create a new folder called /edh_installer and launch the installer from there.
Run this command to create the new folder:
sudo mkdir /edh_installer
sudo chown cloudshell-user /edh_installer
Finish the install in one CloudShell session
Only your CloudShell $HOME directory is persisted between sessions. A folder created outside $HOME (such as the one above) is removed when your CloudShell session ends, so run the installation from start to finish in a single session. If your session ends before the install completes, recreate the folder and clone the repository again.
Download EDH:
Engineering Development Hub is open-source and available on Github (https://github.com/awslabs/engineering-development-hub). To get started, simply clone the repository:
# First, CD into the right location
cd /edh_installer

# (Option1): Clone the repo using HTTPS
user@host: git clone https://github.com/awslabs/engineering-development-hub .

# (Option2) Clone the repo using SSH
user@host: git clone git@github.com:awslabs/engineering-development-hub.git .
Then move to Step 4 below.
Make sure you have configured your IAM user/role (see Step1) in your awscli and ensure git is installed and configured on your computer.
Download EDH:
Engineering Development Hub is open-source and available on Github (https://github.com/awslabs/engineering-development-hub). To get started, simply clone the repository:
# (Option1): Clone the repo using HTTPS
user@host: git clone https://github.com/awslabs/engineering-development-hub .

# (Option2) Clone the repo using SSH
user@host: git clone git@github.com:awslabs/engineering-development-hub.git .
Then move to Step 4 below.
Step 4 - Review the storage provider
EDH will deploy two mandatory partitions called /apps and /data. You will have to choose which storage provider to pick for each at installation time.
Linux/Windows Hybrid Environment
We recommend going with fsx_ontap (FSx for NetApp ONTAP) if you are planning to have both Windows and Linux Clients. FSx for Netapp ONTAP will give you the ability to access the same filesystem from both Linux & Windows machine seamlessly.
Refer to the Storage section for more details.
Step 5 - Run the installer
Customize defaults before you run the installer
If you want to change any default values (for example, the number of NAT Gateways, the KMS key, or the scheduler instance type), edit installer/default_config.yml before running the installer. See Customize default values.
Plan for the full installation to take roughly half an hour, most of which is the CloudFormation deployment and the cluster configuration check.
Once you have cloned your repository, execute installer/edh_installer.sh script. The installer will perform the following tasks:
- Check if Python3 is available on your system
- Create a custom Python virtual-environment and install required libraries
- Install NodeJS, NPM, CDK and AWS CLI if needed
- Setup your EDH cluster
Installer is built with AWS Cloud Development Kit (CDK). Learn more information about CDK here.
Execute ./edh_installer.sh script located in the installer folder. If needed, EDH will install PyEnv and the required version of Python, this is a one-time operation that can take a couple of minutes to complete.
# Assuming your current working directory is the root level of EDH
./installer/edh_installer.sh
Use custom IAM policies
If you created custom IAM policies for least-privilege installation in Step 2, pass each one with its own --cdk-cloudformation-execution-policies argument:
./installer/edh_installer.sh \
    --cdk-cloudformation-execution-policies <cdk_policy_arn> \
    --cdk-cloudformation-execution-policies <installer_policy_01_arn> \
    --cdk-cloudformation-execution-policies <installer_policy_02_arn> \
    --cdk-cloudformation-execution-policies <uninstall_policy_arn>
Please note you must specify each Policy ARN, not just the Policy Name.
Use non default IAM profile
If you are planning to use a local IAM profile configured in your ~/.aws/credentials other than default, you must pass it via
./installer/edh_installer.sh --profile <profile_name>
EDH installer will first automatically install all required dependency (npm/node/python) if needed. Please note this operation can take some time.
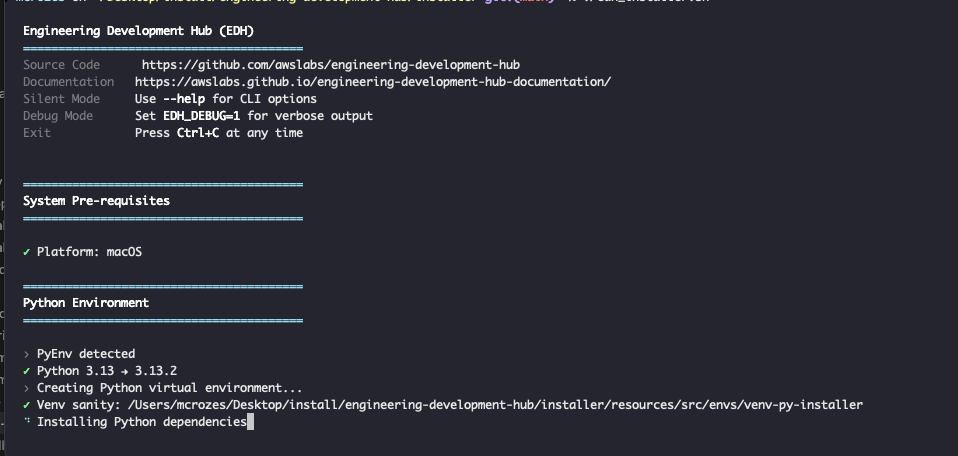
EDH installer will then launch once all pre-requisite are validated:
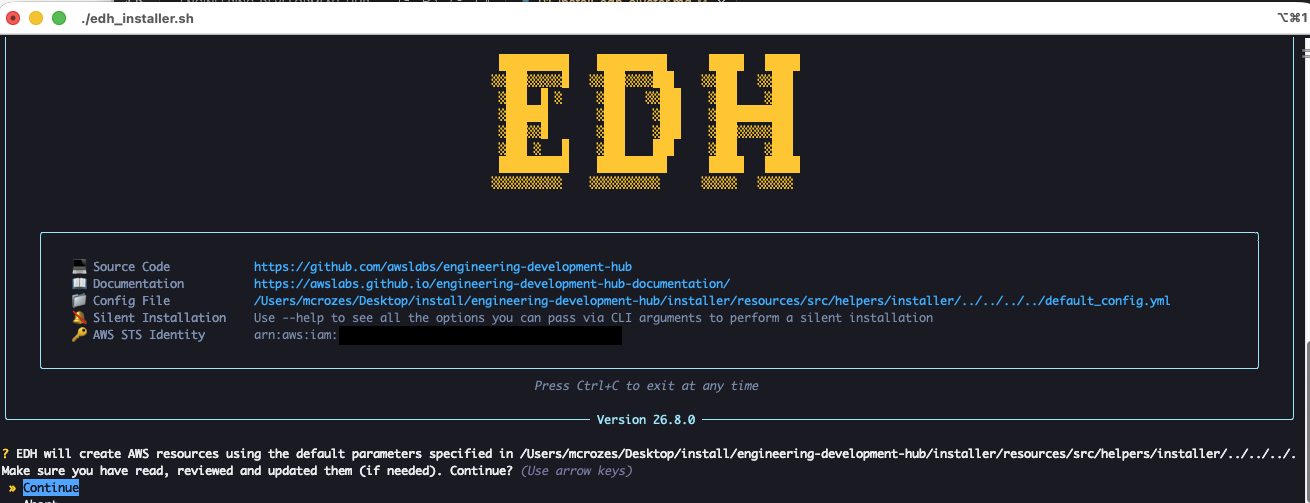
You will then be prompted for your cluster parameters. Follow the instructions and choose a S3 bucket you own, the name of your cluster, the SSH keypair to use and other cluster parameters.
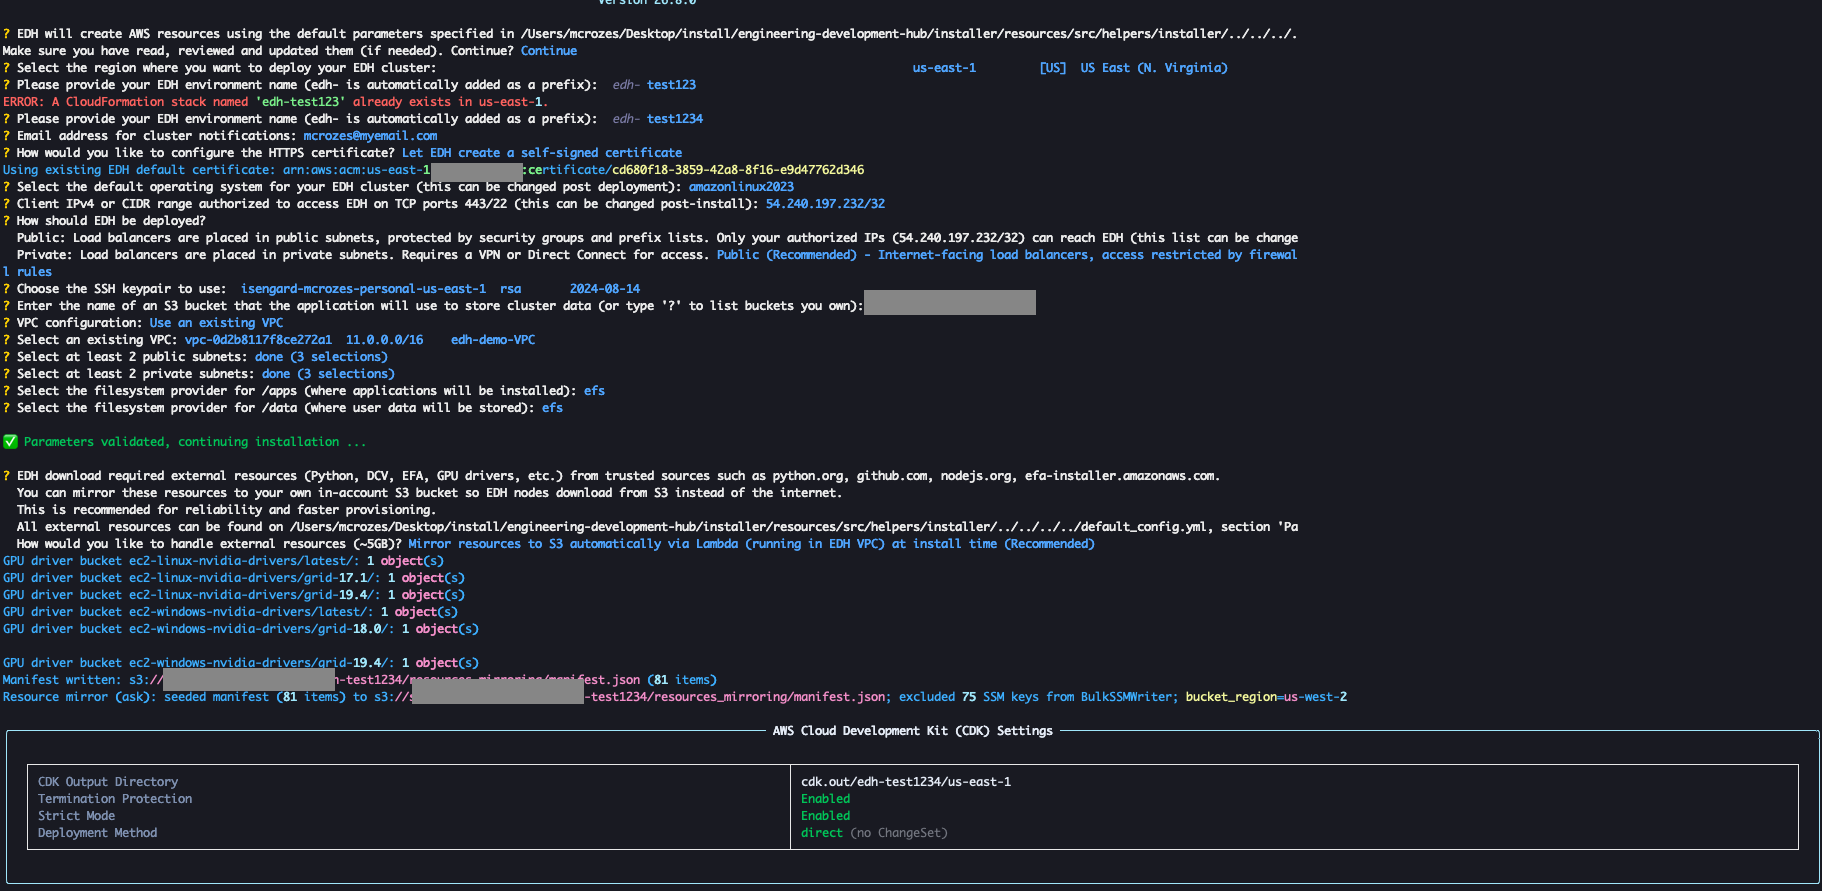
Silent Installation
You can pass all parameters via arguments to automate the installation process.
Run ./edh_installer.sh --help to see all options available
Once all the parameters are specified, installer will run cdk bootstrap.
This action will create a staging S3 bucket and store all assets generated by CDK. No actions will be performed if you already have your environment enabled for CDK.

EDH will then upload the scripts (<100 mb) required to configure the scheduler to the S3 bucket you specified during installation.

Finally, the installer will trigger a cdk deploy command and the deployment will start. This will create a new CloudFormation stack on your AWS account.
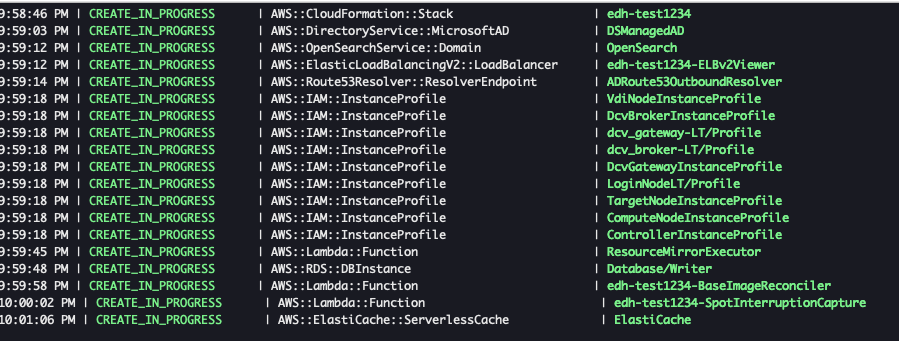
Once the cloudformation stack is created, the installer will verify if your EDH cluster is configured correctly. This steps can take up to 30 minutes:
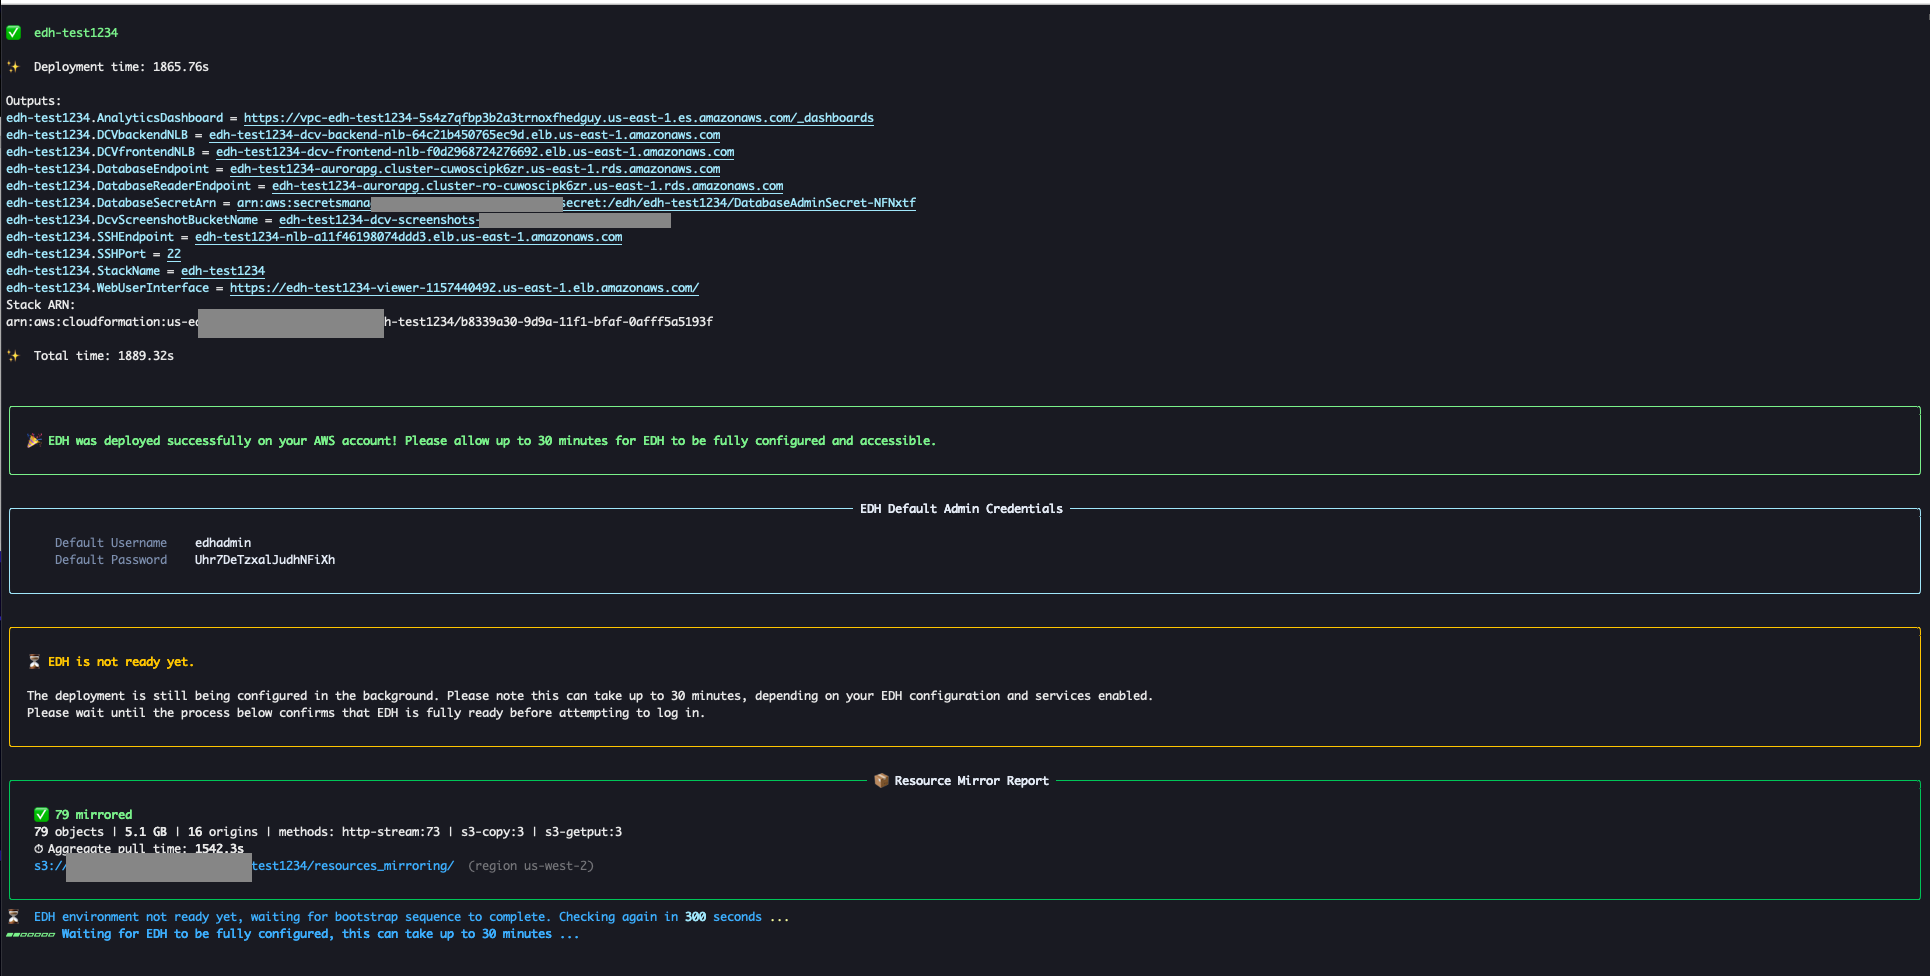
The installer will exit once your EDH is fully configured and reachable.

Note
If your IP has changed, the EDH installer will not be able to validate if EDH installation complete successfully since the endpoint is not reachable. However, it does not means the installation has failed. Simply update the security group with the correct/updated IP and try to access your EDH HTTPS endpoint
(Optional) Customize default values
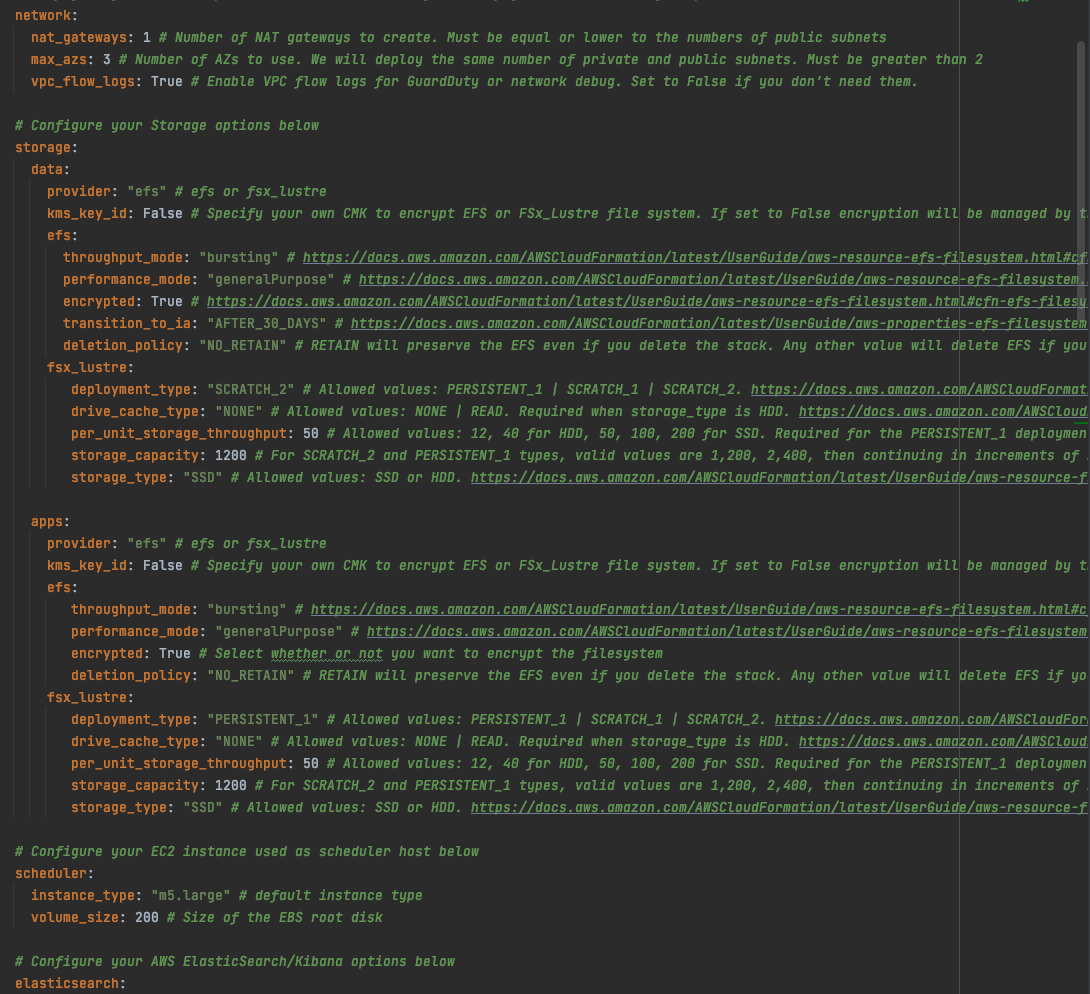
EDH gives you the ability to customize all resources created during the installation. For example, you can choose how many NAT Gateways to deploy (default to 1), the KMS encryption to use for your filesystems (default to aws/key), the instance type (default to m5.large) to provision for the scheduler and more.
Edit installer/default_config.yml if you want to change the default values
Troubleshoot EDH installer
Login to the EDH Controller via SSH or SSM and review the bootstrap logs available under /root/edh_bootstrap_<instance_id>/.
The logs subfolder contains a log for each bootstrap step:
/root/edh_bootstrap_<instance_id>/logs/
├── 02_prerequisites.sh.log
├── 03_setup.sh.log
├── bootstrap_FATAL.log
├── filesystems_mount.log
└── install_required_packages.sh.log
If the bootstrap fails, start with bootstrap_ERROR.log or bootstrap_FATAL.log, which capture the error that stopped the setup.
Uninstall EDH
Run installer/uninstall_edh.sh to uninstall EDH.
Info
Use --force to skip prompts
./uninstall_edh.sh --cluster-name my-cluster --region us-east-1 --s3-bucket my-bucket --force
Using custom CDK Policy
Make sure that you add all required Delete API permissions If you are using a custom CDK policy.
Post Install
What if SSH port (22) is blocked by your IT?
Engineering Development Hub supports AWS Session Manager in case you corporate firewall is blocking SSH port (22). SSM let you open a secure shell on your EC2 instance through a secure web-based session.
First, access your AWS EC2 Console and select your Controller instance, then click "Connect" button
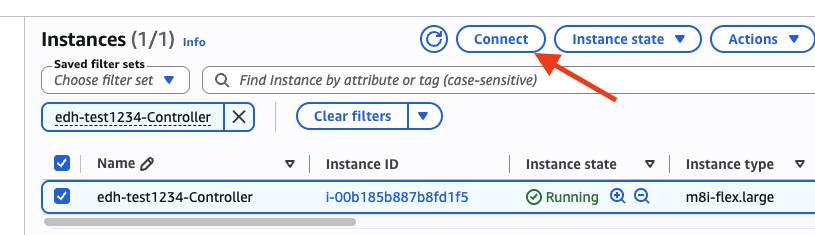
Select Session Manager and click Connect
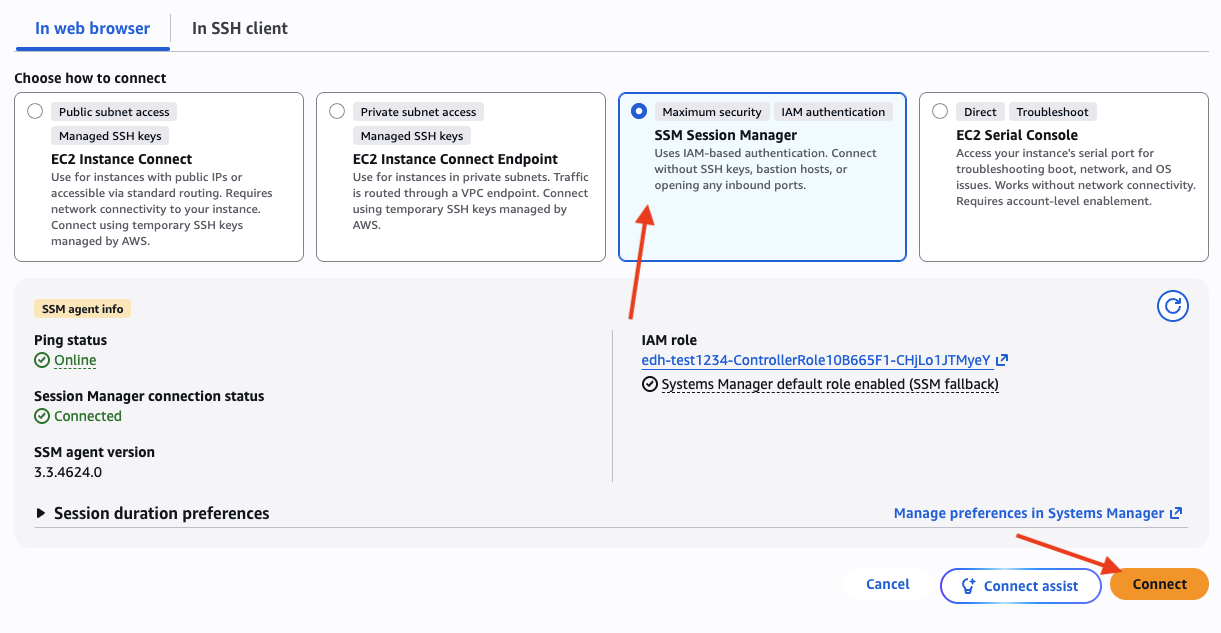
You now have access to a secure shell directly within your browser.
Operational Metrics
This solution includes an option to send anonymous operational metrics to AWS. We use this data to better understand how customers use this solution and related services and products. Note that AWS will own the data gathered via this survey. Data collection will be subject to the AWS Privacy Policy.
To opt out of this feature, set the /configuration/DefaultMetricCollection configuration key to false
When enabled, the following information is collected and sent to AWS:
- Solution ID: The AWS solution identifier
- Base Operating System: The operating system selected for the solution deployment
- Unique ID (UUID): Randomly generated, unique identifier for each solution deployment
- Timestamp: Data-collection timestamp
- Instance Data: Type or count of the state and type of instances that are provided for by the Amazon EC2 scheduler instance for each job in each AWS Region
- Keep Forever: If instances are running when no job is running
- EFA Support: If EFA support was selected
- Spot Support: If Spot support was invoked for new auto-scaling stacks
- Stack Creation Version: The version of the stack that is created or deleted
- Status: The status of the stack (stack_created or stack_deleted)
- Scratch Disk Size: The size of the scratch disk selected for each solution deployment
- Region: The region where the stack is deployed
- FSxLustre: If the job is using FSx for Lustre
What's next ?
Learn how to access your cluster, how to submit your first job or even how to change your Engineering Development Hub DNS to match your personal domain name.